How to Fix 0x0000001A Error Code in Just a Few Clicks!

What is 0x0000001A Error Code?

The 0x0000001A is a severe memory management blue screen of death error code.

This is Windows error is also called a Stop code The system is automatically forced to reboot state which means any unsaved work is likely to be lost.

This error code pop-up locks you out of the program running on the screen and prevents you from working on it.

Solution

Restoro box imageError Causes

Experiencing error codes on your PC is an unusual activity that triggers that there is definitely something wrong with your system which should be repaired before it becomes a serious threat. The underlying causes of each error code are different.

When you come across a 0x0000001A error message this triggers several issues on your PC but largely it’s related to defective or mismatched RAM (Random Access Memory).

This could be due to disk De-fragmentation, cluttered registry, and overheating of PC hardware, or perhaps the power supply units that have been used to overcapacity which prompts your PC to show a 0x0000001A error message on your screen.

In addition to this, another reason could be a fault in the BIOS motherboard that could be outdated.

No matter what the underlying cause of the 0x000001A may be, it is imperative to get it resolved as it seriously damages your computer and leads to system failure.

Further Information and Manual Repair

Restoro is the best way to resolve almost all types of error codes including 0x0000001A in just a few clicks. It is a multi-functional PC registry cleaner that serves as a one-stop solution for all PC issues.

This tool can be used to resolve the blue screen of death errors like 0x0000001A in seconds and help you resume and get access to the program that you were working on before you experienced the error code.

With this helper, you don’t need to have the technical expertise or sound knowledge about the underlying cause of 0x0000001A.

This is an intuitive and advanced tool with built-in cutting edge technology that scans and identifies the cause of 0x00000001A and fixes it right away.

It has a neat design layout and a user-friendly interface that is easy to use for even novice users.

Restoro registry cleaner cleans up registry disk space, occupied by unnecessary files including junk files, invalid registry entries, temporary internet files, and entries of uninstalled programs that are still present in the registry.

It cleans and clears up disk space and wipes out clutter stored in the registry of your system which is likely to trigger RAM and memory mismanagement issues triggering an error code 0x0000001A pop-up message.

Restoro is feature-filled which makes it multi-functional.  It is safe, secure and efficient. For optimum data security during repair, it creates backup files. This helps recover data in the event of data loss during repair, which is quite rare.

So what are you waiting for? Download Restoro Registry Cleaner today and resolve the error pop-up 0x0000001A now!

Do You Need Help with Your Device?

Our Team of Experts May Help
Troubleshoot.Tech Experts are There for You!
Replace damaged files
Restore performance
Free disk space
Remove Malware
Protects WEB browser
Remove Viruses
Stop PC freezing
GET HELP
Troubleshoot.Tech experts work with all versions of Microsoft Windows including Windows 11, with Android, Mac, and more.

Share this article:

You might also like

KFConsole enters the console competition
Yes, you read that right, KFC is making a console partnered with Cooler Master. Bizzare at it sounds, it is even more bizarre that the console is designed to keep your food warm!!! You can pull out the drawer from the console out on its top and place some food there in order to keep it warm. kfconsole drawerThe console itself is coming in cylindrical shape powered by Intel CPU and ASUS GPU of the unknown chipset. It has Seagate Baraccuda 1TB SSD and it is VR-ready. The console will have raytracing and will be 4K ready.

My thoughts

Well, my thoughts are somewhat strange, on one side I am not really sold on food heating gimmicks and without specific hardware specifications, it is difficult to say how much power the console will have. Price is also not leaked so that is also a stumbling stone for making an informed opinion. I am a little puzzled and concerned about this whole heating food thing because personally, I can see 2 issues: Console overheating and fat dripping on inside hardware, I am sure they have somehow eliminated this but I would be very interested to see how.
Read More
Headphone jack is not working on a laptop
In some cases, a couple of Windows 10 laptops, especially the newer ones that run the NVIDIA RTX series GPUs have been experiencing some problems, particularly with their headphone jacks which seem to be malfunctioning even though the internal speakers works just fine. And despite having all the drivers updated to their latest versions, the problem still occurs. According to security experts, this kind of problem occurs on laptop computers that are manufactured by MSI and since there is still no workaround or reliable fix released by the company, in this post you will be guided on how you can resolve the problem with the headphone jack. So if you are using a laptop made by MSI and are experiencing the same issue, then you’ve come to the right place. There are several potential fixes you can check out to resolve the problem, you can try to force reboot your computer or clean your headphone jack and then plug it back in properly. In addition, you could also try to update your Audio drivers or set your headphone as default. For more information, follow each one of the given options below.

Option 1 – Try to force reboot your computer

The first thing you can do is to force reboot your computer as this simple fix could help in fixing the problem. This option is quite simple, just make sure that before you do it, you have to save all your work.
  • First, turn on your computer and press and hold the power button for at least 30 seconds. You might notice the screen flashing or making any changes, just ignore it.
  • After that, plug out and plug in your computer and automatically turn it on.
  • Once done, check if the headphone jack is now working fine.

Option 2 – Try to clean the headphone jack and plug it properly

The next thing you can do to fix the problem is to clean your headphone jack and plug it back in properly. Make sure that you use a cotton swab in cleaning the headphone jack as there are instances where some dust might have settled in the port which results in issues like your headphone jack no working.

Option 3 – Try to update, rollback or reinstall the Audio driver

If the glitch in your audio has something to do with software, chances are it might be related to the audio driver – it could be that the newest version of your Windows 10 does not work well with the old version of the driver. This is why you have to update your audio driver to the newest available version.
  • Tap the Win + R keys to open the Run dialog box and then type in MSC and tap Enter or click OK to open the Device Manager.
  • Expand the section for the outdated device drivers.
  • And then select the outdated driver(s) and right-click on it/them.
  • From the drop-down menu, select the Update Driver option and follow the on-screen instructions to install the latest version of the driver.
  • Then also click on the option, “Search automatically for updated driver software.
  • Restart your PC after the installation.
Note: If updating or reinstalling the Audio driver didn’t work, you can go to the website of MSI and look for the support section where you can download the drivers for your computer. You just need to take note of your PC’s correct model and model number so you can find the appropriate driver.

Option 4 – Try to set the headphone as the default device manually

There are times when you plug a headphone, it does not toggle the default audio device. Thus, to fix this issue, you have to set the default audio device to the headphones manually. To do that, follow these steps:
  • First, right-click on the volume icon located on the system tray.
  • Next, select the Open sound settings option to open the Sound section in the Windows 10 Settings app.
  • From there, select the Control Panel for Sound on the rightmost column. This will open a new mini window.
  • After that, select your headphone under the Playback tab and click on the Set default button.
  • Once done, click on Apply and then OK buttons to save the changes made.

Option 5 – Try to run the Playing Audio Troubleshooter

Since the Windows 10 operating system has the Playing Audio Troubleshooter, you can use this troubleshooter to try and fix the problem with the headphones. You can access this tool in the Control Panel or in the Taskbar Search and even on the Troubleshooters page of Windows 10.
Read More
Completely Uninstall and Remove Flash
Google Chrome, Microsoft Edge, Mozilla Firefox are some of the leading browsers commonly used these days and they all include an embedded copy of the Adobe Flash Player. So if you are running a Windows 10 PC then you can have up to 4 copies of Adobe Flash Player; one for Microsoft Edge, one for Internet Explorer, one for Opera, one for Firefox. You might also experience cases wherein two flash players are simultaneously running, i.e. one installed in Chrome as a single plug-in and another one installed in Windows, trying to parse the data. And in such cases, you might consider removing or uninstalling one of the versions of Adobe Flash Player. If you do, then you’ve come to the right place as this post will guide you in disabling the embedded Adobe Flash Player in Windows 10. Before you get started in removing the Adobe Flash Player in Internet Explorer & Microsoft Edge browser, you need to sign in with your administrative account even if don’t use it or set it as the default browser. After you’ve signed in to your administrative account, follow the steps below. Step 1: Open your browser, if you are using Edge then open it. Step 2: After opening your browser, go to its Settings and select Advanced Settings. Step 3: Next, Move the slider against the “Use Adobe Flash Player” option to off. Step 4: After that, open File Explorer and navigate to this address, “C:/Windows/servicingPackages” and from there, check on the following entries:
  • Adobe-Flash-For-Windows-Package~31bf3856ad364e35~amd64….(version number of the Flash Player)
  • Adobe-Flash-For-Windows-WOW64-Package~31bf3856ad364e35~amd64….(version number of the Flash player #)
  • Adobe-Flash-For-Windows-onecoreuap-Package~31bf3856ad364e35~amd64…(version number of the Flash Player)
Step 5: Take note of all the listed package names of Adobe Flash Player and tap the Win + R keys to open the Run dialog box and type “Regedit” in the field and hit Enter to open the Registry Editor. Step 6: Next, right-click on the three keys which have the name of the packages you listed and select “Permissions” one after the other. Step 7: Then check “Allow” to enable full control for the Administrators account and click OK to save the changes made. Step 8: Select the three keys one after the other and select Visibility DWORD located on the right side and then right-click on Visibility and change the Value data from 2 to 1. Step 9: Go over the same procedures again for the other keys. Once you’ve completed then you should now be able to remove packages using the DISM tool. Step 10: Simply open an elevated Command Prompt and execute the following commands:
  • dism /online /remove-package /packagename:Adobe-Flash-For-Windows-Package~31bf3856ad364e35~amd64-10.0.17134.1
  • dism /online /remove-package /packagename:Adobe-Flash-For-Windows-WOW64-Package~31bf3856ad364e35~amd64-10.0.17134.1
  • dism /online /remove-package /packagename:Adobe-Flash-For-Windows-onecoreuap-Package~31bf3856ad364e35~amd64-10.0.17134.1
Keep in mind that the numbers at the end could be different on your computer due to the difference of version number so you have to use the numbers on your system. After that, reboot your computer.
Read More
Removing Linkey From Windows Tutorial

Linkey is a potentially unwanted web browser search extension for the top browsers, designed to modify the user’s search and home pages in order to direct advertising. This extension changes your default search provider, redirects new tabs, and distributes information & statistics to the server. This extension will display unwanted ads, redirect you through unwanted search engines, and send your browsing information (potentially private information) back to its ad network.

From the publisher: Linkey is compatible with all the latest versions of Internet Explorer, Chrome, and Firefox. Linkey is a simple browser extension that allows you to get the best sites in one click in visualized & friendly interface.

About Browser Hijackers

Browser hijacking is actually a type of unwanted software, often a browser add-on or extension, which causes modifications in the browser’s settings. Browser hijackers could do many different things on your PC. Usually, hijackers will force hits to websites of their preference either to increase traffic producing higher advertisement revenue, or to obtain a commission for each and every user visiting there. Nonetheless, it’s not that harmless. Your online safety is compromised and it is also extremely annoying. Browser hijackers could also allow other malicious programs without your knowledge to further damage your computer.

How to know whether the web browser is hijacked?

The typical symptoms that suggest having this malicious software on your PC are: 1. your homepage has been reset to some unfamiliar site 2. your browser is constantly being redirected to adult sites 3. the essential web browser settings are modified and undesirable or insecure resources are put into the trusted sites listing 4. unsolicited new toolbars are added to your browser 5. you may notice endless pop-up ads on your screen 6. your web browser starts running sluggishly or exhibits frequent errors 7. You simply can’t access particular sites, particularly anti-malware websites.

How it infects your computer

Browser hijackers attack computers through malicious e-mail attachments, downloaded infected computer files, or by checking out infected internet sites. They could be included with toolbars, BHO, add-ons, plug-ins, or browser extensions. Also, certain freeware and shareware can put the hijacker in your PC through the “bundling” technique. Examples of well-known browser hijackers are Fireball, GoSave, Ask Toolbar, CoolWebSearch, Babylon Toolbar, and RocketTab. Browser hijackers could interrupt the user’s browsing experience severely, keep track of the websites visited by users and steal financial information, cause problems in connecting to the internet, and ultimately create stability issues, making applications and computers crash.

How you can get rid of a browser hijacker

Some hijackers can be simply removed by deleting the free software they came with or by removing any extension you have recently added to your computer. Unluckily, the majority of the software products used to hijack a browser are deliberately built to be difficult to eliminate or detect. Moreover, manual removals demand in-depth system knowledge and therefore can be an extremely difficult job for novices.

What To Do When You Cannot Download Safebytes Anti-Malware?

All malware is bad and the magnitude of the damage may vary greatly in accordance with the type of infection. Certain malware variants modify internet browser settings by including a proxy server or modify the computer’s DNS configurations. When this happens, you will be unable to visit some or all of the websites, and therefore unable to download or install the necessary security software to remove the malware. If you’re reading this, you may have infected by a virus that prevents you from downloading computer security software like Safebytes Anti-Malware. There are a few options you can attempt to get around with this obstacle.

Install in Safe Mode

The Windows-based PC has a special mode called “Safe Mode” in which just the bare minimum required programs and services are loaded. If the malware is blocking internet access and affecting your PC, running it in Safe Mode will let you download antivirus and run a diagnostic scan while limiting potential damage. In order to get into Safe Mode or Safe Mode with Networking, press F8 while the system is starting up or run MSConfig and look for the “Safe Boot” options under the “Boot” tab. After you restart into Safe Mode with Networking, you could download, install, as well as update anti-malware software from there. After installation, run the malware scanner to remove most standard infections.

Use an alternate browser to download an antivirus application

Certain viruses might target vulnerabilities of a specific web browser that obstruct the downloading process. If you appear to have a virus attached to Internet Explorer, then switch over to an alternate internet browser with built-in safety features, such as Chrome or Firefox, to download your favorite antivirus program – Safebytes.

Install security software on a thumb drive

Here’s another solution which is creating a portable USB anti-malware software that can check your system for malicious software without needing installation. Do these simple actions to clean up your affected PC using portable anti-malware. 1) Download the anti-malware program on a virus-free computer. 2) Plug the Flash drive into the clean computer. 3) Double-click on the downloaded file to open the installation wizard. 4) Choose the USB flash drive as the destination for saving the software file. Follow the on-screen instructions to finish the installation. 5) Unplug the USB drive. You may now utilize this portable anti-malware on the infected computer system. 6) Double click the Safebytes Anti-malware icon on the flash drive to run the software. 7) Click on “Scan Now” to run a complete scan on the infected computer for malware.

A Look at the Best AntiMalware Program

Want to download the very best anti-malware software for your laptop? There are several applications in the market that come in paid and free versions for Microsoft Windows systems. Some of them are excellent, some are ok types, while some will destroy your PC themselves! When searching for an anti-malware tool, choose one which provides dependable, efficient, and complete protection against all known computer viruses and malware. On the list of highly recommended software programs is SafeBytes AntiMalware. SafeBytes carries a good track record of top-quality service, and customers are very happy with it. Safebytes is one of the well-established computer solutions companies, which offer this all-inclusive anti-malware software. Using its cutting-edge technology, this application will allow you to eradicate multiples types of malware such as computer viruses, trojans, PUPs, worms, ransomware, adware, and browser hijackers. SafeBytes has got a variety of wonderful features that can help you protect your PC from malware attacks and damage. Below are some typical features present in this tool: Live Protection: SafeBytes offers a totally hands-free active protection that is set to observe, prevent and remove all threats at its very first encounter. This utility will always monitor your computer for any suspicious activity and updates itself regularly to keep current with the newest threats. Most Reliable AntiMalware Protection: This deep-cleaning anti-malware software program goes much deeper than most antivirus tools to clean your computer system. Its critically acclaimed virus engine finds and disables hard-to-remove malware that conceals deep inside your PC. Internet Security: Through its unique safety rating, SafeBytes notifies you whether a site is safe or not to access it. This will make sure that you’re always certain of your safety when browsing the net. Lightweight Utility: The program is lightweight and can run silently in the background, and that does not have an effect on your PC efficiency. 24/7 Live Professional Support: SafeBytes provides 24/7 technical support, automatic maintenance, and upgrades for the best user experience.

Technical Details and Manual Removal (Advanced Users)

If you wish to manually remove Linkey without the use of an automated tool, it may be possible to do so by removing the program from the Windows Add/Remove Programs menu, or in cases of browser extensions, going to the browsers AddOn/Extension manager and removing it. You will likely also want to reset your browser. To ensure the complete removal, manually check your hard drive and registry for all of the following and remove or reset the values accordingly. Please note that this is for advanced users only and may be difficult, with incorrect file removal causing additional PC errors. In addition, some malware is capable of replicating or preventing deletion. Doing this in Safe Mode is advised.

The following files, folders, and registry entries are created or modified by Linkey

Files: C:Users%USER%AppDataLocalTempis33084504mysearchdial.dll C:Users%USER$AppDataLocalTempis357113909833170_stpsetup.exe c:Users%USER$AppDataLocalTempMega Browsemegabrowse_setup.exe C:Program Files (x86)Linkeylog.log C:Program Files (x86)LinkeyHelper.dll C:Program Files (x86)LinkeyChromeExtensionChromeExtension.crx C:Program Files (x86)Linkey C:Program Files (x86)LinkeyChromeExtension C:Program Files (x86)LinkeyIEExtension C:Users%USER$AppDataRoamingDigitalSitesUpdateProc Registry: HKLMSOFTWARECLASSESAPPID6A7CD9EC-D8BD-4340-BCD0-77C09A282921 HKLMSOFTWAREWOW6432NODECLASSESAPPID6A7CD9EC-D8BD-4340-BCD0-77C09A282921 HKLMSOFTWARECLASSESCLSID181F2C09-56DD-4F98-86D7-59BA2BC59B5A HKLMSOFTWARECLASSESCLSID4D9101D6-5BA0-4048-BDDE-7E2DF54C8C47 HKLMSOFTWAREMICROSOFTWINDOWSCURRENTVERSIONEXPLORERBROWSER HELPER OBJECTS HKLMSOFTWARELINKEY HKLMSOFTWAREWOW6432NODELINKEY HKLMSOFTWAREWOW6432NODESYSTEMKGeneral HKUS-1-5-18-ED1FC765-E35E-4C3D-BF15-2C2B11260CE4-0SOFTWARECONDUITValueApps HKLMSOFTWAREWOW6432NODEMICROSOFTWINDOWSCURRENTVERSIONEXPLORERBROWSER HELPER OBJECTSEF5625A3-37AB-4BDB-9875-2A3D91CD0DFD HKLMSOFTWARELINKEY|ie_jsurl, http://app.linkeyproject.com/popup/IE/background.js HKLMSOFTWAREWOW6432NODELINKEY|ie_jsurl, http://app.linkeyproject.com/popup/IE/background.js
Read More
Fix Network driver issue in Windows
The network driver error is a not serious Windows issue.  It happens from time to time and luckily it can be solved with a little effort and in a short time period. Today in this article we will explore the most common solutions for driver malfunction for Network adapter inside Windows 10. If you have this particular problem, go from step 1 to the last step since all steps are meant to go from simplest to the most complex. All of that being said let us fix your Network driver issue.
  1. Check to see if the cable is plugged in and not malfunctioned

    The first common issue of the network now working can be cable malfunction or bad contact in your network adapter or in HUB/SWITCH. There are various tools to check the quality and working order of cable but you could also make sure that it is not a cable issue by trying connection with the correct working cable. If the network is restored with another cable then change the malfunctioning cable and your issue is resolved if the problem persists move to the next step.
  2. Check if Windows troubleshooter will resolve the issue

    Righ-click on the network icon in the taskbar and choose to troubleshoot problems. Windows built-in tools could resolve issues and fix them for you. If by any chance Windows is not able to find or resolve issues move to the next step.
  3. Check if the Device Manager is reporting an error and update the driver

    If the hardware is functioning properly then the issue might be in Windows not detecting device or driver malfunction. In any case, the Device Manager will be the one who will report this problem. In order to check to see if the driver is properly working press ⊞ WINDOWS + X to open the hidden start menu. keyboard with windows and x marked Once it opens, click on Device Manager to open it, If you have a driver device error inside Windows, you should see it immediately when entering the Device Manager, it will have a yellow exclamation mark beside it. Right-click on it and choose update driver.
  4. Reinstall driver

    If driver update failed or you already have the latest drivers, reinstalling them could fix the issue since drivers might have corrupted during installation of some update or application. Follow steps from point 3 to get to the driver in Device Manager, then right-click on it but instead of update choose to uninstall. Reboot Windows once the driver is uninstalled and Windows will install a new one automatically. If you do not want to update drivers automatically, do not restart your system, instead install the latest driver for your device, then reboot. Since this is a network error, you will have to get drivers on another computer and transfer them via USB to malfunctioning one.
  5. Check Windows update

    Check to see if the latest Windows update is installed, update your Windows if needed
  6. Fix driver issue with DRIVERFIX

    If everything else fails, get DRIVERFIX, a premium solution for your PC issues, and fix driver errors.
Read More
Apple gaming is coming!!!

New Apple's upscaling technology called MetalFX will place iOS and macOS devices back into the gaming world. Apple had great games back in the old days and some all-time hits like the prince of Persia have been made first for apple but along the way, it just lost it.

Same as NVIDIA's DLSS and Intel's XeSS systems, Apple MetalFX also uses AI algorithms to upscale the resolution of output game frames. So, for example, the GPU inside your MAC might render the game at 1080p, but through MetalFX and AI upscaling it will look like a 4K image but have a good frame rate since it is rendered in base resolution.

apple metalfx

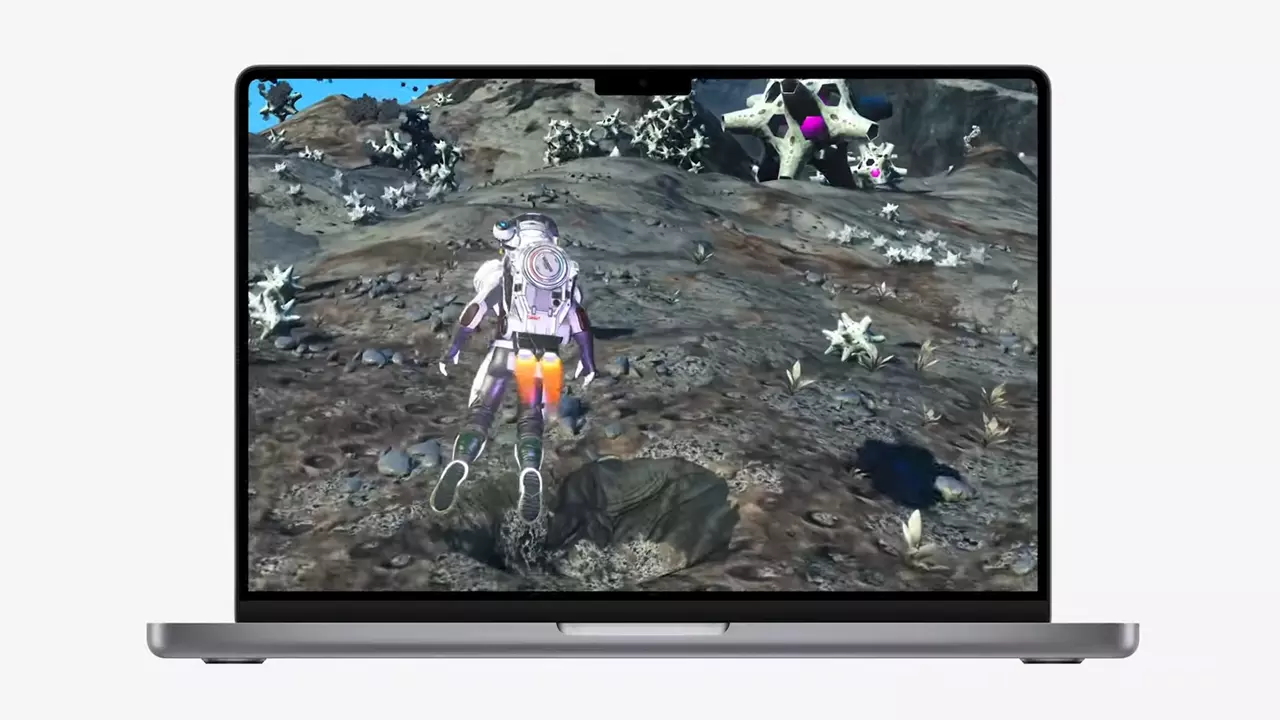
The ability to make AI strike a good balance between performance and image quality is a key to technology in today's modern gaming and having this technology will help developers a ton to be able to achieve great results on Apple hardware.

The First MetalFX Games

So far three official games that will use this technology and be released natively for Appl hardware are Resident Evil 8 Village, GRID legends, and No Man's Sky. All three games have been confirmed and Resident Evil 8 Village is already sent for review people are impressed since the game can run smoothly on all Apple devices, even ones with an M1 CPU.

Apple is back into gaming

When you say Apple gaming is probably the last thing that comes to your mind but truth be told Apple makes more money from games than Microsoft, Nintendo and Sony combined. Also, Apple itself was a big player once regarding computer games as well, Myst and Prince of Persia are games that were made and have been released for Apple first. Bungie was also founded by Apple developers and Halo was originally announced as a Mac game.

Apple has been trying and pushing gaming on its platform since it kind of died down. Today all Sony, Nintendo, and Microsoft controllers work without any issues with all Apple products. Apple also has its own gaming subscription service, Apple Arcade, and its Apple TV is packed with GPU that can rival Xbox ones.

MetalFX API ties and brings it all together, it is designed to get the most performance from the hardware by minimizing overhead.

Now, computers and laptops do not hold any large numbers if we look at the user base, and that could deter developers but if we look at iPad and iPhone things are different there, much different. How same CPU power these devices and how MetalFX is available across all products it is clear that there is a market for games there. No Man's Sky is coming to iPad using these technologies and bringing full computer experience to tablets.

Read More
Folder shortcuts in Windows 11 on Start menu
Special folders like music, pictures, download, videos, etc, can be placed as shortcuts in the start menu inside Windows 11 for easy access. Shortcuts will appear in the start menu on the bottom as simple glyphs. They are not present in the start menu by default so it needs to be turned ON first. Folder shortcutsIf you want to place these icons in your Star menu follow this step-by-step guide and you will have them in no time.
  1. Open Windows settings
  2. In settings go to Personalization > Start
  3. In Start click on Folders
  4. On the given list of Settings, File Explorer, Documents, Downloads, Music, Pictures, Videos, Network, and Personal folder click on the switch beside them if you want them as shortcuts in the Start menu. You can choose whichever you want.
  5. Close settings
You can revisit the settings menu to add more icons or remove some of them later if you wish so.
Read More
How to Fix Installer Error 1603

Installer Error 1603 - What is it?

Installer Error 1603 message occurs during the installation of the Microsoft Windows installer Package. The error message is often displayed as the following:
'Error 1603: A fatal error occurred during installation.'
It indicates a problem occurred during the installation process and unsuccessful installation.

Solution

Restoro box imageError Causes

The installer error 1603 may occur if:
  • The folder you are trying to install the Windows Installer package to is encrypted
  • The system account does not have full control permissions
  • Incorrect installation
  • Registry issues

Further Information and Manual Repair

To resolve this error on your system, try the solutions listed below:

Solution 1: Install-Package in an Un-Encrypted Folder

Try installing the package to a folder that is not encrypted. However, if the error still persists, try other solutions listed below.

Solution 2: Enable Full System Control Permissions

Sometimes the error may occur when you don’t have system full control permissions. To enjoy full control permissions here’s what you need to do, go to my computer and right-click the drive that you wish to install the Windows Installer Package to. After that click properties and the security tab. If you can’t locate the security tab, this means your Simple File Sharing feature is turned on. You need to turn it off to continue. For that go to my computer, tools, and then click folder options. Now here press the view tab and check the Simple File Sharing box to turn it off. Press OK to save changes. Now you will be able to locate the security tab. Click on the Security tab and verify the name box that contains the system user account. If the system user account is empty then insert the account name. To insert, click Add, and then select user's dialog box, add a name, and close. Now go to the permissions section and check the box ‘Allow’ under full control. After that go to the ‘Advanced’ tab and do the following: If you are an XP user, select ‘Replace permission entries on all child objects with entries shown here that apply to child objects’ and then press OK to confirm. If you are not an XP user, then follow the same instructions but select the check box that says ‘Reset permissions on all child objects and enable propagation of inheritable permissions’ for the system account. Now click OK to confirm. To activate changes you will have to wait for a while. Once the changes are activated, try installing the Windows Installer package again.

Solution 3: Clean and Repair Registry

The Installer error 1630 can occur due to registry problems as well. To resolve registry-related issues download Restoro. This is a cutting-edge and advanced registry cleaner that scans your entire PC for registry-related errors in seconds and resolves them spontaneously. It removes all the unnecessary junk files, bad keys, invalid registry entries, cookies, and internet history cluttering and corrupting the registry. It repairs the damaged system files and repairs the registry right away thereby resolving Installer Error 1630 on your PC. It is safe and efficient. It is embedded with an intuitive algorithm and a sophisticated user-friendly interface. It is easy to use and operate. You can download it on any Windows version. Besides functioning as a registry cleaner, it also functions as an antivirus and a system optimizer. Click here to download Restoro on your PC to resolve all registry issues generating the installer error 1603 on your system.
Read More
FindGoFind Browser Hijacker Removal Guide

FindGoFind is a browser extension for Google Chrome.Developers present findgofind.com as an improved Internet search engine that supposedly enhances the Internet browsing experience by generating better search results. These claims often trick users into believing that findgofind.com is legitimate and useful. In fact, developers promote this site using deceptive software download/installation set-ups that hijack web browsers and modify various options without permission. Furthermore, findgofind.co continually records various data relating to users’ Internet browsing activity.

While this extension is installed, users will see additional unwanted ads throughout their browsing sessions. Furthermore, this extension changed the default search engine to FindGoFind to easier display Sponsored content.

About Browser Hijackers

Browser hijackers (also known as hijackware) are a type of malicious software that modifies web browser configuration settings without the computer owner’s knowledge or approval. These hijacks are raising at an astonishing rate across the world, and they can be truly nefarious and sometimes harmful too. Browser hijackers can do a variety of things on your computer. These are typically used to force hits to a specific site, manipulating web traffic to earn ad revenue. Many people believe that the browser hijacker is just a harmless website but that is incorrect. Almost every browser hijacker poses an actual threat to your online safety and it’s vital to categorize them under privacy risks. When the malware attacks your computer, it begins to mess things up a whole lot that slows your PC down to a crawl. In the worse case, you will be pushed to tackle serious malware threats too.

How one can know if your browser is hijacked

The typical signs that signify having this malicious software on your PC are: 1. the home page of the browser is changed all of a sudden 2. you see new unwanted favorites or bookmarks added, usually directed to advertisement-filled or porn websites 3. the default browser configurations are changed and/or your default web engine is altered 4. you’ll see multiple toolbars in your internet browser 5. you see lots of pop-ups on your screen 6. your internet browser has become unstable or starts running slowly 7. you can’t navigate to certain websites, like security software-related sites.

Exactly how they infect computer systems

Browser hijackers may use drive-by downloads or file-sharing websites or even an e-mail attachment to reach a targeted computer. They also come from add-on programs, also known as browser helper objects (BHO), web browser plug-ins, or toolbars. Also, certain freeware and shareware can put the hijacker in your PC through “bundling”. Some of the most well-known hijackers are FindGoFind, Babylon Toolbar, Conduit Search, Sweet Page, OneWebSearch, and CoolWebSearch.

How you can get rid of a browser hijacker

Some hijackers can be simply removed by uninstalling the free software they came with or by deleting any add-ons you have recently added to your system. In some cases, it can be a difficult job to find and delete the malicious program because the associated file might be running as part of the operating system process. Apart from that, manual removal expects you to perform several time-consuming and complicated actions that are tough to do for new computer users. Industry experts always recommend users to eliminate any malware including browser hijacker with an automatic malware removal tool, which is easier, safer and faster than the manual removal method. SafeBytes Anti-Malware can counter relentless hijackers and provide you with proactive PC protection against all kinds of malware.

What you can do if Virus Prevents You From Downloading Anti-virus?

Malware may cause several kinds of damage to computers, networks, and data. Some malware sits in between the computer and your net connection and blocks a few or all internet sites that you want to visit. It will also block you from adding anything to your system, particularly the anti-virus program. So what to do if malicious software keeps you from downloading or installing Anti-Malware? There are a few actions you can take to get around this issue.

Download the application in Safe Mode with Networking

If the malware is set to load at Windows startup, then booting in Safe Mode should prevent it. Just the minimum required programs and services are loaded when you start your computer in Safe Mode. To start your Windows XP, Vista, or 7 computers in Safe Mode with Networking, do as instructed below. 1) At power on/start-up, hit the F8 key in one-second intervals. This will conjure up the Advanced Boot Options menu. 2) Select Safe Mode with Networking with arrow keys and press Enter. 3) When this mode loads, you will have the internet. Now, use your browser to download and install Safebytes Anti-malware. 4) Following installation, run a complete scan and let the software delete the threats it detects.

Use an alternate web browser to download an antivirus application

Some malware may target vulnerabilities of a particular browser that obstruct the downloading process. If you’re not able to download the anti-malware software program using Internet Explorer, it means the virus is targeting IE’s vulnerabilities. Here, you need to switch over to a different browser like Firefox or Chrome to download Safebytes Anti-malware software.

Make a bootable USB anti-virus drive

Another option would be to make a portable antivirus program onto your USB thumb drive. Adopt these measures to use a flash drive to fix your infected computer system. 1) Download the anti-malware program on a virus-free PC. 2) Connect the USB flash drive to a USB port on the uninfected computer. 3) Double click on the downloaded file to run the installation wizard. 4) Pick a USB flash drive as the place when the wizard asks you exactly where you intend to install the application. Follow the activation instructions. 5) Transfer the pen drive from the clean PC to the infected PC. 6) Run the Safebytes Anti-malware directly from the pen drive by double-clicking the icon. 7) Hit the “Scan” button to run a full computer scan and remove viruses automatically.

Protect your PC against Malware With SafeBytes Security Suite

If you are looking to download an anti-malware application for your PC, there are several tools out there to consider nonetheless, you should not trust blindly anyone, no matter whether it is free or paid software. A few are good ones, some are decent, and some are merely fake anti-malware software that will harm your PC themselves! You need to be very careful not to select the wrong product, particularly if you buy a paid application. When considering commercial application options, the majority of people select well-known brands, like SafeBytes, and are very happy with them. SafeBytes anti-malware is trustworthy software that not only secures your PC permanently but is also very easy to use for people of all ability levels. Once you have installed this software, SafeByte's sophisticated protection system will ensure that no viruses or malicious software can seep through your personal computer.

SafeBytes has excellent features when compared to other anti-malware programs. Listed below are some of the features you may like in SafeBytes.

Robust Anti-malware Protection: With a critically acclaimed anti-malware engine, SafeBytes offers multilayered protection which is made to find and get rid of viruses and malware that are hidden deep in your computer’s operating system. Real-Time Protection: SafeBytes gives complete and real-time security for your PC. It’ll inspect your personal computer for suspicious activity at all times and its unparalleled firewall protects your PC from illegal access by the outside world. High-Speed Malware Scanning Engine: SafeBytes Anti-Malware has got a multi-thread scan algorithm that works up to 5 times faster than any other antivirus software. Safe Web Browsing: SafeBytes provides an instant safety rating on the web pages you are going to check out, automatically blocking unsafe sites and making sure that you’re certain of your online safety while browsing the web. Lightweight: The program is lightweight and can run silently in the background, and that does not impact your PC efficiency. Premium Support: For any technical queries or product guidance, you can obtain 24/7 professional assistance through chat and e-mail. To sum it up, SafeBytes has created a meaningful anti-malware solution that is aimed to protect your computer against all manner of malware. There is no doubt that your PC will be protected in real-time as soon as you put this software program to use. You’ll get the best all-around protection for the money you pay on SafeBytes Anti-Malware subscription, there’s no question about it.

Technical Details and Manual Removal (Advanced Users)

If you wish to carry out the removal of FindGoFind manually instead of employing an automated tool, you may follow these simple steps: Navigate to the Windows Control Panel, click the “Add or Remove Programs” and there, select the offending program to remove. In case of suspicious versions of browser plug-ins, you can actually remove it via your browser’s extension manager. You’ll likely also want to reset your browser. If you opt to manually delete the system files and Windows registry entries, use the following list to make sure you know precisely what files to remove before performing any actions. Please remember that this is for experienced users only and might be challenging, with wrong file removal resulting in additional system errors. In addition, some malicious programs have the capability to defend against its deletion. Doing this malware-removal process in Safe Mode is recommended.
Registry: HKEY_LOCAL_MACHINE\SOFTWARE\Microsoft\Windows\FindGoFind.comTT0-F49X-LPA01-3150QB HKEY_LOCAL_MACHINE\SOFTWARE\Microsoft\Windows\CurrentVersion\FindGoFind.comWG9-L33B-ZSH05-1418OI HKEY_LOCAL_MACHINE\SOFTWARE\Microsoft\Windows\Shell\FindGoFind.comRegistry: HKEY_LOCAL_MACHINE\SOFTWARE\Microsoft\Windows\FindGoFind.comTT0-F49X-LPA01-3150QB HKEY_LOCAL_MACHINE\SOFTWARE\Microsoft\Windows\CurrentVersion\FindGoFind.comWG9-L33B-ZSH05-1418OI HKEY_LOCAL_MACHINE\SOFTWARE\Microsoft\Windows\Shell\FindGoFind.com%#MANIFEST#%PH1-S39W-JGS29-6268LL HKEY_CURRENT_USER\Software\Microsoft\Windows\CurrentVersion\Run [random].exe HKEY_CURRENT_USER\Software\AppDataLow\Software\FindGoFind.com HKEY_LOCAL_MACHINE\SOFTWARE\Microsoft\Windows\CurrentVersion\Uninstall\ FindGoFind.com HKEY_LOCAL_MACHINE\SOFTWARE\Microsoft\Windows\CurrentVersion\Explorer\BrowserHelperObjects\[random numbers]PH1-S39W-JGS29-6268LL HKEY_CURRENT_USER\Software\Microsoft\Windows\CurrentVersion\Run [random].exe HKEY_CURRENT_USER\Software\AppDataLow\Software\FindGoFind.com HKEY_LOCAL_MACHINE\SOFTWARE\Microsoft\Windows\CurrentVersion\Uninstall\ FindGoFind.com HKEY_LOCAL_MACHINE\SOFTWARE\Microsoft\Windows\CurrentVersion\Explorer\BrowserHelperObjects\[random numbers]
Read More
How to Fix Windows 10 Error Code 0xC004E003

What is Error Code 0xC004E003?

Error code 0xC004E003 almost always appears when there are damaged files in the Windows operating system. These files could be corrupt for a number of reasons and are usually a serious danger to the life of the computer system. These file errors may be caused by a number of things. Incomplete installation setup, incorrect deletion of hardware or utilities, or an unfinished file erasure. The trigger might also be in the event that the computer system is contaminated with a virus or adware or spyware, or even by the improper shut down of the computer. Any of these scenarios have the possibility to result in the removal or corruption of data of the Windows system data files.

The data system files that are damaged will give linked data and archives that are missing or wrongly linked. These are needed for the proper functioning of the software. This can also happen when or after installing third-party software that might have changed the system files. If it is suspected that a program installation will need to be stopped, it is best to let it run through the setup and then delete it later. While it installs, it is altering program files, and likely rearranging them. Stopping this in the middle can scramble files associated with the program and files vital to the usage of the computer.

Solution

Restoro box imageError Causes

This error will pop up after installing third-party software that has changed the system files. These system files are necessary to finish the activation process. A restore point will be necessary if it is ultimately determined that a system restore is necessary, to bring the computer back to the state it was in previous to the failed installation.

  • Error code “0xC004E003” appears and does not allow the system to continue the install.
  • The computer will not allow any further access or installation of the program.
  • The computer may crash.
  • The third-party program will not have installed completely or successfully.
  • The system will not start up correctly.
  • Personal files are corrupt or missing.

Further Information and Manual Repair

There are several steps that can be taken when the error code 0xC004E003 appears. It is helpful to know that this can occur from trying to install third party software. Going forward, do not attempt to install third-party software that is not trusted, and does not attempt to abruptly stop the third-party software from installing. This may cause the program to corrupt the files or delete important files. Recovering from this error can be easy if there is a recent restore point already backed up in the recovery portion of the system's files.

  • Method One

Run an error scan. The problem should be resolved after rebooting the computer once these steps have been completed.

  1. Download and save an error code fix utility.
  2. Setup the program and then click the Scan button.
  3. Click the Repair Errors button when the diagnostic has been completed successfully.
  4. Reboot the computer.
  • Method Two

Best when utilized by an expert.

  1. Start the system up and sign in as the admin.
  2. Click on Get Started, then select Programs, Accessories, Tools, and then System Restore.
  3. On the next screen, click on Restore my PC to an Earlier Period, and then click Next.
  4. Select the most recent system restore date within the drop-down menu of “select restore point”.
  5. Click Next.
  6. Click Next on the confirmation window.
  7. Reboot the system after the system has finished restoring.
  • Method Three

Another option for restoring. This method can be used by a novice.

  1. Right-click on the Start button, then select Control Panel.
  2. Look for the Control Panel for Recovery.
  3. Select Recovery, then Open System Restore, then Next.
  4. Choose the restore point right before the problematic installation.
  5. Click Next, click Finish.

NOTE: If there are no restore points available, the system recovery may not be turned on. To check this, go to Control Panel, and select Recovery. Configure System Restore, Configure. Then, select Turn on system protection. Having a current restore point for a computer ensures the ease of recovery if any problems with the computer arise.

If you wish to always have at your disposal a utility tool to fix these Windows 10 and other related issues when they do arise, download and install a powerful automated tool.

Read More
1 2 3 171
Logo
Copyright © 2023, ErrorTools. All Rights Reserved
Trademark: Microsoft Windows logos are registered trademarks of Microsoft. Disclaimer: ErrorTools.com is not affiliated with Microsoft, nor claims direct affiliation.
The information on this page is provided for information purposes only.
DMCA.com Protection Status