As we near the end of 2022 we look at the current best antivirus software for popular platforms, why they are the best, and why you should get them.
Avira, a great free Antivirus
Avira has been around a long time with its free antivirus version of the larger protection suite. It had its ups and downs but the latest versions are really great. With high-speed scans and low system impact, Avira antivirus is really one of the best free antivirus software currently on the market.
The software itself has also received UI & UX updates making it straightforward and easy to use. The virus scanning engine is the same as in paid version that ranks among the top engines in the world for this type of work. The package also gives you some great browser protection and a good firewall as well, there is really no excuse to skip on this if you want a free solution.
The only thing that we would say is not so great in Avira is reporting some false positives, sometimes even for MS updates, it is rare but it can happen.
Malwarebytes, a powerful Windows antivirus
Malwarebytes Premium is easy to use, simple antivirus solution that shies away from complicated UI, and simply put, it just works. Its scanning engine is well-known and places among the top and best in the world often finding some malware that other can miss.
Another great thing is its integration with Windows itself, it is one of the rare applications that can and will work incredibly well beside your typical Windows protection tools so you can have both of them running at the same time.
Installation and running are really simple and every typical PC user will find it as easy as walking in the park. On the other hand, sadly system impact is a little high and it will have issues running on lower-end systems due to its memory requirements.
Intego MAC Internet Security X9, the best Mac antivirus
Gone are the days when MAC had no virus issues, since MAC rose in popularity among the users, also rose the number of viruses and malware. The system itself has some great protection built it inside but for more security and better control of it, you will need a third-party dedicated solution.
Intego was made by Mac antivirus experts who have been building this kind of software last 25 years. The interface is easy to use and premade presets are really helpful, but the security suite can also be customized to fit your needs and desires.
Since this is only available as a security suite, you are getting a firewall and some other security tools along with your antivirus that will run as a part of it.
The bad side is that scans can sometimes run slow, most of the time they are OK in terms of speed but occasionally they can switch to slower speeds and impact scanning time to some annoying times. Also, there is no webcam protection nor VPN service included where others on this list have them.
Bitdefender mobile security: best Android protection
While protection is not only needed for your gaming or workstation, software suites that are dealing with mobile and tablet security exist. The best of them is the Bitdefender antivirus mobile suite. Low on system resources and low on performance impact with the really great virus detection rate Bitdefender is at the top of suites for your phone.
Consistent high virus detection packed with low battery impact is great but the suite comes with tons of other tools as well like browser security tools, email protection, and real-time link and notification protection.
The application will always scan each file and newly installed application in the background and alert and cut off any found threat. App itself is easy to install and use and most of the time it will do everything in the background for you but offer you customization if you need it.
The package also includes VPN and application lock that will let you protect the critical applications from being accessed as well as an online account scanner. Anti-theft and anti-loss tools, which allow you to find, remotely lock or wipe a stolen or lost device, add yet another layer of protection.
One thing that is missing from this great package is fraudulent call protection. Newer Android phones have this feature inside but it would be nice if Bitdefender had it as well.
Bitdefender, the best antivirus software
Now that we have covered specific cases of each platform, there is one player that has all of them covered and with a quality product, that player is BitDefender and it is great. Personally, this is my protection suite of choice and as I type this it is running in the background.
Bitdefender has it all, low system impact, as a matter of fact, it is one, if not, the lowest performance impact engine on the market currently and that is packed with a great and highly consistent virus & malware detection suite. Along with real-time malware protection, browser security, and anti-spam tools, you also get anti-phishing defenses, ransomware protection, and a strong firewall.
Bitdefender scores are very high in both the zero-day threat and real-world protection tests at AV-Test, an established organization that tests antivirus software. Despite being tested against tens of thousands of well-known and widespread malware threats, the software consistently achieves a 100% blocking rate.
The suite also comes with a restricted free VPN and with parental controls as well. Webcam and microphone protection are also included in the suite and on top of all, it has great pricing plans and constant discounts.
BitDefender is really a great package and it might sound too good, but after years and years of personally using it I have not had single malware or virus issue, the only thing that I would put as a negative is that system is severely slowed down when system scans are performed so be sure to run or schedule them when you are not using your computer. This, of course, can put some people off and I will admit it is a serious drawback but for me, the security of my workstation is more important than leaving the computer for 20 or so minutes in order to perform a full scan of the system.
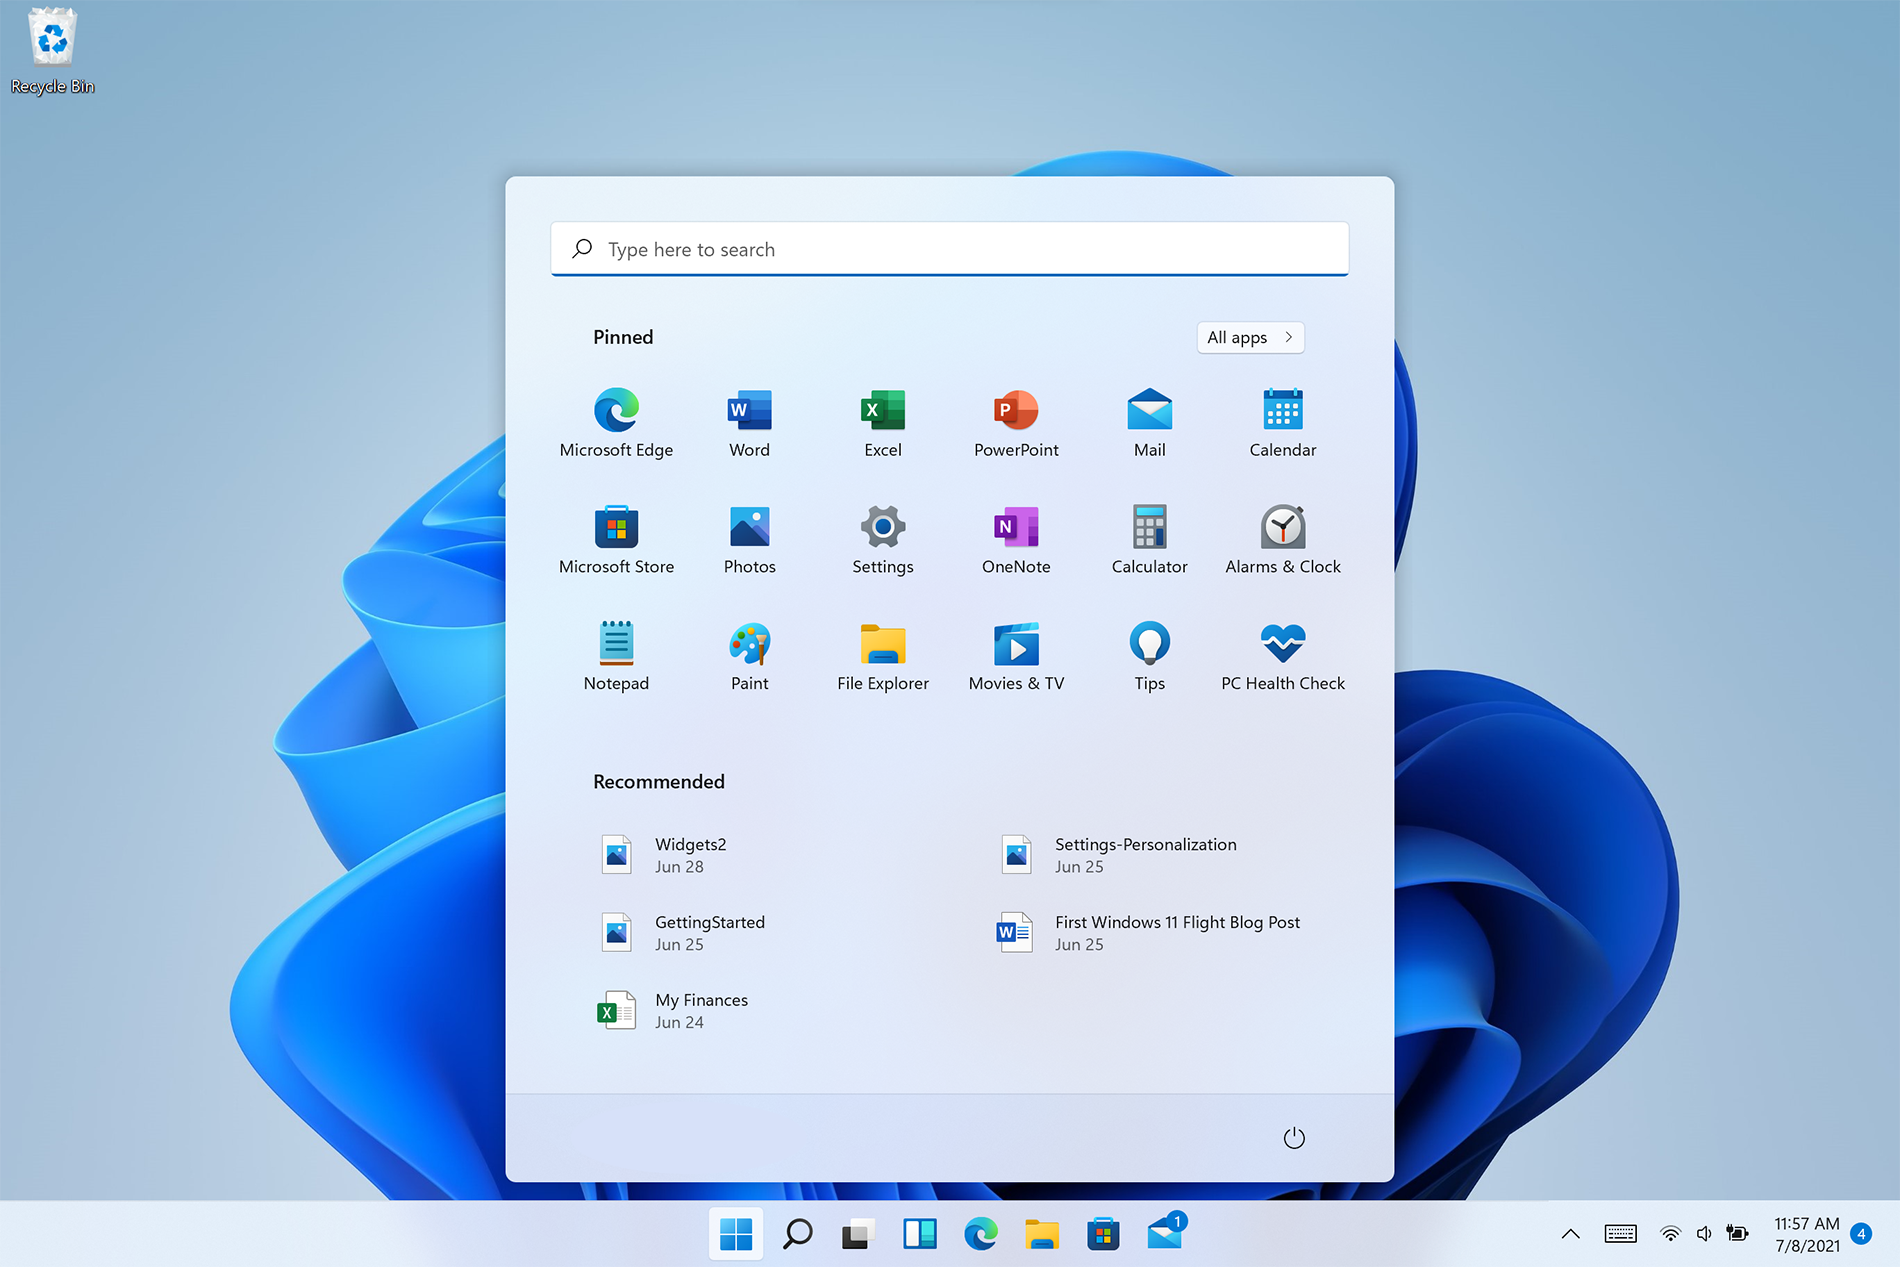
Windows 11 is released and its adoption goes slower than Microsoft would like but nevertheless, it is slowly getting adopted, especially among new computers. Windows 11 has brought us a new modern look of OS but if you would like to personalize it a little more you can. Follow the guide on various things that you can change inside Windows 11.
Personalize list of recently added apps, opened items, folders
The recommended section that shows recently added apps and recently open items can be turned off and hidden now to be shown. In order to do this follow these steps:
Open Windows Settings by pressing WINDOWS + I
Click on personalization in the sidebar
Click on START and go through the options
Turn OFF switch beside recently accessed files
Additionally, you can also change which folders appear on the Start menu.
Remove apps or change app order on the Start Menu
To remove application not to be shown in the Start menu at all follow this simple guide:
Right-click on app
Choose unpin
To place the application on Start click on All Apps, right-click on the app and choose Pin to Start
To drag and rearrange apps, simply click on them and drag them to the new place.
Change the Start Menu location
When Windows 11 was first released Start Menu could only be located in the middle of the screen but thanks to plenty of backlash from users now it is possible to move it on a more traditional left side.
Press WINDOWS + I to open the settings app
Click on Personalization
Look for taskbar behaviors
Inside taskbar behaviors look for Taskbar alignment
Change alignment to left
Change the Start Menu color
In order to change the color of the Start Menu follow the next steps:
Open Settings app
Go to personalization settings
Go to Colors
Switch to custom
Under accent color pick a color you like or make your custom one.
The color settings in a Windows computer certainly matter a lot especially when it comes to printing pictures. Users who are found or edit photos for a living change their computer’s color settings in order to ensure that the printout looks like the actual colors. However, those settings might not be appropriate for computer display and you can really tell right away that there something’s not right in the display. You might also notice some weird tint which isn’t easy to get rid of. You can’t actually tell the difference at first, not until you look at some other computers and then wonder what’s wrong with yours so, in this guide, you will know how to restore the display color settings back to their default state on your Windows 10 PC.
Make sure to follow each one of the steps laid out below carefully to restore the default Display Color settings.
Step 1: Set the Color Management Settings to default.
In the Start search box, type in “color management”. Once you see it in the search results, open it.
Once you’ve pulled up the Color Management window, go to the Advanced tab. From there, make sure that every single option is set to default – from all the options in both the “Windows Color System” and “ICC rendering intent to WCS gamut mapping”.
Note: You also have the option to reset it for everyone by simply clicking on the “Change system defaults” button.
Finally, you can also try to calibrate your display.
Step 2: Set the Graphics Properties to default.
After making changes in the Color Management settings, you need to also set the Graphics Properties to default.
Start by right-clicking on any empty space on your desktop.
Then select the Graphics properties from the context menu. From the Graphics properties window, you will see that most sections have to restore defaults.
Step 3: Try using Nvidia Color Settings for Desktop
The next thing you can try is using the Nvidia Color Settings if you have Nvidia graphics installed on your Windows 10 PC. Just the Control Panel to reset the color settings.
From the system tray, launch the Nvidia control panel.
Next, go to Display > adjust desktop color settings.
From there, select the display and then select the Nvidia Settings.
After that, change the options accordingly in order to get the correct combination though you can always leave them to default.
If your Windows 10 computer slows down, the first thing you can do is to check the status of the resource usage in the Task Manager. In such cases, it shoots up to even 1000% which causes the system to either hang or freeze since some programs are using a major chunk of system resources. And this is the case with msrtn32.exe.
Msrtn32.exe is a malicious file that may try to steal your digital currency. It can get installed on your computer when you install a browser plugin or extension that can modify the default settings of browsers, the content of web pages, search results, as well as display tons of intrusive ads. So if you see msrtn32.exe under the Processes tab of the Task Manager
If you see msrtn32.exe under the Processes tab of your Task Manager, refer to the suggestions given below to get rid of it and restore your computer’s normal function.
Before you proceed, take note that this executable file is found in the following location:
C:/Program Files(x86)msrtn32
Option 1 – Delete the folder where msrtn32.exe is located
The first thing you can do is to go to C:/Program Files(x86)/msrtn32. From there, look for the malicious executable file and delete its folder. If you are not able to delete the folder, make sure that you’re logged in as administrator and then try again.
Option 2 – Try scanning your computer using Windows Defender
Since you are dealing with a malicious file, if you weren’t able to delete the folder where the file is located, you can scan your computer using the built-in Windows Defender program and then eliminate the malicious file. Follow the steps below to do so:
Tap the Win + I keys to open Update & Security.
Then click on the Windows Security option and open Windows Defender Security Center.
Next, click on Virus & threat protection > Run a new advanced scan.
Now make sure that Full Scan is selected from the menu and then click the Scan Now button to get started.
The Sysfader iexplore.exe Application Error - What is it?
To understand Sysfader iexplore.exe application error, first, it is important to learn what is Sysfade.exe file.
Sysfader.exe is basically an IE (Internet Explorer) application file that provides cool animation effects. These animation effects include fading menus in and out, animated windows and etc. It is responsible for the graphical enhancements for animated pages.
The Sysfader iexplore.exe application error occurs when this file fails to execute properly and open animated websites on Internet Explorer.
The error code is displayed in the following format:
“SysFader: iexplore.exe – Application ErrorThe instruction at “0×00000000″ referenced memory at “0×00000000″. The memory could not be “read”.”
Solution
Error Causes
The Sysfader iexplorer.exe application error may be triggered due to many causes. These include:
Sysfader.exe file corrupted by malware and spyware
Recently upgraded Internet Explorer which resulted in the Sysfader iexplorer.exe application error due to incompatibility issues with the system program.
Issues with IE configuration
Damaged registry files
Damaged DLL files
Obsolete and bad registry entries
Due to Sysfader iexplorer.exe application error, your Internet Explorer browser may crash. Furthermore if the error is not fixed timely, it may result in even more severe PC problems like system slowdown, system crash and failure.
This happens especially when Sysfader iexplorer.exe application error is related to the registry.
The registry saves all the activities performed on the computer. This also includes junk files, invalid registry entries, bad registry keys, cookies, temporary internet files, and files of the programs uninstalled.
If the registry is not cleaned frequently, these obsolete files overload the RAM causing great deal of damage to the registry. When you try to upgrade your browser, the installation fails and results in browser incompatibility issues because of the previous files of the uninstalled program saved in the registry.
Furthermore, the error code may also pop up due to the Sysfader.exe file corrupted by malicious software like spyware and adware on your system if you don’t run an antivirus on your system regularly.
Further Information and Manual Repair
To prevent IE web browser and your PC from coming crashing, here are some solutions that you can try to resolve the Sysfader iexplorer.exe application error:
Repair and restore the registry by changing the configuration settings in the Registry Editor Window. This is accessible by typing ‘Regedit’ in the Run window. However, to edit the configuration settings manually and restore the registry, you should be technically sound. If not then making the changes would be slightly complex and time-consuming for you.
However, another alternative to this is to download Restoro. Restoro is a powerful, advanced, and highly functional PC repair tool that includes multiple utilities such as a registry cleaner and a system optimizer. The registry cleaning feature scans your entire PC for registry issues triggering error codes like Sysfader iexplorer.exe.It wipes out all the unnecessary and obsolete files and fixes the damaged dll files thus simultaneously restoring the registry. The antivirus utility scans for and removes viruses and spyware from your PC which as we explained earlier could be the reason for Sysfader error code.
With Restoro, it takes only a few seconds to resolve this error and repair the registry. If you have system slowdown issues, it takes care of that too.
It has simple navigations and a user-friendly interface which makes it very easy to operate even if you are not technically sound. It is safe, efficient, and compatible on all Windows versions including Vista, XP, Windows 7, 8, 8.1, and 10.
Click here to download Restoro and resolve Sysfader iexplorer.exe application error on your PC today!
Recently, a lot of users reported to Microsoft about getting an error code 0x80096004 while trying to update their Windows 10 computers. This kind of Windows Update error occurs during the initial download and verification process. It also affects the Windows features (FODs) and when you encounter this error, you will also see this error code, “TRUST_E_CERT_SIGNATURE”. This error code indicates that the signature of the certificate could not be confirmed. This is caused by a broken certificate store or a corrupt copy of the Windows operating system is installed.
Here’s the complete error message:
“There were some problems installing updates, but we’ll try again later. If you keep seeing this and want to search the web or contact support for information, this may help: (0x80096004).”
To fix Windows Update error 0x80096004, you can check out the options provided below.
Option 1 – Delete the contents in the Software Distribution folder and Catroot2 folder
Open the WinX Menu.
From there, open Command Prompt as admin.
Then type in the following command – don’t forget to hit Enter right after typing each one of them.
net stop wuauservnet start cryptSvcnet start bitsnet start msiserver
After entering these commands, it will stop the Windows Update Service, Background Intelligent Transfer Service (BITS), Cryptographic, and the MSI Installer
Next, go to the C:/Windows/SoftwareDistribution folder and get rid of all the folders and files thereby tapping the Ctrl + A keys to select them all and then click on Delete. Note that if the files are in use, you won’t be able to delete them.
After resetting the SoftwareDistribution folder, you need to reset the Catroot2 folder to restart the services you just stopped. To do that, follow these steps:
Type each one of the following commands.
net start wuauservnet start cryptSvcnet start bitsnet start msiserver
After that, exit Command Prompt and restart your computer, and then try to run Windows Update once more.
Option 2 – Run the Windows Update Troubleshooter
Running the built-in Windows Update troubleshooter is one of the things you can first check out as it is known to automatically resolve any Windows Update errors like error code 0x80096004. To run it, Refer to these steps:
Tap the Win + I keys to open Settings.
From there, click Update and Security and go to the Troubleshoot section.
Next, select Windows Update and click the “Run the troubleshooter” button and wait until it’s finished, and then try to run Windows Update again.
Option 3 – Try to temporarily disable anti-virus and Windows Defender Firewall
As mentioned, the error could be due to the antivirus program or the Windows Defender Firewall installed on your computer. Thus, disabling them or any security software installed in your computer is always a good idea you can try when you’re not able to access the shared drive on your computer. There are times when you encounter problems like Error Code 0x80096004 due to interference of antivirus or security programs. Thus, you have to disable both your antivirus program and Windows Defender Firewall for the meantime and check if it fixes the error or not.
Option 4 – Try to replace the DLL file with a trusted source
You can also try to replace the crypt32.dll file as it could help in fixing the Windows Update error. Just make sure that you get one from a trusted source.
First, you need to get the new DLL file from another computer with preferably the same file version number.
After that, you need to boot your PC into Safe Mode and navigate to the paths listed below and then replace the file using a USB drive or other external storage devices.
x86: This PC > C:/Windows/System32
x64: This PC > C:/Windows/SysWOW64
Next, type “cmd” in the Cortana search box and right-click on Command Prompt, and select “Run as administrator” to open it with administrator privileges.
Now type the “regsvr32 crypt32.dll” command and hit Enter.
Restart your PC and check if the error is now fixed.
Option 5 – Try downloading and installing the Windows Updates manually
Error Code 0x80096004 might be due to a Windows Update that has failed. So if it is not a feature update and only a cumulative update, you can download the Windows Update and install it manually. But first, you need to find out which update has failed, and to do so, refer to the following steps:
Go to Settings and from there go to Update and Security > View Update History.
Next, check which particular update has failed. Note that Updates that have failed to install will be displayed under the Status column which has a label of “Failed”.
After that, go to the Microsoft Download Center and look for that update using its KB number and once you find it, download and then install it manually.
Note: You can also use the Microsoft Update Catalog, a service from Microsoft that provides a list of software updates that can be distributed over a corporate network. With the help of this service, it can be easier for you to find Microsoft software updates, drivers as well as fixes.
Option 6– Run System File Checker or SFC scan
System File Checker or SFC is a built-in command utility that helps in restoring corrupted files as well as missing files. It replaces bad and corrupted system files to good system files. To run the SFC command, follow the steps given below.
Tap Win + R to launch Run.
Type in cmd in the field and tap Enter.
After opening Command Prompt, type in sfc /scannow
The command will start a system scan which will take a few whiles before it finishes. Once it’s done, you could get the following results:
Windows Resource Protection did not find any integrity violations.
Windows Resource Protection found corrupt files and successfully repaired them.
Windows Resource Protection found corrupt files but was unable to fix some of them.
Reboot your PC.
Option 7 – Try to run the Windows Update Service in a Clean Boot State
There are some instances that some conflicting programs installed in your computer might be the one that’s causing Windows Update error. To identify which program is causing the problem, you need to put your computer in a Clean Boot State. To do so, follow the steps below.
Log onto your PC as an administrator.
Type in MSConfig in the Start Search to open the System Configuration utility.
From there, go to the General tab and click “Selective startup”.
Clear the “Load Startup items” check box and make sure that the “Load System Services” and “Use Original boot configuration” options are checked.
Next, click the Services tab and select the “Hide All Microsoft Services” check box.
Click Disable all.
Click on Apply/OK and restart your PC. (This will put your PC into a Clean Boot State. And configure Windows to use the usual startup, just simply undo the changes.)
Now try to run the Windows Update Service again and see if Windows Update error 0x80096004 is now gone.
Some users installing or upgrading to Windows 10 experienced the theKMODE_EXCEPTION_NOT_HANDLED Blue Screen of Death (or commonly known as BSOD) error. This error can be due to different types of things, ranging from software to driver issues. When you experience this BSOD error while trying to install Windows 10, it will prompt you to restart your computer every single time you experience it. In most cases, you will also not be able to proceed with the Windows 10 set-up.
Solution
Error Causes
The “KMODE_EXCEPTION_NOT_HANDLED” error is normally caused by:
Hardware incompatibility
A faulty device driver or system service
Further Information and Manual Repair
You won’t be able to successfully upgrade or set up Windows 10 if you continue to encounter this BSOD error. Note that this error will always prompt your computer to restart every time it happens, preventing you from completing the Windows 10 set-up.
If you’re not tech-savvy or not capable of debugging this issue, it’s highly advisable to proceed with the basic troubleshooting techniques available in this link.
After troubleshooting, below you’ll find a few solutions to rectify the issue.
Method 1 – Check The Cause of The BSOD Error
Two common causes of the KMODE_EXCEPTION_NOT_HANDLED issue are hardware incompatibility and faulty device driver or system service.
If you experience this error, check first if any of your newly installed hardware is compatible with Windows 10. You can find the required hardware for Windows 10 from this link.
If all your hardware is compatible with Windows 10, you might need to check the device driver or system service. Review the bug check message. If any of the drivers you have is listed in the message, either disable or uninstall them before upgrading or setting up Windows 10.
You might also find it useful to check the System Log available in the Event Viewer for other error messages that can help you figure out the driver or device that’s causing the error. Running hardware diagnostics can also be useful.
Method 2 – Disable (or preferably uninstall) Software Before Upgrading
If you’re upgrading Windows 10 from Windows 7 or Windows 8.1, you might need to disable or uninstall the software first.
First, try uninstalling your Antivirus utility before starting the upgrade. Restart a few times before starting the Windows 10 installation.
If you’re upgrading using the Windows 10 update, make sure that you disconnect from your Wi-Fi or Internet LAN (Ethernet) connection as soon as the download reaches 100% before attempting to start the set-up.
Other users also reported that the cause of the KMODE_EXCEPTION_NOT_HANDLED issue is BitDefender. If this is what happened in your case, it will show in the error message such as KMODE_EXCEPTION_NOT_HANDLED (bdselfpr.sys). Users reported that a common solution for this is renaming the file. In the case of BitDefender, try renaming it to bdselfpr.s__. However, make sure to do this cautiously. Sometimes, renaming a file will even do more damage than good.
Method 3 – Disable/Disconnect From Hardware
If you’re connected to any general USB devices (such a smart card reader), disable it. If your computer is connected to other external devices, disconnect all of them. Examples of this include gaming controllers, printers, external hard disk, USB keys, and other non-essential devices).
Method 4 – Other Troubleshooting Steps
Other troubleshooting steps include:
Upgrade using an .ISO file, instead of directly upgrading from Windows Update. When you do this, make sure you’re disconnected from the Internet during installation. If the process started and you forgot to disconnected, it’s best to restart the installation.
If you’re connected to a domain while trying to set up Windows 10, disconnect and use a local account.
If you’re using a SCSI hard disk, connect a thumb drive with the drivers for your storage device. While Windows 10 is setting up, click on the Custom Advanced Option. Using the thumb drive, use the Load Driver command to load the SCSI drive.
Another possible cause of this error is due to BIOS incompatibility. BIOS issues can be solved by upgrading your version of your system BIOS. If you don’t know how to do this, refer to your BIOS manufacturer’s website.
Method 5 – Use A Trusted Automated Tool
If you still experience the error after doing the methods above, you might want to try a powerful and trusted automated tool to fix the job.
If you spend a large amount of time gaming or working on a computer gaming chair is a very important asset. One other thing that is mostly looked past but could help greatly is a good desk. A great chair accompanied by a great desk can make your long sitting sessions more pleasant and more healthy which is very important in the long run.
Hey, but it is only a desk, what is so special about having an expensive desk? Well truth to be told desk is just a desk and any kind of desk can serve the purpose of hosting a keyboard, mice, and screen. But a good desk will offer some other advantages that may not seem so important but they could mean a lot like adjusting desk height so it fits perfectly on your size and sitting position making long hours more pleasant and lower stress on hands sitting on it.
Advanced desk features
Bytezone might not be a company that will sound familiar to you, mostly because they manufacture gaming chairs and desks, now in the gaming chairs world there are a lot of competitors and Bytezone has managed to make a name for itself despite this fact. But they are more popular in their gaming and office modern-looking desk category.
The advanced desk is made from carbon steel and plastic combination, it is very durable and it weighs 27kg. Now that is not really light but it is not very heavy if we compare it to wood desks. The top layer of the table is made from easy-to-clean material and the desk comes with a large mouse and keyboard pad.
The table itself includes a cup holder, headphones bracket under the table and it has a cable management drawer in the back. The desk is sized 66x120x76 cm. Also for anyone interested desk itself comes also with RGB lights for that true gaming feel.
Error 10013 is a type of Socket Windows PC error. Socket error 10013 occurs when the attempt to access the server is denied. This indicates that the needed socket connection is denied which further implies that a port is blocked or unreachable.
Solution
Error Causes
The socket error 10013 can occur due to multiple reasons:
Antivirus or firewall software
Incompatible drivers
Registry corruption
Misconfigured files
Further Information and Manual Repair
To resolve the socket error 10013 on your PC, here are some methods that you can try:
1. Disable Firewall
To resolve this issue on your PC, you may have to temporarily disable Firewall. Sometimes Firewall can stop you from connecting to the server. Try doing this; it is most likely to resolve the error. If the Firewall is the reason for the denied access, turning it off will surely help.
2. Disable your Antivirus Software
If disabling the Firewall doesn’t resolve the issue, try disabling your antivirus software temporarily. If the error still persists, then try other solutions listed below.
3. Upgrade Drivers
Incompatible drivers could be a reason too for denied server access.
Your server may no longer be using the drivers that you have on your PC which is why you may not be getting permission to access it. If this is the cause, then the best way to resolve it is to upgrade drivers. To find out about new drivers, visit the software manufacturer’s website for new drivers and then download them to your PC.
4. Registry Issues
Sometimes the underlying cause of the error could be registry issues and misconfigured files.
If you don’t wipe out unnecessary and obsolete files from your systems like junk files, cookies, internet history, temporary files, and other files from your PC, it can damage and corrupt the registry and misconfigured files thereby causing socket error 10013 on your system.
To resolve registry issues and repair your PC, download Restoro. It is an advanced, easy to use, and highly functional PC fixer embedded with multiple utilities including a powerful registry cleaner. It is deployed with an intuitive algorithm that scans and detects all registry issues in seconds.
It removes all the unnecessary and obsolete files stored in your PC overloading your registry. This registry cleaner repairs the damaged and misconfigured files and restores the registry, thereby resolving socket error 10013 on your system right away.
It has simple navigations and a user-friendly interface which makes it very easy for all levels of users to work around and use it to its maximum advantage. Furthermore, it can be installed on all Windows PC.
Restoro is compatible with all Windows versions.
In addition to this, it also includes several other value-added features such as an antivirus, a system optimizer, and an Active X controls and class scanner. These utilities can be used to resolve numerous other PC-related errors.
Click here to download Restoro today and resolve socket error 10013 on your PC right away.
If your WIFI signal is strong but you can not connect to the internet then keep reading in order to find out why this happens and what can you do to fix it.
One very important thing to know and understand is that WIFI and the internet are two different things and that they altho connected and working together are basically 2 things.
WIFI is a name for a group of technologies that are using radio vawes to connect to the router in order to access the internet. The Internet itself is series of computers all connected in LAN. Think of WIFI like some invisible cable that connects your computer to the router. When we put things into perspective this way it becomes clear that we can indeed have a strong WIFI signal and that we are connected to the router but the router itself is not connected to the internet.
So basically troubleshooting an internet connection is troubleshooting the router itself. The most common approach is to reset the router, turn it off, then back on, check cables, etc. But be sure that if your WIFI signal is strong and you can not access the internet it is a router issue.
Facebook has an algorithm inside it that can recognize your face in pictures and videos which is meant to help people tag friends when they upload media into Facebook. It is a neat feature meant to help all Facebook users but what if we do not want to be detected in pictures and videos? What if we do not want to be tagged?
If you are one of the Facebook users that do not wish to be detected and recognized by Facebook in media keep on reading to find out how you can disable this option.
Open the Facebook website and log into your account.
Click on the arrow visible in the top menu bar.
Select the Settings & privacy option.
Click on the Settings option.
Switch to the Face recognition tab on the left-hand side.
Click the Edit button.
Select No from the drop-down list.
And you are done, you do not need to log out or restart facebook in order for changes to have an effect. Now you are free from face recognition and detection.


 Personalize list of recently added apps, opened items, folders
 Advanced desk features