As we near the end of 2022 we look at the current best antivirus software for popular platforms, why they are the best, and why you should get them.
Avira, a great free Antivirus
Avira has been around a long time with its free antivirus version of the larger protection suite. It had its ups and downs but the latest versions are really great. With high-speed scans and low system impact, Avira antivirus is really one of the best free antivirus software currently on the market.
The software itself has also received UI & UX updates making it straightforward and easy to use. The virus scanning engine is the same as in paid version that ranks among the top engines in the world for this type of work. The package also gives you some great browser protection and a good firewall as well, there is really no excuse to skip on this if you want a free solution.
The only thing that we would say is not so great in Avira is reporting some false positives, sometimes even for MS updates, it is rare but it can happen.
Malwarebytes, a powerful Windows antivirus
Malwarebytes Premium is easy to use, simple antivirus solution that shies away from complicated UI, and simply put, it just works. Its scanning engine is well-known and places among the top and best in the world often finding some malware that other can miss.
Another great thing is its integration with Windows itself, it is one of the rare applications that can and will work incredibly well beside your typical Windows protection tools so you can have both of them running at the same time.
Installation and running are really simple and every typical PC user will find it as easy as walking in the park. On the other hand, sadly system impact is a little high and it will have issues running on lower-end systems due to its memory requirements.
Intego MAC Internet Security X9, the best Mac antivirus
Gone are the days when MAC had no virus issues, since MAC rose in popularity among the users, also rose the number of viruses and malware. The system itself has some great protection built it inside but for more security and better control of it, you will need a third-party dedicated solution.
Intego was made by Mac antivirus experts who have been building this kind of software last 25 years. The interface is easy to use and premade presets are really helpful, but the security suite can also be customized to fit your needs and desires.
Since this is only available as a security suite, you are getting a firewall and some other security tools along with your antivirus that will run as a part of it.
The bad side is that scans can sometimes run slow, most of the time they are OK in terms of speed but occasionally they can switch to slower speeds and impact scanning time to some annoying times. Also, there is no webcam protection nor VPN service included where others on this list have them.
Bitdefender mobile security: best Android protection
While protection is not only needed for your gaming or workstation, software suites that are dealing with mobile and tablet security exist. The best of them is the Bitdefender antivirus mobile suite. Low on system resources and low on performance impact with the really great virus detection rate Bitdefender is at the top of suites for your phone.
Consistent high virus detection packed with low battery impact is great but the suite comes with tons of other tools as well like browser security tools, email protection, and real-time link and notification protection.
The application will always scan each file and newly installed application in the background and alert and cut off any found threat. App itself is easy to install and use and most of the time it will do everything in the background for you but offer you customization if you need it.
The package also includes VPN and application lock that will let you protect the critical applications from being accessed as well as an online account scanner. Anti-theft and anti-loss tools, which allow you to find, remotely lock or wipe a stolen or lost device, add yet another layer of protection.
One thing that is missing from this great package is fraudulent call protection. Newer Android phones have this feature inside but it would be nice if Bitdefender had it as well.
Bitdefender, the best antivirus software
Now that we have covered specific cases of each platform, there is one player that has all of them covered and with a quality product, that player is BitDefender and it is great. Personally, this is my protection suite of choice and as I type this it is running in the background.
Bitdefender has it all, low system impact, as a matter of fact, it is one, if not, the lowest performance impact engine on the market currently and that is packed with a great and highly consistent virus & malware detection suite. Along with real-time malware protection, browser security, and anti-spam tools, you also get anti-phishing defenses, ransomware protection, and a strong firewall.
Bitdefender scores are very high in both the zero-day threat and real-world protection tests at AV-Test, an established organization that tests antivirus software. Despite being tested against tens of thousands of well-known and widespread malware threats, the software consistently achieves a 100% blocking rate.
The suite also comes with a restricted free VPN and with parental controls as well. Webcam and microphone protection are also included in the suite and on top of all, it has great pricing plans and constant discounts.
BitDefender is really a great package and it might sound too good, but after years and years of personally using it I have not had single malware or virus issue, the only thing that I would put as a negative is that system is severely slowed down when system scans are performed so be sure to run or schedule them when you are not using your computer. This, of course, can put some people off and I will admit it is a serious drawback but for me, the security of my workstation is more important than leaving the computer for 20 or so minutes in order to perform a full scan of the system.
Copy & Paste function is an essential option in properly working Windows, from copying text to weblinks and many other sources like pictures and files it is one of the crucial features in Windows.
When the copy and paste feature is not working we are somewhat left in Windows limbo, essentially Windows itself is working but without this specific feature it is very hard, almost impossible to get any work done, if you are an unfortunate user who has faced this particular issue do not worry, we have solutions for you.
Update Windows
Glitches come in various forms and sometimes they are introduced in updates, check to see if it is available Windows update and if it, download and install it, there is a very high chance that the next update will bring fixes for known glitches.
Disable antivirus
A good antivirus is an essential piece of software for any PC, however, sometimes it can interfere with the basic operations of windows itself. Disable it completely to see if copying and pasting will start to work, if this is a case, see can you somehow turn options off in antivirus or switch to another one.
Run Check disc
Corrupted applications and system files can cause issues with Windows functioning, the easiest way to solve this issue is to run build-in Windows Check disk utility and let it scan and fix potential issues.
Run SFC
If the check disk failed to fix the issue, run command prompt as administrator and type in sfc /scannow, file checker will go through all files and fix if it finds anything including corrupted system files. Reboot your system after the operation completes. Please note that an SFC scan can take a long time sometimes, do not interrupt the scanning process and leave it to finish.
Restart rdpclip process
Restarting rdpclip.exe can solve the issue. Open task manager and under process find rdpclip.exe, right-click on it and end it, then go to windows/system32 and search for rdpclip.exe and double click it. Please note that you will be able to find this process only if you are on a remote PC machine, on a local user machine rdpclip is not running.
Rollback to the previous system restore point
If this particular issue was introduced in the latest update and previous solutions have not worked, roll back to the restore point where everything was working as it should.
Stop virtualization
if you are using virtual software there is a chance that the shared clipboard feature is interfering with Windows, turn the Virtual machine off and try copy & paste again.
One of the worst Blue Screen of Death errors you can encounter is the UNMOUNTABLE_BOOT_VOLUME BSOD on Windows 10. In this BSOD error, your computer won’t be able to properly boot. Meaning to say, even if you want to reinstall Windows, you won’t be able to back up your important files. Thus, it wouldn’t be really feasible to fix the system files, and besides, reinstalling Windows 10 would take a lot of time, not to mention resources.
The UNMOUNTABLE BOOT VOLUME error is the kind of BSOD error that occurs if Windows is not able to access the volume that contains the boot files. Resolving this BSOD error won’t be easy but you will surely manage by following the suggestions laid out below but before you go on, make sure to create a System Restore Point.
Option 1 – Try checking the hardware
If you got the UNMOUNTABLE BOOT VOLUME BSOD error while trying to update your computer to a higher version of Windows, then you need to check if you have the compatible drivers for the disk controller as well as re-check the drive cabling and make sure that it is properly configured. And if you’re reusing either ATA-100 or ATA-66 drivers, ensure that you have an 80-connector cable and not the standard 40-connector IDE cable.
Option 2 – Try using Automatic Repair
You might also want to use Automatic Repair in fixing the BSOD error. To do so, follow the steps below.
You can start by creating and booting from a bootable Windows 10 USB Stick.
After that, click on Repair your computer located in the bottom left corner when you are on the initial Windows Startup screen.
Next, click on Troubleshoot, and then on the other screen, click the Startup Repair option.
Now select the operating system you want to repair. Once you do that, it will start to repair your operating system. Wait until the process is completed and then check if the problem’s now fixed.
Option 3 – Try fixing the Master Boot Record or MBR
The MBR or Master Boot Record is the location and is where the architecture of the operating system is installed. Thus, if either the location or the architecture has tampered with, it can cause lots of BSOD errors like the UNMOUNTABLE BOOT VOLUME error.
Boot your computer into Safe mode with Networking using the Advanced startup options which you can access by tapping the F2 or F8 key. Once you’ve accessed the Advanced startup options.
After you access the Advanced Startup options, select Command Prompt by using the arrow keys on your keyboard.
After opening Command Prompt, execute the following command and hit Enter:
bootrec /fixboot
After entering the command, wait until the process is completed and then restart your computer to apply the changes made successfully.
Option 4 – Run the CHKDSK command to repair hard disk errors
Running the Chkdsk utility could help you fix the UNMOUNTABLE BOOT VOLUME error. If your hard drive has issues with integrity, the update will really fail as the system will think that it’s not healthy and that’s where the Chkdsk utility comes in. The Chkdsk utility repairs hard drive errors that might be causing the problem.
After you access the Advanced Startup options, select Command Prompt by using the arrow keys on your keyboard.
After opening Command Prompt, execute the following command and hit Enter:
chkdsk /f /r
The command you entered will scan the hard disk for any errors and will automatically fix it if it finds some issues. Wait for the process to be completed and then reboot your PC.
Error Code “Windows 10 isn’t activated after upgrading for free” – What is it?
Windows 10 isn’t activated error occurs when Windows users attempt to upgrade to Windows 10 for free and end up in a non-activated state. It is a Windows 10 activation error affecting PC owners who attempt to upgrade their Windows 7 or Windows 8.1 operating systems. A message box will appear with the following message: “Windows 10 isn’t activated after upgrading for free from Windows 7 SPI or Windows 8.1 update.”
Common symptoms of this error code include the following:
Inability to upgrade for free to Windows 10
The appearance of activation error code in the message box
Solution
Error Causes
To understand the cause of this activation error, users will need to understand activation within Windows. Activation is a process that allows Windows to verify that you are upgrading your operating system based on the Microsoft Software Licensing Terms. These terms specify, for instance, the number of devices upon which you can use Windows.
Once you have a genuine copy of Windows and you are following the terms mentioned earlier, you should be able to activate and complete the upgrade to Windows 10. However, the activation fails when these conditions are not met. Note also that the error may occur if users fail to upgrade to Windows 10 before reinstalling, requiring them to repeat the installation process by first going back to the previous version of Windows present on their system. Once the upgrade process is not done as should, you might encounter other Windows 10 errors such as error code 0xc0000142
If you see this error code, “Windows 10 isn’t activated after upgrading for free” proceed to rectify it using manual repair methods below.
Further Information and Manual Repair
To fix this activation error code in Windows 10, users will need to employ at least one manual repair procedure. This process can successfully be completed by non-technical Windows users. However, you may also consider getting assistance from a Windows repair technician if you are not certain you have the requisite skills needed to complete the manual repair tasks below.
The main methods to resolve the error code “Windows 10 isn’t activated after upgrading for free from Windows 7 SPI or Windows 8.1 update” is as follows:
Method One: Manually Activate Windows
If you attempted upgrading for free to Windows 10 and ended up with the activation error you will need to first perform a manual activation. Follow the steps below to complete the process.
Step one: Tap or click the Start button
Step two: Select Settings then Update & security
Step three: Select Activation
Step four: Once activation status is Connect to the Internet to activate Windows, click or tap Activate
The steps above enable users to successfully activate Windows 10 if the issue involves a connection problem. However, if Windows is not activated, it may mean your copy of Windows is not genuine. This may require you purchase a copy of Windows to rectify the issue. However, if you have a genuine copy of Windows proceed by applying the steps found in method two.
Method Two: Use Product Key to Verify Copy of Windows
A valid product key is one way you can verify your copy of Windows is genuine. This will enable you to complete activation and allow you to access the free upgrade to Windows 10. Follow the steps below.
Step one: Click or tap the Start button
Step two: Select Settings then Update & security
Step three: Click Activation
Step four: Select Change Product Key then type in the product key. (Ensure you type the 25 characters in the correct order.)
Method Three: Use an Automated Tool
Error codes in Windows often occur due to poor maintenance of one’s PC. To improve your system and reduce your machine’s risk of experiencing error codes, download a powerful automated tool. This tool is both powerful and user-friendly, making its benefits accessible to even the most non-technical Windows users.
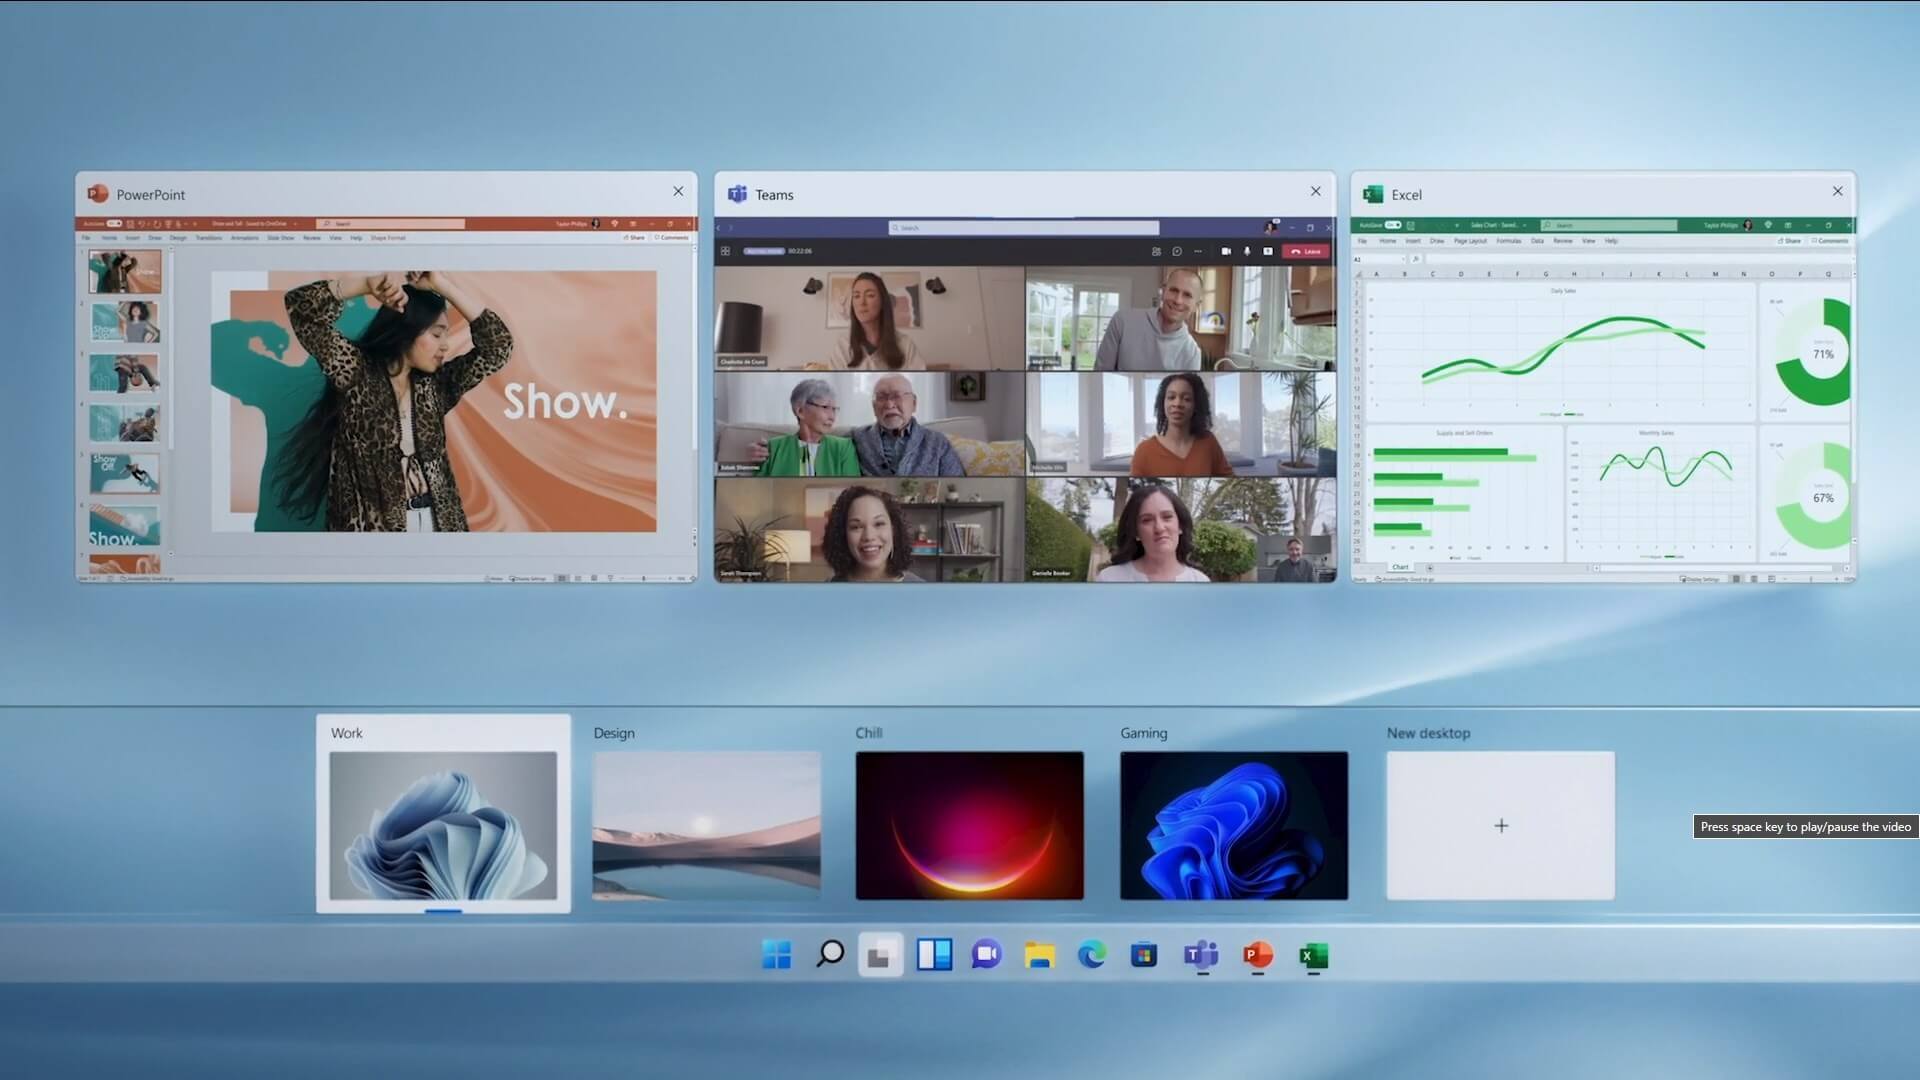
The feature that was originally planned for now scrapped Windows 10X is included in Windows 11. You will be able to customize your Virtual desktop with different wallpapers for each screen.
In order to fully customize your virtual desktops with different wallpapers follow this easy step-by-step guide.
Click on the Task View button in the taskbar
When the Task View opens, select the desktop on which you want to set wallpaper
The view will switch to the selected desktop. Right-click anywhere on the desktop and select personalize
In personalization settings, click on the background
Select wallpaper which you would like to have on the desktop by clicking on browse and navigating to the desired one
Close the settings
Repeat for each virtual desktop you would like to customize
I must admit that I am a big Western Digital fan, I have been using their hard drives really long time and I must admit that I am very happy with their products. Sometimes they could be a little more expensive than other drives on market but security and performance are on their side. If you ever wanted to purchase Western Digital or WD hard drives or you are considering getting one, no doubt that you have come across their color cryptic line of products.
1TB Hard drive can come in 6 different colors in your search products query and if you are not familiar with the WD color coding of hard drives you might be a little lost as to which one is right for you and what are the differences. This article is made to explain exactly that, what are WD colors representing so you can choose the right one for your needs.
Western Digital has decided to use color codes in order to mark their series of disks which means that each color represents different hard drive series and it is made and aimed for different use, we are going to explore in detail each series below:
WD BLUE
Blue series is all around typical hard drive made and meant for daily use in desktop computers for all kinds of tasks. You can use it in casual gaming or for storage, its purpose is tailored for all-around casual daily users.
WD RED
WD Red HDD is designed for NAS and RAID systems. Its purpose is to be turned 24/7 who ever need access to it. Get this series if you need to have constant access to files or if you need a reliable RAID hard drive.
WD GREEN
Green series of the hard drive is manufactured for low power consumption and for storage, they are meant to be used for storage and not accessed regularly.
WD PURPLE
Purple line of hard drive products is designed solely for video surveillance systems. Instead of having a preference on reading data like WD RED, the PURPLE series is given preference on writing, constant writing to be more precise.
WD BLACK
The black series is made for an external storage medium with high performance. Due to the high performance, WD Black hard drives are much popular among photo editors and high-end gamers.
WD GOLD
WD Gold HDD provides a long-term cold storage medium. Therefore, this series of Western Digital hard drives are suitable for data centers. These hard drives can handle many sophisticated systems simultaneously and work well with different servers
That's it, I hope that you have now a more clear understanding of the WD color-coding of its hard drive series. As always thank you for reading and I hope you will have a great day.
If you would like to read more helpful articles and tips about various software and hardware visit errortools.com daily.
Error 0x0000001e is when you start the Windows XP Setup and you see a message which says something like:
STOP: 0x0000001E (0x80000003, 0xBFC0304, 0x0000000, 0x0000001)
Solution
Error Causes
You are most likely to face this error if you restart your PC while the Windows Setup is still under process and yet to complete.
Other causes of this error include any of the following conditions:
The drive on which you are installing Windows has insufficient disk space to accommodate the installation.
An incompatible or outdated third-party driver (or more) is installed on your PC which is conflicting with the installation. For instance, this could be a problematic video driver.
The system BIOS has incompatibilities with the installation.
Further Information and Manual Repair
This error is also called the “Bug check code”.
The STOP 0x1E signifies that there was an unknown or illegal processor instruction detected by the Windows XP kernel. You will see the exception address which shows up to indicate the root of the problem which is usually a driver or faulty hardware.
You should note this address down as well as the link date of the faulty driver or image which includes it.
If at any point it becomes impossible for you to handle and you end up contacting the Windows support center to help you out with the process then this information will help you out in making things a lot easier while the support team tries to troubleshoot the problem.
The parameters included in the STOP 0x1E error message are the following:
is the exception code which couldn’t be handled.
shows the module’s address where the exception took place.
signifies the exception’s parameter 0.
represents the exception’s parameter 1.
You can use this information which usually is provided in error 0x0000001e message to pinpoint the root cause of the problem and troubleshoot it.
In order to fix this error, you need to follow either one of the following procedures as needed according to your situation.
Clean Up Your Disk
If your disk doesn’t have ample space to accommodate the installation then you should free up some of the space on your disk to make sure the Windows can be installed on it.
You can also reinstall the Windows on another disk that has sufficient space.
Get Rid of the Third Party Driver
If the error 0x0000001e message gives you the name of the driver due to which the installation process is being halted, then get rid of that driver by disabling it or removing it.
If the problem is resolved by this then you should contact the manufacturer of the third-party driver and ask them about any newer versions of the driver that wouldn’t conflict with the installation of Windows.
Upgrade System BIOS
Upgrading your system BIOS is something that you can’t do on your own. You will need to find out more about how you can upgrade. For this, you should contact either your PC’s manufacturer or your motherboard’s manufacturer.
If nothing else works, you can always make use of the Microsoft Debugging Tools which will provide you ample information about the error message.
You will find the Debugging Tools and further information about them including the downloading and installation process on Microsoft’s website.
Blinking or Flashing Desktop After login - What does it mean?
Upon updating to Windows 10, some users might encounter a blinking or flashing desktop after logging in. This will result in a repetitive restarting of explorer or you won’t be able to make the start menu and shortcut keys work. In addition, the network icon might not appear in your taskbar as well. Other Windows 10 error messages include error code 0xc000021a.
Solution
Error Causes
Your blinking or flashing desktop after logging in might be the result of problems with the bushell.dll shell extension, which is a part of the Norton Security Suite. Another possible cause for this annoying problem is an issue with your display driver since not all systems will use the same display driver and will depend on what graphics card you use.
Further Information and Manual Repair
In fixing the bothersome blinking or flashing desktop after logging in problem, you can do a manual repair method to address the root problem. You need to be familiar with the Windows command line to successfully go through the process. However, if you are not knowledgeable or confident enough to do this on your own, it would be best to seek help from a professional. Or, you might want to consider using an automated tool to solve the issue.
You need to identify first what’s causing the blinking or flashing of your desktop after login to properly address the issue. The following methods can be done if your issue is caused by bushell.dll shell extension issue:
Method One: Forcefully Terminate Process
Press on Ctrl+Alt+Del then select Task manager
Start a Command Prompt as an administrator by choosing the File menu then Run New Task.
Type exe. Make sure to tick the checkbox “Create this task with administrative privileges.”
NOTE: Text input is most probably affected by the explorer restarts so you might need to repeatedly type some letters or to carefully input texts.
In the Command Prompt, type taskkill /f /im explorer.exe. This will stop the blinking or flashing.
Type cd “Program Files” afterward, type dir /s bushell.dll to locate where the dll is. (For example, purposes, use c:\program files\Norton Security Suite\Engine6422.5.2.15 as the location)
If the dll file is not found, you can try repeating step 5 but this time, use “Program Files (x86)” However, you can proceed with the next step if you already located where the bushell.dll is.
Type cd ”c:\program files\Norton Security Suite\Engine 6422.5.2.15” to change the name of the directory you found the dll in.
Type ren bushell.dll bushell-crash.dll
Restart now the system by typing shutdown /r /f /t o in the command line.
Method Two: Uninstall Programs
Log out then go to the sign in screen
Press the Shift key as you simultaneously click on the Power button on the screen.
Continue pressing on the Shift key as you click
Continue pressing on the Shift key as you wait for the Advanced Recovery Options menu to appear.
Once the Advance Recovery Options menu appears, click on Troubleshoot then select Advanced options.
Click on the Startup Settings then select
Boot on Safe Mode by pressing 4 on your keyboard.
Log in then press Windows key + X.
Select the Device Manager then expand Display Adapter.
On your Display Adapter, right-click then select
Exit Device Manager
If in case you also have an older Antivirus utility, you should uninstall it as well.
Restart
NOTE: You might need to download the latest Video Driver on a working computer. Save it in a thumb drive then copy and install it on your computer. If in case there is no native Windows 10 driver, you can also download the latest Windows 7 or Windows 8.1 video driver. Afterward, install it in compatibility mode.
Method Three: Use Microsoft System Configuration Utility
Log out then go to the sign in screen
Press the Shift key as you simultaneously click on the Power button on the screen.
Continue pressing on the Shift key as you click
Continue pressing on the Shift key as you wait for the Advanced Recovery Options menu to appear.
Once the Advance Recovery Options menu appears, click on Troubleshoot then select Advanced options.
Click on the Startup Settings then select
Boot on Safe Mode but this time, choose 5 to start in Safe Mode with networking.
Check if your problem is present or not in Safe Mode. If not, then you are on the right track.
Press on the Windows key + R then type msconfig to start up your exe file.
Click on the Services tab then choose Disable All. Afterward, click on
Once you’re prompted to reboot your computer, go ahead and reboot in Normal Mode. Check if the issue is still present.
If the blinking or flashing desktop after login is gone, then you can just do a process of elimination.
Start-up on your exe again then begin bringing up services a few at a time.
You can turn on all other services except for the following which causes the blinking or flashing desktop after login problem:Problem Reports and Solutions Control Panel Support•Windows Error Reporting Service.
Microsoft just released Windows 11 ISo file, based on the latest Insider Preview Build 22000.132. Inside build, you can try all-new features like clock updated app, snip tool, and everything releases so far via various patches. You can also use Windows 11 ISO file to do a clean install on your computer, but if you go with this option all of your existing files will be deleted.
Microsoft says it added the ability to name your PC during the setup experience. You’ll also get to experience the Get Started app that’s designed to help you get going on your new Windows 11 PC (even if it’s not actually a new one).
Download ISO
Go to the Windows Insider Downloads page. You will need to sign in with a Microsoft account registered with the Insider Program.
Scroll down to Select Edition and select the build you want to download. You will most likely want the one at the top from the developer channel, as this is where Windows 11 should arrive first. So far, only Windows 10 builds are available. Click confirm.
Select your preferred language. Not all languages available for Windows are compatible with the Insider program, so you may have to stop depending on where you are from.
Click the download button and the ISO file will start downloading.
This is definitely an easier method, but unfortunately, it is not available yet. We will update this article once Windows Insider ISOs are available. Later, once Windows 11 64 bit is available to everyone, you can also download the stable build of Windows 11 iso. Microsoft offers the Media Creation Tool and Upgrade Assistant, which usually do just that. It will be some time before Windows 11 versions of the tools are available, as the operating system is only getting closer to this holiday.
Error 2 is a typical Battle.net error code. Battle.net is a desktop app that allows you to access all Blizzard games.
It enables Blizzard gamers around the world to play multiplayer matches together, online. Error 2 occurs when you are unable to connect to the login server. This error code is displayed in the following format:
Battle.net Error #2: Unable to connect. Please try again later. If the problem persists, please contact technical support.
Solution
Error Causes
Error 2 may be triggered due to several reasons. These include:
Program conflict
Security software conflict
Bad DNS cache entry
Issues with network devices
Viruses and malware
Registry corruption
Error 2 is not a fatal error like the blue screen of death error codes. However, this error may hamper your ability to play Blizzard multi-player games. To overcome this problem it is advisable to fix error 2 immediately.
Further Information and Manual Repair
To resolve this error you don’t need to spend hundreds of dollars to hire a professional and get it fixed. Here are some of the easy do-it-yourself methods to resolve this error on your PC. These methods require no technical expertise or knowledge. Let’s get started:
Method 1
Error 2 may sometimes pop up on the screen due to program conflict. This happens when you have Blizzard games and other programs running on your PC at the same time.
In such a situation, it is advisable to close background applications to resolve conflicts between Blizzard games and other programs running in the background.
Method 2
Sometimes antivirus programs and firewalls can also hinder and interfere with the game’s connection to our servers. In this event, the best way to fix the error is to temporarily uninstall your security software.
Method 3
If error 2 is triggered by the issues with network devices then simply power cycle network devices to re-stabilize the connection.
Power cycling router and modem allow you to reset and reestablish a connection to your ISP. To do this, shut down the computer then power down/unplug the router and the modem.
Allow the modem to sit for 60 seconds, unplugged. Then turn it on and allow it to boot up till the front panel connection lights show a steady connection.
Now turn on the router and do the same as you did with the modem. After that start the computer and allow it to completely boot up. Now try logging on to the Blizzard gaming server.
This will hopefully resolve the issue.
Method 4
Viruses and malware infections can also trigger error 2. In such a situation install an antivirus and remove all malicious programs infecting your PC.
Method 5
If the cause of the error is related to registry corruption, then it is advisable to download Restoro. This is a user-friendly PC Fixer with a registry cleaner. The registry cleaner removes all unnecessary and obsolete files corrupting the registry, cleans and repairs the corrupted registry in a few minutes.
Click here to download Restoro on your PC to resolve error 2. For further information you may be interested in these similar issues:
Hal.dll error is a type of dynamic link library error that is common in Windows.
Hal.dll is the critical file in all Windows installations and the error occurs when this file cannot be correctly loaded. Hal is the abbreviation for ‘Hardware Abstraction Layer’. Communication between Windows and different PC hardware is facilitated with this file.
The error causes inconvenience and hampers your ability to use the hardware.
The error message is displayed in either one of the following formats:
"Windows could not start because the following file is missing or corrupt: C:Windowssystem32hal.dll. Please re-install a copy of the above file."
"Cannot find WindowsSystem32hal.dll"
"C:WindowsSystem32Hal.dll missing or corrupt: Please re-install a copy of the above file."
Solution
Error Causes
Hal.dll error occurs due to multiple reasons. These include:
BIOS are not configured properly
Damaged hard drive
Hal.dll file is missing, damaged, or corrupt
Viral Infection
Further Information and Manual Repair
To fix and resolve the Hal.dll error code on your system, you don’t always have to hire a professional technician for the job.
Though Hal.dll error is critical but easy to resolve, here are some solutions that you can try to fix it right away even if you don’t have any technical expertise.
1) Restart Your PC
Sometimes this can be a temporary error, so try restarting your PC. If the error is resolved then that’s great. However, if it still persists, then try other solutions.
2) Change the Boot Order
The underlying cause for the Hal.dll error is often not properly configured BIOS; if this is the cause, simply change the boot order of the bootable devices like your hard drive.
The BIOS setup utility is used to change boot order settings. This can be done by restarting your PC. Once you restart, press F2 to enter the setup. Now go to SATA operation and change RAID AHCI to RAID ATA.
Save changes and then exit. By doing so, you will be able to re-configure the BIOS and resolve the error.
3) Use BOOTMGR
Another way to resolve is to update the volume boot code to use BOOTMGR.
To do this, access advanced startup options, open the command prompt and type bootsect command and then press Enter. Run the command and then you’ll get the following message:
C: (\?Volume{37a450c8-2331-11e0-9019-806e6f6e6963})
Successfully updated NTFS filesystem bootcode.
Bootcode was successfully updated on all targeted volumes.
After that close the command prompt. This is most likely to resolve the error.
4) Repair Registry With Restoro.
In case the error is still not fixed, then this means that the problem is bigger than you thought. It may be due to hard drive failure, viral infection, or sometimes because of hal.dll file corruption. In the event of these error causes, it is recommended to download Restoro.
Restoro is an advanced, next-generation, and multi-functional PC repair tool embedded with numerous utilities like a registry cleaner, an antivirus, and a system optimizer. The registry cleaner utility:
Scans for all registry issues
Wipes out the unnecessary files saved in the hard drive like the junk files, cookies, internet history, and temporary files
The antivirus utility scans and removes all malicious software from your PC including viruses, Trojans, malware, adware, and spyware. Simultaneously, it also boosts the speed of your system.
It is safe and efficient PC repair software. It has simple navigation and a user-friendly interface. Whether you are using Windows 7, 8 or Vista, it is compatible with all. It can also be used on Windows XP.
Click here to download Restoro and resolve the Hal.dll error today!


 The feature that was originally planned for now scrapped Windows 10X is included in Windows 11. You will be able to customize your Virtual desktop with different wallpapers for each screen.
In order to fully customize your virtual desktops with different wallpapers follow this easy step-by-step guide.
The feature that was originally planned for now scrapped Windows 10X is included in Windows 11. You will be able to customize your Virtual desktop with different wallpapers for each screen.
In order to fully customize your virtual desktops with different wallpapers follow this easy step-by-step guide.
 If your disk doesn’t have ample space to accommodate the installation then you should free up some of the space on your disk to make sure the Windows can be installed on it.
You can also reinstall the Windows on another disk that has sufficient space.
If your disk doesn’t have ample space to accommodate the installation then you should free up some of the space on your disk to make sure the Windows can be installed on it.
You can also reinstall the Windows on another disk that has sufficient space.
 Microsoft just released Windows 11 ISo file, based on the latest Insider Preview Build 22000.132. Inside build, you can try all-new features like clock updated app, snip tool, and everything releases so far via various patches. You can also use Windows 11 ISO file to do a clean install on your computer, but if you go with this option all of your existing files will be deleted.
Microsoft says it added the ability to name your PC during the setup experience. You’ll also get to experience the Get Started app that’s designed to help you get going on your new Windows 11 PC (even if it’s not actually a new one).
Microsoft just released Windows 11 ISo file, based on the latest Insider Preview Build 22000.132. Inside build, you can try all-new features like clock updated app, snip tool, and everything releases so far via various patches. You can also use Windows 11 ISO file to do a clean install on your computer, but if you go with this option all of your existing files will be deleted.
Microsoft says it added the ability to name your PC during the setup experience. You’ll also get to experience the Get Started app that’s designed to help you get going on your new Windows 11 PC (even if it’s not actually a new one).