NoteHomepage (by MyWay) is a browser extension that may be bundled with other free software that you download off of the Internet, or delivered via other advertising means. When installed NoteHomepage will set the homepage and search engine for your web browser to http://search.myway.com.
While installing this extension will gather information from your browsing sessions, including website visits, clicked links, and sometimes even private information, that it later sends back to display unwanted ads into your browser.
Several anti-virus scanners have marked this extension as a Browser Hijacker and are therefore not recommended to keep on your computer. It is considered potentially unwanted, and many users wish to remove it, so it is flagged for optional deletion.
Browser hijacking is a form of unwanted software program, usually a web browser add-on or extension, which then causes modifications in the web browser’s settings. Browser hijacker malware is developed for many different reasons. Generally, browser hijacking is utilized for earning advertising revenue from forced advert mouse clicks and site visits. Even though it might seem harmless, these tools are designed by malicious individuals who always look to take full advantage of you, so that they can earn money from your naivety and distraction. Some browser hijackers are programmed to make certain modifications beyond the browsers, like altering entries on the system registry and letting other malware further damage your machine.
Below are some signs and symptoms that suggest your browser has been hijacked: the home page of your browser is changed unexpectedly; your browser is constantly being redirected to adult websites; the default search engine is changed; you are getting browser toolbars you have never noticed before; never-ending pop-up advertisements show up and/or your web browser popup blocker is disabled; your web browser gets sluggish, buggy, crashes regularly; Inability to navigate to certain websites, particularly anti-malware and also other security software websites.
Browser hijackers might use drive-by downloads or file-sharing networks or an e-mail attachment in order to reach a targeted PC. They could also come from add-on programs, also called browser helper objects (BHO), web browser plug-ins, or toolbars. Browser hijackers sneak into your computer in addition to free software application downloads also that you unknowingly install alongside the original. A good example of some infamous browser hijackers includes Babylon, Anyprotect, Conduit, SweetPage, DefaultTab, Delta Search, and RocketTab, however, the names are regularly changing.
Browser hijackers will affect the user’s web surfing experience severely, track the websites frequented by users and steal personal information, cause difficulty in connecting to the web, and eventually create stability problems, causing software programs and systems to crash.
Some hijackers can be removed by just uninstalling the corresponding freeware or add-ons through the Add or Remove Programs in the Windows control panel. But, many browser hijackers are difficult to get rid of manually. No matter how much you try to get rid of it, it might keep returning again and again. Additionally, manual removals demand in-depth system knowledge and thus can be a very difficult job for novices.
Industry experts always suggest users remove any malicious software including browser hijacker with an automatic malware removal tool, which is easier, safer, and quicker than the manual removal method. Employ a PC optimizer along with your anti-malware software to solve various registry issues, remove computer vulnerabilities, and boost your computer performance.
If the malware is set to run immediately when Windows starts, stepping into safe mode may block the attempt. Just minimal required applications and services are loaded whenever you start your laptop or computer in Safe Mode. To launch your Windows XP, Vista, or 7 PCs in Safe Mode with Networking, follow the instructions below.
1) At power on, hit the F8 key before the Windows splash screen begins to load. This would invoke the “Advanced Boot Options” menu.
2) Select Safe Mode with Networking with arrow keys and press ENTER.
3) As soon as this mode loads, you should have an internet connection. Now, get the malware removal software you want by utilizing the web browser. To install the program, follow the directions in the installation wizard.
4) Immediately after installation, run a full scan and let the software remove the threats it discovers.
Some viruses may target vulnerabilities of a particular web browser that obstruct the downloading process. If you’re not able to download the anti-virus software program using Internet Explorer, this means malware is targeting IE’s vulnerabilities. Here, you need to switch to a different internet browser such as Firefox or Chrome to download the antivirus program.
To successfully get rid of the malware, you have to approach the problem of installing anti-malware software on the affected computer system from a different perspective. Adopt these measures to run the anti-virus on the affected computer system.
1) Download the anti-malware software on a virus-free computer.
2) Plug the USB drive into the clean computer.
3) Double click on the downloaded file to open the installation wizard.
4) Select flash drive as the location when the wizard asks you exactly where you wish to install the application. Follow the on-screen instructions to finish the installation process.
5) Remove the flash drive. Now you can utilize this portable anti-malware on the affected computer.
6) Double-click the anti-malware software EXE file on the USB drive.
7) Press the “Scan” button to run a full computer scan and remove viruses automatically.
To eliminate NoteHomepage manually, navigate to the Add or Remove programs list in the Windows Control Panel and select the program you want to get rid of. For web browser plug-ins, go to your web browser’s Addon/Extension manager and choose the add-on you want to disable or remove. You might also want to reset your home page and search providers, as well as clear your web browser cache and cookies.
Finally, check your hard disk for all of the following and clean your Windows registry manually to remove leftover application entries after uninstalls. Please be aware that this is for professional users only and could be challenging, with incorrect file removal resulting in additional PC errors. In addition to that, certain malware is capable of replicating or preventing deletion. You’re advised to do this procedure in Windows Safe Mode.
Files:
C:\Users\%USERNAME%\AppData\Local\Google\Chrome\User Data\Default\Extensions\lamecoaceiheggdhlnjnmciaonfdamlg.600.11.14900_0
C:\Users\%USERNAME%\AppData\Local\Google\Chrome\User Data\Default\Local Extension Settings\lamecoaceiheggdhlnjnmciaonfdamlg
C:\Users\%USERNAME%\AppData\Local\Google\Chrome\User Data\Default\Sync Extension Settings\lamecoaceiheggdhlnjnmciaonfdamlg
C:\Users\%USERNAME%\AppData\Local\NoteHomepageTooltab
C:\Users\%USERNAME%\AppData\Roaming\Mozilla\Firefox\Profiles\profile\extensions\[email protected]
C:\Users\%USERNAME%\AppData\Roaming\Mozilla\Firefox\Profiles\profile\extensions\[email protected]\chrome
C:\Users\%USERNAME%\AppData\Roaming\Mozilla\Firefox\Profiles\profile\extensions\[email protected]\META-INF
C:\Users\%USERNAME%\AppData\Roaming\Mozilla\Firefox\Profiles\profile\notehomepage_j
Registry:
HKLM\SOFTWARE\Classes\AppID\NoteHomepage Toolbar.exe
HKEY_LOCAL_MACHINE\SOFTWARE\Microsoft\Internet Explorer\Extensions
HKEY_LOCAL_MACHINE\Software\Microsoft\Windows\CurrentVersion\Explorer\Browser Helper Objects
HKEY_LOCAL_MACHINE\Software\Microsoft\Internet Explorer\Toolbar
HKEY_LOCAL_MACHINE\SOFTWARE\Google\Chrome\Extensions
HKEY_LOCAL_MACHINE\SOFTWARE\Mozilla\Firefox\Extensions
HKEY_CURRENT_USER\Software\Opera Software\Explorer\Main\Start Page Redirect=http://random.com
HKEY_LOCAL_MACHINE\SOFTWARE\Microsoft\Windows NT\CurrentVersion\NoteHomepage
HKEY_CURRENT_USER\Software\Microsoft\Windows NT\CurrentVersion\Winlogon Shell = %AppData%\IDP.ARES.Generic.exe
HKEY_CURRENT_USER\Software\Microsoft\Windows\CurrentVersion\Run Random
HKEY_LOCAL_MACHINE\Software\Microsoft\Windows NT\CurrentVersion\Random.
HKEY_CURRENT_USER\Software\Microsoft\Internet Explorer\Main
HKEY_CURRENT_USER\Software\Microsoft\Windows\CurrentVersion\Uninstall\NoteHomepageTooltab Uninstall Internet Explorer
HKEY_CURRENT_USER\Software\NoteHomepage

“We couldn’t install Windows in the location you choose. Please check your media drive. Here’s more info about what happened: 0x80300002”You can encounter this kind of error if there is corruption in the partition table of the drive where the installation is in progress. In addition, corruption on the Media device could also cause this problem. So if you encounter this error when running Windows Setup, read on as this post will guide you in fixing it. There are several ways to resolve this issue. The first thing you can do is to verify the compatibility between the BIOS and the installation media. You could also try recreating all the partitions as well as recreating the bootable USB drive. For more detailed information, follow the given options below.
Converters Now developed by Mindspark Interactive is a Browser Extension for Google Chrome and is promoted at their website like a very useful tool for converting PDF and Doc files, alongside with dictionary, and other useful tools. While this might appeal to you the extension hijacks your New Tab page, changing it to Search.MyWay.com
While active, this extension monitors user’s online activity, recording visited websites, clicked links, bought products, and other browsing information. This information is later forwarded or sold to Mindsparks ad network to better deliver user Targeted Ads.
Browsing the internet with ConvertersNow will result in displaying additional ads, sponsored content, and sometimes even pop-up ads injected into various pages or websites throughout your browsing sessions. CovertersNow has been marked as a Browser Hijacker by several anti-virus programs and it is marked for removal.
Each time when you press WINDOWS + PrtScn key on your keyboard a screenshot is taken and saved on your Hard drive, to be more precise, it is saved in a specific folder which is in c:\Users\Your user name\Pictures\Screenshots. Now, this specific location is not anything that's bad but it is a little deep and not so user-friendly for quick access.
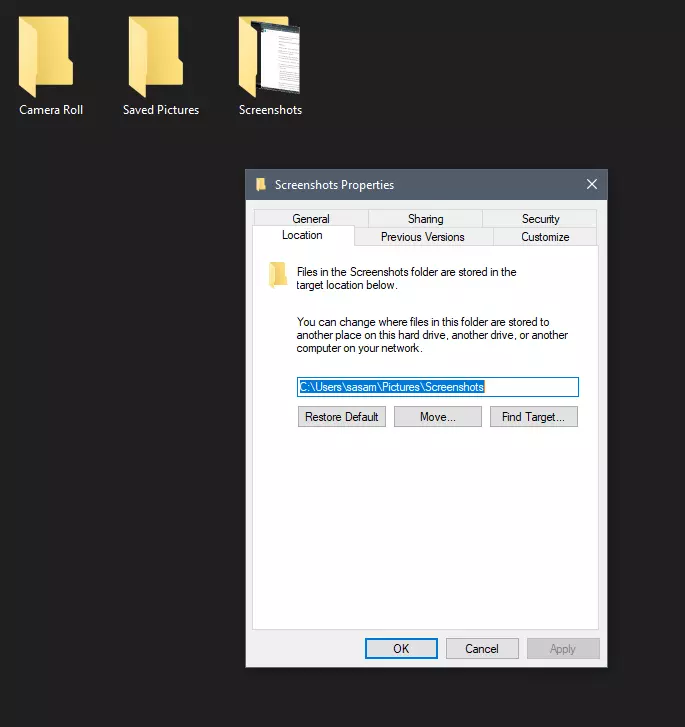
Luckily this default location can be changed into any folder that you like.
First thing is to open File Explorer and then navigate to your PC. Once you go to your PC, go to Pictures, and inside right-click on the Screenshots folder. If there is no screenshots folder inside, this means that since Windows was installed no screenshots were taken with WINDOWS + PrtScn key combination. Please note that just by pressing PrtScn you will create a screenshot but you will place it inside the clipboard ready to be pasted somewhere, with WINDOWS + PrtScn you are saving the screenshot directly in a file on your hard drive.
So once you clicked on the Screenshots folder, go to the bottom and click on properties. Inside properties go to the Location tab. In the location, tab clicks on MOVE and browse to your new location where you would like screenshots to be saved. Once you select the folder for screenshots, click on the Select Folder button and confirm with OK. After this, Windows will ask you would you like to move existing screenshots into the chosen folder. Click YES or NO, depending on your preference.
After this easy setup, all of your new screenshots will be placed now inside the chosen folder.
Thank you for reading and I hope to see you tomorrow. Take care.
ListenToTheRadioNow is a Browser Extension that allegedly lets you listen to radio from your browser. However, all this extension does is add links to the popular radio stations on your home page. This extension hijacks your home page and changes your default search provides to MyWay. While running it monitors browsing data from your browser, mining information such as website visits, clicked links, and sometimes even personal information. This information is later used to display targeted ads through your browser. Several anti-virus scanners have marked this extension as a possible Browser Hijackers, and due to its data mining nature, it is not recommended to keep it on your computer.
Error code 0xc00007b usually manifests itself via the inability to start an application properly. It can occur when users attempt to run a game or other programs on their computer. In such a case, the application will not start and a message box will pop up stating that error code 0xc00007b has occurred. The error code is likely to occur when users attempt to run a program in the incorrect or inappropriate bit. For instance, if you try to load a 32bit location with a 64bit location.
 Error Causes
Error code 0xc00007b affects various versions of the Windows operating system, including Windows 7, 8, 8.1, and Windows 10. In the case of error code 0xc00007b for Windows 10, the error may be caused by issues related to software you’ve installed on your machine. This may cause software conflict resulting in the need to install programs like DirectX. Left unchecked, error code 0xc00007b could incite other error codes in Windows 10, such as error code 0xc004f034.
To repair error code 0xc00007b for Windows 10 devices, users will need to implement at least one manual repair procedure. Manual repair methods are effective in combating these issues as they can address the issues causing the error in the first place, thus fixing the problem.
The manual repair procedures for fixing error code 0xc00007b are very straightforward and can be implemented with little technical knowledge. However, you may need to contact a Windows repair technician if you have difficulty fixing the error code after completing the manual repair methods listed below.
Microsoft DirectX is an application usually included in the Microsoft operating system. It enables users to access high-speed gaming and multimedia on their PC. The latest version of this Windows technology is available on Microsoft’s official site.
Visit the Microsoft website and search for DirectX End-User Runtime Web Installer. Once you have located the latest version of the program, select the preferred language you would like DirectX to run in, and then click download. Run the program, then be sure to reboot your computer.
Note that this solution should only be applied if you are having issues running or displaying a gaming or multimedia application. Once you’ve correctly installed the latest version of DirectX, it should be able to fix underlying issues that may be causing error code 0xc00007b to occur. If you are still unable to run applications after completing this manual repair procedure, however, you will need to apply another method to fix error code 0xc00007b for Windows 10.
.NET Framework, a framework developed by Microsoft, provides solutions for users who may be having problems with applications. To download the latest version of the .NET framework, follow the steps listed below.
To ensure you successfully download the latest version of the .NET Framework, verify your computer is properly connected to the Internet while downloading the software. Also, follow the instructions provided on the Microsoft website.
After completing the download process, reboot your computer then check if you have successfully resolved error code 0xc00007b for Windows 10. If this manual repair method is successful, you will be able to access your gaming and multimedia programs. Otherwise, the error code message box will reoccur, stating that the application error code is present on your device. Apply the next manual repair procedure to correct the error code if this reoccurs.
In certain instances, application error codes like error code 0xc00007b affect PC users who fail to install the most current Windows updates on their device. That is why it’s important to check your system and ensure you have installed all the latest updates.
The updates, if any are available, will automatically be installed on your PC once you access Windows Update in Settings. Reboot your computer then check if you are able to run programs that previously would not open due to error code 0xc00007b. If problems persist resulting in the reoccurrence of the error code, reinstall the applications you are unable to open or get help from a Windows repair technician.
If you wish to always have at your disposal a utility tool to fix these Windows 8 and other related issues when they do arise, download and install a powerful automated tool.
 According to Zimperium zLabs, this malware that was recently detected has been doing its scams and attacks even in November of 2020 and has thus far accumulated hundreds of thousands of dollars in its scam.
On the surface it looks very harmless, asking for typical permissions like internet access, calls, and other related needed functions, and then it waits. After few months the real attack happens when users get charged with premium service they never subscribed to in the first place.
According to Zimperium zLabs, this malware that was recently detected has been doing its scams and attacks even in November of 2020 and has thus far accumulated hundreds of thousands of dollars in its scam.
On the surface it looks very harmless, asking for typical permissions like internet access, calls, and other related needed functions, and then it waits. After few months the real attack happens when users get charged with premium service they never subscribed to in the first place.
FindGoFind is a browser extension for Google Chrome.Developers present findgofind.com as an improved Internet search engine that supposedly enhances the Internet browsing experience by generating better search results. These claims often trick users into believing that findgofind.com is legitimate and useful. In fact, developers promote this site using deceptive software download/installation set-ups that hijack web browsers and modify various options without permission. Furthermore, findgofind.co continually records various data relating to users’ Internet browsing activity.
While this extension is installed, users will see additional unwanted ads throughout their browsing sessions. Furthermore, this extension changed the default search engine to FindGoFind to easier display Sponsored content.
“You are running Windows 10 Pro, but you have a valid digital license for Windows 10 Home.” Or: “The specified product key is invalid or is unsupported by this version.”If you got the error code 0xC004F00F then it means that you’ve entered a product key for the Enterprise edition of Windows to activate Windows 10 Pro or Windows 10 Home. It could be that you have a key from your work and you accidentally use it on your Home PC. If you got the error codes 0xC004E016, 0xC004F210, then it means that you have entered a product key that is meant for a different edition or version of Windows. On the other hand, if you got the error code 0xC004F034 instead, then it means that you have entered an invalid product key or a product key for a different Windows version. Whichever error codes you have, refer to the possible solutions given below to fix the Invalid Product Key or Version mismatch Activation Error in Windows 10.