 Without any fanfare, news, or information Bethesda has released a completely free upgrade for legendary Quake 1. Free upgrade is automatically applied to all users who possess the original game and it has already been rolled out.
On September 18th, 2017, Cisco’s Talos announced that CCleaner, a popular utility with billions of worldwide users, had been compromised by hackers, and was used to unwittingly distribute hidden malware in its installer. Later in the day, Piriform, the publisher of CCleaner, confirmed the problem.
Undetected by all but 1 major antivirus including CCleaner’s own parent company, this occurred for over a month and impacted over 2.7 million users. Users of CCleaner v5.33.6162 and CCleaner Cloud v1.07.3191 for 32-bit Windows are affected. These downloads were live on CCleaner’s official site from August 15th to September 12th, 2017. Anyone who downloaded the program during this time could be affected.
The company claims that while the hackers set up the backdoor and many users were impacted, that the perpetrators have been arrested and that the malware never successfully performed its full task and compromised user’s PCs or sent out their data; in the wake of recent security breaches such as Equifax, users are understandably worried. Given the severity of the threat of hacking and data theft, users should take action immediately if they have CCleaner.
First reported by Talos, the malware, which was hidden in the CCleaner installer without the publisher noticing (despite them being owned by Avast, a massive Anti-virus company), modified a core program DLL file to evade detection, and creates several registry keys. Not only were these files not flagged by any major Anti-Virus, but they were also even digitally signed by Piriform via their Symantec certificate, meaning your PC and security program would likely whitelist and trust the malicious installer. The malware gathers personal information on a user’s PC, including IP address and running programs, and sends it to a remote server. In our testing, the program sent data to IP 216.126.225.148.
As of the publication of this article, there have been no assurances given that updating or even uninstalling CCleaner will remove the malware is installed. The only action thus far has been shutting down the remote server where user data was being sent has been shut down by authorities. For this reason, it is best to remove the underlying malware separately, as its presence represents a serious security threat. Unfortunately, as this could have been installed as far back as August 15th, 2017, your System Restore points may not go back that far, or even if they do, restoring to such an outdated point may cause unintended problems with other programs you use and potentially lost files and data. Manually backing up files and doing a full format or clean Windows installation would likely be successful in fully removing the malware, but is extremely time-consuming and can be difficult for many PC users. Unfortunately, this makes a PC Restore or format an unattainable option for many.
While CCleaner has told users to update to the latest version of the program. Prior to doing so, we recommend fully uninstall CCleaner, ensuring you check its program files folders and registry keys, manually deleting any remnants, and then re-downloading the latest version from the official site and reinstalling clean.
 Without any fanfare, news, or information Bethesda has released a completely free upgrade for legendary Quake 1. Free upgrade is automatically applied to all users who possess the original game and it has already been rolled out.
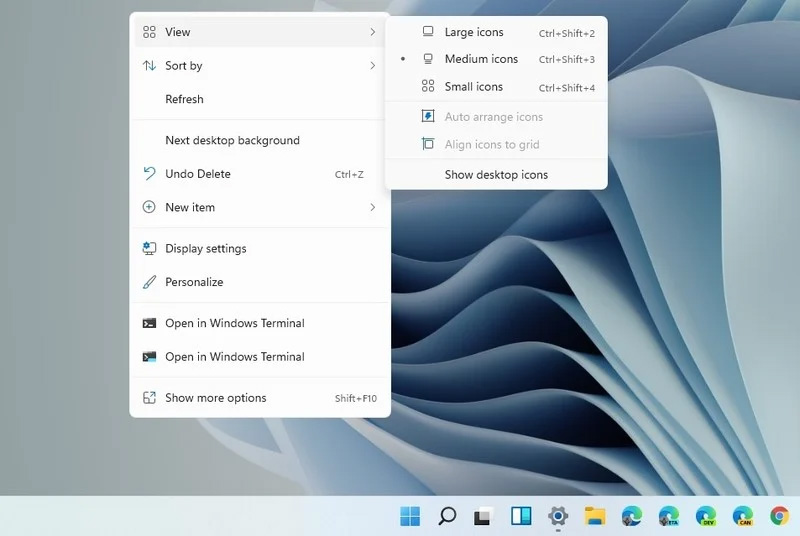 Since this requires registry tweak, please follow given solution step by step
Windows 10 isn’t activated error occurs when Windows users attempt to upgrade to Windows 10 for free and end up in a non-activated state. It is a Windows 10 activation error affecting PC owners who attempt to upgrade their Windows 7 or Windows 8.1 operating systems. A message box will appear with the following message: “Windows 10 isn’t activated after upgrading for free from Windows 7 SPI or Windows 8.1 update.”
Common symptoms of this error code include the following:
 Error Causes
To understand the cause of this activation error, users will need to understand activation within Windows. Activation is a process that allows Windows to verify that you are upgrading your operating system based on the Microsoft Software Licensing Terms. These terms specify, for instance, the number of devices upon which you can use Windows.
Once you have a genuine copy of Windows and you are following the terms mentioned earlier, you should be able to activate and complete the upgrade to Windows 10. However, the activation fails when these conditions are not met. Note also that the error may occur if users fail to upgrade to Windows 10 before reinstalling, requiring them to repeat the installation process by first going back to the previous version of Windows present on their system. Once the upgrade process is not done as should, you might encounter other Windows 10 errors such as error code 0xc0000142
If you see this error code, “Windows 10 isn’t activated after upgrading for free” proceed to rectify it using manual repair methods below.
To fix this activation error code in Windows 10, users will need to employ at least one manual repair procedure. This process can successfully be completed by non-technical Windows users. However, you may also consider getting assistance from a Windows repair technician if you are not certain you have the requisite skills needed to complete the manual repair tasks below.
The main methods to resolve the error code “Windows 10 isn’t activated after upgrading for free from Windows 7 SPI or Windows 8.1 update” is as follows:
If you attempted upgrading for free to Windows 10 and ended up with the activation error you will need to first perform a manual activation. Follow the steps below to complete the process.
The steps above enable users to successfully activate Windows 10 if the issue involves a connection problem. However, if Windows is not activated, it may mean your copy of Windows is not genuine. This may require you purchase a copy of Windows to rectify the issue. However, if you have a genuine copy of Windows proceed by applying the steps found in method two.
A valid product key is one way you can verify your copy of Windows is genuine. This will enable you to complete activation and allow you to access the free upgrade to Windows 10. Follow the steps below.
Error codes in Windows often occur due to poor maintenance of one’s PC. To improve your system and reduce your machine’s risk of experiencing error codes, download a powerful automated tool. This tool is both powerful and user-friendly, making its benefits accessible to even the most non-technical Windows users.
Boost My PC is a program developed by 1.0.2.6. During setup, a scheduled task is added to Windows Task Scheduler in order to launch the program at various scheduled times (the schedule varies depending on the version). When installed, it will add a context menu handler to the Windows shell in order to provide quick access to the program.
Boost My PC presents itself as a legit PC speed-up utility, it scans your computer for problems and displays errors that need to be fixed. Upon accepting to fix these alleged errors, you are asked for a Payment in order to activate this product for a few months.
Many anti-virus scanners have marked this application as a Potentially Unwanted Program, and while Boost My PC is not so harmful on its own, it comes bundled with other Potentially Unwanted Programs that might harm your computer.
Chedot is a Chromium-based Browser that replaces your default System Internet Browser. This browser offers users tools for downloading videos, faster browsing, and custom searches. From the publisher: A feature of our browser is a high speed on slow computers, high speed download on a poor internet, support resuming file download when connection is broken and the download in multiple threads, the ability to go on blocked websites and downloading videos from video sites.
While this may seem interesting and good at start, this browser has been marked as a Potentially Unwanted Program. It monitors user activity, collects web traffic data, and user information. While using Chedot you may see additional ads throughout your browsing sessions.