Device Manager Error Code31 pops up when Windows prevents the driver for a particular hardware device from loading. The error code 31 is almost always presented in the following format:
“This device is not working properly because Windows cannot load the drivers required for this device.” Code 31
This error can occur with any hardware device; however, in most cases, it occurs with Ethernet cards. The good news is that it belongs in the easy-to-resolve category. So repairing it should not be difficult.
Solution
Error Causes
Error code 31 is related to driver problems, and the most common causes include:
Outdated drivers
Missing drivers
Mis-configured drivers
Corrupt drivers
Further Information and Manual Repair
To resolve error code 31 on your system, try the methods given below. We have listed down some of the most effective and easy-to-perform DIY methods for fixing Device Manager code 31 on your PC.
Method 1 - Rollback the Driver to its Previous State
This simply means to return the driver back to its previous state - to the version last installed. Try this method to resolve error code 31. This is probably the easiest way to return your PC to its previous working state.
However, by doing so, you will not be able to update your drivers and run new driver versions on your system. In other words, this is a temporary method to fix this issue.
You may still want to try other methods given below to ensure you have the latest drivers installed on your system.
You can roll back the driver to its previous version by accessing the Driver Rollback feature located in the driver settings within the Device Manager. Or another way to perform a rollback is to use the Windows System Restore Utility.
It is a recovery tool built-in the new Windows versions. To access it, simply go to the start menu and type System Restore Utility in the search menu.
Access it and pick a point in the past, also referred to as the restore point, to return your PC to its previous state before the error code 31 occurred.
However, to resolve the problem permanently, try method 2.
Method 2 - Update the Driver
Error code 31, as discussed above, may occur due to outdated, misconfigured, or corrupted drivers. Whatever the reason may be, to ensure the proper functioning of your hardware device, it is important to update the drivers on your system frequently.
To start driver updates, first, it is important to find out and identify problematic drivers. You need to identify the drivers that are corrupt, misconfigured, and outdated. For this, go to the Device Manager and then look for devices with yellow exclamation marks.
The yellow exclamation marks next to the devices show that these device drivers are problematic. Once you’ve identified the problematic drivers, simply update them by finding the latest and compatible versions on the manufacturer’s website.
This process is time-consuming and can be frustrating at times, especially when doing it for the first time.
Also, once you’ve updated the drivers, you need to update them from time to time to ensure they don’t get outdated, or else you will have to encounter Device Manager error codes again.
Method 3 - Download DriverFIX to Update Drivers Automatically
To avoid the hassle and stress involved in updating drivers manually, it is advisable to download and install DriverFIX.
DriverFIX is a smart, innovative, and feature-filled software embedded with an intelligent algorithm that quickly detects problematic drivers, matches them with the latest and compatible versions, and updates them immediately and automatically in just a few seconds and a couple of clicks.
It’s as simple as it can be. Furthermore, with this software installed on your PC, you don’t have to stress and worry about when your drivers need to be updated again.
DriverFIX ensures all drivers are continuously and regularly updated before they become outdated.
Click here to download DriverFIX to repair Device Manager error code 31 and update drivers automatically and regularly.
NoteHomepage (by MyWay) is a browser extension that may be bundled with other free software that you download off of the Internet, or delivered via other advertising means. When installed NoteHomepage will set the homepage and search engine for your web browser to http://search.myway.com.
While installing this extension will gather information from your browsing sessions, including website visits, clicked links, and sometimes even private information, that it later sends back to display unwanted ads into your browser.
Several anti-virus scanners have marked this extension as a Browser Hijacker and are therefore not recommended to keep on your computer. It is considered potentially unwanted, and many users wish to remove it, so it is flagged for optional deletion.
About Browser Hijackers
Browser hijacking is a form of unwanted software program, usually a web browser add-on or extension, which then causes modifications in the web browser’s settings. Browser hijacker malware is developed for many different reasons. Generally, browser hijacking is utilized for earning advertising revenue from forced advert mouse clicks and site visits. Even though it might seem harmless, these tools are designed by malicious individuals who always look to take full advantage of you, so that they can earn money from your naivety and distraction. Some browser hijackers are programmed to make certain modifications beyond the browsers, like altering entries on the system registry and letting other malware further damage your machine.
Find out how to identify a browser hijack
Below are some signs and symptoms that suggest your browser has been hijacked: the home page of your browser is changed unexpectedly; your browser is constantly being redirected to adult websites; the default search engine is changed; you are getting browser toolbars you have never noticed before; never-ending pop-up advertisements show up and/or your web browser popup blocker is disabled; your web browser gets sluggish, buggy, crashes regularly; Inability to navigate to certain websites, particularly anti-malware and also other security software websites.
So how exactly does a browser hijacker infect a computer?
Browser hijackers might use drive-by downloads or file-sharing networks or an e-mail attachment in order to reach a targeted PC. They could also come from add-on programs, also called browser helper objects (BHO), web browser plug-ins, or toolbars. Browser hijackers sneak into your computer in addition to free software application downloads also that you unknowingly install alongside the original. A good example of some infamous browser hijackers includes Babylon, Anyprotect, Conduit, SweetPage, DefaultTab, Delta Search, and RocketTab, however, the names are regularly changing.
Browser hijackers will affect the user’s web surfing experience severely, track the websites frequented by users and steal personal information, cause difficulty in connecting to the web, and eventually create stability problems, causing software programs and systems to crash.
Learn how to remove browser hijackers
Some hijackers can be removed by just uninstalling the corresponding freeware or add-ons through the Add or Remove Programs in the Windows control panel. But, many browser hijackers are difficult to get rid of manually. No matter how much you try to get rid of it, it might keep returning again and again. Additionally, manual removals demand in-depth system knowledge and thus can be a very difficult job for novices.
Industry experts always suggest users remove any malicious software including browser hijacker with an automatic malware removal tool, which is easier, safer, and quicker than the manual removal method. Employ a PC optimizer along with your anti-malware software to solve various registry issues, remove computer vulnerabilities, and boost your computer performance.
Download the software in Safe Mode with Networking
If the malware is set to run immediately when Windows starts, stepping into safe mode may block the attempt. Just minimal required applications and services are loaded whenever you start your laptop or computer in Safe Mode. To launch your Windows XP, Vista, or 7 PCs in Safe Mode with Networking, follow the instructions below.
1) At power on, hit the F8 key before the Windows splash screen begins to load. This would invoke the “Advanced Boot Options” menu.2) Select Safe Mode with Networking with arrow keys and press ENTER.3) As soon as this mode loads, you should have an internet connection. Now, get the malware removal software you want by utilizing the web browser. To install the program, follow the directions in the installation wizard.4) Immediately after installation, run a full scan and let the software remove the threats it discovers.
Switch over to an alternate browser
Some viruses may target vulnerabilities of a particular web browser that obstruct the downloading process. If you’re not able to download the anti-virus software program using Internet Explorer, this means malware is targeting IE’s vulnerabilities. Here, you need to switch to a different internet browser such as Firefox or Chrome to download the antivirus program.
Run anti-virus from a pen drive
To successfully get rid of the malware, you have to approach the problem of installing anti-malware software on the affected computer system from a different perspective. Adopt these measures to run the anti-virus on the affected computer system.
1) Download the anti-malware software on a virus-free computer.2) Plug the USB drive into the clean computer.3) Double click on the downloaded file to open the installation wizard.4) Select flash drive as the location when the wizard asks you exactly where you wish to install the application. Follow the on-screen instructions to finish the installation process.5) Remove the flash drive. Now you can utilize this portable anti-malware on the affected computer.6) Double-click the anti-malware software EXE file on the USB drive.7) Press the “Scan” button to run a full computer scan and remove viruses automatically.
Technical Details and Manual Removal (Advanced Users)
To eliminate NoteHomepage manually, navigate to the Add or Remove programs list in the Windows Control Panel and select the program you want to get rid of. For web browser plug-ins, go to your web browser’s Addon/Extension manager and choose the add-on you want to disable or remove. You might also want to reset your home page and search providers, as well as clear your web browser cache and cookies.
Finally, check your hard disk for all of the following and clean your Windows registry manually to remove leftover application entries after uninstalls. Please be aware that this is for professional users only and could be challenging, with incorrect file removal resulting in additional PC errors. In addition to that, certain malware is capable of replicating or preventing deletion. You’re advised to do this procedure in Windows Safe Mode.
Hello and welcome to another problem-solving tutorial on errortools.com. Today we will be solving error 0x80070057, we could not format the selected partition which occurs during setup and installation when performing a clean install of Windows from a USB drive.
So, you have backed up your files and decided to format and do clean WIndows installation, you have your USB ready, you reboot the system, plug in USB, start Windows setup, choose the hard drive on which you want to do a clean install and then this happens.
This error is very frustrating and it annoys pretty much anyone who encountered it but do not worry we have a solution for you.
First thing is to confirm the error prompt, Click on the OK button and then on X to exit Windows 10 installation wizard. Click on yes to confirm that you want to exit the setup.
You will find yourself in original installation windows.
On that screen choose and click on Repair your computer. Choose an option screen that will pop up, click on Troubleshoot. In the advanced options, click on the command prompt.
Once you are in command prompts type DISKPART and hit ENTER
In the diskpart prompt type LIST DISK and hit ENTER again.
type SELECT DISK #, where # is listed disk number where you would like to install Windows.
type LIST VOLUME in order to list volumes in the selected disk and hit ENTER
You need to select the volume on which you would like to place your WINDOWS, to do this type in SELECT VOLUME #, where # is the listed number of the volume
Finally, type FORMAT FS=NTFS and hit ENTER
You have successfully formated a given volume, you can now exit DISKPART and return to setup, to exit DISKPART simply type exit and hit ENTER.
Leave command prompt as well by again typing exit and hitting ENTER
You will be returned to Choose an option screen, click on Turn off your PC.
Your drive has been successfully formatted and it is ready for clean Windows installation, you can now restart your Windows 10 installation and the process will complete without errors.
In case you don’t know, Microsoft has included an Enhanced Search Mode in the new Windows 10 v1903. This new Enhanced Search mode, compared to the Classic Mode, indexes everything on your Windows 10 computer, and in this post you will be guided on how you can disable this new feature as well as discuss how it is different from the Classic Search mode.
Over the years, the Windows 10 Start Search has changed. When you tap the Start button and when you type, the results that appear are categorized into Apps, Documents, Email, Web, Folders, Music, People, Photos, Settings, Videos, and many more. This is the reason why the Enhanced Mode was brought into the picture. So unless everything is indexed, this new feature wouldn’t be of much use.
A Classic Search is the term used for the old search technique in Windows 10. The Classic Search mode is restricted to Libraries and Desktop and end-users can only select to customize the search location by adding them manually to the indexer. To simply put it, it would only index files and folders which you want to get indexed and if the search term is not in the index, it would initiate the regular search which would take quite a while and this is where the Enhanced Windows Search comes in. It indexes everything as it is its default nature which is the exact opposite of the Classic Search mode. This feature allows you to exclude folders where the Search will not look and index anything that could be personal to you. In addition, it can also impact the life of the battery of laptops, if you are using one. The initial crawl of your data will take place only when connected to power and during that time, both the CPU usage and battery will take a bit of a hit.
To enable the Enhanced Search Mode in your Windows 10 computer, here’s what you have to do:
Step 1: Go to Settings > Search > Searching Windows.
Step 2: Next, click on the radio button for Enhanced.
Step 3: After that, select the folders which the Windows Indexer should exclude from the Enhanced Search mode.
And that’s about it. The next time you search anything on your computer, Windows will be looking at all the locations except for the ones you excluded and the results will be a lot faster compared to the Classic Search.
Now that you’ve enabled the Enhanced Search mode, there are two settings you need to check out.
Advanced Search Indexer Settings – this setting allows you to configure how or where Windows will search or what file types it will search in your computer. It will also open the same setting that’s available in the Classic Search.
Run the Indexing Troubleshooter – when you click on the Indexing Troubleshooter, it will start to troubleshoot any Search and Indexing issues on your Windows 10 computer and fix them automatically.
Windows 11 comes with glass and transparency effects by default once it is installed. The transparency effect looks really good but if in any case, you do not like them, you can easily turn them off very easily
Open settings inside Windows 11
Inside settings click on Accessibility in the sidebar
Click on Visual Effects on far-right
Inside Visual effects, settings click on the switch beside Transparency effects to OFF
Windows will automatically save settings and apply changes right away. Just close your settings application and continue with work. You can always turn it back ON if you change your mind.
Recent Windows updates have been slowly but surely moved a lot of control panel features into settings. This indicates that in the long term goal is probably to get rid of the control panel altogether. No matter how the setting app is easy to use and good there are still things in the control panel that we need and we will still need until they are all moved in the setting application.
There are several ways to open and get to the control panel from run dialog to shortcut keys but one perhaps more convenient and easiest way is to just simply have in file explorer right beside hard drives double click away.
In order to place the control panel icon inside file explorer, we will need the help of our old friend: the registry editor. As always playing with the registry editor can cause some instability and it is always a smart thing to back up it first before attempting any kind of edits.
Registry editor adding a key
To open registry editor press ⊞ WINDOWS + R to open the run dialog and inside type in REGEDIT followed by ENTER
Once the registry editor is opened locate the following key: HKEY_LOCAL_MACHINE\SOFTWARE\Microsoft\Windows\CurrentVersion\Explorer\MyComputer
Right-click on the NameSpace folder on the left navigation pane and then select New > Key
Rename the key with {21EC2020-3AEA-1069-A2DD-08002B30309D} (This CLSID code will add access to the Category view of the Windows 10 Control Panel) or with {26EE0668-A00A-44D7-9371-BEB064C98683} (This CLSID code will add access to the large icons view of the Windows 10 Control Panel)
Save and exit the registry editor
Now when opened, file explorer will show a control panel icon for easy access.
Have you been feeling anxious in the digital space? Feeling like you have a million eyes on you each time you visit a website? It can definitely make you uneasy. Luckily there’s an easy fix, and it’s called a VPN.
In this article we’ll take you through the basics of what a VPN does and some of the biggest benefits you can reap from buying one.
VPN: definition and how it works
VPN stands for Virtual Private Network, so its name already says a lot about what it does.
A VPN is specialized software that keeps your browsing private and secure. Essentially it hides your identity, preventing possible cyberattacks and data theft. This is especially important in cases of public network use, where you’re highly exposed to potential threats.
To be more specific, this software encrypts your Internet Protocol (IP) address by filtering it through a server hosted by the VPN provider first. That way, it prevents your Internet service provider, third parties and lurking online thieves from tracking the actual you.
Credit: FLY:D on Unsplash
Some providers, such as Surfshark VPN with its IP Rotator feature, even make it a habit to frequently change your IP address to further protect your identity. With most VPN providers, you can also appear to be in a completely different country, adding to your disguise.
There are tons of advantages you can look forward to if you decide to use a VPN. Take a look at some of the crucial ones.
Benefits of using a VPN
When choosing a VPN, you can find both free and paid options. We recommend you go with the paid ones, since they have stronger security, encryption and data protection, as well as more advanced features. Free VPNs come with limitations and risk of malicious attacks on the software itself.
You can choose to buy a singular VPN service or opt for antivirus software that has a VPN built in, for example Bitdefender’s Ultimate Security plan. That depends on what you use your computer for and how much.
When you pick one, here’s what it can do for you.
1. Access region-specific content
When we said you could change your location, we meant it. Say you’re using a streaming service and a show you desperately want to watch isn’t available in your country. You can use your VPN to make it look like you’re browsing from a country where it’s unlocked.
This option is also convenient for gamers who want to access maps, skins and other in-game items unavailable in their location.
In addition, you can use this powerful feature when you’re traveling to a region where some of your favorite content may not be accessible.
Do keep in mind that you need to read the Terms and Conditions (yeah, we know - who does that?) of your games and services before doing this, since you could end up getting a penalty. It’s also important to remember that there are entire countries that have strict regulations or even bans on VPNs, for example Belarus, Russia and China. So make sure to be very cautious with your VPN use, friends.
2. Browse like no one’s watching
VPNs shield your browsing habits from prying eyes on the web. Those can be malicious hackers or just third-party cookies tracking your every move to later bombard you with targeted ads. For example, Surfshark VPN features a Cookie blocker that blocks all cookie-related pop-ups and lets you browse in peace (and secret). It works even when the VPN is turned off, which is also pretty neat.
In addition, their CleanWeb 2.0 technology makes sure ads and especially malware don’t stand a chance at all, since they’re blocked before they can even load.
The inability of sites to track your browsing means they can’t collect and analyze any of your data. So, your personal information - or your company’s information in case that’s what you’re using your computer for - is entirely hidden and secure.
3. Save money
It’s well-known that the prices of certain items and services vary based on your location, browsing time, age and many other factors. This most commonly goes for airline tickets and hotel stays.
You can use your VPN to avoid high prices and surcharges. Clear all cookies, turn on your VPN and visit an online shopping site to check out their prices. Then compare your findings with the offers you see when your VPN is off, when you spend a long time on the site or have an active account with the company.
Sometimes this can really help you find the best deals and avoid breaking the bank. But again, check the Terms and Conditions before you purchase something using a VPN.
4. Secure your smart home
The more smart devices you have connected to your network, the more exposed you are to potential cyberattacks. Phones and computers are generally designed to be decently secure even without a VPN or antivirus, but smart home devices leave a lot to be desired in that regard.
Protecting your home network with a VPN software means all devices connected to it are secure, be it an air purifier or Alexa.
Credit: Bence Boros on Unsplash
5. Prevent connection slowdown
Your ISP can intentionally slow down your internet speed based on how much data you’ve consumed (data throttling) or your activities online (bandwidth throttling).
But with a VPN, what kind of data you send and receive and how much is entirely hidden. Therefore, if your ISP can’t see you, they can’t control you and they can’t throttle down your speed.
The bottom line
You can never be too safe online. So definitely think about getting yourself a solid VPN to pump up your privacy and security as much as you can. And if you have any questions or need help choosing the perfect software for you, feel free to reach out to us.
If you are following the latest gaming trends and spend a lot of time on social media, watching streams, etc. you might be under impression that gaming as a hobby is very expensive. If you plan to play the latest games on a very large screen in their highest setting that might be true but if you do not care about that you can still play games and spend much less money on them.
That being said we are here to share with you some tips and tactics on how to play good games with minimum money spent.
Do not buy games the moment when they are released
Buying a game on its launch date is maybe the worst and most expensive thing you can do. Games have their highest price on launch day but sadly with the current state of the industry, they are in their worst state as well. Games eventually became better over time after patches are released but so does their price drops after the hype has calmed down. So if you really must have some specific game on its launch day, go for it but know that by doing so you are getting the worst version of the game for its higher price.
Wishlist games and wait for the sale
All services today have a wishlist, very good and money-saving tactic is to wishlist interesting titles and wait for them to be on the sale. Services will usually have the option of sending you an email once your wishlist titles are on sale so you will be notified once they do. A good tactic as well is to wait for large sales like for example summer, winter, easter sales, or many other seasonal ones.
Get free games
Some online stores are offering free games from time to time and some are always offering some titles as gifts in order to get customers to their platform. EPIC has become famous for gifting some great titles over the past years completely for free and there are a lot of free-to-play games on each platform that you can play.
Get second-hand PC
Having a new computer is great but if your budget is tight you might consider getting your PC as a second hand instead of the new one. Hardcore games will switch components more frequently than your typical users and usually the components will be sold cheaper and be more affordable.
Play games on some older devices in general
Many games today are available on many platforms not only just on your typical PC. Same titles are available on your mobile phones, tablets, and even on your Android TV. Many titles will not even require the latest technology or monster of a computer in order to run them. You can also lower game settings and play many games on lower hardware if you do not mind not having top graphics settings.
Play over the cloud streaming
If you are very tight on budget but want to enjoy new games in their full glory there is always the option to play games via a cloud streaming service, it is not exactly a mega cheap option since it has a monthly fee but it is cheaper than some high-end gaming computer. If you combine this with the game pass you can enjoy the latest games with high-quality settings and pay it on a monthly basis.
If there are any third-party add-ons or proxy settings that interfere with your Windows 10 computer’s internet connection, then you will most likely encounter a problem where you see an error message saying, “Website is online but isn’t responding to connection attempts” when you try to run the Network Adapter troubleshooter.
Like pointed out, this kind of error can be caused by some proxy settings that prevent the connection. On the other hand, it could also be caused by some third-party add-ons. To fix this error, read on as this post will guide you on what you can do to fix it. You can try to turn off the proxy settings or disable the add-ons on your browser. You can also try resetting both the TCP/IP and DNS as well as reset the network. For more details, refer to the options provided below.
Option 1 – Try to turn off the proxy settings
There are some users who reported that they’ve fixed the problem after they’ve disabled the use of a proxy server using the built-in way. Follow the steps below to disable the proxy server.
Tap the Win + R keys to open the Run dialog box.
Then type “inetcpl.cpl” in the field and hit Enter to pull up the Internet Properties.
After that, go to the Connections tab and select the LAN settings.
From there. Uncheck the “Use a Proxy Server” option for your LAN and then make sure that the “Automatically detect settings” option is checked.
Now click the OK and the Apply buttons.
Restart your PC.
Note: If you are using a third-party proxy service, you have to disable it.
Option 2 – Try disabling the add-ons or browser extensions
The next thing you can do to fix the problem is to disable any extensions or add-ons on your browser. For instance, if you are using Chrome, here’s what you have to do:
Open Chrome and press Alt + F keys.
Go to More tools and click Extensions to look for any suspicious browser extensions or toolbars.
Click the Recycle bin and select Remove.
Restart Chrome and press Alt + F keys again.
Proceed to On Startup and mark Open a specific page or set of pages.
To check if the browser hijacker is still active, click Set pages, if it is active, overwrite the URL.
Option 3 – Try to update the Network Adapter Driver
Follow the steps below to update your Network Adapter Driver:
Tap the Win + R keys to launch the Run window and then type in the “MSC” command and hit Enter to open the Device Manager window.
From there, expand the list of all the network drives and update each one of them.
Note: If updating the network drivers didn’t help in fixing the problem, you can also try to uninstall the very same drivers and restart your Windows 10 PC. After that, the system itself will reinstall the drivers you just uninstalled. Alternatively, you can also download and install the drivers from the manufacturer’s website directly.
Option 4 – Try to reset the TCP/IP and the DNS cache
As you know, the TCP/IP or the Internet Protocol is the most important thing if you want to use the internet on your computer. That’s why if it ends up getting corrupted, you need to reset the TCP/IP to fix the problem. To reset TCP/IP, refer to these steps:
In the Windows start to search, type “command prompt” and right-click on Command Prompt from the search results.
Then select the “Run as administrator” option to open Command Prompt with admin privileges.
After that, execute this command: netsh int ip reset resettcpip.txt
Next, execute this second command: ipconfig /flushdns
Once it’s done, exit Command Prompt and restart your computer and then check if the error is now fixed.
Option 5 – Try to reset the Network
You can also try to perform a Network Reset to resolve the problem. This will reset the entire network configuration including your IP address. To perform Network Reset, follow these steps:
Tap the Win + I keys to open Settings.
From there, go to the Network and Internet section.
Next, scroll down and look for “Network Reset” under the status pane.
After that, click on Network Reset and then on Reset now to start resetting the network configuration. Once done, check if it is able to fix the error or not.
EhRecvr.exe is an executable file located in a subfolder of C:\Windows (usually C:\WINDOWS). An executable file is denoted by the filename extension .exe.
You should only run executable files from the publisher you trust because .exe files are prone to errors. Executable files can potentially change your computer settings and harm your computer. These files can easily get corrupted.
Similarly, when the EhRecvr.exe fails to run on the computer and gets corrupt, you experience an EhRecvr.exe error on your system. This error code may pop up while playing games on the PC or using any other program.
EhRecvr.exe error may be displayed in any one of the following formats:
“ehRecvr.exe cannot be found."
“There was a problem starting [path]ehRecvr.exe. The specified module could not be found."
"Runtime Error. ehRecvr.exe pure virtual function call."
"This program can't start because ehRecvr.exe is missing from your computer."
"Unable to launch the software located at path: [path]ehRecvr.exe"
"This application requires the file ehRecvr.exe, which was not found on this system."
"ehRecvr.exe is missing."
"Access Violation File [path]ehRecvr.exe"
Solution
Error Causes
There are plenty of reasons why this error may occur these include:
EhRecvr.exe file is mistakenly deleted
EhRecvr.exe file is corrupted and damaged
Viral/Malware infection
Bad registry entries
Outdated drivers
Though this error code is not fatal but nonetheless it is advisable to fix it immediately because EhRecvr.exe error not just hampers your ability to run and access different programs on your system but it also triggers issues like viral infection and registry problems which if not resolved can put your big at greater risk like system failure, freeze, and crash.
Further Information and Manual Repair
To resolve the EhRecvr.exe error on your system, you don’t have to hire a professional and spend hundreds of dollars in repair. Here are the best and easy DIY methods that you can try to fix this error.
To work around these methods you don’t need to be a technical whiz.
Let’s get started:
Method 1 - Restore EhRecvr.exe from Recycle Bin
In the case of EhRecvr.exe file deletion, it is advisable to check the recycle bin. Search through the bin for the file. If you find it, then simply restore it, if not then if you have access to the internet, then download it from a trusted website.
Method 2 - Reinstall the Associated Software That Uses EhRecvr.exe File
If you receive this error when you want to use certain software on your PC, then try reinstalling that software again on your PC.
This will be very helpful to obtain the EhRecvr.exe file that is not provided by Microsoft. To re-install, first, uninstall the program. Go to Add/Program in the control panel and find the program and then uninstall it.
Once uninstalled, simply follow the same steps but this time round install the software. This will hopefully help resolve the EhRecvr.exe error code.
Method 3 - Update Drivers for Hardware Devices
Sometimes the error may pop up due to outdated drivers. If this is the cause then the best way to resolve the issue would be to update the driver. Use the wizard within the Device Manager to update the outdated drivers.
Method 4 - Scan for Viruses
Viruses and malware can disguise as executable files. These usually enter your PC through downloads from unreliable websites and phishing emails. In such an event, it is recommended to install a powerful antivirus. Scan your entire PC and remove all viruses to repair the issue.
Method 5 - Clean and Repair the Registry
Another method is to clean and repair the registry. If you don’t clean the registry regularly it may get accumulated with obsolete files and get corrupt. This may generate EhRecvr.exe error codes.
To resolve, simply download Restoro. This is a user-friendly PC Fixer with a powerful registry cleaner. It scans for all registry errors, wipes out all the invalid entries and obsolete files and repairs corrupted DLL and .exe files in minutes.
Click here to download Restoro and resolve the EhRecvr.exe error now!
When we are working on our computer, we have tendencies to make it look and behave to our best needs and however, best suits us. The Internet has crawled into our lives and made itself a must-have in modern society, internet browsers as a crucial piece of software for viewing the web have also grown and made themselves to be more open for user settings and personalization, Chrome, one of the most popular browser has the option to open a specific set of pages one it is opened and that is what we will cover today in this tutorial.
No matter would you like to by default open some online store, maybe an email or news website, you can open each of them or all of them once Chrome is run, making your daily routine more enjoyable and stress-free.
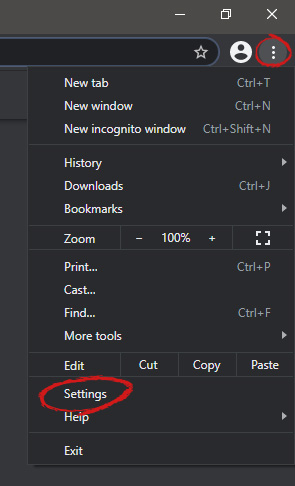
The first thing, of course, is to start Chrome itself, once Chrome is up, click on three dots in the upper right corner of the Chrome window and select settings.When you are in settings, on the left side move toward the bottom until you run into a tab that says On Startup and click on it. On right, a new section will open, click on Open a specific page or set of pages.You will be presented with the option to add a new page by typing its URL or getting it from bookmarks or using a specific opened one. You can repeat this process until you have added all pages that you wish to be automatically opened once Chrome is opened for the first time.
BONUS:
If you have noticed right above the setting that we have used for opening a specific set of pages there is the option Continue where you left off, this option will open each page exactly where it was when Chrome was shut down letting you keep viewing where you have left off. This is useful if by any chance your battery ran out or you had to quickly turn the computer off for whatever reason.


 This error is very frustrating and it annoys pretty much anyone who encountered it but do not worry we have a solution for you.
First thing is to confirm the error prompt, Click on the OK button and then on X to exit Windows 10 installation wizard. Click on yes to confirm that you want to exit the setup.
You will find yourself in original installation windows.
On that screen choose and click on Repair your computer. Choose an option screen that will pop up, click on Troubleshoot. In the advanced options, click on the command prompt.
Once you are in command prompts type DISKPART and hit ENTER
In the diskpart prompt type LIST DISK and hit ENTER again.
type SELECT DISK #, where # is listed disk number where you would like to install Windows.
type LIST VOLUME in order to list volumes in the selected disk and hit ENTER
You need to select the volume on which you would like to place your WINDOWS, to do this type in SELECT VOLUME #, where # is the listed number of the volume
Finally, type FORMAT FS=NTFS and hit ENTER
You have successfully formated a given volume, you can now exit DISKPART and return to setup, to exit DISKPART simply type exit and hit ENTER.
Leave command prompt as well by again typing exit and hitting ENTER
You will be returned to Choose an option screen, click on Turn off your PC.
Your drive has been successfully formatted and it is ready for clean Windows installation, you can now restart your Windows 10 installation and the process will complete without errors.
This error is very frustrating and it annoys pretty much anyone who encountered it but do not worry we have a solution for you.
First thing is to confirm the error prompt, Click on the OK button and then on X to exit Windows 10 installation wizard. Click on yes to confirm that you want to exit the setup.
You will find yourself in original installation windows.
On that screen choose and click on Repair your computer. Choose an option screen that will pop up, click on Troubleshoot. In the advanced options, click on the command prompt.
Once you are in command prompts type DISKPART and hit ENTER
In the diskpart prompt type LIST DISK and hit ENTER again.
type SELECT DISK #, where # is listed disk number where you would like to install Windows.
type LIST VOLUME in order to list volumes in the selected disk and hit ENTER
You need to select the volume on which you would like to place your WINDOWS, to do this type in SELECT VOLUME #, where # is the listed number of the volume
Finally, type FORMAT FS=NTFS and hit ENTER
You have successfully formated a given volume, you can now exit DISKPART and return to setup, to exit DISKPART simply type exit and hit ENTER.
Leave command prompt as well by again typing exit and hitting ENTER
You will be returned to Choose an option screen, click on Turn off your PC.
Your drive has been successfully formatted and it is ready for clean Windows installation, you can now restart your Windows 10 installation and the process will complete without errors.  Windows 11 comes with glass and transparency effects by default once it is installed. The transparency effect looks really good but if in any case, you do not like them, you can easily turn them off very easily


 When you are in settings, on the left side move toward the bottom until you run into a tab that says On Startup and click on it. On right, a new section will open, click on Open a specific page or set of pages.
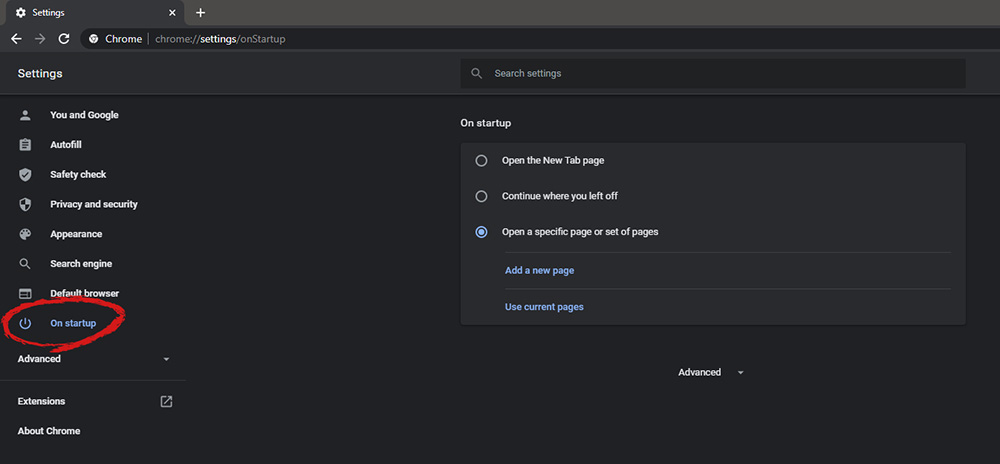 You will be presented with the option to add a new page by typing its URL or getting it from bookmarks or using a specific opened one. You can repeat this process until you have added all pages that you wish to be automatically opened once Chrome is opened for the first time.