 So far I believe each person on this planet has at least heard of Marvel superhero movies, perhaps even watched a few of them, and no wonder. Movies are spawning now over 20 titles and they are not really released as events described in them.
Throw into mix TV series and you can get confused pretty fast. Now it was officially stated that all TV series that were released before Wanda vision is no canon in Marvel cinematic universe which simplify thing a little but there are still series that are.
And there you go, if you have someone who has not yet seen movies or you would like to view that as the story is revealed and not by the date they were released now you can easily with this list.

2021 is nearing toward the end and with just a couple of days remaining in this year, we are happy to look forward to the next year. So in large anticipation of what will next year bring us, we are taking a good design look at this one and making a list for you of what graphic design software you should learn and use in the upcoming 2022.
 Before we dive into it in more detail and predictions please be aware that this article is based upon my personal opinion drawn from the research of current trends and standards. That being said let's dive right into details.
Whether you like it or not, Adobe has cemented itself with its flagship application Photoshop and how things are looking this situation will not change any time soon. Photoshop is an extraordinary pixel manipulation software that has the ability to work with both animations and vector graphics as well making it a great single application for all-around design needs. It has been industry-standard design software for the web, print, and all other kinds of design all over the globe and this will not change in near future. With its constant updates and expansion of its abilities, this is a must-have tool in your design tool belt. If you are looking to find work as a designer you will have to know how to work with photoshop.
Many will tell you that is photoshop for raster graphics, the illustrator is for vectors. First started as illustrator 88 on Mac right away it took first place for vector graphics from FreeHand and it continued on its path of vector dominance. After some time and more integration with photoshop Adobe managed to overthrow Corel Draw as well winning the title for best vector editing software with illustrator. Same as with photoshop, if you are planning to work in a serious industry you will need to know the illustrator.
We are still in Adobe train and it is moving hard, InDesign is graphic design software aimed for paper publications. If you need to create and prepare any kind of professional publication for printing InDesign is the application to go to. With its specific print aimed features it is a must-have for any graphic designer.
Once the king of vector and print design but dethroned by Adobe Corel Draw still has some punches to stay relevant in the field. With some cool features like symmetry and long shadows, it stands out from its competitors for its ease of use. Corel was always focused on easy to learn, and difficult to master and it is still following that kind of thinking. Granted not many employers will require you to be a master of Corel Draw but some of them will request that you are familiar with the application. One of perhaps the greatest advantages of Corel over Adobe is not locking you into a subscription making Draw suit a great choice for freelancers and designers that want to own software, not rent it.
The first software from Affinity was Photo, made as a cheap version one-time purchase competitor for photoshop. Later it has released Designer, also a one-time purchase competitor for illustrators. If we are going to take a good look into a feature for feature comparison, both Adobe and Corel will win over Affinity but if we take a look at a price that is a one-time purchase Affinity will win over easily. Priced only at $54.99 it is a steal, and taking into account that many designers will not require any very advanced features found in Corel or Adobe applications Affinity is the way to go.
Speaking of price, nothing beats free, and both Inkscape and GIMP are completely free. offering very decent and competitive features applications will require you to get used to their own specific UI and workflow, but once you get a grasp of them, you will be able to do most design work in them. One of the downsides of using these free open source apps is their limited export options but if all that is required from you is to deliver a typical SVG, JPG, EPS, PNG, or PDF file you are good to go.
Free with basic functionality with the option to purchase more advanced features Colorcinch is a great application if you are on quickly developing and creating graphics for social media posts. Add quickly text or filters, quickly do the color adjustment and save for social apps. The application also within its basic boundaries can work directly on the website without you requiring to even install it making it one of a kind. Go try it at the official site and enjoy yourself.
If you have followed the graphic design scene you will notice that nothing has changed and it will not change in near future. This just speaks about how much industry is defined and how little change is there over time. I advise if you can to get and learn adobe suite since it is industry standard and is required from almost every employer today. Rest applications on the list are great alternatives and can bring you income and offer you a way to finish your project.
Some Windows users have been experiencing errors in an attempt to upgrade to Windows 10 OS. This includes the “We Couldn’t Install Windows Technical Preview 0x80070070 – 0x20005” error code. If you’re one of the many users who’ve encountered this error, you might want to check the available space on your device. Error code 0x80070070 – 0x20005 occurs when you do not have the required space to be able to install the upgrade.
 Error Causes
In order to upgrade to Windows 10, you need to have at least 40 to 50 GB of free space in your device. Thus, you need to free up some space in order to successfully upgrade your system to Windows 10. See below for the manual methods you can employ to solve your problem.
NOTE: It would be best to seek help from an experienced technician if you are not confident enough to perform the manual methods yourself or you can alternatively make use of an automated tool.
Sometimes, there are unused applications just lying around your device. This may take up your needed space from your device for a system upgrade. Uninstalling these applications can make space that will eventually elude error code 0x80070070 – 0x20005 along with its alternatives – code 0x80070070 – 0x50011, code 0x80070070 – 0x50012, and code 0x80070070 – 0x60000.
If there are tons of images, media, videos, or documents that you rarely use but will still be needing in the future, you can move these files to another drive where Windows 10 will not be installed on.
If there are no secondary drives in your device, consider using a USB Drive or external hard disk. Another option you can do is making use of cloud storage programs like One Drive or Google Drive. In this way, you’ll still have access to these files even if it’s not in a physical location while making larger space in your device.
Most Windows users download applications or software regularly. These applications or software might come from unsafe sites where you might have accidentally downloaded a virus or malware along with the legit application or software you intended to download.
With that said, it is highly recommended to download and install in your device a reliable and powerful antivirus. Using an antivirus, you can now perform an overall scan of your device’s system. Once you’re able to detect and remove any suspected virus or malware, you’ll now be able to get rid of the error code 0x80070070 – 0x20005. After solving the issue, you can now resume upgrading to Windows 10.
Can’t seem to put up with the long and technical manual repair process? You can still fix this error by downloading and installing a powerful automated tool that will surely get the job done in a jiffy!
chkdsk /r /f
Error code 0x800704c7 occurs when Windows users attempt to update their system. It affects various Windows users including those using Windows 7, Windows 8, and 8.1 and Windows 10. It usually occurs due to poor maintenance of the system and includes common symptoms such as the following:
Error CausesError code 0x800704c7 in Windows 10 can occur due to several reasons. For instance, it may be due to corrupted or missing system files. It may also result from malicious programs affecting your system or occur when a program or several programs are running in the background of one’s system while the user attempts to run the update.
To correct this issue, Windows users will need to select one or a few methods, depending on the issues affecting their PC.
Some of the best solutions for error code 0x800704c7 available to Windows users including using tools to scan for missing systems files or correct other issues inherent within your system.
These methods may include the use of Command Prompt and the performance of technical repair procedures. If you are uncertain of your skills, avoid compounding the issue or causing further damage to your PC by contacting a skilled Windows repair technician. This IT professional will be best equipped to use Windows tools and other methods to resolve error code 0x800704c7.
Using System File Checker Tool (SFC), Windows users can check their system for missing o corrupt system files. These utility tools within your Windows device will be able to replace missing files and repair corrupted ones, resulting in a more efficient system. Run this tool by following the steps below:
After running these procedures, check if the error code has been resolved. Go to Settings > Update & security > Windows Update. Update your Windows operating system. If error code 0x800704c7 reoccurs, you will need to try the next method below.
System Restore is one of the best manual repair solutions Windows users can apply when they come across error codes like error code 0x800704c7. That’s because this method requires no technical or advanced knowledge and therefore can be performed by anyone. Simply follow the steps below to restore your system to a period of time in the past where the error was not present on your system. If done correctly, this could enable you to resolve the issue with little frustration on your part.
Note that once System Restore is enabled it will remove drivers, apps, and even updates installed after the restore point. For this reason, be careful to choose the most appropriate restore point. Also once you’ve completed this task, check to see if you are able to update your system. If the update stops before the process is complete and a message box occurs with the error code 0x800704c7, proceed to the next manual repair option below.
Viruses or other forms of malware can adversely affect your system, causing error codes and other issues to take place. To resolve error code 0x800704c7 in Windows 10, check for and remove malware using a reputable anti-malware program.
If no anti-virus software is present on your system or if you scan your device but fail to spot an issue, proceed to method four.
This method involves the use of a powerful automated tool. But why is this important you might ask? A third-party tool is often the best solution when all manual repair efforts fail. Automated tools come equipped to tackle the most serious PC problems including error codes which can cause frustration and result in reduces PC performance.
Microsoft will soon offer 4 CPU computer specifically aimed at developers and its name is Volterra. The machine as stated will come with 4 processors but the strange thing is that they will be ARM-based instead of x86.
CEO of Microsoft, mister Satya Nadella has introduced the product and Microsoft has released a youtube video promoting it.
The computer system will have Qualcomm's NPU or built-in neural processing unit to use AI's power to help developers write and produce better and faster code. The sad news is that besides processors used there is no other information on other components that will go into this system.
As seen in the video, the computer reminds me a lot of the apple MAC mini with its size and design, and as stated it is made from recycled plastic which in our opinion will bring the price under $1000.
Microsoft has not provided an official price tag for Volterra, but our hope is that it will be more affordable than building your own development PC. Also, there was nothing said about computer availability, we suspect that the selling model will be typical Microsoft one with first models available only in the USA and moving forward slowly opening it to other markets.
As previously said nothing except the number of CPUs and their type has been officially said but we managed to get some information about some other specific things not including its inside components.
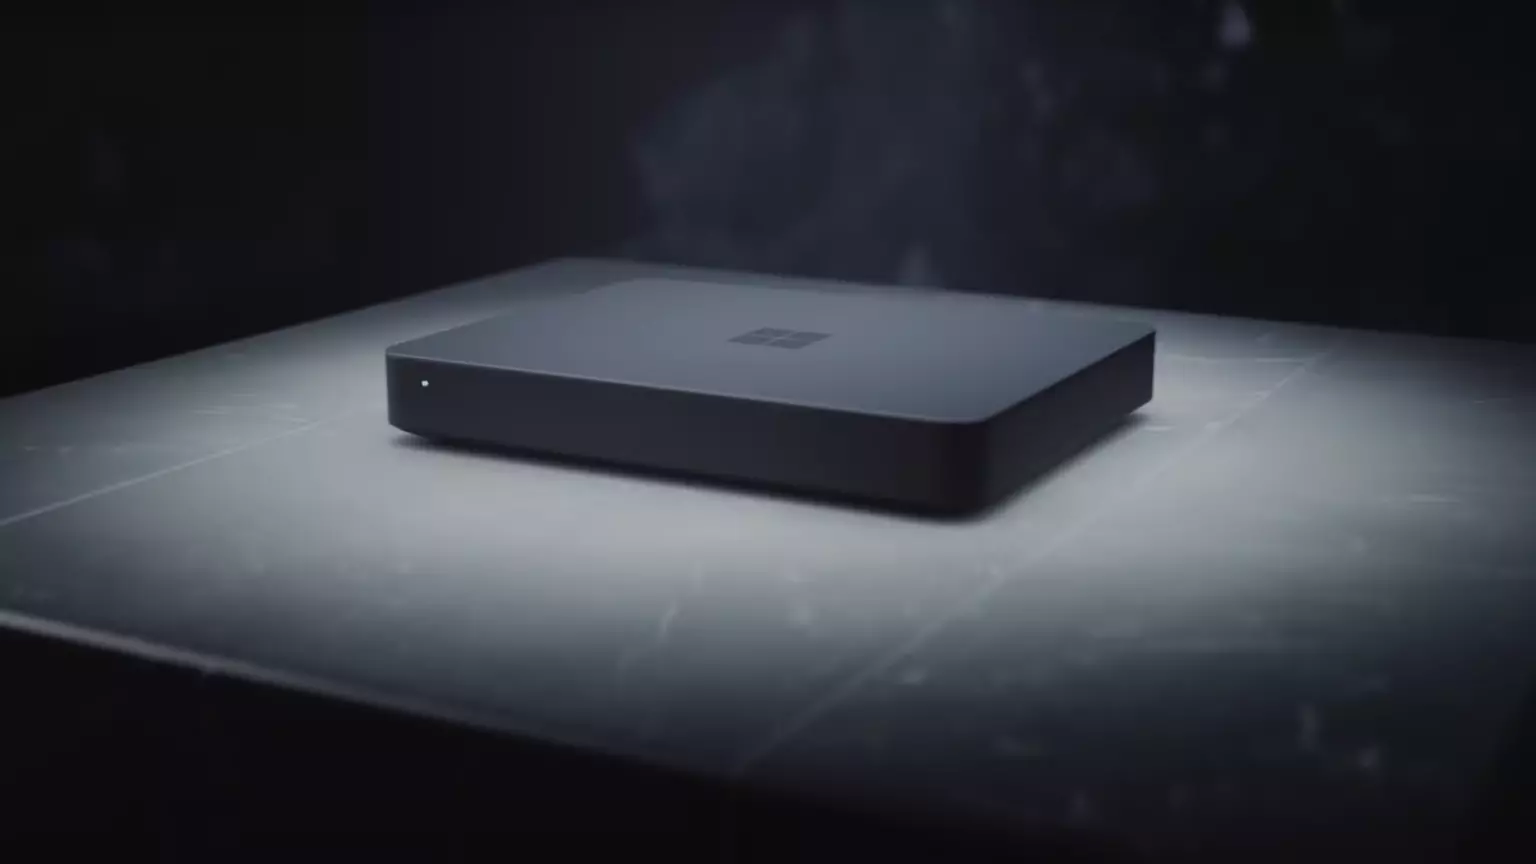
The unit will have a fan inside of it for cooling purposes and better performance and that is what was officially stated by Microsoft. On the outside, it is known that the computer will have three USB-A ports, a mini DisplayPort, and an ethernet input. All of these will be positioned on the back of the device, on its left side there will be two USB-C ports.
The unit itself will be running on Windows 11 but it was not disclosed anything about the version, we presume since this is a model aimed for professional use that it will come with Windows 11 PRO version.
Since this product is aimed at developers logically support for developing software is a must-have and at the time of this writing software that will come and that will run on Volterra is:
Once MAC studio has been released it showed that specific builds have their audience and can be sold for less of a price than full-fledged custom-made workstations. There is no doubt that Microsoft Volterra will find its audience but will that be enough to have more versions of this compact computer only time will tell.