

0x00000050 - What is it?
0x00000050 is a type of stop error code. It is also known as a Blue Screen of Death error. It usually occurs when you try to start your PC or load a program. It can also occur while running a program. This error may also pop up when you restart your PC after installing Windows XP Service Pack (SP1) on your computer. Unlike some PC related errors, 0x00000050 error code occurs without any warning. The stop 0x00000050 error is displayed in a blue screen and interrupts you from carrying your desired activities on your PC smoothly. This error message is prompted in the following format:Stop 0X00000050 (parameter1, 0, parameter3, parameter4) PAGE_FAULT_IN_NONPAGED_AREA”
Solution
 Error Causes
Stop 0x00000050 error code may pop up on your Windows computer screen due to multiple causes. The most common causes for this error code include:
- Poor PC maintenance
- Registry issues- Bad registry keys, invalid entries, corrupt and damaged registry
- Incompatible DLL files
- Corruption of system files- Pool corruption in the Srvnet.sys file
- Spyware and viruses
- Overheating of PC components
- The conflict between Windows XP SP1 and the display adapter drivers that are currently installed on your PC.
Further Information and Manual Repair
To prevent data loss and system failure, there are some effective methods to resolve Stop 0x00000050 error code on your PC. To implement these solutions on your PC, you don’t need to be a technical whiz or a computer programmer.Method One
If the error cause is the conflict between Windows XP SP1 and the display adapter drivers then here’s what you need to do to resolve it:- First start Windows in safe mode. To do this, restart your computer and press F8. On the Windows Advanced Options Menu, use the arrow keys to select Safe Mode.
- Once you select it press enter. Now use the arrow keys to select the operating system, press enter to start your computer in safe mode.
- Go to Start, click Run and then type ’msinfo32’ in the open box and press OK to continue. Then under the System Summary option, expand Components and then click Display to note the information that corresponds to the INF File Item. And then simply quit the utility.
- After that, go to the start menu again and then the My Computer and Properties option.
- Press the Hardware Tab and then click the Device Manager tab. Go to the ‘Display Adapters’ option and press the option ‘Uninstall. To confirm action press OK.
- Once again, go to the start menu and run and then type the following commands as illustrated below and after each command press enter.
- ren %systemroot%infINF file name from Step 5.inf *inf.old
- ren %systemroot%infINF file name from Step 5.pnf *pnf.old
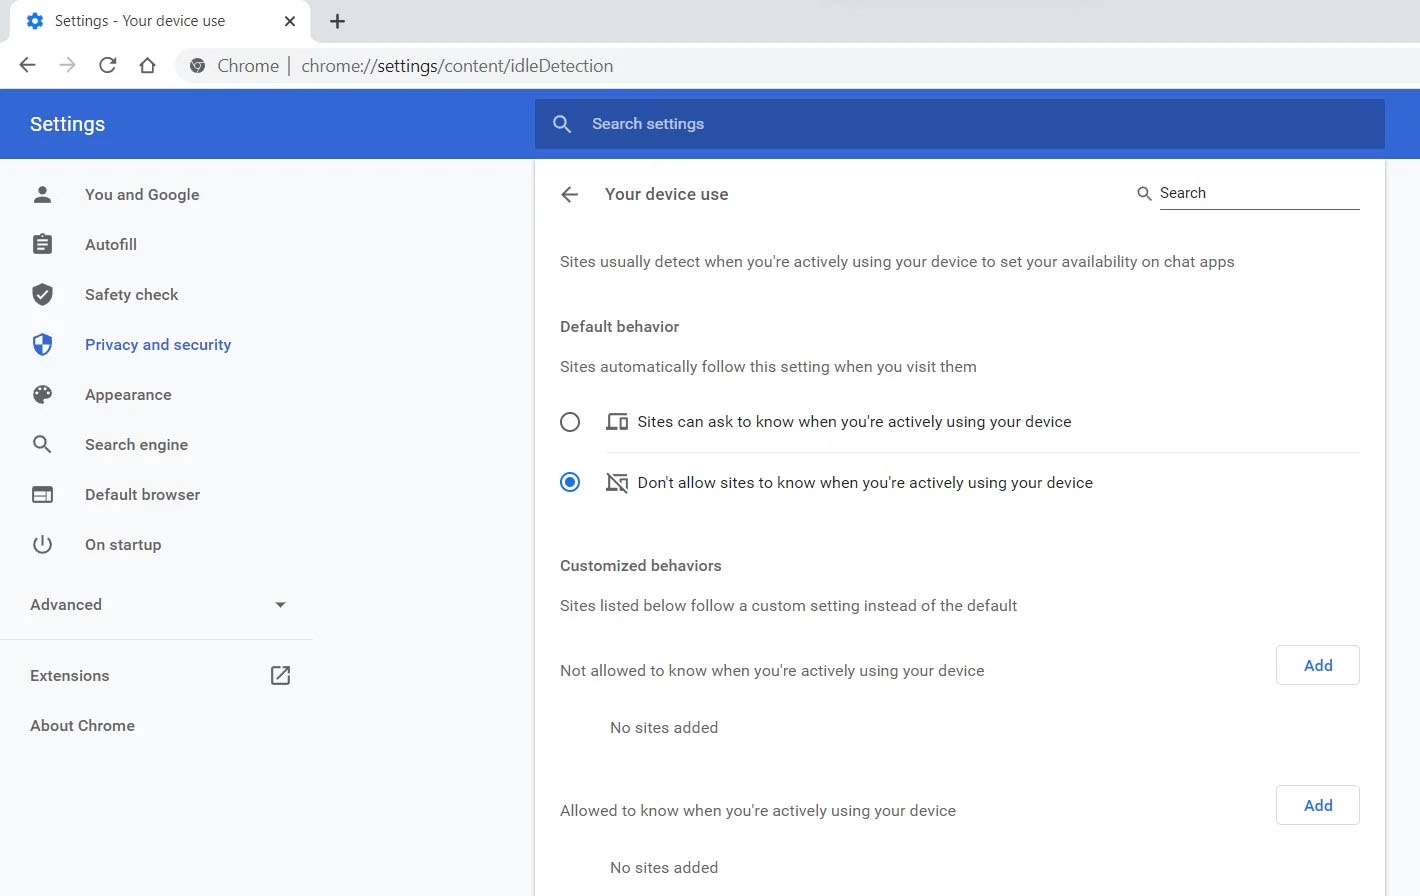 Good thing is that website or web application will prompt you to allow it to use this feature like when a site/application wants to use your microphone or web camera. Developers are on board with this feature since it can provide them with more telemetric data on how users are interacting with their website/application but there are some that are strongly voicing against this.
Tantek Çelik, Mozilla Standards Lead, commented on GitHub, saying:
Good thing is that website or web application will prompt you to allow it to use this feature like when a site/application wants to use your microphone or web camera. Developers are on board with this feature since it can provide them with more telemetric data on how users are interacting with their website/application but there are some that are strongly voicing against this.
Tantek Çelik, Mozilla Standards Lead, commented on GitHub, saying:
