If you have the HP printer, then you may come across this error. HP Printer Spooler not running errors does not mean there is anything wrong with your printer. It indicates printer driver issues.
 Error Causes
There can be multiple causes behind the HP printer Spooler not running error code such as:
Though this is not a critical error code as it does not pose serious damage threats to your PC, however, it is advisable to resolve it as it can cause you a great deal of inconvenience especially if you want to take out printouts every now and then.
Here are some ways you can try to resolve HP Printer Spooler Not Running Error on your system:
1. Reinstall the HP Printer driver on Your System
Once you update the driver, try using the Printer to see if it works. Sometimes you may come across a pop-up displaying the following message: ‘Driver installed correctly, Device is ready to use however, you may not see the printer under the printer’s pane. This triggers registry issues.
2. To resolve registry issues, install Restoro on your system.
This is a highly functional registry cleaner integrated with a powerful antivirus. It helps resolve registry issues, malware, and guarantees system optimization. This feature-filled tool is the answer to all your PC-related issues.
Restoro is a next-generation PC repair software that extends outstanding usability and helps PC users resolve errors efficiently.
Its simple navigation and user-friendly interface make it so easy to use that even novice users can also work around it and repair issues without any hassle or difficulty.
It’s a smart and intuitive in-built registry cleaner that wipes out all the unnecessary and obsolete files on your hard disk. This includes junk files, internet history, invalid registry keys, and files from the uninstalled old program versions.
Sometimes the files from the uninstalled programs hamper your ability to update new program versions thus leading to unsuccessful driver installation. Nonetheless, all such files are removed in seconds with this helper and you are then ready to reinstall the driver.
This registry cleaner cleans the clutter from your hard disk and optimizes your system's speed, lowering your PC boot time significantly. Total System Care can be used on all Windows versions
To fix the HP printer spooler not running error on your computer, simply click here to install Restoro. Run it to scan for the error and fix it in seconds. Once the issue is resolved, update the printer driver. You’ll see the driver will be updated successfully and the HP printer will also appear in the printer’s panel.
By installing Restoro on your system, you can also resolve several other issues like privacy errors triggered by malware and virus infections. With this tool, you will not have to download and run a separate anti-virus on your system.

 As in previous Windows 10, inside Windows 11 also when you press the ALT + TAB key combination you will get a preview of all running applications along with all Browser tabs so you can go through them and pick the one you want to switch to.
Alto, I personally am a big fan of alt-tabbing, I must admit that I am not a big fan of having multiple browsers tabs on screen when I do press key combo. Luckily there is a very easy way to turn this feature off.
Turning browsers tabs thumbnails off
As in previous Windows 10, inside Windows 11 also when you press the ALT + TAB key combination you will get a preview of all running applications along with all Browser tabs so you can go through them and pick the one you want to switch to.
Alto, I personally am a big fan of alt-tabbing, I must admit that I am not a big fan of having multiple browsers tabs on screen when I do press key combo. Luckily there is a very easy way to turn this feature off.
Turning browsers tabs thumbnails off
 REevil is one of the most active and successful hacking groups connected to Russia and operating all over the world. The group recently demanded a huge bitcoin ransom for an attack targeting IT firm Kaseya in the USA.
Since Tuesday blog and payment site run by REvil group cannot be longer reached without any kind of explanation or why.
The reason behind the disappearance is unknown but has sparked speculation that the group may have been targeted deliberately by authorities.
US President Joe Biden said he raised the issue with Vladimir Putin during a phone call on Friday, after discussing the subject during a summit with the Russian president in Geneva last month.
Mr. Biden told reporters that he had "made it very clear to him...we expect them to act" on information and also hinted the US could take direct digital retaliation on servers used for intrusions.
The timing of Tuesday's outage has sparked speculation that either the US or Russian officials may have taken action against REvil - though officials have so far declined to comment and cyber experts say sudden disappearances of groups are not necessarily uncommon.
The development comes after a series of high-profile ransomware attacks which have hit major US businesses this year.
The FBI accused REvil - also known as Sodinokibi - of being behind a ransomware attack on the world's largest meat processing company JBS last month.
REevil is one of the most active and successful hacking groups connected to Russia and operating all over the world. The group recently demanded a huge bitcoin ransom for an attack targeting IT firm Kaseya in the USA.
Since Tuesday blog and payment site run by REvil group cannot be longer reached without any kind of explanation or why.
The reason behind the disappearance is unknown but has sparked speculation that the group may have been targeted deliberately by authorities.
US President Joe Biden said he raised the issue with Vladimir Putin during a phone call on Friday, after discussing the subject during a summit with the Russian president in Geneva last month.
Mr. Biden told reporters that he had "made it very clear to him...we expect them to act" on information and also hinted the US could take direct digital retaliation on servers used for intrusions.
The timing of Tuesday's outage has sparked speculation that either the US or Russian officials may have taken action against REvil - though officials have so far declined to comment and cyber experts say sudden disappearances of groups are not necessarily uncommon.
The development comes after a series of high-profile ransomware attacks which have hit major US businesses this year.
The FBI accused REvil - also known as Sodinokibi - of being behind a ransomware attack on the world's largest meat processing company JBS last month. Google Docs has cemented itself as a great free alternative to Microsoft Office Word. Most of the time people just share links to google Docs among themselves but sometimes you need to save and download files.

Luckily Google docs let you download easily files in various formats including PDF as well. In this short tutorial we will explain how can you download your Google document as a PDF file.
Open the Google document inside the browser and click on the File drop-down menu. In the file drop-down menu go to Download and choose PDF document. Next, choose the location where you would like your file to be saved and click on SAVE.
And that's all that needs to be done. Also, you can edit PDF files as well in google docs if you need to.
Error CausesWhen you receive the error 0x800ccc79 it may hamper your ability to send emails. Therefore it is advisable to fix it to ensure your emails are sent and received without any difficulty.
This Outlook error 0x800ccc79 is quite easy to repair. By following the quick fix 0x800ccc79 error code solutions given below you can resolve this error in just a couple of minutes.
Here’s what you need to do to fix this error right away:
Solution: If the error occurs due to Outlook Express being configured to use the SSL protocol while sending and receiving emails via the web, then to resolve it, you need to allow Outlook Express to bypass the Secure Socket Layer settings.
To do so, click on ‘tools’ and then on ‘Accounts’. Now select the email account that you want to modify.
Now select the ‘Properties’ tab and then click on ‘Advanced Settings’.
Here search for the following text message ‘This server requires a secure connection’. Once you locate it, uncheck all the checkboxes given next to this option. After that save the changes and restart Outlook Express to see bring the changes into effect.
Solution: If the error 0x800ccc79 occurs due to missing or corrupt registry entries, then the best way to fix this error is to download and install a good registry cleaner on your PC.
The registry cleaner will help you clean your corrupt and damaged Windows registry entries and get rid of this error right away. It is suggested you download the registry cleaner tool from a reliable website to avoid any malware or virus downloads simultaneously.
Once you download the registry cleaner on your system, click on scan. The cleaner will scan your computer completely for registry errors and show you the results in a list form.
After the scanning is complete, click on repair to fix the errors.
So, next time, if you or anyone at your office comes across the Outlook Express error 0x800ccc79, you can try these solutions and fix the error immediately without waiting for the network personnel to come and resolve it.
CHKDSK /R /X C:
 Many times we were talking and writing here on Errortools.com about security, privacy, hacking, identity theft, etc. We tried to raise important security questions and I hope I have managed to at least shed some light and change maybe some bad behaviors for some, helping them embrace better routines about their security on their PC.
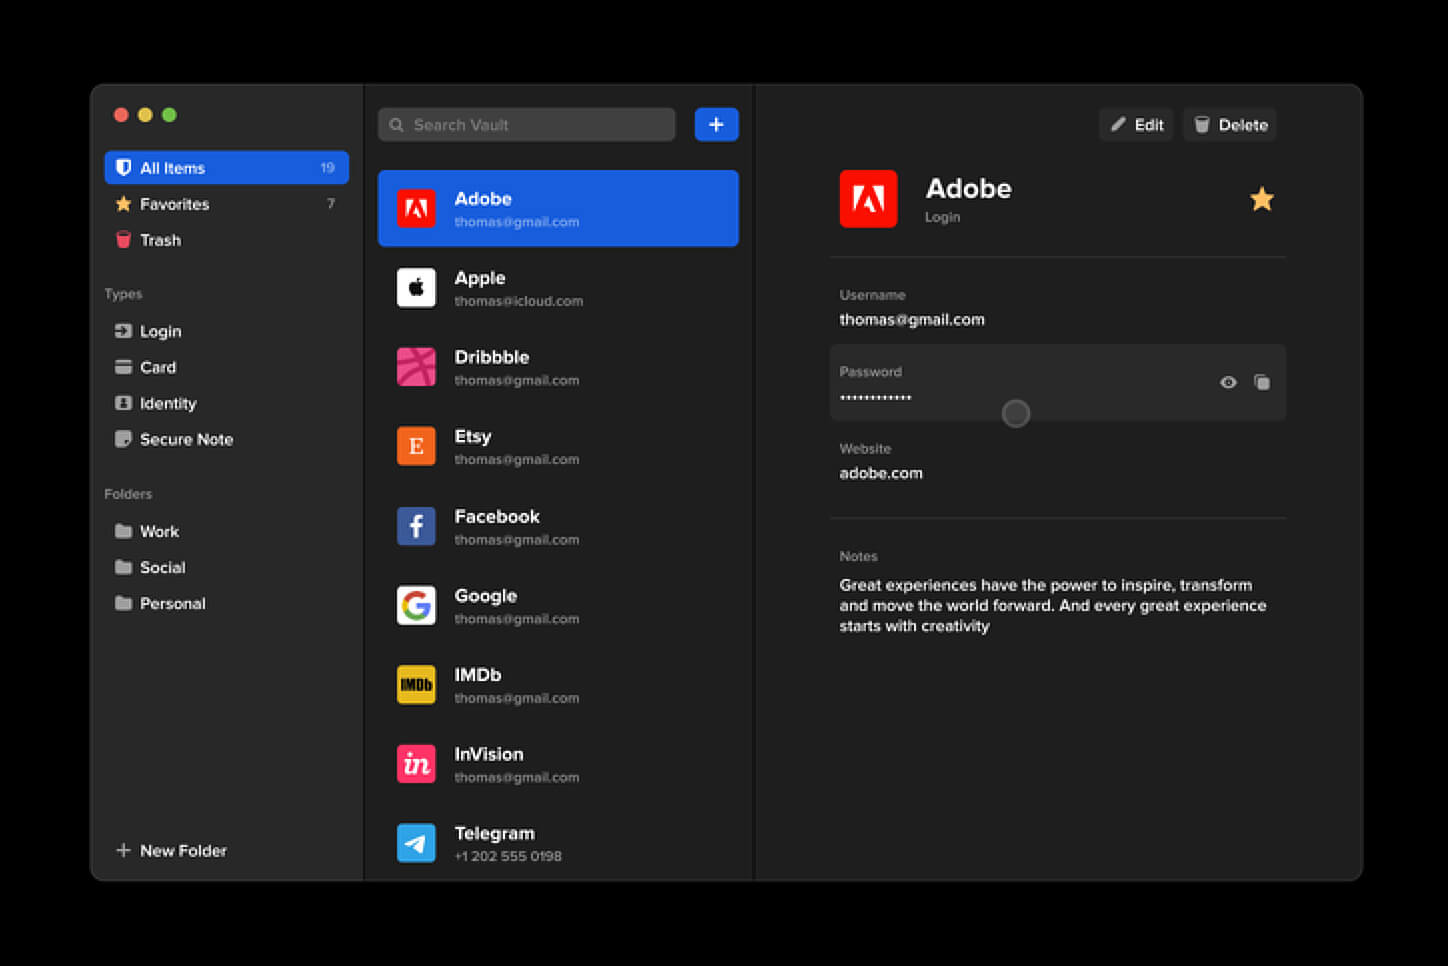
In this light, I will today present you with one neat and awesome piece of software, a password manager worth your time and money (if you want premium features): BitWarden.
Many times we were talking and writing here on Errortools.com about security, privacy, hacking, identity theft, etc. We tried to raise important security questions and I hope I have managed to at least shed some light and change maybe some bad behaviors for some, helping them embrace better routines about their security on their PC.
In this light, I will today present you with one neat and awesome piece of software, a password manager worth your time and money (if you want premium features): BitWarden.