Hello and welcome to our Business Email Etiquette. Most people have experience in writing emails at some point before in their lives. However, the emails an average person writes are probably personal emails and not mails for work purposes.
Emails you send to friends are incredibly different in content and context to business emails you would send to customers or employers or even other colleagues in your workforce.
So, if you have a job that involves you writing emails to people in business style, learning business email etiquette is an absolute must for you.
When you are sending emails to friends, you generally lay them out like a memo. This means there is very little detail in the layout besides basic greetings and paragraphs, usually starting with the greetings.
However, with a business email, it is best to lay it out exactly like you would lay out a formal letter. You need to put the company’s address in the right-hand corner and the date as well. Only then must you go on to the greetings.
This will make your email look more formal, making you seem like a professional who knows what they are doing as opposed to someone who just couldn’t be bothered spending the extra time to get the layout right.
When you are sending an email to a friend, you usually greet them informally. If their name was Mary Johnson, you’d probably start your letter with a ‘Hey Mary’ or a ‘Hello Mary.’
However, this is not considered a professional way to write an email to a customer or other important person in your business. Again, you must use the proper method that you would greet someone with were you writing them a formal letter instead.
If your customer is Mary Johnson again, you should greet her with respect. ‘Dear Ms. Johnson’ would be the most appropriate way to start off your letter’s actual body in this case. If you do not know the recipient’s name, then you should start with a simple ‘Dear Sir or Madam.’
Politeness will always get you incredibly far, no matter what line of work you are in.
You should get straight to the point with your email. Don’t dawdle on with it like you would if chatting to a friend and don’t write it how you would speak either.
You use language that sounds impressive and smart while not using such obscure language that your recipient doesn’t know what you are saying. All the time, you must keep it informal where possible, possibly even impersonal as well.
It will make you seem very professional in the long run.
When you are sending your email, you must end it as you would with a letter also. Don’t just say ‘Bye’ and your first name; that is too personal.
You need to say ‘yours sincerely if you know the name of the recipient and ‘yours faithfully’ if you do not. Then you should end with your full name and whatever position you have at the company. (CEO, technical staff etc.)
So there you have it! All you need to do now is to show your boss that you can handle the emails from now on!

 Run the Windows Memory Diagnostic tool
Reagentc /setreimage /path C:RecoveryWindowsRE
reagentc /info commandNote: Since the Recovery folder is hidden as well as the WINRE folder in it and you won’t be able to access them using the Windows File Explorer, you need to use the Windows PowerShell or Command Prompt so that you can access them.
You probably heard about switches for LAN but not a lot of people heard about KVM switches. So what exactly is KVM switch?
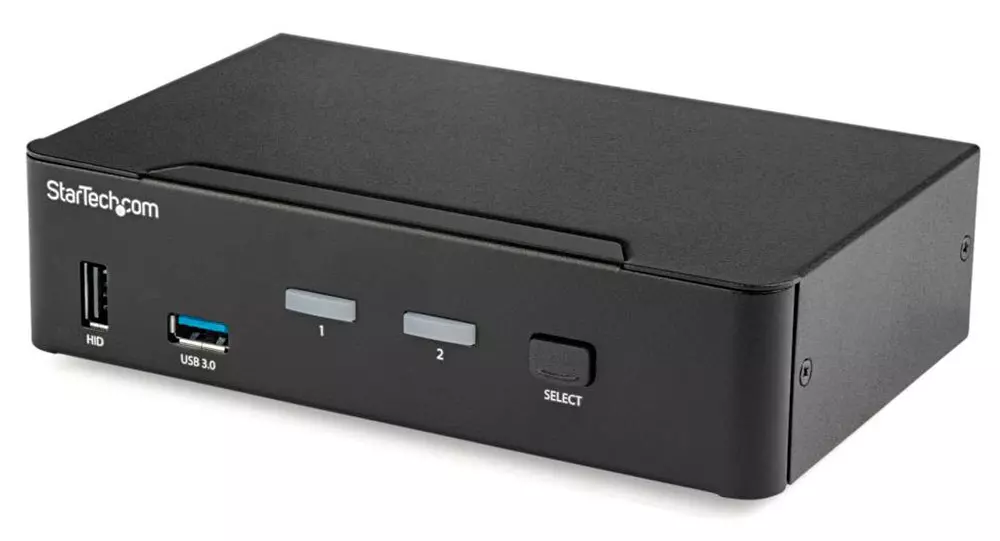
If we look at the name, it is a shortcut for Keyboard, Video & Mouse and the original idea was to have multiple computers but one keyboard, mouse, and monitor. These peripherals would be connected to the KVM switch and other computers could all use one set of these on the fly when needed.
The technology behind the switch is a little interesting since it will actively fake signals to other computers that are not using peripherals. Once they are switched to them the transition is smooth and not noticeable. In old days these switches were more important than today since on every mouse or keyboard disconnection you had to reboot the computer, and although today that is not the case CPU will still detect disconnection and on the next connection it will run through the ID of the device and try to use the existing driver and if peripheral was connected in other USB port, it will install the same driver but connect it to the new USB port.
This type of reconnection can slow down work and place unnecessary load on the CPU so that is why KVM will fake connection in order to make switching externals on the computer smooth and in nick of a time.
These days modern KVM switches will offer you more options than just being able to switch between keyboard, mouse, and monitor. Modern switches now offer Lan, audio, and many more various options.
There are also different kinds of switches offering you only one option, like for example just a Video switch that will let you use one monitor on three computers and many more other specialized options.
So far we talked about Hardware switches, a real device being able to take peripherals into it and switch computers on the fly. On the other line, we have software switch solutions that will have specific software installed on all computers and have it run at all times, and switching between them will be through specific software.
There are two very good and main advantages of using software solutions instead of a hardware one. First, of course, is the price, since the most popular Synergy is an open-source solution, completely free of charge. The second big advantage is that software switch is not limited to how many computers can you use. Hardware switches tend to go to a large number like 16 but if you have a large cluster of computers over a LAN, let's say 30 then the box solution might be difficult.
On the other hand software solution will switch only keyboard and mouse since each other computer will have to have some screen on it in order to work. Both solutions have their strong advantages and disadvantages and it is up to you to choose one that best suits you.
If you are multitasking with a lot of computers or just need your peripherals from time to time to connect to another machine then the KVM switch is something that you might find the use of. Just be aware that if you go for some cheap switch you might experience some lag on your peripherals, but if that is not a concern you can get hardware one for as low as $50 USD.
Battle.net Error #2: Unable to connect. Please try again later. If the problem persists, please contact technical support.
 Error Causes
“There were some problems installing updates, but we’ll try again later. If you keep seeing this and want to search the web or contact support for information, this may help: (0x80096004).”To fix Windows Update error 0x80096004, you can check out the options provided below.
net stop wuauserv net start cryptSvc net start bits net start msiserver
net start wuauserv net start cryptSvc net start bits net start msiserver
@echo off taskkill /f /im explorer.exe taskkill /f /im shellexperiencehost.exe timeout /t 3 /NOBREAK > nul del %localappdata%PackagesMicrosoft.Windows.ShellExperienceHost_cw5n1h2txyewyTempState* /q timeout /t 2 /NOBREAK > nul start explorer @echo on