Best MMO games to play during this winter

How summer is slowly slipping away and winter is coming people will spend more time indoors, and on top of that delta variant of Covid-19 is rampaging through the world. Being the gamer is now maybe the best time to be, sitting in the comfort of your home, safely isolated from viruses and people, just pushing buttons and emerging yourself in a vast world and new adventures.

But games cost money, and sometimes being a gamer can be expensive, also the COVID situation makes it even more difficult to spend some time with friends. Do not worry, we are here to help.

I am presenting you the list of MMO games that you should try or play during this COVID Winter, and since they are MMO games, you can play them with your friends and hang out in the virtual world. Some of them are also free to play so they will not cost you any money to enjoy them.

The following list is not set in any particular order and remember that this is not a ranked list. There is no best MMO and I will not try to place any of these titles as one dominant, I will just point their style and who they might be for, it is up to you to decide which one you will pick and enjoy.

Best MMO’s in no particular order

EVE Online

eve online MMOEVE Online is one of the earliest MMO games out there but since its release, it is still actively developed and is receiving updates. This science-fiction Sandbox will offer space lovers everything they need and more. Large scale PvP, mining, pirating, etc. It can be daunting and complex for beginners but take your time to get familiar with its systems and you will be rewarded greatly with an immersive and complex game worth the time. Open PvP in some zones might not be everyone’s cup of tea and seeing only your ship might be a turn-off for some players, but if you do not mind these things give it a go. It is free to play with an item shop.

Final Fantasy XIV

ff14 mmoFF14 had a tough start, so tough that it was scrapped and destroyed and has been remade again and that idea was great. The game now is better than ever and at this time it is experiencing large players from other games surging into it. This on the rails fantasy MMO will offer you a great story and great leveling experience. It has a free trial where you can play the whole original game for free but if you wish to continue playing you will have to buy the expansion and pay a monthly subscription but the content is well worth the money.

World of Warcraft

wowLet’s be honest, not a single list of MMO games cannot be without a once greatest and most successful MMO ever made, World of Warcraft. But instead of me praising the game why it was the greatest and why you should play it and how great it is I am going to take a little different approach. I am going to recommend you World of Warcraft classic, yup, you read it correctly, classic. Now World of Warcraft is a retail game with a subscription service but with that one subscription you will be able to access three games in the World of Warcraft universe: World of Warcraft retail (standard game), World of Warcraft Classic (vanilla WOW without expansions offering you experience as it once was when it was released) and World of Warcraft the Burning Crusade classic (same as WOW classic but with the first expansion the Burning Crusade). Among all solutions, I would really urge you to play either WOW classic or WOW TBC classic simply for reason that they are far superior games in comparison to typical retail ones, but if you like easier game go for retail, it is included in the sub anyway.

Guild Wars 2

gw2Guild Wars 1 was one of my favorite games and I sank a lot of times in it and once Guild Wars 2 came I must admit I was pleasantly surprised with it and I would recommend it highly. The base game is completely free to play with only expansion to be purchased and it is buy to play model without monthly fees. It has specific mechanics different from other games and interesting classes to try. The living world is a great feature of the game and it is still very strong with its player base.

Star Wars: old republic

Star-Wars-The-Old-RepublicThis game is made for people who enjoy, love, and like Star Wars. Mechanically besides being able to have henchmen with you and space battles (which I do not really like how they are done) game itself does not offer anything special. Where it shines is in the story and overall Star Wars experience. If you look at this game as a single-player game with multiplayer dungeons you will have a great time, since the story is really good but sadly end game lacks in comparison.

Elder Scrolls Online

Blackwood-release-date-on-TESO-when-will-the-new-chapterI am going to admit something here, I was not fond of the idea to make the beloved Elder Scrolls series into MMO, but in time I gave it a go and I am really glad I did. This game is great and it is getting better and better as time progresses. It is buy to play without monthly fees and basic game free, same as FF14 but without fees. It has a decent community and offers a really good Elder Scrolls experience and now it is packing Morrowind expansions and other great areas. Highly recommended for any Elder Scrolls fan.

Lord of the Rings Online

Lord-of-the-Rings-Online-to-Receive-VisualTech-Updates-asThis one is troublesome to recommend, on one side you have free to play games deeply inside Tolkien Lord of the Rings lore, on the other side, you have outdated graphics and some stupid item shop decisions like buys specific classes. But if you look past stupid item shop decisions and can live with playing free class in the game you will be pleasantly surprised. The game itself is surprisingly good, the story is great as expected from the game infused with lore taken from one of the best books series ever written, and the feeling when visiting iconic landscape is epic. But if I need to be real as I should, I would recommend this one to people appreciate good story and lore and ones that are fans of Lord of the Rings itself.

Neverwinter

Neverwinter-Sharandar-Artwork-001Neverwinter is a premium and licensed D&D MMO game and it is well strange. The free-to-play model of the game will let you enjoy it until you hit the end game, then you will have to shell real money if you want to be competitive but the journey until then is great. I would recommend it to D&D lovers and people that love to try other people's maps, yup you read it correctly. Neverwinter has a map editor making it one of a kind MMO game where you can create your own dungeons and post them for other players to play, this user-generated content makes it a very specific beast in this list, and for that feature alone it has my recommendation.

Tera

tera-classes-guideAnother one of the older titles, Tera will offer you nor depth nor anything new in terms of leveling, quests, or end game except… the COMBAT. This is maybe the greatest MMO Combat game ever created and it is quite fascinating that even after so many years no other game has managed to create a better combat system than one of Tera. If you enjoy action combat and like some specific aesthetics Tera is a game for you.

Albion

Albion-Online-LaunchAlbion is a sandbox game with open-world PvP and building mechanics where you can build your own forest, house, etc. You know, sandbox stuff, including a lot of crafting and well, other sandbox stuff. If you want great quests and some occasional play then skip Albion, this game is made for a more hardcore player base not being afraid to die and spend some time crafting and going through the economy. The best comparison might be with EVE but in fantasy settings.

Black Desert

bdoBlack Desert is also a sandbox game but different from Albion, here you can organize and hire a workforce and send them to different nodes on a map to harvest resources and build an economy while you are on some epic adventure. Housing is also included but you can buy already made houses instead of making your own in the world. Combat is a game that comes very close to Tera combat and it is very enjoyable. The end game is money sink and PvP based so be careful when choosing this one.

Secret World Legends

the-secret-world-relaunching-as-1200x675If you like occult and supernatural with new world order themes and conspiracy theories, Secret World Legends is the game for you. Somewhat little clunky its setting and story really set it apart in many many ways. It has semi-action combat and it is free to play with item shop but all the content can be experienced for free. Recommended for fans of deeper gameplay and horror lore.

Runescape

runescapeWhen I said no MMO list can be without World of Warcraft, it also cannot be without Runescape, one of the oldest games it was revamped with newer mechanics and graphics, free to play all the way and you can also pick old school Runescape if you really want to go all the way on a nostalgia trip. I would recommend a newer one for newer players, the game offers a great story and unusual quests infused with puzzles and interesting storylines. If you like really good quest design without fetch and grind quests along with interesting story this is a game for you.

AION

aionLast on my list would be AION, a very interesting game made also a long way back, but the fact that is completely free with the cosmetic shop will make it as one to recommend since you can experience the whole game for free. It has some limited flying mechanics in it and later game zone are open PvP zones, story is interesting and leveling process is enjoyable. Also game itself is not really easy and if not careful you can get yourself in danger quite quickly. Recommended for old-school feeling.

Conclusion

That's it, there are many more MMO games out there but some are on verge of closing down and some are plainly bad. I hope that I have made your choice easier and that you will find one or a few from this list to spend your time in it. Remember, stay safe and take care of yourself.
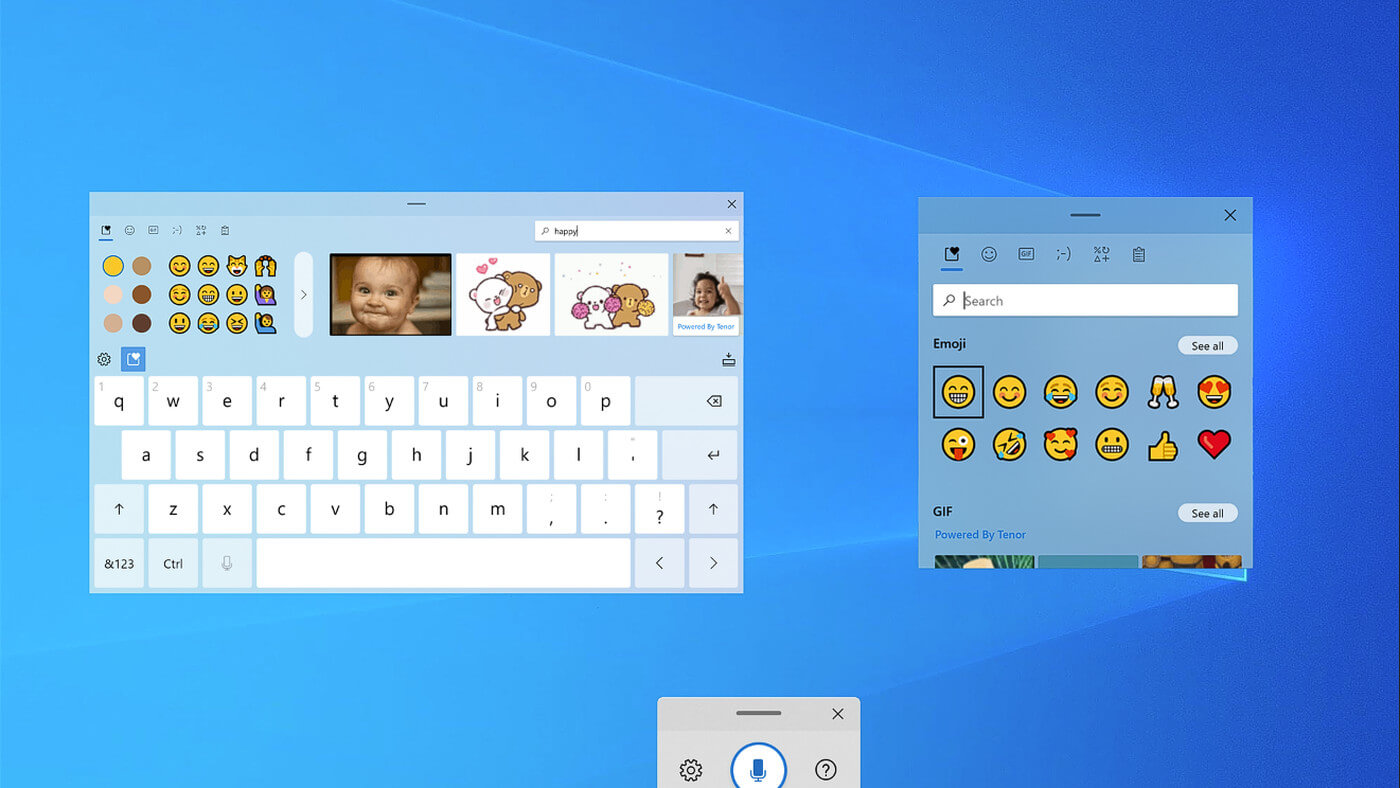
Do You Need Help with Your Device?

Our Team of Experts May Help
Troubleshoot.Tech Experts are There for You!
Replace damaged files
Restore performance
Free disk space
Remove Malware
Protects WEB browser
Remove Viruses
Stop PC freezing
GET HELP
Troubleshoot.Tech experts work with all versions of Microsoft Windows including Windows 11, with Android, Mac, and more.

Share this article:

You might also like

A Patch for Windows Code 44 Error

Error Code 44 – What is it?

Error Code 44 is a device driver error that users encounter when using Windows 2000 operating system and later versions.

It is when the peripheral device that is connected to the computer, such as a printer or a fax machine, cannot be accessed as the programs required for operation interfere with other software on the computer. The error code will pop up with the following message:

“An application or service has shut down this hardware device. (Code 44)”

Solution

driverfix boxError Causes

Error Code 44 is caused when the program that you are using shuts down the peripheral device installed on your system. It is triggered by the following:
  • Corrupted system registry entries
  • Device driver files are outdated
  • Device driver files are missing
It is critical to fix the Error Code 44 as it can pose serious risks to the wellbeing of your PC.

Further Information and Manual Repair

While bothersome, like other error codes, error code 44 to is relatively easy to fix. Here are ways to help resolve the error.

Method 1 – Restart your PC

The easiest method you can use to solve your PC error code is to simply run a restart of your Windows system. It may be that the error prompted upon connecting the device you have connected is merely a temporary problem, and upon restart, will resume functioning smoothly.

Method 2 – Run the Troubleshooting Wizard

If restarting your PC does not help, you will have to find the exact nature of the problem by running the troubleshooting wizard for the device and address the problem accordingly. To do this, proceed with the following steps:

  • Run Device Manager on your PC
  • Click on the program under the installed programs that are creating problems for you
  • Click on the ‘General’ Tab
  • Click ‘Troubleshoot’
  • Upon opening, the Troubleshooting Wizard will ask a series of questions regarding the error. Answer the questions and follow its directions for solving the error code.

After following the directions of the Troubleshooting wizard, make sure to restart your PC for the changes to take effect. Then check if your device is still causing problems.

Method 3 – Manually uninstall and reinstall the device driver

If troubleshooting does not work, you may have to resort to manually uninstalling and then reinstalling the device driver causing the problem.

This would be necessary since the remaining incomplete files due to a partial removal or installation of programs is what contributes to the error code. A fresh install, after uninstallation of the previous drivers, would lead to the completion of the files.

You can do this by firstly logging in as Administrator and opening Device Manager. Select the device that is causing the problem and double click it and make sure that the peripheral is connected properly to the PC.

Upon opening, click on the ‘Driver’ tab and then select ‘Update Driver’. Make sure to refer to the system documentation that you received with your PC or computer to check for the motherboard details and driver specifics.

Method 4 – Use software to automatically download the driver

Manually uninstalling and reinstalling the driver will do the trick, however, it may be time-consuming especially when you would have to resort to your hardware user manual.

Therefore, using a program such as DriverFIX can save you a lot of time and frustration in having your device work properly on your computer.

Driver Assist, with its user-friendly approach to help you fix your PC issues, comes with an integrated database that detects which drivers you need to reconfigure within just a few seconds and downloads it automatically.

It further ensures that your drivers are installed in their entirety leaving no room for any incomplete files to remain that create Error Code 38.

It also has the added advantage of being able to backup and restores your files should there be the slightest possibility of system file damage. DriverFIX is the answer to fixing your PC error codes accurately and quickly.

Click here to download DriverFIX to fix Error Code 44 quickly and effectively!

Read More
Software review series: Adobe Photoshop
From photo editing and compositing to digital painting, animation, and graphic design you can do it all in Photoshop. Bring ideas to life across desktop and iPad. Magically transform images with the power of AI. Learn new skills and share your projects via Livestream. Started as a photo editing application, photoshop has surpassed the original ideas and designs in the following years growing with each release and including more tools and flexibility not matched in other applications. Photoshop was the first to introduce many new features and set standards for other applications. How years have passed product grew and innovation was pushed forward, it took some time but eventually, photoshop was able to set itself as the industry-standard application for pixel editing and it holds that position even today. Throughout the world artist all over the globe are using it to create digital art in various fields be that illustrations, film, photography, texturing, etc. Its vast majority of tools and possibilities as well as its extensibility with plugins, actions, brushes have cemented it in the highest place in any designer or artist toolkit. Today you can get it as a part of a creative suite for a monthly fee on the official adobe website and even if you do not need other creative suite applications photoshop is worth the fee alone. Simply you have to try it, learn it, and then harvest its power. If you would like to read more helpful articles and tips about various software and hardware visit errortools.com daily.
Read More
Change system font in Windows 10
In previous versions of Windows changing the system, the font was a pretty straightforward process, but it seems Microsoft did not want this feature to keep for whatever reason and there is no option as of the time of the writing of this article to do it in standard options in Windows 10. But do not worry, you are still able to customize your Windows and choose which font would you like to see inside it in all of its dialogs. You can choose whichever font you desire, the only prerequisite is it to be installed on your system. This guide will require you to change values in the registry of Windows itself so please follow step-by-step instructions and always make a backup of the registry before changing it in order to prevent some permanent Windows issues. All of that being said, let's start.

Setting new font

First thing is to open notepad, in the notepad paste the next block of code:
Windows Registry Editor Version 5.00 [HKEY_LOCAL_MACHINE\SOFTWARE\Microsoft\Windows NT\CurrentVersion\Fonts] "Segoe UI (TrueType)"="" "Segoe UI Bold (TrueType)"="" "Segoe UI Bold Italic (TrueType)"="" "Segoe UI Italic (TrueType)"="" "Segoe UI Light (TrueType)"="" "Segoe UI Semibold (TrueType)"="" "Segoe UI Symbol (TrueType)"="" [HKEY_LOCAL_MACHINE\SOFTWARE\Microsoft\Windows NT\CurrentVersion\FontSubstitutes] "Segoe UI"="NEW_FONT"
Where in "Segoe UI"="NEW_FONT" instead of NEW_FONT you need to write the exact name of the font that you wish to use as a system font. Once you have replaced the default system font with your desired one, go to File and save as, from file type drop-down menu, choose all files and save this file as .REG type giving it whatever name you wish. When the file is saved, close notepad, right-click on the saved file and choose the merge option. Confirm with YES and click on OK. Reboot your system and your Windows will now use the font of your choice as its default system font.

Restoring default font

If you wish to return the old default system font as it was, follow the same steps but in your notepad paste this code:
Windows Registry Editor Version 5.00 [HKEY_LOCAL_MACHINE\SOFTWARE\Microsoft\Windows NT\CurrentVersion\Fonts] "Segoe UI (TrueType)"="segoeui.ttf" "Segoe UI Black (TrueType)"="seguibl.ttf" "Segoe UI Black Italic (TrueType)"="seguibli.ttf" "Segoe UI Bold (TrueType)"="segoeuib.ttf" "Segoe UI Bold Italic (TrueType)"="segoeuiz.ttf" "Segoe UI Emoji (TrueType)"="seguiemj.ttf" "Segoe UI Historic (TrueType)"="seguihis.ttf" "Segoe UI Italic (TrueType)"="segoeuii.ttf" "Segoe UI Light (TrueType)"="segoeuil.ttf" "Segoe UI Light Italic (TrueType)"="seguili.ttf" "Segoe UI Semibold (TrueType)"="seguisb.ttf" "Segoe UI Semibold Italic (TrueType)"="seguisbi.ttf" "Segoe UI Semilight (TrueType)"="segoeuisl.ttf" "Segoe UI Semilight Italic (TrueType)"="seguisli.ttf" "Segoe UI Symbol (TrueType)"="seguisym.ttf" "Segoe MDL2 Assets (TrueType)"="segmdl2.ttf" "Segoe Print (TrueType)"="segoepr.ttf" "Segoe Print Bold (TrueType)"="segoeprb.ttf" "Segoe Script (TrueType)"="segoesc.ttf" "Segoe Script Bold (TrueType)"="segoescb.ttf" [HKEY_LOCAL_MACHINE\SOFTWARE\Microsoft\Windows NT\CurrentVersion\FontSubstitutes] "Segoe UI"=-
Reboot your system and your Windows will now revert the font of your choice as its default system font.
Read More
Upcoming comic book movies with release dates
upcoming comic moviesThe World of Superhero movies has gone through some interesting variations, from good ones to bad ones, from big-budget ones to small ventures, even from large well-known characters to niche ones. No matter what you think of some of them no one would disagree that since the release of Iron Man and starting Marvel cinematic universe superheroes movies exploded in popularity. Following the Superhero craze, let’s see what is coming up in comic books transferred to big screens with their release dates.

List of upcoming movies

Shang-Chi and the Legend of the Ten Rings, Sept. 3, 2021 Trailer Venom: Let There Be Carnage, Oct. 15, 2021 Trailer Eternals, Nov. 5, 2021 Trailer Spider-Man: No Way Home, Dec. 17, 2021 Trailer Morbius, Jan. 28, 2022 Trailer The Batman, March 4, 2022 Trailer Doctor Strange in the Multiverse of Madness, March 25, 2022 Thor: Love and Thunder, May 6, 2022 DC League of Super-Pets, May 22, 2022 Black Panther: Wakanda Forever, July 8, 2022 Black Adam, July 29, 2022 Trailer Spider-Man: Into the Spider-Verse 2, Oct. 7, 2022 The Flash, Nov. 4, 2022 The Marvels, Nov. 11, 2022 Aquaman and the Lost Kingdom, Dec. 16, 2022
Read More
Fix DISM Error: The scratch directory size ...
One of the most useful and powerful built-in utility in Windows 10 is the DISM tool. This tool can be used with the Command Prompt command line as well as for other purposes. However, it is not without flaws and there are times when you may encounter some issues while using it. One of the problems you can get while using the DISM tool is the following error:
“The scratch directory size might be insufficient to perform this operation”
This kind of error in DISM occurs when the DISM command is executed from the Windows Recovery Environment due to the limited size permissions of a delivery where the operating is being performed. To fix this DISM error, you need to follow the instructions laid out below. Step 1: First, tap the Win + R keys to open the Run utility and then type “cmd” in the field and tap Enter to open Command Prompt. Step 2: Next, you have to specify a scratch directory that contains the Windows folder and to do that, you can either use the DIR command or the BCEDIT command. So in the elevated command prompt type and enter “dir” or “bcedit”. Step 3: After that, you will see a list of folders inside the C: partition. Now you have to create a folder named “scratch” inside the partition. To do so, execute the following command:
mkdir C:Scratch
Note: The command you just entered will create a directory inside the root of the C: partition named Scratch. Step 4: Now that you’ve created the Scratch folder, note that each time you run any of the DISM commands, you have to enter the following code snippet in them:
/ScratchDir:C:Scratch
 Note: For instance, if you are using the DISM tool to repair the offline Windows image, instead of executing the “Dism /Online /Cleanup-Image /RestoreHealth” command, you now have to execute the “DISM /Image:C: /ScratchDir:C: Scratch /Cleanup-Image /Restorehealth” command. And if you want to remove a selected installed update package, you can use the “DISM /image:C: /ScratchDir:C:Scratch /Remove-Package /PackageName:Package_for_RollupFix~31bf3856ad364e75~amd64~~16299.196.4.9” command. Keep in mind that the mentioned package is only an example. And lastly, you also have to replace the drive letter in the new code snippet when you execute the commands given above.
Read More
Windows Photo Viewer can’t display picture
There are instances when you open a picture or an image in the Windows Photo Viewer and instead of displaying the image, it displays nothing and you’ll see an error message instead that says, “Windows Photo Viewer can’t display this picture because there might not be enough memory available on your computer”. Although this may look like a clear-cut issue of less storage space or low RAM in your computer, that’s not always the case. Security experts noticed that even when your computer has enough resources and disk space, this kind of problem could still occur. So if you experience the same thing, you need to check the Color Profile of your screen. For more information, refer to the detailed instructions provided below but before you proceed, make sure that you close some processes in the Task Manager or restart your computer and see if it helps in fixing the problem. You can also try using the Disk Cleanup tool. To use it, refer to these steps:
  • Tap the Win + R keys to open the Run dialog box and then type “cleanmgr” in the field and hit Enter to open the Disk Cleanup window.
  • After that, select the drive you want to clean.
  • Now click OK to clean the disk and restart your computer.
If the Disk Cleanup tool didn’t help in resolving the issue, refer to the instructions below. Step 1: In the search box, type “color management” and then select the “Change advanced color management settings for display” option from the search results. Or you could simply go to Settings > System > Display, Advanced display settings, and from there, select display and click on the Display adapter properties of Display. Step 2: Next, switch to the Color Management tab and click on the Color Management button. Step 3: Select the monitor where you’re getting the “Windows Photo Viewer can’t display this picture because there might not be enough memory available on your computer” error in the next window. And if you have two displays, make sure that you select the primary display. You also have an option to identify the monitor. Step 4: Once confirmed, select the “Use my settings for this device” checkbox. Step 5: After that, select the Profile listed under the “Profiles associated with this device” option and then click on Remove. Step 6: Next, go to the Advanced tab and make sure that all settings are set to System default which includes a device profile, perceptual images, rendering intent, Relative Colorimetric, and many more. Step 7: Once you’re done, you have to restart your computer and then try to open the same image you were trying to open earlier and then check if you can now open it instead of seeing the error.
Read More
Fixing the No such interface supported
If you are using File Explorer but suddenly encountered an error saying, “No such interface supported”, read on as this post will guide you on how to fix the problem. This kind of error occurs due to the corruption in the system files which supports several tasks in the system that works with the Windows File Explorer process or File Explorer. This kind of error can give you a hard time in browsing the files on your computer, or when you open important utilities like the Control Panel, or when you copy files and other inconveniences. Needless to say, it won’t bring you any productivity at all and can only leave you frustrated. To fix this problem, there are several options you can try. You can try to run the System File Checker scan or the DISM tool. You could also try to re-register the potentially corrupted DLL files or fix the User Profile. For more details, refer to each one of the given options below.

Option 1 – Try to run System File Checker

System File Checker or SFC is a built-in command utility that helps in restoring corrupted files as well as missing files. It replaces bad and corrupted system files to good system files that might be the cause why you’re getting the errors 0x8024a11a and 0x8024a112. To run the SFC command, follow the steps given below.
  • Type “cmd” in the Start search and then right-click on the appropriate search result.
  • Next, select “Run as administrator” to open Command Prompt with admin privileges.
  • After opening Command Prompt, type in sfc /scannow
The command will start a system scan which will take a few whiles before it finishes. Once it’s done, you could get the following results:
  1. Windows Resource Protection did not find any integrity violations.
  2. Windows Resource Protection found corrupt files and successfully repaired them.
  3. Windows Resource Protection found corrupt files but was unable to fix some of them.
  • Now restart your computer and see if the problem is fixed or not.

Option 2 – Try to fix the User Profile

The next thing you can do to fix the problem is to fix the User Profile. All you have to do is migrate to a new User Profile in Windows 10 by creating a new User Account and migrating all your personal files from the current user profile folder in the C:/Users location to the new user profile folder which is also located in the same folder.

Option 3 – Run the DISM tool

You can try running the Deployment Imaging and Servicing Management or DISM tool to fix the “No such interface supported” error. Using this built-in tool, you have various options such as the “/ScanHealth”, “/CheckHealth”, and “/RestoreHealth”.
  • Open the Command Prompt with admin privileges.
  • Then type in the following commands and make sure to hit Enter right after you type each one of them:
    • Dism /Online /Cleanup-Image /CheckHealth
    • Dism /Online /Cleanup-Image /ScanHealth
    • exe /Online /Cleanup-image /Restorehealth
  • Do not close the window if the process takes a while as it will probably take a few minutes to finish. Once it’s done, restart your computer.

Option 4 – Try to re-register the problematic DLL file

You may have to re-register the ntdll.dll file using the regsvr32.exe before you can successfully install the program and fix the error. The Regsvr32 tool is a command-line utility that can be used to register and unregister OLE controls like DLL and ActiveX (OCX) controls in the Windows operating system. Follow the steps below to use it.
  • Open Command Prompt as admin from the WinX menu.
  • Next, type the following command in the elevated Command Prompt and hit Enter to execute it. This will re-register the affected DLL file using the Windows operating system tool, regsvr32.exe.
regsvr32 c:windowssystem32actxprxy.dll
  • After you execute the given command, you should see a message saying, “DllRegisterServer in vbscript.dll succeeded” if the Regsvr32 tool was able to run successfully. If it didn’t work, you can try to execute this command instead: FOR /R C: %G IN (*.dll) DO "%systemroot%system32regsvr32.exe" /s "%G"
  • Once it’s done, restart your computer.
Read More
What to do if you can’t find Recycle Bin
The Recycle Bin is undeniably an important place to make files ready for deletion. To put it simply, it assumes some importance but there are times when it displays an unpredictable behavior. For instance, it just suddenly goes missing and even Cortana is unable to find it. A lot of users have experienced the missing Recycle Bin issue in their Windows 10 computers. If you are one of these users, you might have wondered where the Recycle Bin icon has gone and how you can get it back. Worry not, as this post will provide you a couple of options you can try to bring back Recycle Bin in your Windows 10 computer. Follow the given options below to get started.

Option 1 – Try to restore Recycle Bin

It could be that you have disabled the Recycle Bin by accident which is why Windows was not able to show it on your desktop. To restore Recycle Bin, follow these steps:
  • First, click on the Start button and select Settings.
  • Next, select the Personalization setting and then select Themes from the left pane.
  • After that, click on the “Desktop icon settings” link under the “Related Settings” heading. This will display a list of icons in the Desktop Icons window.
  • From there, make sure that you check the checkbox for “Recycle Bin” to make it appear on your Desktop screen once again.

Option 2 – Try to recreate the Recycle Bin

If the first option didn’t work, then it could be that Recycle Bin might have been deleted which is why you fail to restore it. And to resolve this problem, you need to recreate Recycle Bin. Refer to the following steps to do so:
  • You need to launch the Windows File Explorer first and go to the View tab.
  • From this tab, select Options and click on the drop-down arrow and then select the “Change folder and search option”.
  • Afterward, switch to the View tab when the Folder Options window appears on your screen and select the “Show hidden files, folders, and drives” option.
  • And then unmark the checkbox next to the “Hide protected operating system files (Recommended)” option and click on both the Apply and OK buttons, respectively.
  • Next, go back to the File Explorer and click on “This PC” located on the left bar and go to the C: drive.
  • From there, you will find a file named “$Recycle.Bin” located at the top.
  • Open this folder to access its contents and you should see the Recycle Bin icon located at the top.
  • After that, right-click on the Recycle Bin icon and click on the “Send To” option and then click on “Desktop (create shortcut)”.
  • It will then confirm and recreate the Recycle Bin icon on your Desktop screen.
Note: Even though this icon is quite similar to the original one, it actually differs from it. The difference is that you won’t see if fill up when you delete files and you can’t simply empty it by right-clicking on the shortcut. On the other hand, you can still drag items into it just like with the original one. So when you want to empty the content of the newly restored Recycle Bin, you just have to double-click on the shortcut and right-click on the recycle bin in the window that appears, and select the “Empty Recycle Bin” option. In addition, now that you’ve set up the Recycle Bin shortcut, you have to re-activate the “Hide protected operating system files” to keep the important files and folders in your computer hidden.

Option 3 – Try to repair the Recycle Bin

If both the first two options failed to restore the missing Recycle Bin, then you can try repairing it instead. There are times when the Recycle Bin is removed from the Desktop screen due to some corrupted Windows system files. To fix these corrupted system files, you can run the DISM tool. This tool is known to repair potentially corrupted files in your system as having them could also system issues like the missing Recycle Bin. To repair these corrupted system files, you can run the DISM commands:
  • Tap the Win + X keys and click on the “Command Prompt (Admin)” option.
  • After that, input each one of the commands listed below sequentially to execute them:
    • Dism /Online /Cleanup-Image /CheckHealth
    • Dism /Online /Cleanup-Image /ScanHealth
    • Dism /Online /Cleanup-Image /RestoreHealth
  • Once you’ve executed the commands given above, restart your computer and check if the problem is now fixed.

Option 4 – Make sure that you are not in Tablet Mode

Since Windows 10 is designed to work on both desktop and mobile devices, it could be that your computer has slipped into Tablet Mode which explains why you’re not seeing the Recycle Bin. To check if your computer is really in Tablet Mode, follow these steps:
  • Go to the Start menu and select Settings.
  • Next, select the System setting and from the left pane select the Tablet Mode.
  • From there, make sure that the buttons next to the options given below are set to the off position:
    • Hide app icons on the taskbar in tablet mode
    • Automatically hide the taskbar in tablet mode
Read More
Headphones are not working or detected
If you find that your headphones are suddenly not working, read on as this post will help you sort out the problem. There could be several reasons why your headphone is malfunctioning, it could be due to an update you just installed, or it could also be due to incompatible operating system, drivers, and so on. Although updates are created to fix bugs on a computer, there are times when it also causes some issues in the computer. One of the issues it causes is the broken headphone. When this happens, the computer will stop playing any audio using the headphones. The problem, as pointed out, could be due to Windows Updates or incompatible or corrupted drivers in the system. To resolve this problem with the headphones, there are several fixes you can check out. Make sure that you follow each one of the given potential fixes below.

Option 1 – Try to set the headphone as the default device manually

There are times when you plug a headphone, it does not toggle the default audio device. Thus, to fix this issue, you have to set the default audio device to the headphones manually. To do that, follow these steps:
  • First, right-click on the volume icon located on the system tray.
  • Next, select the Open sound settings option to open the Sound section in the Windows 10 Settings app.
  • After that, go to the Output section and select Headphones for the “Choose your output device” option. This should fix the problem for you.

Option 2 – Try to update, rollback or reinstall the Audio driver

If the glitch in your audio has something to do with software, chances are it might be related to the audio driver – it could be that the newest version of your Windows 10 does not work well with the old version of the driver. This is why you have to update your audio driver to the newest available version.
  • Tap the Win + R keys to open the Run dialog box and then type in MSC and tap Enter or click OK to open the Device Manager.
  • Expand the section for the outdated device drivers.
  • And then select the outdated driver(s) and right-click on it/them.
  • From the drop-down menu, select the Update Driver option and follow the on-screen instructions to install the latest version of the driver.
  • Then also click on the option, “Search automatically for updated driver software.
  • Restart your PC after the installation.
Note: If updating the Audio driver didn’t work, you can go to the website of your PC manufacturer and look for the support section where you can download the drivers for your computer. You just need to take note of your PC’s correct model and model number so you can find the appropriate driver.

Option 3 – Try checking the status of the audio-related Windows Services

The Windows Services manages audio for all Windows-based programs and if this service is stopped, audio devices, as well as effects, will also be affected and if this service is disabled, any services that depend on it explicitly will fail to start. So you need to check the status of this service. How? Follow the steps below.
  • Tap the Win + R to open the Run dialog box.
  • Then type in “MSC” in the field and tap enter to open the Windows Service Manager.
  • Next, navigate down to the Windows Audio Service and double-click on it to open Properties.
  • After that, set the Startup Type to Automatic and then click on the Start button and if it has already started, stop it and then start it again.
Note: You should also make sure that the following Dependency Services are started and have Automatic Startup type:
  1. Remote Procedure Call
  2. Windows Audio Endpoint Builder
You should also start the Multimedia Class Scheduler and set it on Automatic if you have it in your system. The Multimedia Class Scheduler Service or MMCSS is a service in Windows that allows multimedia applications to get prioritized access to CPU for time-sensitive processing like the multimedia applications as well as prioritized disc access to make sure that the process does not lack data to process.

Option 4 – Try running the Playing Audio Troubleshooter

Since the Windows 10 operating system has the Playing Audio Troubleshooter, you can use this troubleshooter to try and fix the problem with the headphones. You can access this tool in the Control Panel or in the Taskbar Search and even on the Troubleshooters page of Windows 10. Run this troubleshooter and see if it can fix the issue or not.

Option 5– Try to rollback or install a newer Windows Update

As mentioned earlier, the issue with the headphones could be due to a Windows Update. Thus, to fix the problem, you can try to either roll back or install a newer Windows Update.
Read More
How to remove FindWide

FindWide is a browser add-on for Internet Explorer. This addon Hijacks your home page and internet search provider changing it to search.findwide.com. Alternate versions change the homepage to search.us.com.

This addon monitors your user activity while you are surfing the web. It collects user and browsing data, that it uses to better display targeted ads. While browsing with this addon enabled you will see additional ads, sponsored links, and even sometimes pop-up ads displaying throughout your browsing sessions.

Several anti-virus programs have marked this addon as a Browser Hijacker and is therefore not recommended to keep on your computer.

From the Author: Each search engine has its own method of searching and each will return different results. Findwide.com looks at all of them, decides which are most relevant to your search, eliminates duplicates, and reveals them to you. In the end, you get a list of results more complete than using any one search engine alone.

Help! Malware Blocking Antivirus Installation And Access To The Internet

Viruses could cause plenty of damage to your computer. Some malware is meant to restrict or block things that you wish to do on your personal computer. It may well not permit you to download anything from the net or it will stop you from accessing some or all websites, especially the anti-malware websites. If you’re reading this, you probably have got infected by a virus that prevents you from installing a computer security program like Safebytes Antimalware on your PC. Even though this kind of problem can be tougher to get around, there are some steps you can take.

Download the application in Safe Mode with Networking

If any virus is set to run automatically when Microsoft Windows starts, entering Safe Mode could block the attempt. Since only the bare minimum applications and services launch in safe mode, there are seldom any reasons for conflicts to take place. To launch your Windows XP, Vista, or 7 PCs in Safe Mode with Networking, follow the instructions below. 1) Press the F8 key continuously as soon as your computer boots, but before the big Windows logo comes up. This will bring up the Advanced Boot Options menu. 2) Choose Safe Mode with Networking using arrow keys and press ENTER. 3) When you are into this mode, you will have online access again. Now, utilize your browser to download and install Safebytes. 4) Following installation, do a full scan and let the software get rid of the threats it discovers.

Switch over to an alternate web browser

Certain malware might target vulnerabilities of a specific web browser that obstruct the downloading process. In the event you suspect that your Internet Explorer has been hijacked by malware or otherwise compromised by hackers, the best course of action is to switch over to an alternate internet browser such as Chrome, Firefox, or Safari to download your chosen computer security application – Safebytes Anti-Malware.

Install antivirus on a USB drive

Here’s another solution which is using portable USB anti-malware software that can scan your computer for malicious software without needing installation. Follow these steps to run the anti-malware on the affected computer system. 1) Download Safebytes Anti-Malware or MS Windows Defender Offline onto a clean computer. 2) Plug the Flash drive into the uninfected computer. 3) Double-click the exe file to open the installation wizard. 4) When asked, select the location of the pen drive as the place in which you want to put the software files. Follow the directions to complete the installation process. 5) Transfer the USB drive from the clean PC to the infected PC. 6) Double-click the anti-malware software EXE file on the thumb drive. 7) Press the “Scan” button to run a full computer scan and remove malware automatically.

Protect Your PC & Privacy With SafeBytes Anti-Malware

To help protect your computer or laptop from various internet-based threats, it is very important to install anti-malware software on your computer system. However, with countless numbers of antimalware companies in the marketplace, nowadays it is actually challenging to decide which one you should obtain for your laptop. A few are good ones, some are decent, while some are simply just fake anti-malware software that will harm your PC themselves! You must be careful not to choose the wrong product, especially if you buy a premium program. Among few good applications, SafeBytes Anti-Malware is the highly recommended program for security-conscious people. SafeBytes anti-malware is a trustworthy tool that not only protects your PC completely but is also very easy to use for people of all skill levels. With its cutting-edge technology, this application can help you eliminate multiples types of malware like computer viruses, trojans, PUPs, worms, ransomware, adware, and browser hijackers. SafeBytes anti-malware offers an array of advanced features which sets it apart from all others. The following are some typical features present in this computer software: Real-time Threat Response: Malware programs attempting to enter the system are discovered and stopped as and when detected by the SafeBytes active protection shields. This tool will always monitor your PC for any suspicious activity and updates itself continuously to keep current with the latest threats. Robust Anti-malware Protection: By using a critically acclaimed anti-malware engine, SafeBytes offers multilayered protection that is made to catch and eliminate threats that are concealed deep inside your computer. Web Filtering: Through its unique safety score, SafeBytes alerts you whether a website is safe or not to visit it. This will assure that you’re always certain of your safety when browsing the net. Lowest CPU/Memory Usage: SafeBytes is well-known for its low effect on computer resources and great detection rate of countless threats. It runs quietly and efficiently in the background so you are free to use your computer at full power all the time. Fantastic Technical Support: Support service is accessible 24 x 7 x 365 days via chat and email to answer your queries. To conclude, SafeBytes Anti-Malware is really great for securing your computer against all sorts of malware threats. Once you’ve installed SafeBytes Anti-Malware, you will no longer have to bother about malware or other security concerns. If you’re searching for a comprehensive antivirus program that’s still easy to use, SafeBytes Anti-Malware is just what you need!

Technical Details and Manual Removal (Advanced Users)

If you do not wish to use an automated tool and like to eliminate FindWide manually, you could possibly do so by going to the Windows Add/Remove Programs menu in the Control Panel and deleting the offending program; in cases of browser plug-ins, you can uninstall it by visiting the browser’s Add-on/Extension manager. You might also want to reset your home page and search engine providers and also clear your browser cache and cookies. Finally, examine your hard disk for all of the following and clean your Windows registry manually to remove leftover application entries following uninstalls. But bear in mind, this is often a complicated task and only computer professionals could perform it safely. In addition, some malware is capable of replicating or preventing removal. Carrying out this malware-removal process in Safe Mode is suggested.
Files: C:\Documents and Settings\%USERNAME%\Local Settings\Application Data\TNT2.0.0.1599\Autorun.inf C:\Documents and Settings\%USERNAME%\Local Settings\Application Data\TNT2.0.0.1599\crx.tar C:\Documents and Settings\%USERNAME%\Local Settings\Application Data\TNT2.0.0.1599\ffassist.1.dll C:\Documents and Settings\%USERNAME%\Local Settings\Application Data\TNT2.0.0.1599\GLOBALUNINSTALL.TNT C:\Documents and Settings\%USERNAME%\Local Settings\Application Data\TNT2.0.0.1599\hmac.1.dll C:\Documents and Settings\%USERNAME%\Local Settings\Application Data\TNT2.0.0.1599\iehpr.1.dll C:\Documents and Settings\%USERNAME%\Local Settings\Application Data\TNT2.0.0.1599\iestage2.1.dll C:\Documents and Settings\%USERNAME%\Local Settings\Application Data\TNT2.0.0.1599\IEToolbar.dll C:\Documents and Settings\%USERNAME%\Local Settings\Application Data\TNT2.0.0.1599\IEToolbar64.dll C:\Documents and Settings\%USERNAME%\Local Settings\Application Data\TNT2.0.0.1599\INSTALL.TNT
Read More
1 2 3 171
Logo
Copyright © 2023, ErrorTools. All Rights Reserved
Trademark: Microsoft Windows logos are registered trademarks of Microsoft. Disclaimer: ErrorTools.com is not affiliated with Microsoft, nor claims direct affiliation.
The information on this page is provided for information purposes only.
DMCA.com Protection Status