When Microsoft held Windows 11 presentation it took special time to present the upcoming new Windows 11 store as kind of a big deal.
It was openly stated that with new Windows we will get a new store with a different attitude and new look.
 New Microsoft store
Microsoft has stated that both customer and developer feedback over time has contributed to their redesign and rethinking of the store itself.
They want to be sure that policies for developers are more straightforward and clear so more developers will decide to bring their product to Windows. As for customers, they want more safety and more security so they feel protected when making a purchase.
The new store will come in Windows 11 but also in Windows 10 as well via update.
Introducing the new store will be curated stories. Microsoft believes that stores should be focused on user experience so stories from customers themselves will play a big role here. They are rich editorial content to keep you informed about the best apps and inspire you to achieve more with your device.
This approach to information is aimed at bringing unknown applications to users via presenting them in a professional manner.
Android apps in the store
As stated in Windows 11 unveiling and presentation, Android apps will work inside Windows 11. Microsoft has teamed up with Amazon to bring you Android apps directly inside Windows via the new Microsoft store.
When you are surfing on a certain webpage and want to save and install the application from there, a new pop-up store window will show allowing you to install the app directly.
Microsoft has not said will this feature work outside their Edge browser so we will have to wait and see about that.
Since now developers were tied to certain formats if they wanted to publish their application in any kind of environment. Microsoft wants to bridge this.
Windows developers can publish any kind of app, regardless of app framework and packaging technology – such as Win32, .NET, UWP, Xamarin, Electron, React Native, Java, and even Progressive Web Apps.
For Progressive Web Apps Microsoft has made open-source tool PWABuilder 3.
Starting July 28, app developers will also have an option to bring their own or a third-party commerce platform in their apps, and if they do so they don’t need to pay Microsoft any fee. They can keep 100% of their revenue.

 As in most usual online scams, everything starts with a strange email containing threats and other poorly written and composed speech. At the end of the given email, there would be a link claiming that you, of course, need to read it and follow instructions about the threat, if you click the link it will open a web page where you will have an innocent-looking PDF file with more information about the threat itself.
If you click on a seemingly innocent PDF file it will summon Windows 10's AppInstaller.exe tool, kickstarting a download-and-run process that'll put you in a bad place very quickly. From there, you'll have to deal with the dangers of malware BazarBackdoor, including data and credential theft.
This kind of scam is nothing new but the interesting thing here is that it uses App installer and by clicking on a link you are opening and giving permission for a malicious crook to use it. So, stay safe and do not click on any links from unknown emails no matter what.
As in most usual online scams, everything starts with a strange email containing threats and other poorly written and composed speech. At the end of the given email, there would be a link claiming that you, of course, need to read it and follow instructions about the threat, if you click the link it will open a web page where you will have an innocent-looking PDF file with more information about the threat itself.
If you click on a seemingly innocent PDF file it will summon Windows 10's AppInstaller.exe tool, kickstarting a download-and-run process that'll put you in a bad place very quickly. From there, you'll have to deal with the dangers of malware BazarBackdoor, including data and credential theft.
This kind of scam is nothing new but the interesting thing here is that it uses App installer and by clicking on a link you are opening and giving permission for a malicious crook to use it. So, stay safe and do not click on any links from unknown emails no matter what. ‘An error is preventing the photo or video from being displayed’ Error code 0x80010108
 Error Causes
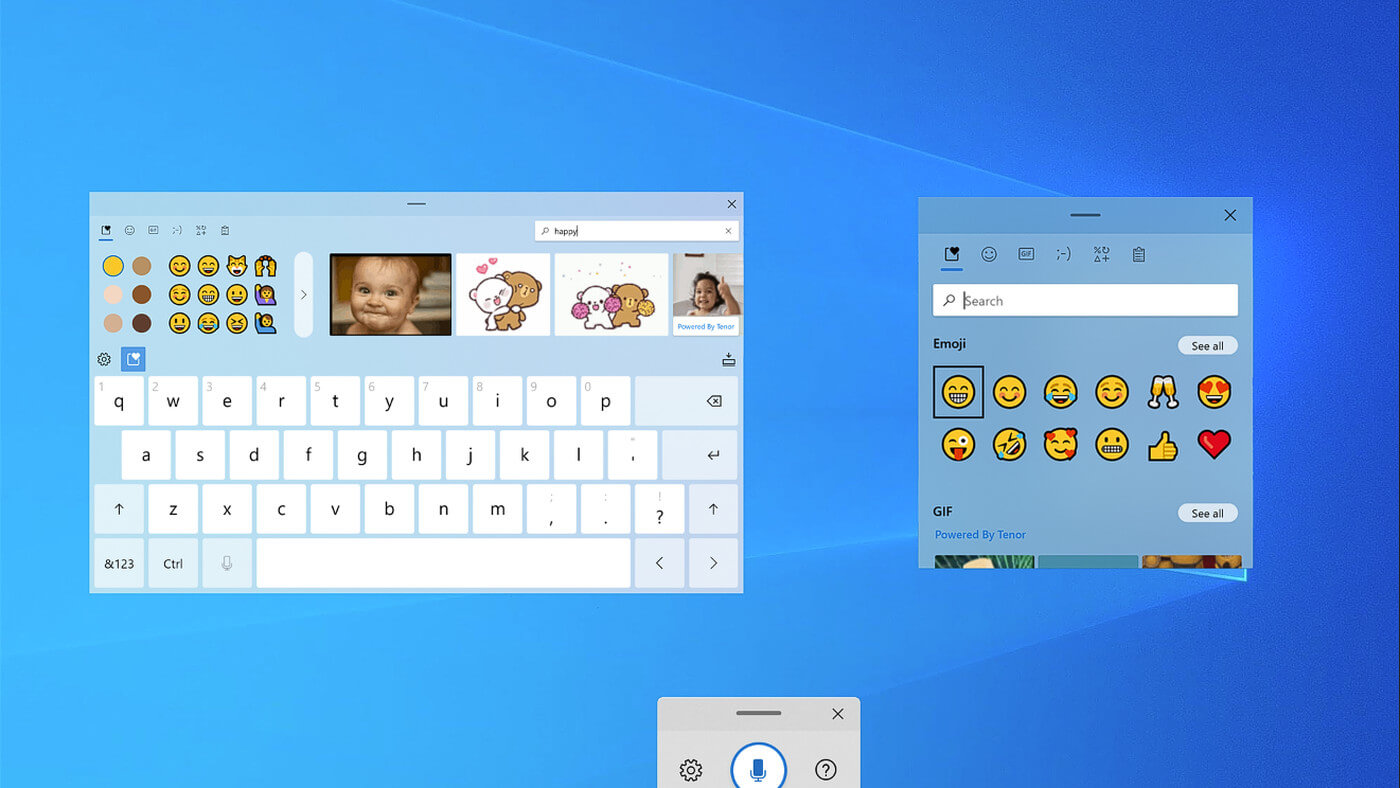 If by any chance you are working on a touchscreen PC, tablet, or any similar device and have no access to a hardware keyboard there is a way to place Touch Keyboard on your screen for easy typing, and you can enable icon on the taskbar for easy access.
 Steam has cemented itself as the largest digital game shop in the World. First, release all the way back on September 12th, 2003, it was meant to be a standalone software client aimed to deliver updates to Valve’s games. It was soon expanded to include titles from third parties.
The greatest Steam expansion and its popularity started in 2004 with the release of Half-life 2. Steam allowed prepurchased editions to be downloaded before the official release of the game making it available for play the moment it was officially out.
Very soon after Steam gained its popularity, Valve has opened doors to other developers and offered them to use Steam as means for a digital distribution platform. Today it hosts over 30000 different game titles, not including DLC or applications.
And how soon Valve’s steam deck is coming out soon we would like to share some great tips and tricks about Steam itself for easy everyday gaming.
Steam has cemented itself as the largest digital game shop in the World. First, release all the way back on September 12th, 2003, it was meant to be a standalone software client aimed to deliver updates to Valve’s games. It was soon expanded to include titles from third parties.
The greatest Steam expansion and its popularity started in 2004 with the release of Half-life 2. Steam allowed prepurchased editions to be downloaded before the official release of the game making it available for play the moment it was officially out.
Very soon after Steam gained its popularity, Valve has opened doors to other developers and offered them to use Steam as means for a digital distribution platform. Today it hosts over 30000 different game titles, not including DLC or applications.
And how soon Valve’s steam deck is coming out soon we would like to share some great tips and tricks about Steam itself for easy everyday gaming.