When you run a program in Windows 10, error 0xc000012f may pop up, mentioning that the files and binaries you’re trying to run are corrupted. Error 0xc000012f means Bad Image, denoting that the program’s executable or one of the supporting modules is corrupt. Or there is probably a DLL mismatch.
This error usually manifests itself after a windows update or after installation of some application, in order to fix it follow the steps below:
Press ⊞ WINDOWS + X to open the Windows menu
 From the menu choose command prompt (admin)
 In command prompt type sfc /scannow and press ENTER
Leave the computer for the operation to be completed and Reboot your computer
Press ⊞ WINDOWS + X to open the Windows menu
From the menu choose command prompt (admin)
in command prompt type: DISM.exe /Online /Cleanup-image /Restorehealth and press ENTER
wait for the process to be finished and Reboot your computer
If this error has been popping up after the application install remove the installed application and install it again. There is the possibility that the application installer has by accident corrupted some files, reinstalling it might fix the issue.
In some cases, Windows update can introduce this issue, go to Windows updates, into advanced options, and uninstall the latest update to see if this will fix the error.
Go to the official Microsoft website and download C++ redistributable package and install it
If there is a new Windows update install, there is a chance that in the last update something went wrong and it is very likely that it was fixed in the last one.

RegClean Pro is a program developed by Systweak Inc. RegClean Pro cleans such invalid registry errors using its advanced scan engine. It not only fixes invalid registry entries, it also defragments the registry, keeping it streamlined for smoother system performance.
RegClean Pro defines auto-start registry entities that allow the program to run each time the system is restarted, it also adds various Scheduled tasks in Windows Task Manager in order to launch the application at various times. This application has been found bundled up with various other potentially unwanted applications, also several anti-virus programs have detected this application for optional removal.
 The console itself is coming in cylindrical shape powered by Intel CPU and ASUS GPU of the unknown chipset. It has Seagate Baraccuda 1TB SSD and it is VR-ready. The console will have raytracing and will be 4K ready.
Code 42 Error is referred to as a Device Manager Error code. Before we explain what this code indicates, it is important to understand what ‘Device Manager’ is and its functions.
Device Manager is basically a Windows tool that helps manage devices attached to the system such as the Printer, Scanner and the USB Device. The Device Manager Error code 42 occurs when a duplicate device is detected.
Error Code 42 is displayed in the following format:
“Windows cannot load the device driver for this hardware because there is a duplicate device already running in the system. Code 42”
 Error Causes
Narrowing down to one particular cause for error code 42 is not virtually possible because it may be triggered due to many underlying reasons. These include:
No matter what the reason for this error code,, to avoid inconvenience and to ensure proper hardware performance, it is advisable to fix it right away without any delay.
If you’re not technically sound, the code 42 message display can panic you. But don’t worry, the error message sounds complex but it is quite easy to fix.
To resolve code 42 in a few minutes, simply try the methods given below. These methods are easy-to-perform, effective and more importantly require no technical expertise.
Code 42 can pop up due to some temporary glitch in the Device Manager. By simply restarting your PC, you can resolve this problem.
Therefore, first things first, restart your system. However, in case it doesn’t work out, try other methods.
Launch the troubleshooting wizard to find the underlying problem and resolve it accordingly. To do this, proceed with the following steps:
Another method to fix code 42 is to use the System Restore tool to restore your PC to its previous working state before the error popped up. To do this,
Creating backup manually can be time-consuming and a painstaking task. The best way to create backup and restore your PC to its normal state is to download DriverFIX.
It is a user-friendly device driver management software that helps create data backup automatically and simultaneously restores your PC back to its normal working state in a few seconds.
This software is compatible with all Windows versions.
Click here to download DriverFIX on your system to resolve error code 42.
HKEY_CURRENT_USERSoftwareMicrosoftWindows NTCurrentVersionWindows
You probably heard about switches for LAN but not a lot of people heard about KVM switches. So what exactly is KVM switch?
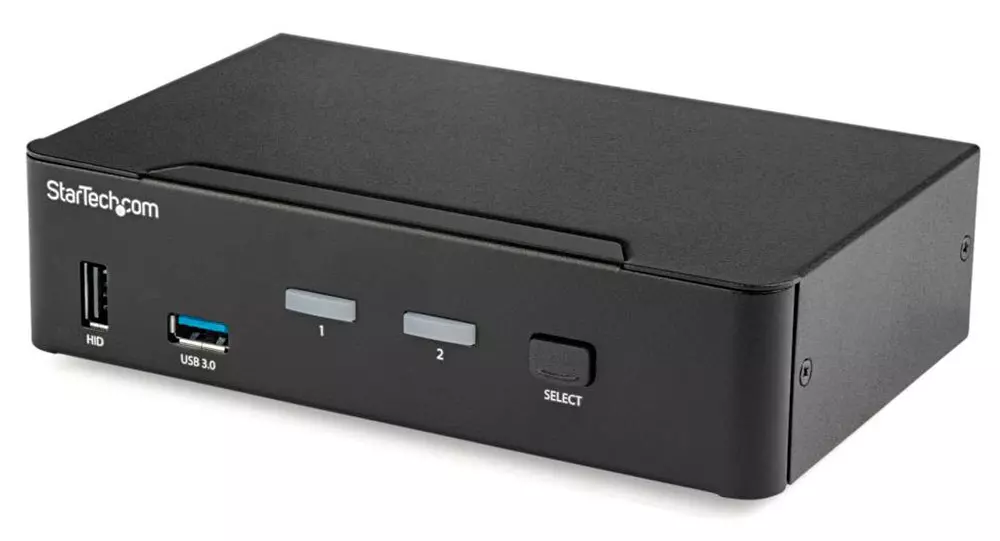
If we look at the name, it is a shortcut for Keyboard, Video & Mouse and the original idea was to have multiple computers but one keyboard, mouse, and monitor. These peripherals would be connected to the KVM switch and other computers could all use one set of these on the fly when needed.
The technology behind the switch is a little interesting since it will actively fake signals to other computers that are not using peripherals. Once they are switched to them the transition is smooth and not noticeable. In old days these switches were more important than today since on every mouse or keyboard disconnection you had to reboot the computer, and although today that is not the case CPU will still detect disconnection and on the next connection it will run through the ID of the device and try to use the existing driver and if peripheral was connected in other USB port, it will install the same driver but connect it to the new USB port.
This type of reconnection can slow down work and place unnecessary load on the CPU so that is why KVM will fake connection in order to make switching externals on the computer smooth and in nick of a time.
These days modern KVM switches will offer you more options than just being able to switch between keyboard, mouse, and monitor. Modern switches now offer Lan, audio, and many more various options.
There are also different kinds of switches offering you only one option, like for example just a Video switch that will let you use one monitor on three computers and many more other specialized options.
So far we talked about Hardware switches, a real device being able to take peripherals into it and switch computers on the fly. On the other line, we have software switch solutions that will have specific software installed on all computers and have it run at all times, and switching between them will be through specific software.
There are two very good and main advantages of using software solutions instead of a hardware one. First, of course, is the price, since the most popular Synergy is an open-source solution, completely free of charge. The second big advantage is that software switch is not limited to how many computers can you use. Hardware switches tend to go to a large number like 16 but if you have a large cluster of computers over a LAN, let's say 30 then the box solution might be difficult.
On the other hand software solution will switch only keyboard and mouse since each other computer will have to have some screen on it in order to work. Both solutions have their strong advantages and disadvantages and it is up to you to choose one that best suits you.
If you are multitasking with a lot of computers or just need your peripherals from time to time to connect to another machine then the KVM switch is something that you might find the use of. Just be aware that if you go for some cheap switch you might experience some lag on your peripherals, but if that is not a concern you can get hardware one for as low as $50 USD.
bootrec /rebuildbcd