If the display of your Windows 10 computer turns on all of a sudden no matter how put it to sleep over and over again, it always wakes up, read on as this post will guide you in resolving this peculiar issue.
In case you don’t know, the Windows 10 computer Sleep state is made in such a way that if it’s really important, it wakes up. You may have configured this kind of behavior or there could be some hardware component that’s interrupting its Sleep state. Thus, this post will give you some troubleshooting tips to fix the Sleep state issue caused by the Legacy Kernel Caller. The Legacy Kernel Caller points to the external hardware that’s causing your Windows 10 to wake up even when it’s in a Sleep state.
Step 1: Find out what’s keeping your computer from going to sleep.
To figure out what really is keeping your computer from going to sleep, you can execute the “powercfg –requests” command instead of checking the power configuration of your computer. This command will look for requests from applications and drivers that prevent the computer from turning off the display or from going to sleep.
To execute the command, simply open Command Prompt and type “
powercfg –requests” and hit Enter. After that, you will see part of the result that looks like this:
“SYSTEM
[DRIVER] USB AUDIO DEVICE
An audio stream is currently in use
[DRIVER] Legacy Kernel Caller.”
Step 2: The next thing you have to do is remove all the external hardware connected to your computer.
In this step, you have to disconnect external hardware from your computer. Based on reports from users who experienced the same issue, the “TV card” is the culprit so make sure you remove that one. Once you’ve removed it, open Command Prompt and run the “
powercfg –requests” command again and you’ll see that the “Legacy Kernel Caller” will no longer be on the list. In addition, your computer will get into its regular sleep mode once the hardware is removed. Once you do that, the driver gets hung and won’t release the power request despite being used.
Step 3: Try using the request override option
The powercfg command also offers a request override option which allows users to disable the requests from applications and services to wake the computer from sleep mode. To run this command, simply open Command Prompt with admin privileges. After you open Command Prompt, type the following command and hit Enter to disable requests from applications and services that causes the computer to wake from sleep state.
Powercfg -requestsoverride Driver "Legacy Kernel Caller" System
Step 4: Check the streaming and media applications
You also have to check if your computer is running an audio or video service in the background. In such cases, your computer won’t be able to go to sleep mode if these services are running in the background. You might have noticed that when you play a video or audio, your computer never goes to sleep. And if you have put it to sleep in between watching the video, then it’s probably why your computer is waking up. Thus, you have to stop these services.
Step 5: Check the devices that can wake your computer
If you didn’t see the Legacy Kernel Caller in the result after you execute the ”powercfg –requests” command, then you can try to execute the following command instead.
powercfg –devicequery wake_armed
After you enter this command, it will give you a list of all the devices that can wake your computer. So if there is anything other than the mouse, keyboard, touchpad, you have to check the power configuration of that device. To do that, go to the Device Manager and disable the device’s “Allow this device to wake the computer” option in its Properties
Step 6: Check the Sleep Advanced Settings
- Click on the Windows key and type “control panel” in the field and select the related search result.
- Next, select the Security and Maintenance option and click on the Power Options.
- After that, you have to select the Change Plan Settings but keep in mind that this option is barely readable so you need to read each option carefully.
- Now click on the Change advanced power settings button and a new window will appear.
- Then look for the “Sleep” option and expand it. Make sure that the “Allow hybrid sleep” option is on.
- Reboot your computer and check if your computer now functions properly. If it still didn’t work, you may have to reverse the changes you’ve made.
On the other hand, you could also run the Power Troubleshooter to resolve the Sleep state issue. This built-in troubleshooter will automatically fix any power-related issues in your computer.
 Jokes aside, I truly believe that choosing to upgrade your System to Windows 11 at this point in time is a bad decision and I will explain why I do believe it.
 So far I believe each person on this planet has at least heard of Marvel superhero movies, perhaps even watched a few of them, and no wonder. Movies are spawning now over 20 titles and they are not really released as events described in them.
Throw into mix TV series and you can get confused pretty fast. Now it was officially stated that all TV series that were released before Wanda vision is no canon in Marvel cinematic universe which simplify thing a little but there are still series that are.
So far I believe each person on this planet has at least heard of Marvel superhero movies, perhaps even watched a few of them, and no wonder. Movies are spawning now over 20 titles and they are not really released as events described in them.
Throw into mix TV series and you can get confused pretty fast. Now it was officially stated that all TV series that were released before Wanda vision is no canon in Marvel cinematic universe which simplify thing a little but there are still series that are.

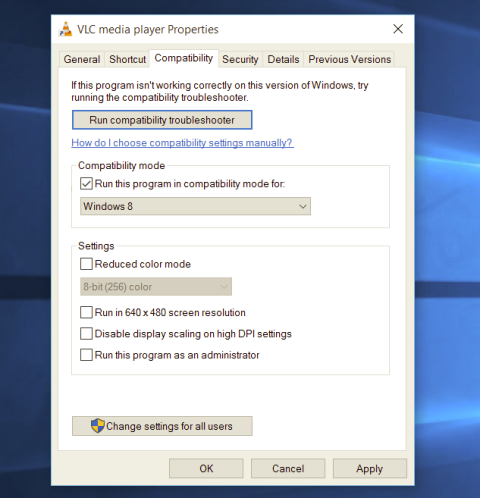 Most of the time running applications with typical settings is fine but from time to time we might have some applications that will require running with administrator privilege in order to work properly. In this case, it is very easy to do it, you just right-click and choose run as administrator.
Although a very easy solution, it can be quite annoying if running the app is on a daily basis or even more times per day. If this is the case then right-clicking and choosing to run as administrator can be a daunting task, sometimes you can even forget to run it like this in heat of work and some unforeseen consequences might occur.
Luckily there is an easy hack so you can open the chosen application each time as an administrator with a simple double click each time.
Most of the time running applications with typical settings is fine but from time to time we might have some applications that will require running with administrator privilege in order to work properly. In this case, it is very easy to do it, you just right-click and choose run as administrator.
Although a very easy solution, it can be quite annoying if running the app is on a daily basis or even more times per day. If this is the case then right-clicking and choosing to run as administrator can be a daunting task, sometimes you can even forget to run it like this in heat of work and some unforeseen consequences might occur.
Luckily there is an easy hack so you can open the chosen application each time as an administrator with a simple double click each time.
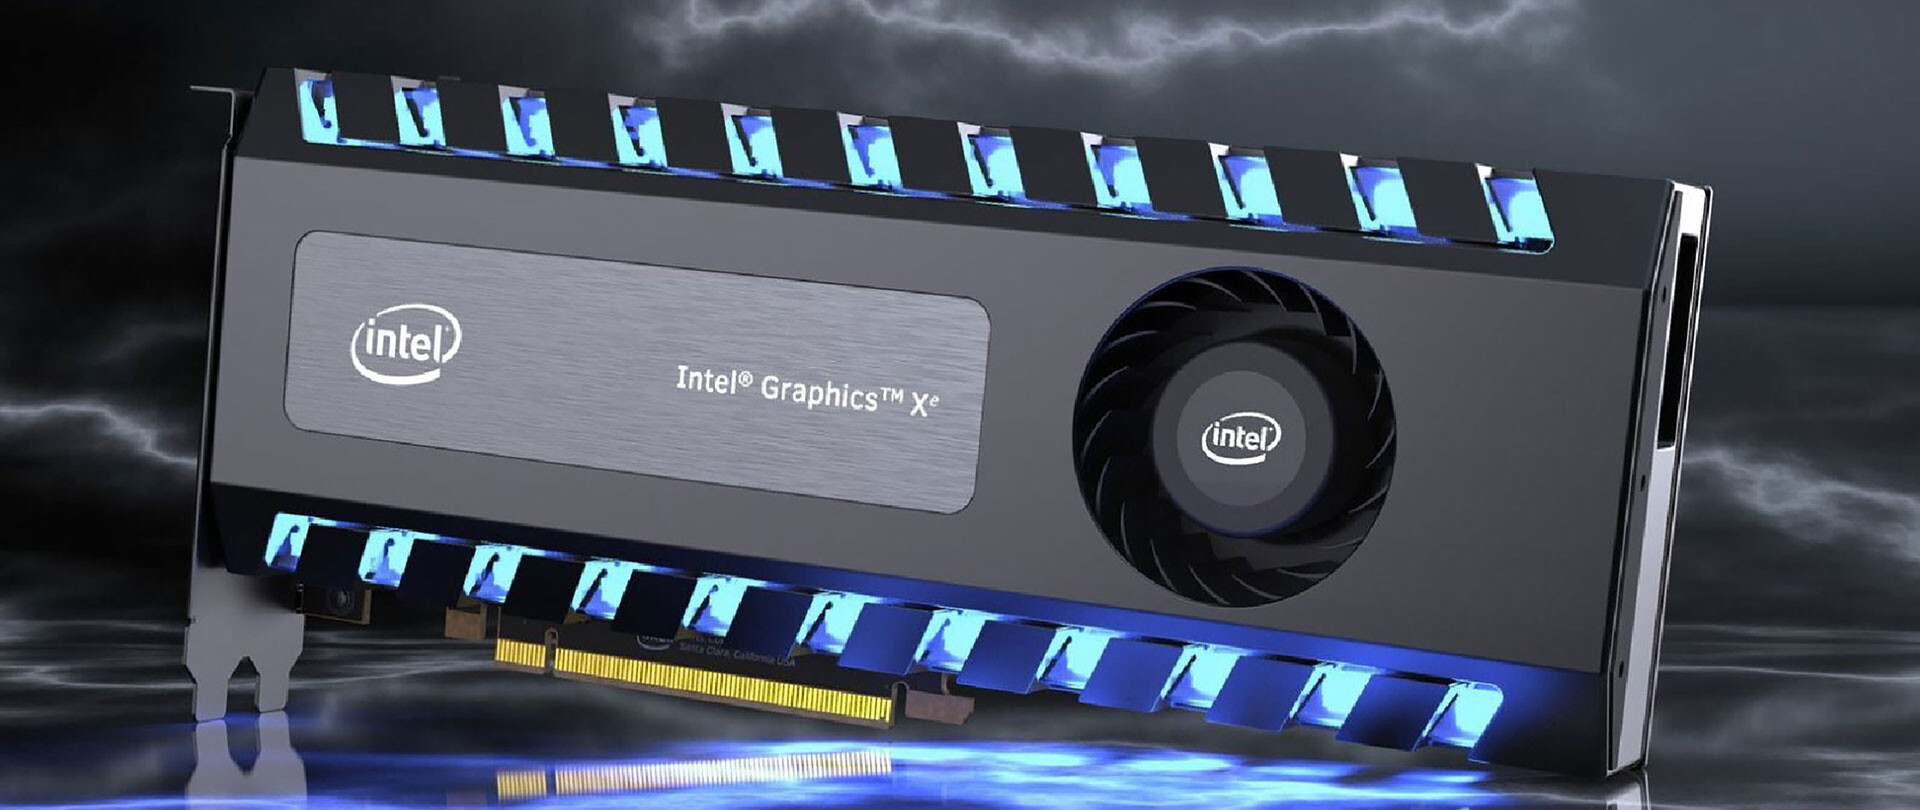 This is not the first time that Intel is trying to enter the GPU field but its adventures so far were, well let us agree not so good. All of that is hoping to be changed with the upcoming ARC GPU. The first generation of Arc graphics, code-named Alchemist and previously known as DG2, will support desktop PCs and laptops and is set to arrive in the first quarter of 2022.
Alchemist will have hardware-based Ray tracing and AI-driven supersampling. This indicates that GPU is aimed to compete in the Hi-end spectrum and battle side by side with Nvidia and AMD on the market. Alchemist will also pack full DirectX 12 Ultimate support.
Intel also released names for the next upcoming future generations of ARC GPUs: Battlemage, Celestial & Druid. More information about ARC products will be released later this year.
“Today marks a key moment in the graphics journey we started just a few years ago. The launch of the Intel Arc brand and the reveal of future hardware generations signifies Intel’s deep and continued commitment to gamers and creators everywhere,” Roger Chandler, Intel vice president, and general manager of client graphics products and solutions.
This is not the first time that Intel is trying to enter the GPU field but its adventures so far were, well let us agree not so good. All of that is hoping to be changed with the upcoming ARC GPU. The first generation of Arc graphics, code-named Alchemist and previously known as DG2, will support desktop PCs and laptops and is set to arrive in the first quarter of 2022.
Alchemist will have hardware-based Ray tracing and AI-driven supersampling. This indicates that GPU is aimed to compete in the Hi-end spectrum and battle side by side with Nvidia and AMD on the market. Alchemist will also pack full DirectX 12 Ultimate support.
Intel also released names for the next upcoming future generations of ARC GPUs: Battlemage, Celestial & Druid. More information about ARC products will be released later this year.
“Today marks a key moment in the graphics journey we started just a few years ago. The launch of the Intel Arc brand and the reveal of future hardware generations signifies Intel’s deep and continued commitment to gamers and creators everywhere,” Roger Chandler, Intel vice president, and general manager of client graphics products and solutions.