The latest security vulnerability was discovered inside both Windows 10 and Windows 11 letting any user access admin privileges inside the operating system. This can, of course, be used by a potential attacker to get full control of the system.
The problem lies in Microsoft's security rules assigned to the Windows Registry and the Security Account Manager. Both for some reason have reduced restrictions allowing any local user to fully access the files without administrator privileges.
The problem is even more amplified if we think about Security Account Manager which includes all account data including the passwords of all users using the same PC. This can provide a potential attacker with all information and let them log on into the administrator account for full control.
Microsoft is aware of the matter and is tracking it with code CVE-2021-36934, and includes a complete workaround for the issue, which includes restricting access to %windir%\system32\config and deleting any restore points or Shadow volumes that were created before that point until the hole is plugged with an official security patch.

Virtual Reality or VR for short has come a long way from its infant stage and as 2022 is in half period we are looking at the VR market and reflecting on what has changed in one year. For starters, games have increased in quality and quantity while the hardware price has decreased making the whole VR experience a little closer to a wider audience.
Many companies have tried to get on the VR bandwagon but also many have failed. What remained are staples in VR hardware from large companies that have started with VR early and kept improving their headsets.
So with great pleasure, we are presenting the remaining best 3 virtual headsets so far of 2022 brought to you from Sony, Valve, and Meta.

If you want VR on consoles then there is really one option, and that is SONY VR. Premium Virtual Reality solution from SONY, sadly you can do this only on Playstation 4 and Playstation 5. Sony managed to pull off great quality hardware and packed with its exclusives on playstore at a very affordable price that is still cheaper than other products.
While waiting for the Sony PlayStation VR2 headset this one is still a great option and quality is still among the top of the game. From the time of its release until today, many AAA titles have been released for it as exclusives that you can not play any other way and some of them are really worth it.

Altho there are headsets like HTC Vive Cosmos Elite that have some features that place it as a better solution than Valve Index, Index is still an overall better VR headset as a whole product but its price is something that is keeping it still way out of reach of your standard user. The price, however, is really an illusion since it applies only when buying the system first time, you see Valve has created this headset as a modular design system making it upgradable meaning that you can, for example, buy newer controllers only and they will work perfectly with rest of hardware.
The modular design will save you money when you want to upgrade your VR system but as said entry price is steep. Besides its somewhat higher price than competitors, it is also notable that Index is a positional tracking VR set which means that it relies on a base station in order to locate the user. This means that once set, it is not so easy to change its location of use.
However, its quality and steam use are unmatched, high-quality games and compatibility that no other headset with steam will even pull off probably make Index one of the 3 best headsets out there. Half-life Alyx, arguably and currently one of the best VR games ever made so far was specifically designed for Valve Index and other games are behaving also incredibly nice with this headset, so if you want a great powerhouse for PC VR gaming, you will no go wrong in purchasing Valve Index.

Cheapest of the three and coming in various iterations, Meta has established itself from the beginning as a leading player in VR technology with its oculus line of products. Quest 2 is the next product in their line and it comes with 128GB and 256GB versions.
Meta has removed the need for the Facebook account for its VR systems and now you can use them without the need to send any kind of data to meta. Priced fairly for its entry 128 models this standalone VR set improves in any way possible from its previous iteration and sets the bar for what will come in VR's future.
Offering both wired and wi-fi connection with its standalone battery Quest 2 also is packed with a large library of games and it is user friendly as your typical game console but still allows some under-the-hood tinkering if you wish so.
Also, Meta's Vr solution since it uses inside-out tracking makes it incredibly easy to just pick it up and carry it with you wherever you go.
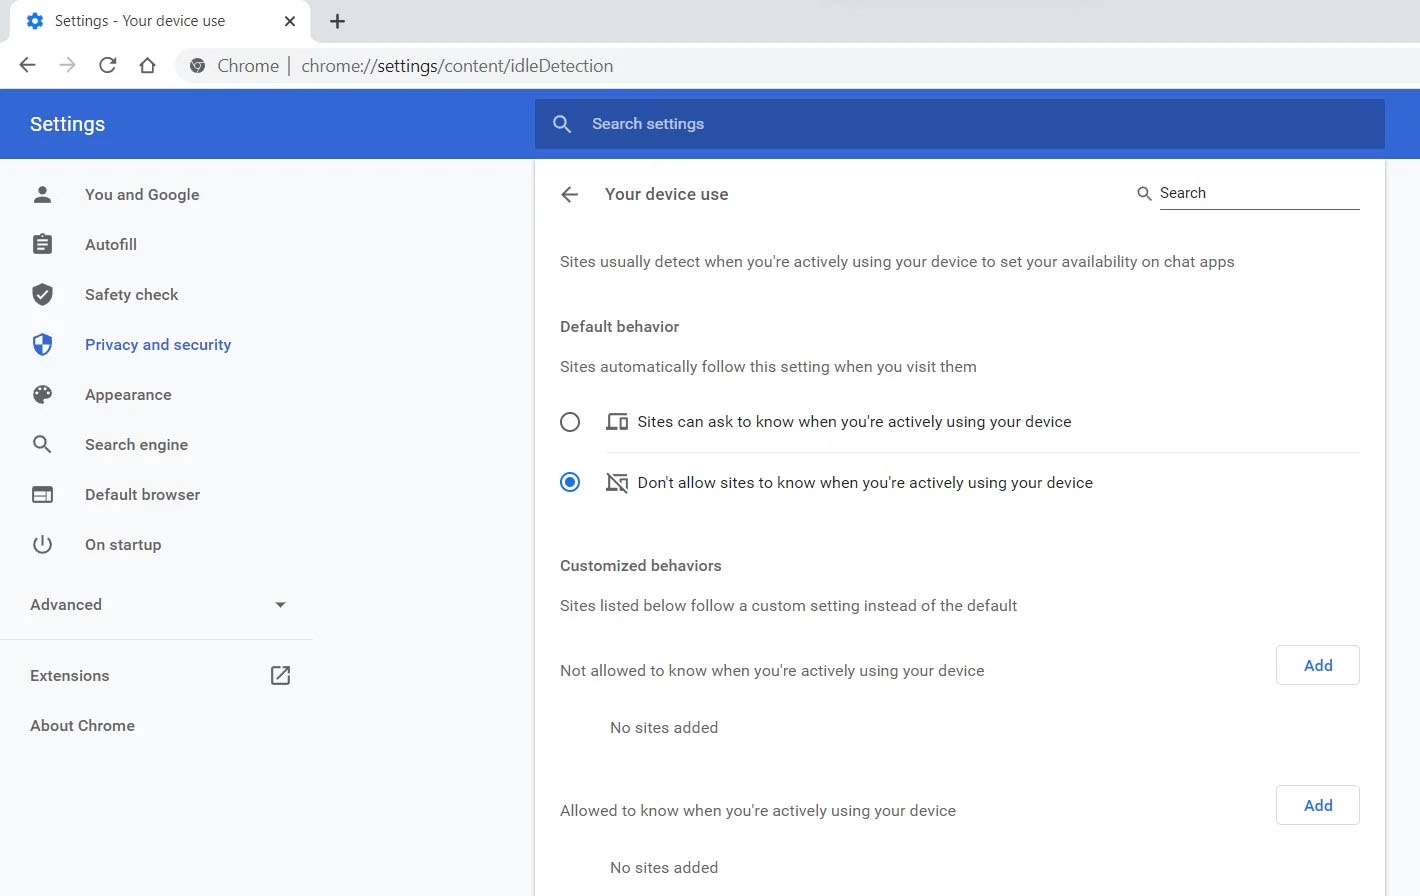 Good thing is that website or web application will prompt you to allow it to use this feature like when a site/application wants to use your microphone or web camera. Developers are on board with this feature since it can provide them with more telemetric data on how users are interacting with their website/application but there are some that are strongly voicing against this.
Tantek Çelik, Mozilla Standards Lead, commented on GitHub, saying:
Good thing is that website or web application will prompt you to allow it to use this feature like when a site/application wants to use your microphone or web camera. Developers are on board with this feature since it can provide them with more telemetric data on how users are interacting with their website/application but there are some that are strongly voicing against this.
Tantek Çelik, Mozilla Standards Lead, commented on GitHub, saying:
As it is currently specified, I consider the Idle Detection API too tempting of an opportunity for surveillance capitalism motivated websites to invade an aspect of the user’s physical privacy, keep long-term records of physical user behaviors, discerning daily rhythms (e.g. lunchtime), and using that for proactive psychological manipulation (e.g. hunger, emotion, choice)… Thus I propose labeling this API harmful and encourage further incubation, perhaps reconsidering simpler, less-invasive alternative approaches to solve the motivating use-cases.Others who have spoken against this feature are people from the WebKit development team inside Apple. Ryosuke Niwa, an Apple software engineer who works on WebKit said:
That doesn’t seem like a strong enough use case for this API. For starters, there is no guarantee that the user won’t immediately come back to the device. Also, who is such a service supposed to know what another device user might be using at any given point? We’re definitely not going to let a website know all the devices a given user might be using at any given point. That’s a very serious breach of the said user’s privacy. It seems to me that such a suppression/distribution mechanism is best left for the underlying operating systems/web browsers to handle.Of course, technology itself as always can be used for good or for bad and time will tell if this feature has brought good stuff or it has paved another brick in surveillance and privacy manipulation. As said for now option will prompt for agreement and let's hope that it will be used for good causes from this day into the future.
“0xC1900209, Incompatible software is blocking the upgrade process. Uninstall the application and try the upgrade again.”This error message comes under the umbrella of the Windows 10 pre-upgrade validation using Setup.exe. And for you to identify the incompatible app, you need to grab a Windows 10 install image using the Windows Media Creation tool to download the suitable Windows 10 version and mount it. After that, execute the setup.exe file that’s located in the root folder of the Windows 10 install image. Once you execute the setup file, the upgrade wizard will give you a list of incompatible apps. Once you have determined which software is not compatible with the Windows Update, there are two options you can try to resolve the Windows Update error 0xC1900209 – you can either try to update the conflicting software or uninstall it. For more details, follow the given options below.
Error code 0x80070652 occurs when Windows users attempt to upgrade their operating system while another program is in the process of being downloaded. It may also occur due to problems related to previously failed update attempts within Window Update. When this Windows 10 upgrade occurs, Windows users fail to access the version of Windows they are attempting to download. Instead, a message box occurs stating that error code 0x80070652 has occurred on the device. If this error message is not rectified, it could give birth to other Windows 10 errors such as error code 0x80072EE2.
 Error Causes
Error code 0x80070652 may result from Windows 10 users attempting to download another program while upgrading their operating system. It may also be caused by an issue related to previous installations of updates. For instance, in some cases, your previous installation of the Windows process may have been interrupted or it was simply not completed properly. This causes any other upgrade process that follows to result in error code 0x80070652.
But what can be done in such a situation to resolve the error code? Windows users have several options available. For instance, they can wait on any additional program that may be in the process of downloading to complete the process before attempting to upgrade Windows. They may also troubleshoot problems related to any failed updates or select a system restore point in which the error code was not present.
The manual repair methods Windows 10 users choose may involve any of the solutions mentioned previously. The choice is largely dependent on the user and his determination to fix the error code. However, note that automated tools or Windows repair technicians may also provide solutions to PC issues like error code 0x80070652.
Since previously failed updates within Windows Update can lead to the occurrence of error code 0x80070652, Windows 10 users will need to verify which of these failed updates occurred by checking the history section of the Windows Update tool. Once you’ve been able to verify that failed updates have occurred in the recent past, you’ll need to troubleshoot these problems to rectify the error code. Follow the instructions below to check for updates that have failed to install properly via Windows Update.
Once you’ve completed the troubleshooting of any updates which failed, proceed by rebooting your device. You may then reattempt to upgrade to the latest version of Windows 10 once no other program is in the process of being downloaded.
If the problem causing error code 0x80070652 was related to failed updates of the past, these issues will likely be resolved once you successfully troubleshoot them. However, if the error code reoccurs, apply the next manual repair solution mentioned in this article.
Another option available to users is simply downloading updates manually by visiting the official Microsoft website, specifically the Windows section which provides downloads. To successfully complete this process, ensure you look for stand-alone packages of these downloads available on the website. You will need to know the Microsoft Knowledge Base (KB) article number related to the specific update(s) which failed.
Once a Windows user has verified the KB article number of the specific update, download it from the Microsoft website, then select Run to install the update. Reboot your PC, then check Windows Update to see if you are able to successfully complete the Windows 10 upgrade.
If the upgrade fails, you may need to implement the next manual repair method as is mentioned below.
One of the best options for Windows 10 users facing certain PC problems is to apply System Restore. This allows them to reset their machine for a period of time in which the problem was not present. This is known as the restore point. To apply this manual repair method, follow the steps below.
If you wish to always have at your disposal a utility tool to fix these Windows 10 and other related issues when they do arise, download and install a powerful automated tool.
 Today most people have Facebook accounts where they keep in touch with friends and family. But large Facebook network of users is also very interesting to another party as well, hackers.
There are many ways hackers can steal your data via direct hacks, trickery, and social engineering in order to get your credentials, emails, and many other things using them to wreak further havoc.
Once a hacker has needed information it is very difficult to minimize impact and all of your information could be compromised from a list of friends to credit card numbers. Keep on reading to learn how can you protect yourself against these attacks and learn about common practices that hackers use in order to steal your data.
Today most people have Facebook accounts where they keep in touch with friends and family. But large Facebook network of users is also very interesting to another party as well, hackers.
There are many ways hackers can steal your data via direct hacks, trickery, and social engineering in order to get your credentials, emails, and many other things using them to wreak further havoc.
Once a hacker has needed information it is very difficult to minimize impact and all of your information could be compromised from a list of friends to credit card numbers. Keep on reading to learn how can you protect yourself against these attacks and learn about common practices that hackers use in order to steal your data.
Users, when upgrading to Windows 10 from Windows 7 or Windows 8/8.1, or when upgrading to a new version, build, service pack, or major update of Windows 10, can encounter error code 0xC1900101, 0x30018. Windows 10 installation fails and stops or hangs. During the installation process, it will reach a certain maximum limit (normally at 6% or 32%) then reverts back to the previous version of the operating system and displays the following message:
We couldn’t install Windows 10. We’ve set your PC back to the way it was right before you started installing Windows 10.
0xC1900101 – 0x30018 The installation failed in the FIRST_BOOT phase with the error during the SYSPREP operation.
Error CausesIn attempting to fix Error Code 0xC1900101-0x30018, it is vital to know what causes this issue. The most probable causes of this error are:
NOTE: If this fails, if possible, you can try using the .ISO file in upgrading.
If you’re using Windows Update in installing Windows 10, you can implement the following:
NOTE: Don’t forget to hit Enter after every command.
net stop wuauserv
net stop cryptSvc
net stop bits
net stop msiserver
NOTE: Don’t forget to hit Enter after every command.
ren
C:WindowsSoftwareDistribution SoftwareDistribution.old
ren
C:WindowsSystem32catroot2 Catroot2.old
NOTE: Don’t forget to hit Enter after every command.
net start wuauserv
net start cryptSvc
net start bits
net start msiserver