 As more and more people get into insider preview of upcoming Windows 11 we will see more and more different takes and opinions on it.
Generally speaking, the first wave was quite positive when it was previewed but how time is passing more and more limitations and frustration comes to the surface.
Some of the limitation that is inside it, which have been confirmed by Microsoft itself includes features missing that we had in Windows 10 like moving the application to the taskbar in order to pin it, moving the file in the taskbar to open it in default application and some big annoyances like Windows opening widgets always in Edge no matter what is your default browser. Not being able to move the taskbar from the bottom is also one of many illogical things.
There is not really a point in these missing features since they were working fine in Windows 10 and many users liked them since they could customize Windows more to their liking, now with this new look at limitations it reminds me personally much of apple macOS and I will be honest, I am not a big fan of that kind of thinking.
If I wanted that kind of OS I would have gotten myself a MAC, not custom build PC, but hey, Linux is always a free alternative, and how Microsoft itself is pushing limitations and in my opinion bad design choices along with awful system requirements that might just be a case for a lot of users.
I am really not sure what is logic behind these moves and I am sure they have their reasons but this time it seems that their take on the new OS is not resonating well with the overall user population, well at least what I have heard so far. Things of course can still be changed and made for the better and I would rather see release postponed and issues addressed than getting more system hogging and limited new OS that at its current state looks like reskinned Windows 10 with limitations.

 Error CausesError CausesError Causes
 Once the device window opens, click once on printers and scanners, and on the right window go to the bottom and uncheck Let windows manage my default printer.
 Unchecking that box will let Windows know that we do not wish anymore for him to set our default printers according to their use. Once the checkbox is clear go up to your printer list and click on the printer you wish to use as the default one. I will choose Microsoft Print to PDF as my default printer and click on it. Once the printer is clicked option menu will appear.
 When the option menu appears under the printer name, click on Manage which will take you to the printer management screen. When you are on the manage screen, click on the Set as default button, and you are done.

taskkill /IM "processname" /T /F processname – it is the name of the process which you can see on the Details tab of the Windows Task Manager. /IM – it is the one that specifies the image name of the process, which follows, that is to be terminated. /T – it is the one that kills not just the main process but also the child process. /F – it is the one that terminates the process forcefully.
wmic process where name='processname.exe' deleteNote: In the given command, you need to replace “processname.exe” with the name of the particular process you want to terminate which is found in the Details tab of the Windows Task Manager.
kill -id pidNote: In the given command above, “pid” is the Process ID number of the process you want to terminate. And for you to identify this number, you need to open the Details tab of the Windows Task Manager once again and take note of the number against the process you want to get rid of. Alternatively, you can also run the following command in the PowerShell prompt that you’ve pulled up to get the process ID number:
Get-ProcessFor example, “5364” is the process ID number for the DimScreen.exe process which is the process you want to terminate. In order for you to kill this process, you need to type in this command:
kill -id 5364
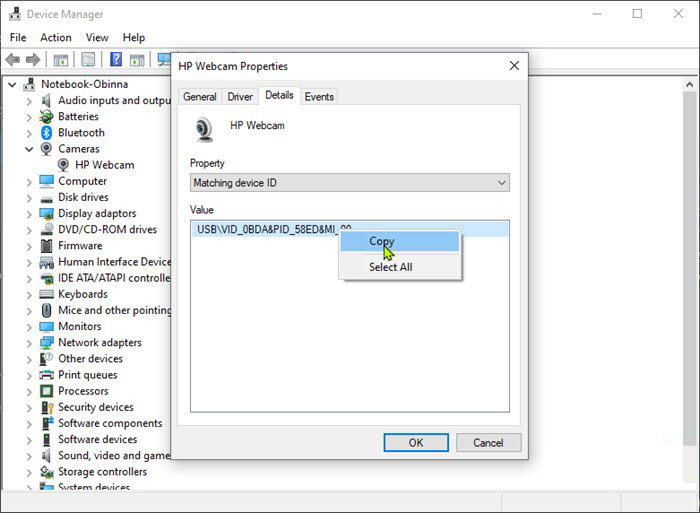
 In the menu choose device manager and click on it.
 When the device manager opens, expand the Imaging devices or Cameras section.
Right-click Integrated Camera or the primary webcam, and click Properties.
Go to the Details tab.
Under the Property section, click to select Matching device ID from the drop-down.
Right-click the value and select Copy
When the device manager opens, expand the Imaging devices or Cameras section.
Right-click Integrated Camera or the primary webcam, and click Properties.
Go to the Details tab.
Under the Property section, click to select Matching device ID from the drop-down.
Right-click the value and select Copy
 The next step is to download and install Windows Driver Kit (WDK)
$id = (Get-CimInstance Win32_PnPEntity |

where caption -match '<PRIMARY CAMERA>').pnpDeviceID

$ppid = "{0}{1}" -f '@',$id

Set-Location c:\<FOLDER>

Devcon status $ppid

Devcon disable $ppid

Devcon status $ppid
To enable the camera device, run the command below in PowerShell:
devcon enable $ppid
Set-ExecutionPolicy Unrestricted
Get-AppXPackage -AllUsers | Foreach {Add-AppxPackage -DisableDevelopmentMode -Register "$($_.InstallLocation)AppXManifest.xml"}Note: In the command given, do not forget to replace the “PackageFullName” with the actual package name for the Photos app. After executing the command, it will uninstall the Photos app from your computer so you need to install it again from the Windows Store by simply looking for it. Once you found it, just click on install to start the installation process.
Chedot is a Chromium-based Browser that replaces your default System Internet Browser. This browser offers users tools for downloading videos, faster browsing, and custom searches. From the publisher: A feature of our browser is a high speed on slow computers, high speed download on a poor internet, support resuming file download when connection is broken and the download in multiple threads, the ability to go on blocked websites and downloading videos from video sites.
While this may seem interesting and good at start, this browser has been marked as a Potentially Unwanted Program. It monitors user activity, collects web traffic data, and user information. While using Chedot you may see additional ads throughout your browsing sessions.