Windows 11 has brought some bad reviews for its inability to change the taskbar location to the screen. Luckily we can still hide it if needed.
In order to hide the taskbar from the screen follow these simple instructions:
Right-click the taskbar itself and select “Taskbar Settings” in the tiny menu that pops up or open Windows Settings and navigate to Personalization > Taskbar
Click on Taskbar Behaviors
Check the box next to Automatically hide the Taskbar
Close settings
As soon as you click on the box to hide the taskbar Windows 11 will apply your settings and hide the taskbar, you will get one line at the very bottom of the screen indicating that the taskbar is still present, just hidden.
When you reach the bottom of your screen with the mouse it will pop up and be visible again, just like in all Windows so far.
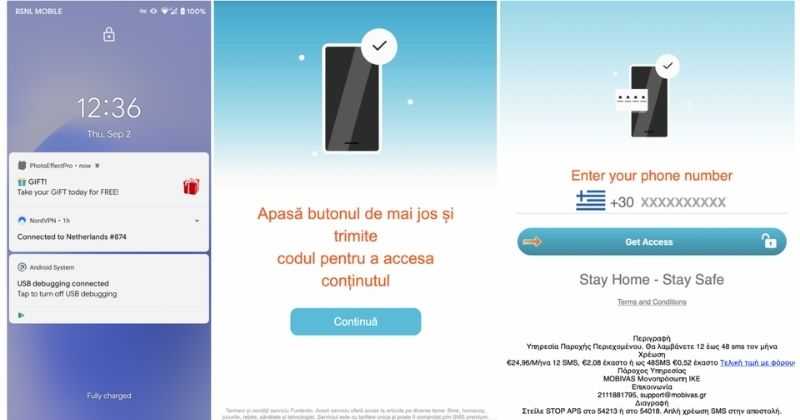
There has been recently discovered in the field of malware targeting Android devices. Affecting more than 10 million users of Android phones, the malware GriftHorse is doing its attacks via phishing and premium services scams. A lot of applications have been discovered that are hosts for this malware and many of them are inside the Google store and available for download.
According to Zimperium zLabs, this malware that was recently detected has been doing its scams and attacks even in November of 2020 and has thus far accumulated hundreds of thousands of dollars in its scam.
On the surface it looks very harmless, asking for typical permissions like internet access, calls, and other related needed functions, and then it waits. After few months the real attack happens when users get charged with premium service they never subscribed to in the first place.
List of Infected Applications that Carry GriftHorse Trojan
Zimperium zLabs listed out some of the apps with this malware. Users are advised to avoid installing them.
Amazing Video Editor
Bag X-Ray 100% Scanner
Bus – Metrolis 2021
Call Recoder Pro
Call Blocker-Spam Call Blocker
Cinema Hall: Free HD Movies
Coupons & Gifts: InstaShop
GPS Phone Tracker – Family Locator
Fingerprint Changer
Fitness Point
Free Calls WorldWide
Geospot: GPS Location Tracker
GPS Phone Tracker – Family Locator
Handy Translator Pro
Horoscope : Fortune
iCare – Find Location
iConnected Tracker
Instant Speech Translation
Lifeel – scan and test
My Chat Translator
My Locator Plus
Plant Camera Identifier
Racers Car Driver
Safe Lock
Screen Mirroring TV Cast
Slime Simulator
Smart Spot Locator
These are only some of the many infected apps available on the internet.
Zimperium zLabs also warned that GriftHorse Trojan exists in over 70 countries worldwide. The infected app quickly changes the language and displays content depending on the user’s IP address.
Error code 0x80240017 is associated with installing or updating a Windows Store app. This error is more common in Windows 8 and Windows 8.1. It appears due to missing certain system files and also corrupt registry.
Common symptoms
When you try to install a Windows Store app on a PC running Windows RT 8.1, Windows 8.1, or Windows Server 2012 R2, the installation fails and you receive an error message: 0x80240017
Certain apps may become unresponsive.
You may not be able to download apps or Windows update
You may have difficulty updating or installing and uninstalling other built-in programs inside Windows 8 and Windows 8.1.
When you have multiple applications running, you may experience crashes and freezes.
Solution
Error Causes
The error code 0x80240017 in Windows 8.1 or Windows 8 usually appears due to the fact that your system has changed after you installed a third-party application. It might also appear if registry entry has changed after a reboot of the operating system and you do not have the required permissions. Other causes may be due to:
Corrupted, broken, or missing system files.
Malware/spyware infection or virus attack
Hardware/RAM decline
Fragmented file
Unnecessary or redundant program installations
Further Information and Manual Repair
Repairing Error Code 0x80240017 in Windows 8/Windows 8.1
Method 1:
Resetting Windows Store app:
Press and hold the Windows key and press R. This will open up the Run command
Now, type exe and hit Enter
Just wait for it to finish and it will re-launch Windows Store. Now, try and install the app you were trying to install which was previously showing an error.
This basic solution will delete the cache and reset Windows Store.
Method 2:
Using Windows troubleshooter:
Click on Search on the Charm bar and type Troubleshooting. Click on the very first option.
A new window will open. Click View all from the left pane.
Scroll down to the bottom and click on Windows update.
Troubleshooter window for Windows update will pop up. Click on NEXT. It may ask you for administrative permission.
The troubleshooter will automatically detect problems and fix them.
Now, close this window and try download/install the app which was previously showing an error.
Method 3:
Disable Proxy Settings:
Disable proxy server on Internet Explorer
Press the Windows + R Run window will appear.
Type cpl and hit Enter
Click the Connections tab and click LAN settings
Under proxy server uncheck “Use a proxy server for your LAN”
Click OK
Now try to install apps from Windows Store.
Method 4:
Boot in Safe Mode:
Open Run command as previously described
Type MSConfig
Click on the Boot tab
Tick Safe boot in Boot option
Select Network
Click Apply and OK
Reboot your system
Your system will boot in Safe mode with Networking. You may now try and open Windows Store and should not see any errors.
Method 5:
Note: It is recommended that you back up your files and folders before attempting this step:
Move the mouse cursor over to the upper right side of the screen.
A menu will pop up on the left. Click on the “Settings” feature on the menu.
On the Settings window, click on the “Change PC settings.”
Now, left-click on the “Update and recovery” feature.
For the next step, left-click on the “Recovery” feature.
There is an option here saying “Refresh your PC without affecting your files.” There, left-click on the “Get started” button.
Now, follow the instructions on the screen to finish the Refresh process.
After the Refresh process has finished restart your Windows 8.1 or Windows 8 device.
Check again to see if the error 0x80240017 has been fixed.
If you do not possess the technical expertise required to accomplish this yourself or do not feel comfortable doing so, download and install a powerful automated tool to get the job done.
Things have stirred lately with Chinas ban on crypto mining and many used GPUs will flow the market probably. But should you buy a used GPU?
Short answer: NO, long answer: keep on reading to find out why.
GPU shortage and its cause
As you all know by now, we live sadly in a world struck by a global Pandemic. Due to this awful disease and measures taken against it, many people are either working from home or are at home making the manufacturing of new chips problematic while demand on the market has raised.
Throw into that mix crypto mining which has raised in popularity and you have, well today's market where we have GPU shortage.
Now with the latest news that China has banned the mining of cryptocurrency, there is to be expected that at some point in time mining cards used there will fit the market in the whole world.
Sadly even with a large quantity of GPUs that will become available, the overall price of cards will not be much lowered I am afraid since demand is still very high and many people would not want to purchase used mining cards and neither should you.
Be prepared for the worst scenario
Although this sounds very pessimistic and in most cases, it will not turn out to be true, you should always prepare yourself mentally that you might be in that lower percentage that will end up with a really bad GPU.
What has come up to be absolutely true when considering GPU that were mining is that if anything at all can be done to GPU in order to increase performance, it has been done. Miners want to optimize and almost every GPU if could be overclocked, it was overclocked.
Extensive mining also means that thermal paste has been dried and it is pretty useless at this point and there is a very high chance that fans and heat sinks will need much cleaning or even replacement raising the price of the card itself for mentioned paste, fans, and heat sinks.
There's no way to tell what the previous owner might have done with a graphics card when you're shopping online, so our advice is to assume the worst. Don't trust the seller to give truthful information. Any listing that says it was "never used for mining" at this point is probably a lie.
Age of the GPU matters
Date when GPU itself has manufactured really matters. Newer cards even if used extensively have been used for a much shorter period of time and are not so damaged were ones produced a few years ago have seen a lot of action.
Let’s say that you get RTX 3060, In the worst-case scenario it has been mining since late February of 2021 and basically, it is still under warranty so it should behave OK and put some good work in gaming even in that state.
On another hand, if we take for example GTX 1080Ti which is 4 years old GPU things start to change drastically. 4 years GPU could be worn out even if it was used just for extensive gaming sessions let alone for mining.
No return policy and seller rating
Most of the time you will run into a product that cannot be returned or no refunds policy. This should bring a red flag right away and deter you from purchase.
Sellers with the highest ratings are more trustworthy since many of them will not want to destroy their reputation but these will probably not even have these kinds of merchandise in their store.
Buying with a poor rating seller and no return policy on a product is just asking for trouble. And although some stores do have arbitration and will stand on the customer side there is no guarantee for that and it will take too much time to process.
If you really must buy a second-hand GPU
Of course in these troubled times sometimes due to malfunction or any other reason, there would not be another choice than to buy a second-hand GPU.
In this case, if there is no other option consider sellers with many positive ratings. If you can buy locally that would even be better or the best-case scenario would be if you could visually see and inspect GPU itself in order to see in what state it is.
Look for warranty stickers to see if they are thorn and the card has been tampered with. Also take a good look at screws, if they have scratches card has been opened, probably to replace fan or heating sinks which means that it has worked a lot.
Conclusion
It is very difficult to give the best possible advice on this situation since of GPU shortage, but I would much prefer a new GPU with lower performance than a hi-performance one which was mining.
You have probably heard a lot of good things about gaming mice, how they are better feeling, better in any way possible and it is all true, everything you heard is actually true, they are superior in any way to a regular mouse but with one big disadvantage, and that would be the price. While you can find a regular mouse for pocket change, a gaming mouse is in comparison very expensive even for entry-level ones.
In this article we will explore all advantages and compare it with the regular one so you can come up with your own conclusion about do you really need one for yourself or if you are fine with regular.
Price
As stated price is one factor that does not favor gaming mice. Regular mouse for a personal computer goes around 10 or 20 USD, while entry-level in gaming one will be 40 USD and can go up to 250 USD, this large gap in price is usually determining factor why people pick up regular one. If you are on a really tight budget go for the regular one, but if you can afford a gaming one get it without second thoughts.
Software
This is where you will see the big difference between mice. Regular ones when connected are recognized and the driver is automatically installed and you can use it, same goes with gaming ones but with one big difference, you have an option to install additional manufacturers' software specially tailored for your mouse. In the application, you will be able to access some features that are specific to the mouse model that you could not set in typical Windows mouse properties. Beside more options software can also have features like setting your profiles and saving them to be recalled when you need them on the fly.
Sensitivity of mouse
The sensitivity of the mouse is measured in dots per one inch or short DPI, this is directly shown on your screen by how fast your mouse can move, higher sensitivity means your mouse will move faster across the screen and lower means it will move slower. All gaming mice come with buttons and settings that will allow you to change DPI on the fly and you can choose precise DPI settings in the software.
The regular mouse comes with DPI around 800 and goes to 1200 typically and does not have usually the option to change this while gaming mice start at 400 and can go as high as 26000 with the option to change it. Some regular mice can have only 1 option of DPI, usually very cheap ones.
Polling rates in mice
Pooling rate is the measurement of how often your mouse reports where it is positioned on the computer. The higher the pooling rate, the more responsive your mouse will be and vice versa. It is measured in hertz (Hz) and regular mice have them around 125Hz that is enough if you are using a computer for office, internet, and mail work.
If you are working in design or gaming you will need more than 125Hz polling rate, luckily gaming mice come with a minimum of 500Hz as an entry point and some hi-end models are going as far as 8000Hz. This very high pooling rate will get some extra load on your CPU but the mouse itself will be maximally responsive and will respond even to the smallest moves.
Ergonomics
Regular mice are well just mice, they are typical shape and size, gaming mice are made with ergonomics in mind. How they are made for extensive daily use of several hours per day they are constructed in a way to offer a pleasant and pain-free experience.
If you work on a computer for long periods of time consider gaming an ergonomic mouse since it will take the strain from hands and place them in a more natural position.
Macro keys
Gaming mice most of the time come with more keys compared with regular ones and good thing is that via its software you can tie certain actions to these extra keys making work or gaming more pleasant and quicker.
Components and material quality
In order to make regular mice more affordable and cheaper materials and quality of components had to suffer. Gaming mice have millions of guaranteed clicks by companies that make them before they break and regular ones usually do not guarantee a single one. This is due of course quality of materials that have been used in constructing these devices.
In the long term, if you use a gaming mouse for typical daily tasks it will outlive your regular one and on the side offer you more pleasant and responsive use along the way.
Despite popular belief, there are a lot of users running Linux OS. Linux offers great security and working environment and 96.3% of the world's top 1 million servers run on Linux. 90% of all cloud infrastructure operates on Linux and practically all the best cloud hosts use it. But gaming on Linux is limited, enter Steam proton a Valve’s gaming solution.
What is Steam proton?
Proton is a WINE fork with some extra capabilities, to play games and run applications not native and not made to run natively under Linux OS. It is supposed to bridge the Gaming issues for PC users and let them more freedom in choosing an operating system to game on.
Find out if your game supports Proton
Although there are a lot of titles that nowadays run natively on Linux some will still need proton in order to run at all and sadly some of them will not be able to run on Linux even via proton but seeing how Valve is busy and it is trying to push its ideas and technology slowly this gap is closing.
In order to see how the game you want to play performs and behaves on Linux and proton environment visit https://www.protondb.com/ and find out. As soon as the site loads you will be greeted with statistics and a search option to find out the status of the desired game with one of the given statuses: Borked, Bronze, Silver, Gold, Platinum, and Native.
As you probably guessed native means that the game will work on Linux out of the box and borked will probably not work at all. Platinum and gold status means that game will run on proton without any input or tweaks from the user while silver and bronze means that it will work but might need some tweaks in order to make it work.
How to get Steam proton?
In order to run games under proton inside Linux, you will need firstly a Steam client which luckily works naturally on Linux. Unlocking/activating Steam Proton on your Linux-based system is easy. Just head over to Steam > Settings > Steam Play and toggle the option “Enable Steam Play for Supported Titles”.
Valve has tested and fixed some Steam titles and you will now be able to play those titles. However, if you wish to go even further beyond, and play titles that even Valve has not tested, toggle the option “Enable Steam Play for all titles”.
Conclusion
Even we are not there yet, native gaming on Linux is gaining a foothold each day. Will Steam’s OS with proton technology be one that will turn the tide from Windows or some other tech we cannot tell but one thing is for sure, more choices mean better products so I am hopeful for a bright future.
It is no secret that a few days ago Facebook has been breach and tons of user accounts have been compromised. These kinds of things are very unpleasant experiences for both users and the company itself. User trust lowers significantly in the company and it can greatly increase the chances of users migrating to another platform.
This just shows how much a hacker or security breach can produce damage to the business.
Sadly we can not offer you guidance or assistance in recovering your stolen data nor can we provide you with removing your data from the hands of the attacker. What we can do is to provide you with information has your data been stolen.
Threat actor released the personal information for 533,313,128 Facebook users on a hacking forum, including mobile numbers, name, gender, location, relationship status, occupation, date of birth, and email addresses. This data was originally sold in private sales after being collected in 2019 using a bug in the 'Add Friend' feature on Facebook.
Facebook had closed this vulnerability soon after it was discovered, but threat actors continued to circulate the data until it was finally released practically for free. Since then, Troy Hunt has added the leaked data to his Have I Been Pwned data breach notification service to help users determine if a Facebook member's data was exposed in the leak.
Go to the site and enter your email address to check and see if your data has been compromised.
There are cases when you encounter some issues while updating your Windows 10 computer. One of these issues is the error 0x80240034. This particular error is a Windows Update Error that appears on the Windows Update pane every time an update fails to install. When this happens, your Windows Update will only get stuck at 1% and nothing happens afterward and eventually fails.
If you click on the View Installed Update History, you will see the error code 0x80240034 for the failed updates. You will see this error each time you try to update your Windows PC. Take note that this issue doesn’t only happen to a specific version of the Windows Update but on various different Windows builds based on many users. What’s more, is that some users are also seeing a different error code when their Windows Update fails but they still end up seeing the error code 0x80240034 when they check the Windows Update history.
At the time of writing, it isn’t determined yet what really causes this error but it’s most likely due to some corrupted files in the computer which is why the most common solution you can try is resetting the Windows Update cache. On the other hand, other users also resolved the issue by using the ISO and selecting the “Do not keep previous settings” option during the Windows Update so it might be something to do with transferring the previous settings through the update client. For clear instructions in fixing this issue, refer to the two options provided below.
Option 1 – Try to clear the Windows Update Cache/Distribution Folder
As mentioned earlier, a lot of users tried clearing the Windows Update cache to fix the problem and so far it has worked. Like them, you can try clearing the Windows Update cache by simply deleting the contents of the folder named “SoftwareDistribution” since Windows apparently can’t clear and re-download the update contents once they are corrupted. Thus, deleting the contents of this folder will make Windows download the contents again which will fix the problem. To do that, follow the steps below.
Step 1: Tap the Windows key once.
Step 2: Next, type in “command prompt” in the Windows Start Search, and from the search results that appear, right-click on Command Prompt and select the “Run as administrator” option from the context menu.
Step 3: After opening Command Prompt, type in “net start wuauserv” and hit Enter.
Step 4: Then type in “rmdir %windir%SoftwareDistribution /S /Q” and hit Enter.
Step 5: Now type in “net start wuauserv” and hit Enter. Once it’s done, try updating your Windows PC again, it should now work just fine.
Option 2 – Update Windows via ISO file
If option 1 didn’t work for you, you can try this second option of updating your Windows 10 computer using an ISO file which means that you will have to create a Windows 10 bootable media and use it to install the latest Windows 10 version. The most user reported that this option works and the reason why it does have something to do with the Windows Update client since the Windows Updates downloaded from the regular Windows Update client seems to create issues such as the error 0x80240034. However, issues like this one don’t occur when the very same Windows Updates are downloaded and installed via an ISO file.
Take note that when using a Windows ISO file, you will be asked to choose what you want to do with the previous settings and apps. A lot of users opted for the “Not to keep the old Windows settings” option which has resolved the issue. So if you want to keep the previous settings then you must try to update Windows first while keeping the old settings. However, if it doesn’t work, you have to try installing the latest version of Windows without keeping the previous settings.
Step 1: Click this link and then click the Download Tool Now button.
Step 2: Next, click the “Use the tool to create installation media (USB flash drive, DVD, or ISO file)…” option and follow the next given instructions on the screen.
Step 3: Now select the ISO file option in step 5.
Step 4: After that, you should now have an ISO file.
Step 5: Next, go to the location where you’ve downloaded the ISO file.
Step 6: Then right-click on the Windows 10 ISO file and select the Open with an option and then select File Explorer.
Step 7: Now click on “setup.exe” and follow the next instructions that appear on the screen. When asked, you have to select either: Nothing (clean install) or Keep personal files only option. Take note that you must not select the “Keep personal files, apps, and Windows settings since it doesn’t really work.
As you know, the Windows 10 Action Center has a stack of all the notifications that come from different applications on your computer. So each time an app displays notifications, it will be displayed for about 5 seconds and then it disappears right away. Although the allotted time for the notifications to be displayed is quite enough to catch your attention and help you get a glance at the message, there are times when you might miss it and you hoped it could’ve been displayed a lot longer. So in this post, you will be guided on how you can increase or decrease the display time of the notification in Windows 10.
The best way you can view the missed notification is to click on the Action Center. From there, you will see all the notifications that are grouped by the applications. This means that if you have a lot of notifications, it would be hard for you to find what you are looking for. Thus, in such cases, the best way you can do is to increase the display time for which notification to stay on the screen.
To get started, refer to the instructions given below.
Step 1: Tap the Win + I keys to open Settings.
Step 2: Next, navigate to Home > Ease of Access > Display.
Step 3: After that, scroll down to the end until you see the dropdown to change the notifications where you should see the “Show notifications for”.
Step 4: Then you can change the time from the default 5 seconds to 7, 15, 30, and so on.
Step 5: Once done, the display time of the notifications should stay longer but keep in mind that you must choose the length wisely so if you have notifications from a lot of apps, then the screen will also be filled with multiple notification cards.
If you suddenly encounter the SPECIAL POOL DETECTED MEMORY CORRUPTION Blue Screen error with a bug check value of “0x000000C1” while you are using your computer then it might be due to some problem with the hardware of your Windows 10 computer. According to security experts, it is most likely caused by the physical RAM which could be due to some error in the Realtek driver for Wireless USB 2.0 as well as corruption of the files inside the RAM, and so on.
This kind of problem indicates that the driver wrote to an invalid section of the special pool. On the other hand, system files like the rtwlanu.sys or nvlddmkm.sys can also trigger the SPECIAL_POOL_DETECTED_MEMORY_CORRUPTION Blue Screen error.
To resolve this Blue Screen error, you can use the options provided below as reference but before you do that, make sure to create a System Restore point first. After you have that covered, proceed to the given options below.
Option 1 – Delete the settings of the Driver Verifier Manager
Open the Driver Verifier Manager using the Start search.
After that, select or click on the “Delete existing settings” option and then click on Finish.
Reboot your computer and see if it fixes the Blue Screen error or not.
Option 2 – Try to update or rollback your Network driver
If you have updated the driver software as of late and you suddenly got this BSOD error, you might have to roll back the device driver – in other words, switch back to the previous working version. To do that, follow these steps:
Tap the Win + R keys to launch the Run window and then type in the “msc” command and hit Enter to open the Device Manager window.
Under the Device Manager, you will see a list of drivers. From there, look for the Network Adapters and expand it.
From the list of Network Drivers, look for “Realtek <Model> Wireless LAN 802.11n PCI-E NIC” and then right-click on it and select Update Driver.
Restart your PC and see if it helped in fixing the BSOD error.
Note: If you see any of the following entries under the Network drivers, you might want to download their latest available versions from each one of their manufacturer’s websites.
Realtek High-Definition (HD) Audio Driver
Realtek Card Reader Driver
Realtek Local Area Network (LAN) Driver
On the other hand, if updating the Network driver didn’t help, you can also try to roll back to its previous version.
Open the Device Manager again and then look for Network Drivers.
Next, select Realtek <Model> Wireless LAN 802.11n PCI-E NIC from the list of Network Drivers and then double click to open a new mini window.
After that, make sure that you’re on the Driver tab and if you are not, just navigate to it then click the Roll Back Driver button to switch back to the previous version of the Realtek driver.
Now restart your computer to successfully apply the changes made.
Option 3 – Try running the ChkDsk utility
You can also run the ChkDsk utility to fix the SPECIAL_POOL_DETECTED_MEMORY_CORRUPTION Blue Screen error.
First, open This PC and right-click on your operating system partition for Windows.
Next, click on Properties and navigate to the Tools tab.
Then click on Check under the Error Checking section.
After that, a new mini window will be opened and from there click on Scan drive and let it scan your disk drive partition for any errors and then restart your computer.
Option 4 – Use the Windows Memory Diagnostics
Since the problem has something to do with the physical RAM, you need to use Windows Memory Diagnostics. To run it, refer to these steps:
Tap the Win + R keys to open Run and type exe and hit Enter to open the Windows Memory Diagnostic Tool.
After that, it will give two options such as:
Restart now and check for problems (Recommended)
Check for problems the next time I start my computer
Once your computer has restarted, perform a basic scan or you could also go for the “Advanced” options such as “Test mix” or “Pass count”. Simply tap the F10 key to start the test.
Note: After you select the option, your PC will restart and check for memory-based issues. If it finds any issues, it will automatically fix them.
Option 5 – Run the Blue Screen Troubleshooter
The Blue Screen troubleshooter is a built-in tool in Windows 10 that helps users in fixing BSOD errors like SPECIAL_POOL_DETECTED_MEMORY_CORRUPTION. It can be found in the Settings Troubleshooters page. To use it, refer to these steps:
Tap the Win + I keys to open the Settings panel.
Then go to Update & Security > Troubleshoot.
From there, look for the option called “Blue Screen” on your right-hand side and then click the “Run the troubleshooter” button to run the Blue Screen Troubleshooter and then follow the next on-screen options. Note that you might have to boot your PC into Safe Mode.
When you try to open a website but instead encounter an “Access Denied, You don’t have permission to access on this server” error message along with the ULR which you aren’t able to access with a reference number, then it is most likely caused by some network-related issue in your browser. Note that this error mostly occurs on Firefox browsers.
The “Access Denied” error appears when your Mozilla Firefox browser uses a different proxy setting or VPN instead of what’s really set on your Windows 10 PC. Thus, when a website detected that there is something wrong with your browser cookies or your network, it blocks you which is why you can’t open it. To resolve this error, here are some suggestions you can try. And if you got the same error message on a different browser, you can still follow the possible solutions given below.
Option 1 – Try clearing everything about the website
Open your browser and tap the Ctrl + H keys on your keyboard.
After that, look for the listing of the website from your browser history and right-click on it.
Then select the “Forget about this site” option. This will get rid of all the data such as browsing history, cache, cookies, and passwords. Thus, if you have a password saved or other important data of the website, you have to save it first before you tap the Ctrl + H keys.
Option 2 – Try disabling the VPN
As pointed out earlier, if you are using VPN, this could be the reason why you’re getting the “Access Denied” error so the most obvious thing to do is for you to turn off the VPN and try to run the Windows Update once more. And if you use a VPN software that works using their software, you can just completely exit or log-off from its account. On the other hand, if you are using a built-in Windows 10 VPN, you can simply turn it off or delete all the settings you have created there.
Option 3 – Uninstall the VPN service you are using or use a different provider
If you disabling the VPN service worked in fixing the “Access Denied” error, you might want to uninstall it. As mentioned, website administrator blocks IP ranges if they notice any malicious activities and because of this, your IP address might fall into the banned range even if you didn’t do anything at all. To uninstall the VPN service, follow the steps below.
Tap the Win + R keys to open the Run dialog box
Then type “appwiz.cpl” in the field and hit Enter to open the Programs and Features in Control Panel.
From there, look for the VPN service you are using, select it and then click on Uninstall to remove it.
After that, restart your computer and try to install the latest version of the program again. It should work now. If not, proceed to the next available option below.
Option 4 – Try disabling the proxy server for your LAN
If your PC was just attacked by some adware or malware as of late, it is possible that it has changed the network settings in the system and might display spam advertisements. Thus, you have to disable the proxy server for your LAN. To do that, refer to these steps:
Tap the Win + R keys to open the Run dialog box.
Then type “inetcpl.cpl” in the field and hit Enter to pull up the Internet Properties.
After that, go to the Connections tab and select the LAN settings.
From there. Uncheck the “Use a Proxy Server” option for your LAN and then make sure that the “Automatically detect settings” option is checked.
Now click the OK and the Apply buttons.
Restart your PC.
Note: If you are using a third-party proxy service, you have to disable it.
 Windows 11 has brought some bad reviews for its inability to change the taskbar location to the screen. Luckily we can still hide it if needed.
 According to Zimperium zLabs, this malware that was recently detected has been doing its scams and attacks even in November of 2020 and has thus far accumulated hundreds of thousands of dollars in its scam.
On the surface it looks very harmless, asking for typical permissions like internet access, calls, and other related needed functions, and then it waits. After few months the real attack happens when users get charged with premium service they never subscribed to in the first place.
According to Zimperium zLabs, this malware that was recently detected has been doing its scams and attacks even in November of 2020 and has thus far accumulated hundreds of thousands of dollars in its scam.
On the surface it looks very harmless, asking for typical permissions like internet access, calls, and other related needed functions, and then it waits. After few months the real attack happens when users get charged with premium service they never subscribed to in the first place.

 GPU shortage and its cause
 Despite popular belief, there are a lot of users running Linux OS. Linux offers great security and working environment and 96.3% of the world's top 1 million servers run on Linux. 90% of all cloud infrastructure operates on Linux and practically all the best cloud hosts use it. But gaming on Linux is limited, enter Steam proton a Valve’s gaming solution.