Logo

Fix Windows Update Error 0x8024000B

As you know, Windows Updates are essential for your operating system as it keeps it protected from potential threats, fixes bugs and improves your experience in using Windows 10. However, there are instances when Windows Updates also cause errors and one of them is the Windows Update Error 0x8024000B.

One of the causes of this particular Windows Update error is that Windows was not able to read the Update Manifest file which is needed to install the Windows Updates. This means that the operation was canceled by either the service or the user. On the other hand, this error could also occur if you are not able to filter the results. When you encounter this error, you will see an error message that says, “WU_E_CALL_CANCELLED: Operation was canceled”. This indicates that the operation was canceled by the operating system itself.

To resolve the Windows Update Error 0x8024000B, here are some suggestions you need to check out.

Option 1 – Try to run the Cleanup (Decline) Superseded updates PowerShell script

The first thing you can do to fix the Windows Update Error 0x8024000B is to run the Cleanup (Decline) Superseded updates PowerShell script. This is actually an easy fix since all you have to do is download and run it from the Microsoft Technet site. Once you’re done downloading and running the file, restart your computer and see if the error is fixed or not.

Option 2 – Try to rename the Spupdsvc.exe file

If the first option didn’t work, you can try renaming the Spupdsvc.exe file which is one of the reasons why you’re getting the Windows Update Error 0x8024000B.

  • First, tap the Win + R keys to launch the Run utility.
  • Next, type the following command and hit Enter to execute it in cmd:

 /c ren %systemroot%System32Spupdsvc.exe Spupdsvc.old

  • The command you entered will rename the troublesome “Spupdsvc(.)exe” file to “Spupdsvc(.)old”.
  • Now restart your computer after the command has been executed.

Option 3 – Try to restart various Windows Update-related services and components

You could also try to restart some Windows Update-related services to resolve the Windows Update error. Refer to the following steps to do so:

  • Tap the Win + X key combination and select Command Prompt (Admin) to open Command Prompt with admin privileges.
  • After opening Command Prompt, copy and paste each one of the commands listed below one by one and tap Enter right after you enter each command.
    • net stop wuauserv
    • net stop bits
    • net stop appidsvc
    • ren %systemroot%SoftwareDistribution SoftwareDistribution.bak
    • ren %systemroot%system32catroot2 catroot2.bak
  • Once you’ve entered all the commands given above, they will stop all the Windows Update services that are running on your computer as well as clear the SoftwareDistribution folder, and reset the Catroot2 folder. Now you have to start all these Windows Update services you’ve just stopped by executing the following commands:
    • net start wuauserv
    • net start bits
    • net start appidsvc
    • net start cryptsvc
  • After that, restart your computer and try to run the setup again, and see if the error is now fixed.

Option 4 – Try to run the Windows Update Troubleshooter

You should also try to run the built-in Windows Update troubleshooter as it could help you resolve the Windows Update Error 0x8024000B. To run it refer to these steps:

  • Go to Settings and then click on Windows Update from the given menu.
  • Next, click on the Troubleshoot option and select Windows Update from the given options to run the Windows Update troubleshooter.
  • After that, follow the next on-screen instructions and wait until the process is completed, and check if the Windows Update Error 0x8024000B is fixed or not.

Do You Need Help with Your Device?

Our Team of Experts May Help
Troubleshoot.Tech Experts are There for You!
Replace damaged files
Restore performance
Free disk space
Remove Malware
Protects WEB browser
Remove Viruses
Stop PC freezing
GET HELP
Troubleshoot.Tech experts work with all versions of Microsoft Windows including Windows 11, with Android, Mac, and more.

Share this article:

You might also like

MS releases ISO for Windows 10 build 21354
On April 7th Microsoft has released Windows build 21354 for their flagship OS and updates are rolling. Alongside the new update builds Microsoft has decided to create and release Windows 21354 build as an installable ISO image for anyone who wishes to do a clean installation of Windows without the need to update it after the installation. We have not seen this move by Microsoft in a long time and honestly, we are welcoming it, it is always great to have updated ISO Windows build than to install the old version and sit through an hour or more of updates. If you are interested in getting this ISO image and you are part of the insider program you can download it from here. If you would like to read more helpful articles and tips about various software and hardware visit errortools.com daily.
Read More
Basic IT skills everybody should know
In today’s world and age, there are some essential IT skills that basically everyone should know. No matter in what field you are working some skills are just needed in order to function properly in the work. So, without further ado let's dive into what are these essential IT skills everyone, even your grandmother should know.

Basic IT skills5 Essential IT skills everybody should know

  1. Word processing

    No matter are you creating or editing business documents or just trying to help a friend or relative, word processing skill is an essential asset and requirement in today’s age. Writing anything on a bunch of paper is time-consuming, papers can get lost, and searching for a particular item inside a bunch of papers is not a really enjoyable experience. A much easier solution is to write, format, and keep everything on the computer and almost all employers are asking for this skill.
  2. Send and using emails

    Today we live in the digital age and most communication is done in real-time via messaging apps and file sharing is done via file-sharing services. Despite mentioned technology, many files are shared and sent through emails. When a message is too long or complex when it needs to have some attachment or to be kept in archive emails are the way to go and therefore using email is a must-have essential skill.
  3. Using search engines

    When talking about using search engines we really do not think about firing up your favorite browser, going into the search engine,s and typing cat pictures. What we think is that a person should know how to use a search engine properly, tweak its search options, and phrase words and sentences to find everything he or she needs.
  4. Doing data work

    Data entry and data calculations have been made easier than ever thanks to today's technology. Microsoft excel, libre office calc, google sheets, etc. are all capable of performing a great variety of calculations and keeping track of plenty of required data. This skill is often asked by employers as an essential one.
  5. Cyber security

    Each employee or person, in general, should be quite aware of various scams and best practices to keep itself safe in this digital world. We have several articles on this topic and there are a great variety of articles on the internet as well.

Conclusion

No matter are you young or old, employed or looking for a job, these skills are a must-have in today’s world.  There are a lot of great tutorials online on these various topics and I am sure that your knowledgeable friend or cousin would be happy to help and show you how to do all of these things.
Read More
Windows Dynamic Lock is missing or not working
If you are familiar with the Dynamic Lock feature in Windows 10, then it has probably made it easier for you to lock your computer the instant you move away from it. This interesting feature does not need any special software like IR Cameras to use this feature as long as your Windows 10 computer supports Bluetooth which it most likely does. However there are times when the Dynamic lock feature is either missing or not working. When that happens, here are some suggestions that could help you. But before anything else, you need to create a System Restore point first since you will be modifying some critical system settings as well as registry files. After you’ve created a System Restore point, refer to the following options below to fix the issue with Dynamic Lock.

Option 1 – Try using the Settings app

  • Tap the Win + I keys to open the Settings app and then navigate to Accounts > Sing-in options.
  • After that, scroll down until you see the Dynamic Lock section.
  • Next, make sure that the checkbox for “Allow Windows to automatically lock your device when you are away” is checked.
  • Now that you’re all set, exit the Settings app.
Note: If for some reason the above-given solution didn’t work, you can try the next options below.

Option 2 – Try to pair your Bluetooth Device

If you get a message saying, “Allow Windows to automatically lock your device when you are away” in the Notifications Center or in the Settings app, then you need to pair your Bluetooth device. To do so, follow the steps below.
  • Go to Settings > Devices > Bluetooth & other devices.
  • From there, make sure that Bluetooth is turned On and then pair your Bluetooth device.
  • And if you open the Windows Defender Security Center, you will see the following message as well.
  • Simply click on the Add Bluetooth device button and it will open the Bluetooth settings where you can also pair the device.

Option 3 – Try to reinstall or update the Bluetooth driver

The issue might have something to do with the Bluetooth drivers. It could be that it is outdated and needs to be updated or that you recently updated it and since then you have trouble removing the Bluetooth device and so to fix the issue, you can update, roll back or uninstall the Bluetooth drivers. How? Follow the steps below.
  • Tap the Win + X keys to open the Device Manager.
  • Next, look for the Bluetooth device and right-click on it.
  • Select the option “Update driver”.
  • After that, a new popup window will appear. In there, select the option, “Search automatically for updated driver software”.
Note: Checking the update may take a few minutes so you’ll have to wait until it finishes. If it is able to find an update, you must install it. And if you want to reinstall the Bluetooth driver, just select the “Uninstall driver” option and follow the next on-screen instructions that follow.

Option 4 – Try to use the Registry Editor

  • Tap the Win + R keys to open the Run dialog box and then type “Regedit” in the field and hit Enter to open the Registry Editor.
  • If a User Account Control or UAC prompt appears, just click on Yes to proceed.
  • After that, navigate to the following registry key:
HKEY_CURRENT_USERSoftwareMicrosoftWindows NTCurrentVersionWinlogon
  • Next, look for a DWORD named “EnableGoodbye” located on the right-side panel and then make sure that its value is set to 1 which means that it is enabled while 0 indicates disabled.
  • Now close the Registry Editor and restart your computer to apply the changes made successfully.

Option 5 – Try checking the Group Policy setting

If your Windows 10 version has the Group Policy Editor, you can use it to fix the Dynamic Lock issue as well. Simply follow the steps below to use it.
  • Tap the Win + R keys to open the Run dialog box.
  • Then type “gpedit.msc” in the field and hit Enter to open the Group Policy Editor.
  • Next, navigate to the following path:
Computer ConfigurationAdministrative TemplatesWindows ComponentsWindows Hello for Business
  • After that, look for an entry named “Configure dynamic lock factors” and double click on it to open a new window.
  • Once you enable this Group Policy setting, the signal rules will be evaluated to detect the absence of a user and will lock the device automatically. On the other hand, if you disable or don’t configure this setting, you can continue locking your computer with existing locking options. Take note that it may be Not configured or Enabled but shouldn’t be set to Disabled.
  • Now select the radio button for Enabled and set the Signal rules then click OK.
  • Then exit the Group Policy Editor and restart your computer.
Read More
How to Resolve the Sqlite3.dll Error Code

Sqlite3.dll Error - What is it?

Sqlite3.dll error is a typical example of DLL errors. This error message occurs when the system fails to access Sqlite3.dLL (Dynamic Link Library) files shared by certain programs to run on the PC. The error is displayed in the following format:

"Cannot find the file sqlite3.dll (or one of its components)"

Followed by:

"Error starting program.. A required .DLL file sqlite3.dll was not found."

Solution

Restoro box imageError Causes

The sqlite3.dll error message may pop up on your computer screen due to the following reasons:
  • Missing sqlite3.dll files
  • DLL files affected due to viruses and malware on your system
  • Registry overloaded with invalid entries
  • Disk fragmentation
Whether the cause for the sqlite3.dll error code on your PC is malware invasion or registry issues, it is recommended to resolve it immediately before the damage sets in. Such errors can expose your PC to serious threats like privacy errors, data breaches, identity thefts, cybercrime, system failure, crashes, and valuable data loss.

Further Information and Manual Repair

When it comes to fixing sqlite3.dll error code, you don’t always need to hire a professional and spend hundreds of dollars on the repair. Here are some simple and do it yourself solutions that you can try and resolve the error on your system for free.

1. Check inside recycle bin and restore the deleted file

If this error popped on your computer screen after installing a certain program, then you need to check your recycle bin. This is because DLL files are shared by multiple programs, it might be possible that the program you just deleted also used the sqlite3.dll file to run on your system. And so when you uninstalled the program, the sqlite3.dll file also got removed. To resolve this, check your recycle bin for the file. If you find it, restore it. Once the files is restored, try running the application that was generating the sqlite3.dll error message. If the error still persists, then this means the cause of the sqlite3.dll error is deeper. It could be due to malware or the registry.

2. Remove Malware

To remove malware, run an antivirus. This will help scan for such malicious software on your system affecting DLL files and remove them. However, the drawback is that it may slow down the speed of your PC significantly. And when running it, you may have to stop all other activities on your system.

3. Repair and Restore the Registry

If the cause of the sqlite3.dll error is the registry corrupted with invalid entries and disk fragmentation, then you need to repair and restore the registry. The best way to do this is to download Restoro. Restoro is a powerful and highly functional registry cleaner. It scans your entire PC and detects all registry issues in seconds. It wipes out all the unnecessary and obsolete files including the junk files, invalid registry entries, bad registry keys, temporary internet files, cookies, and browser history. It clears up hard disk space and frees it of clutter. Furthermore, this registry cleaner also repairs the damaged DLL files and restores the registry. Restoro is not only a registry cleaner but is also a system optimizer. This means you can also run it to scan and remove malware on your PC and system instability issues. It boosts your PC’s speed and performance. It runs smoothly on all Windows versions. It is safe, efficient and user-friendly. The layout is neat and the interface is easy to use and intuitive. In just a few clicks you can resolve the sqlite3.dll error and resume using your desired programs. Click here to download Total System Care on your PC to resolve sqlite3.dll error pop-ups.
Read More
This Publisher has been blocked
There are times when you try to open a file, an executable file for instance, but were unable to do so since you encounter an error in an Open File – Security Warning dialog box that says, “This publisher has been blocked from running software on your machine, You must unblock this publisher to run this software”. This kind of error is most likely thrown by your operating system because it considers the file to be unsafe and could potentially harm your computer. However, if you’re certain that the file is harmless, read on as this post will walk you through fixing the error so you can open the file without getting an error. There are various options you can check out to fix the error. You may run the program using Command Prompt or unblock it using File Properties. You could also try turning off SmartScreen or use the unblock file command in Windows PowerShell.

Option 1 – Try running the program via Command Prompt

  • Tap the Win + R keys to open the Run dialog box and type “cmd” in the field and hit Enter to open Command Prompt.
  • Next, tap the Shift key and right-click on the program or the executable file, and then select the “Copy as path” option.
  • After that, paste this path in the Command Prompt window and tap Enter to open the program.

Option 2 – Try to unblock the file using File Properties

  • Right-click on the file you were trying to open and select Properties.
  • Next, click the Unblock button and then click on the Apply and OK buttons.
  • You should now be able to open or access the file without getting the error.

Option 3 – Turn off SmartScreen

The next thing you can do is to turn off SmartScreen temporarily. All you have to do is open the Windows Defender Security Center and from there, go to the App & browser control section. After that, click on the radio button for Off under Check apps and files. Once you’re done, try opening the file again. Don’t forget to enable the SmartScreen back on.

Option 4 – Try to use the Unblock-File command in PowerShell

You might also want to utilize the Unblock-File command in Windows PowerShell as it will unblock the file so you can open it. To execute this command, follow these steps:
  • Tap the Win + X keys and then click on Windows PowerShell.
  • After opening PowerShell, type or copy and paste this command and tap Enter to execute it: Get-ChildItem -Path 'C:Users<username>Downloads' | Unblock-File
  • The command you entered will unblock all the files in the Downloads folder, assuming that’s where the file you were trying to open is stored. If it’s not, then replace the path with the path where the file is located. Take note to also replace “<username>” with your Username.
  • Now check if the file has been unblocked by accessing or opening it.
Read More
How to remove Ammyy Admin

What is Ammyy Admin

AmmyyAdmin is a software developed by Ammy. This software allows you to manage network computers and servers remotely without complicated NAT settings adjustments or Firewall problems. The program is similar in marketed function to TeamViewer or LogMeIn. This software does not require installation and it lets you control other computers or share files over the software. It usually comes bundled with other software. This software copes files into your computer and sometimes creates new startup keys that allow it to start each time your computer is restarted. AmmyAdmin might display additional ads in your browser as well as pop-up ads. Due to its ability to silently install and run remote administration, it could be used maliciously by those who intend to damage your computer or steal data. AmmyyAdmin is flagged for optional removal, and if you did not intentionally install it, removal is highly recommended

What is a Potentially Unwanted Program (PUP)?

If you’ve ever downloaded freeware or shareware, odds are high that your computer can get installed with a bunch of unwanted programs. A PUA / PUP (potentially unwanted application / potentially unwanted program) is a software program that comes bundled with freeware/shareware and you agree to install it on your computer system. These are programs you definitely don’t want on your system simply because it does not give any beneficial service. PUP doesn’t involve malware in the traditional sense. One simple difference between malware and PUP is distribution. Malware is typically dropped through vulnerability exploitation and in contrast, PUP gets installed with the consent of the end-user, who consciously or unknowingly authorizes the PUP installation on their computer. A PUP might not be viewed as malicious or harmful but nonetheless, it is a common cause of clunky operating systems; some PUPs are a lot more aggressive by deliberately slowing down your PC.

How PUPs affect you?

Potentially Unwanted Programs appear in different forms and varieties, but most times, they are adware programs that exhibit irritating pop-up adverts and advertisements on web pages you explore. In addition, most free software nowadays comes with quite a few unwanted add-ons; in many instances a web browser toolbar or browser modification like a homepage hijacker. They’ll modify browser settings, change default search provider, substitute the default home page with their very own websites, decelerate internet speed, and will damage your computer as well. They could look harmless but PUPs are usually spyware. Some might carry dialers, keyloggers, web browser hijackers, and tracking components that will collect system details, or tracks customer habits and relays these records to third-party organizations. Because of this unwanted program, your application might freeze, your security protections could get disabled which may leave the computer susceptible, your system may get damaged, and the list goes on and on.

Tips on protecting yourself from unwanted software

• When installing anything on your PC, always read the fine print, including the EULA. Do not accept terms of use that are for bundled programs. • Select the “custom” install whenever downloading a software program. Particularly, pay attention to those small boxes which have been checked as default, where you might ‘agree’ to receive advertisements or install software bundlers. • Use anti-PUP software. Security applications like Safebytes Anti-Malware offer the very best real-time protection from PUPs and also other malware. • Be alert if you download and install freeware, open-source programs, or shareware. Avoid downloading and installing browser extensions and programs you are not knowledgeable about. • Use only official product sites for downloading applications. Avoid download websites completely since the majority of websites force users to download the software using their own download manager, which is often bundled with some kind of unwanted program.

Safebytes Anti-Malware scans and detects malware for free. To complete removal, and ensure full PC protections, a paid license key is required.

Malware could potentially cause a lot of damage to your computer. Some malware sits in between the computer and the net connection and blocks a few or all internet sites that you would like to check out. It could also block you from installing anything on your computer, particularly anti-virus programs. If you are reading this article now, you’ve perhaps recognized that a malware infection is a reason behind your blocked net connectivity. So what do if you need to download and install an anti-virus application like Safebytes? There are a few solutions you can attempt to get around with this issue.

Boot Windows in Safe Mode

The Windows-based PC includes a special mode called “Safe Mode” where only the minimum required programs and services are loaded. In the event the malware is blocking internet connection and affecting your PC, running it in Safe Mode enables you to download antivirus and run a scan while limiting potential damage. To enter into Safe Mode or Safe Mode with Networking, press F8 while the system is booting up or run MSCONFIG and locate the “Safe Boot” options in the “Boot” tab. Once you’re in Safe Mode, you can try to download and install your anti-malware software program without the hindrance of the malicious software. Following installation, run the malware scanner to eliminate most standard infections.

Obtain the security program in an alternate web browser

Certain malware may target vulnerabilities of a specific web browser that obstruct the downloading process. If you seem to have a virus attached to Internet Explorer, then switch over to an alternate browser with built-in security features, such as Firefox or Chrome, to download your favorite antivirus program – Safebytes.

Create a portable anti-malware for removing malware

Here’s another solution which is utilizing a portable USB antivirus software that can check your system for malicious software without the need for installation. Adopt these measures to run the anti-malware on the infected computer system. 1) On a clean computer, install Safebytes Anti-Malware. 2) Plug the Thumb drive into the uninfected computer. 3) Double-click the exe file to run the installation wizard. 4) Pick a USB flash drive as the location when the wizard asks you where you want to install the program. Follow the on-screen instructions to finish the installation process. 5) Remove the flash drive. Now you can utilize this portable anti-virus on the affected computer system. 6) Double-click the anti-malware program EXE file on the flash drive. 7) Run Full System Scan to identify and clean-up up all sorts of malware. These days, an anti-malware program can protect your computer from different forms of online threats. But how to select the right one amongst countless malware protection software that is available in the market? As you might be aware, there are numerous anti-malware companies and products for you to consider. Some of them are great, some are ok types, while some will ruin your computer themselves! You have to choose one that is reliable, practical, and has a strong reputation for its malware source protection. One of the strongly recommended software is SafeBytes AntiMalware. SafeBytes has a superb reputation for quality service, and customers appear to be very happy with it. SafeBytes can be described as a highly effective, real-time anti-malware application that is created to assist everyday computer users in safeguarding their computers from malicious internet threats. Using its cutting-edge technology, this application will assist you to eradicate multiples types of malware like computer viruses, PUPs, trojans, worms, ransomware, adware, and browser hijackers. There are many wonderful features you will get with this security product. Below are some typical features found in this software: Robust, Anti-malware Protection: Built on a highly acclaimed anti-virus engine, this malware removal application has the capacity to find and get rid of various obstinate malware threats like browser hijackers, PUPs, and ransomware that other common antivirus software will miss. Real-time Protection: Malware programs attempting to get into the system are identified and stopped as and when detected by the SafeBytes active protection shields. They are very effective in screening and eliminating different threats because they’re constantly improved with the latest updates and alerts. Internet Security: Safebytes assigns all sites a unique safety score that helps you to get an idea of whether the webpage you’re going to visit is safe to browse or known to be a phishing site. Light-weight: This software program is not “heavy” on the computer’s resources, so you’ll not notice any performance problems when SafeBytes is working in the background. 24/7 Online Support: Skilled technicians are at your disposal 24/7! They will promptly resolve any technical issues you might be experiencing with your security software. SafeBytes has come up with a wonderful anti-malware solution that can help you conquer the latest malware threats and virus attacks. Once you’ve installed SafeBytes Anti-Malware, you will no longer need to bother about malware or other security worries. To ensure the complete removal, manually check your hard drive and registry for all of the following and remove or reset the values accordingly. Please note that this is for advanced users only and may be difficult, with incorrect file removal causing additional PC errors. In addition, some malware is capable of replicating or preventing deletion. Doing this in Safe Mode is advised.
Files: %APPDATA%AMMYY C:%DOCUMENTS%%%USER%%LocalTemp$inst.tmp C:%DOCUMENTS%%%USER%%LocalTemp$insttemp_0.tmp C:%DOCUMENTS%%%USER%%LocalTempAA_v3.exe C:%DOCUMENTS%%%USER%%LocalTempencrypted.exe C:Documents and Settings%USER%Application DataCasablanca C:Documents and Settings%USER%Application DataBl 430 493 557.ADO C:Documents and Settings%USER%Application DataDakar C:Documents and Settings%USER%Application DataMegaloblast.a C:Documents and Settings%USER%Application DataCrypto.dll C:%DOCUMENTS%%%USER%%LocalTempnsh2.tmpSystem.dll Key: HKUS-1-5-21-1801674531-413027322-2147225017-500SoftwareAmmyy Key: HKLMSOFTWAREAmmyy
Read More
EU Common Charge Rules

In 27 European countries for some time it has been considered for introducing a law that would force phones, tablets, laptops, and other mobile devices to use a single USB Type-C connector.

EU charge law

The European Parlament announced that a provisional agreement has been reached and that it was voted that a single charging solution is USB Type-C. The current agreement applies and covers the next devices: phones, tablets, Readers, earbuds, digital cameras, headphones, headsets, handheld consoles, and portable speakers. All currently existing devices can still be sold without issues but starting in the fall of 2024 all-new products must support USB Type-C charging.

The agreement will also hit Laptops but not on the same date, How is USB Type-C currently not enough for charging laptops, all new laptops that will have to use it are scheduled for fall of 2025.

Although the agreement is reached the EU Parliament and Council still have to formally approve everything.

Apple targeted the most

Apple has been targeted as the main target for rules since their iPhones are still using Apple's proprietary Lightning charging port. Apple sells a lot of iPhones in Europe and even though iPad Pro and iPad Air along with all MacBooks have moved to USB Type-C, iPhones are still struggling with the Lightning port.

Apple criticized the EU’s charger rules when they were first proposed in 2021, telling the BBC, “We remain concerned that strict regulation mandating just one type of connector stifles innovation rather than encouraging it, which in turn will harm consumers in Europe and around the world.” The European Union has said in response that it will update its rules as new technology arrives.

Why was this proposed?

The main problem in Europe that led to this proposition was electronic waste which reached 11 000 metric tons in 2018. European union is afraid that this will keep rising as chargers become larger and heavier in order to accommodate faster-charging speeds. More electronic waste means more hardware slowly decomposing in landfills that will contribute to climate change affecting everyone on the planet, not just the people living in Europe.

Read More
Removing Default Taskbar Buttons in Windows 11
Windows 11 taskbarI do not know about you, but I prefer to set my Windows to be more to my liking and not how Microsoft thinks it should be. Let’s face it, not all users feel comfortable whit Microsoft settings and idea how things should be. One of the things I particularly did not like even in Windows 10 is icons that come by default on my taskbar, now so far, well until the latest Windows 11 update you could remove default taskbar icons the same way as in Windows 10, just right-click on them and unpin, sadly with latest update build on Windows 11 this option has been removed. In order to remove default icons from the taskbar, one must go now to Windows 11 settings and choose from there which one you would like to be placed on it. Of course, this is nothing game-breaking but it still feels strange why the standard option has been removed, it just makes no sense but lately not many things that come from Microsoft do. I do not know about you, but I prefer to set my Windows to be more to my liking and not how Microsoft thinks it should be. Let’s face it, not all users feel comfortable whit Microsoft settings and idea how things should be. One of the things I particularly did not like even in Windows 10 is icons that come by default on my taskbar, now so far, well until the latest Windows 11 update you could remove default taskbar icons the same way as in Windows 10, just right-click on them and unpin, sadly with latest update build on Windows 11 this option has been removed. In order to remove default icons from the taskbar, one must go now to Windows 11 settings and choose from there which one you would like to be placed on it. Of course, this is nothing game-breaking but it still feels strange why the standard option has been removed, it just makes no sense but lately not many things that come from Microsoft do.
Read More
How to Fix Windows 10 Error 8024402C

Error Code 8024402C – What is it?

When upgrading to Microsoft Windows 10, some users may encounter Error Code 8024402C. This error, while attempting to update, is a result of five possible issues. The error code itself is not a critical concern, yet while the error is occurring, users will not be able to upgrade their Windows software. As with any Microsoft error code, even if it is not critical, it is recommended that the error be addressed sooner rather than later. An insignificant error now could lead to a larger, more catastrophic error later on. Common symptoms include:
  • A dialog box appears with the Error Code 8024402C when attempting to upgrade to Microsoft Windows 10.
  • Your current version of Windows is unable to recognize the need for an update to Microsoft Windows 10.

Solution

Restoro box imageError Causes

As previously stated, there are five major reasons why error code 8024402C occurs.
  • An erroneous character in the proxy override settings
  • A wrongly configured firewall is preventing the update from taking place.
  • Attempting to access the Windows 10 update through a VPN (Virtual Private Network) connection.
  • Workstations that operate behind a corporate ISA server.
  • A corporate network system that does not have auto proxy enabled.
The sooner these known causes are addressed, the sooner you will be able to successfully upgrade to Microsoft Windows 10.

Further Information and Manual Repair

Microsoft Support posits four different resolutions to these known error code 8024402C issues. Some of these methods will be more comfortable for at-home users than others. If you are experiencing this issue in a corporate or business setting, it may be better to have your IT tech or department attempt the methods.

Method 1:  When your firewall is causing the issue.

  1. Access your firewall software.
  2. Specifically, look into the settings associated with your firewall.
  3. Make sure that the following three websites are listed as exceptions to your firewall or proxy.
  • https://*.windowsupdate.microsoft.com
  • http://download.windowsupdate.com
  • http://*.windowsupdate.microsoft.com
  1. If any of these websites are missing from your firewall list, add them to the list.
  2. Restart your Microsoft Windows 10 update.

Method 2: For an erroneous character in the proxy override settings.

  1. Open internet explorer, if you use another program to access the internet, you will still need to use internet explorer for this solution.
  2. Open your internet explorer tools window.
  3. Click on internet options.
  4. Choose the connections tab.
  5. Select LAN settings.
  6. Choose the Advanced option.
  7. Delete anything that appears in the exceptions section.
  8. Closeout of internet explorer.
  9. Click on your start button.
  10. Select RUN and type CMD into the field, press ENTER.
  11. This will access the command prompt screen. Type “proxycfg -d” and press ENTER.
  12. Type the command “net stop wuauserv” and press ENTER.
  13. Finally, type “net start wuauserv” and press ENTER.
  14. Now you have cleared your proxy cache. Access the Microsoft Windows 10 update again to download.

Method 3: If a VPN connection is causing error code 8024402C.

  1. Disconnect from your VPN connection, thus connecting directly to the internet without a proxy or network.
  2. Retry the Microsoft Windows 10 update.
  3. After the update is successful, reconnect to the VPN network.

Method 4: Use this is an ISA server is in place at your networked business site.

  1. Access the ISA firewall client option. From here your goal is to initiate the ISA server automatic detection feature.
  2. From the control panel, select the firewall client option.
  3. Choose the configure option.
  4. Check the box next to “automatically detect firewall server”.
  5. Select the “update now” button.
  6. Click the OK button.
  7. Restart your Microsoft Windows 10 update.
Again, not all of these methods are meant for computer users who do not usually explore and change software settings of this nature. If you do not feel comfortable with any of these methods, you can opt to download and install a powerful automated tool to repair Windows error code 8024402C.
Read More
Change screenshot location

Each time when you press WINDOWS + PrtScn key on your keyboard a screenshot is taken and saved on your Hard drive, to be more precise, it is saved in a specific folder which is in c:\Users\Your user name\Pictures\Screenshots. Now, this specific location is not anything that's bad but it is a little deep and not so user-friendly for quick access.

screenshot properties

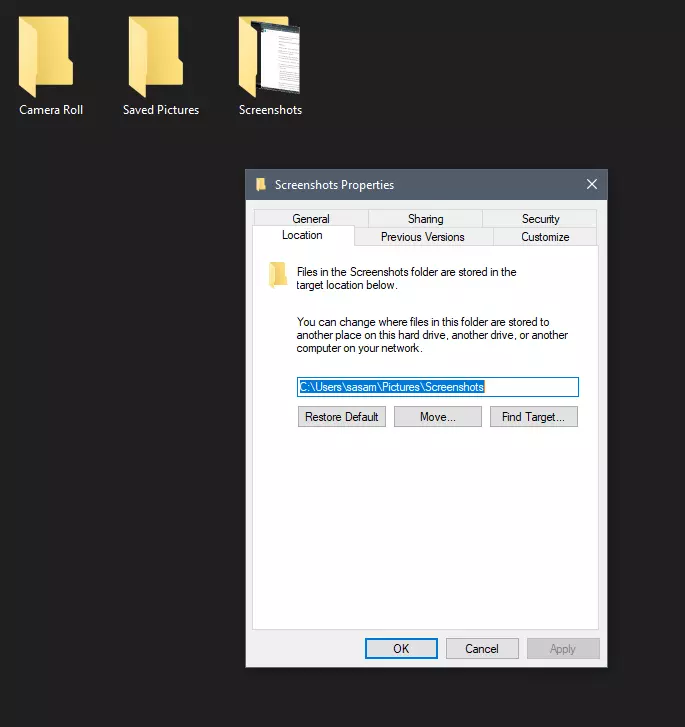
Luckily this default location can be changed into any folder that you like.

Changing location

First thing is to open File Explorer and then navigate to your PC. Once you go to your PC, go to Pictures, and inside right-click on the Screenshots folder. If there is no screenshots folder inside, this means that since Windows was installed no screenshots were taken with WINDOWS + PrtScn key combination. Please note that just by pressing PrtScn you will create a screenshot but you will place it inside the clipboard ready to be pasted somewhere, with WINDOWS + PrtScn you are saving the screenshot directly in a file on your hard drive.

So once you clicked on the Screenshots folder, go to the bottom and click on properties. Inside properties go to the Location tab. In the location, tab clicks on MOVE and browse to your new location where you would like screenshots to be saved. Once you select the folder for screenshots, click on the Select Folder button and confirm with OK. After this, Windows will ask you would you like to move existing screenshots into the chosen folder. Click YES or NO, depending on your preference.

After this easy setup, all of your new screenshots will be placed now inside the chosen folder.

Thank you for reading and I hope to see you tomorrow. Take care.

Read More
1 2 3 171
Logo
Copyright © 2023, ErrorTools. All Rights Reserved
Trademark: Microsoft Windows logos are registered trademarks of Microsoft. Disclaimer: ErrorTools.com is not affiliated with Microsoft, nor claims direct affiliation.
The information on this page is provided for information purposes only.
DMCA.com Protection Status