This post will guide you in fixing the error 0x80070103 when installing Windows Update. According to users who encountered this problem, Windows Update (WU) fails to install several different updates. This kind of Windows Update error is can mostly be seen in the Windows Update screen inside the update reports although it is also known to occur when a user attempts to install a peripheral driver – only if the Windows Update offers to update the driver through a prompt and when you click Yes.
There are several possible causes for this error, it could be that Windows Update is trying to install a particular driver for the second time already which happens when it gets confused by an additional piece of identical hardware like the graphics adapter. Aside from that, the Windows Update might have already installed the driver which is known to occur with unsuitable versions of the already installed driver. In addition, the error could also be due to a third-party program interference like a security program or a utility program that is using the same driver and conflicts with the Windows Update.
Here are some suggestions that might help in fixing the Windows Update error 0x80070103.
Option 1 – Install the updates in a Clean Boot State
You might want to try putting your computer in a Clean Boot state and then install Windows Updates again without any trouble. During this state, you can start the system with a minimum number of drivers and startup programs that will surely help you in isolating the root cause of the issue.
Log onto your PC as an administrator.
Type in MSConfig in the Start Search to open the System Configuration utility.
From there, go to the General tab and click “Selective startup”.
Clear the “Load Startup items” check box and make sure that the “Load System Services” and “Use Original boot configuration” options are checked.
Next, click the Services tab and select the “Hide All Microsoft Services” check box.
Click Disable all.
Click on Apply/OK and restart your PC. (This will put your PC into a Clean Boot State. And configure Windows to use the usual startup, just simply undo the changes.)
After that, try to install the Windows Updates or upgrade again.
Option 2 – Try installing the failing driver without using Windows Update
If installing the updates in a clean boot state didn’t help, you can try a manual approach to yield much better results using the Device Manager or by downloading the driver from the manufacturer’s website manually.
Tap the Win + R keys to launch Run.
Type in msc into the box and tap Enter or click OK to open the Device Manager.
After that, a list of device drivers will be displayed. Look for the device driver you and then select either “Update driver” or “Uninstall device”. And if you find any “Unknown device”, you need to update it as well.
Select the “Search automatically for updated driver software” option and then follow the instructions to complete the process.
If you have chosen to uninstall the driver, follow the screen options to complete the process and then restart your PC.
Note: You also have the option to go directly to the website of your device driver manufacturer and go to the section called Drivers then check if there’s a new available update – if there is, download and install it.
Option 3 – Try to run the Windows Update Troubleshooter
You might also want to run the built-in Windows Update Troubleshooter in Windows that could help you in resolving the Windows Update error 0x80070103. All you have to do is go to Settings > Update& security > Troubleshoot > Windows Update. From there, click on the Run the troubleshooter button and follow the next one-screen instructions that appear. After that, restart your computer and check if the error is now fixed or not by trying to install the update once again.
As you know, the CHKDSK utility is proven to be one of the useful tools to fix any issues that concerns file system, storage, and disk. However, as useful as it may be, it is still not immune to issues as you could encounter errors when running it. One of these errors is the “One such error is the CHKDSK cannot continue in read-only mode” error. If you receive such an error message while running CHKDSK, then you’ve come to the right place as this post will help you sort the problem out.
It is possible that the drive is read-only or that the Write Protection is enabled. It could also be that the drive is already being used and scanned by a different program or utility. To get rid of this error, there are a couple of suggestions you need to check out. You can try to run the CHKDSK utility from Recovery or run it on Boot. You could also try to disable Write Protection. For more detailed steps, follow the given instructions below.
Option 1 – Try to run the CHKDSK utility from Recovery
The first thing you can do to resolve the error in CHKDSK is to run the CHKDSK utility from Recovery. How? Follow these steps:
First, boot into the installation environment for Windows 10 from a Windows installation media.
Next, click on the “Repair your computer” option.
After that, select Troubleshoot > Advanced options > Command Prompt.
After opening Command Prompt, type this command and tap Enter: chkdsk <Partition Letter>: /r /f
Wait until the disk error checking process is completed.
Once it’s done, exit the Command Prompt window and restart your computer and then see if the error is fixed.
Option 2 – Try running the CHKDSK utility on Boot
On the other hand, you can also try to run the CHKDSK utility on Boot so you can fix the error and recover any damaged segments of the drive.
Open an elevated Command Prompt and enter this command: chkdsk /r
After that, you will a message that says, “Chkdsk cannot run because the volume is in use by another process. Would you like to schedule this volume to be checked the next time the system restarts? (Y/N)”
Type Y and tap Enter to schedule a CHKDSK scan once your computer reboots next time.
Option 3 – Try to remove the Write Protection from the drive
As mentioned, removing the Write-Protection on the concerned drive could also help you fix the problem and there are two ways to get rid of the write protection – you can either use the Diskpart utility or the Registry Editor. How? Refer to the following steps.
Via Diskpart utility:
Open Command Prompt with admin privileges and then type the “diskpart” command and tap Enter to execute it.
Next, type “list disk” and tap Enter to get the list of all the Disk connects or all the partitions that are formed on those disks.
After that, you need to choose one command depending on the list of commands you entered. Type “select disk #” and tap Enter to select the disk or partition you want to select.
Then type “attribute disk clear readonly” and tap Enter to Disable the Write Protection on the selected disk or partition.
Via Registry Editor:
Tap the Win + R keys to open the Run utility and type “Regedit” in the field and then tap Enter to open the Registry Editor.
At its most basic level, Error Code 0x8024001b is an error that can cause problems with the installation and updates of software and operating system updates. The most common version of this error appears in Windows 10, but a similar error with a matching code number has been present in previous versions of the operating system, back through Windows 7.
Common symptoms include:
Programs freezing or locking up during use
The appearance of an error message regarding installation difficulties
Computer shutting down or freezing during operation
Difficulty in running multiple programs at the same time
Solution
Error Causes
There are two main causes for Error Code 0x8024001b, both of which are fairly simple: Updates needed for the Windows Update tool itself and software that causes Windows Update to fail during installations through conflicts in system files. While these may seem like technical issues, these problems are actually easily resolved with a few simple steps. The average user can use the methods listed below to fix the problems on their own.
Further Information and Manual Repair
For users who want to address Error Code 0x8024001b for themselves, the steps below can be followed to address the two primary causes for the error. If you have difficulty in completing these steps or are not confident in your computing skills and ability to follow the listed steps, contact a Windows repair technician.
Here are the top methods to resolve Error Code 0x8024001b on your own:
Method One: Check for Updates to Windows Update
In some cases, the Windows Update tool may need an update for itself. When you attempt to run updates or install wizards for other software, it can cause conflicts with the Windows Update process, slowing down your computer or causing it to freeze.
If you are attempting to run multiple installations or updates at the same time, it may also cause Error Code 0x8024001b to arise on your computer.
To resolve this issue, close out all programs, with the exception of the Windows Update tool. Within the tool, select “Check for Updates” and install any updates that are needed. When finished, you should restart your computer to ensure that all updates have been fully applied before attempting any other installations or updates.
Method Two: Uninstall Conflicting Software
Another problem that can cause Error Code 0x8024001b is the presence of conflicting software. If Error Code 0x8024001b has only recently appeared on your computer, consider removing any software that has been added to your computer, running the Windows Update process, and restarting your computer before attempting to reinstall the problem software.
With any method that you use, it is important to remember to keep your Windows Updates current at all times. This is the best way to avoid the appearance of Error Code 0x8024001b and similar errors in the future, as stacked up updates are more likely to cause issues and conflicts with your other installed software and operating system.
While there are some tools out there that claim to be able to fix Error Code 0x8024001b for you, it is important to always thoroughly investigate the publisher and distributor of such software, as some of the tools available on the Internet will actually introduce malware and adware on your computer in the name of “protecting” your computer or resolving an error.
If you have tried to use both methods above and have not fully resolved Error Code 0x8024001b, get in touch with someone who is a qualified computer repair professional and is familiar with your particular version of the Windows operating system to assist you in finalizing your resolution.
Method Three: Use An Automated Tool
If you wish to always have at your disposal a utility tool to fix these Windows 10 and other related issues when they do arise, download and install a powerful automated tool.
If you are having trouble using the Epic Games Launcher, here are some troubleshooting steps that usually fix common problems.
Check the Epic Games server status
Check the Epic Games Server Status page to make sure all systems are operational. If the Epic Games Launcher is affected by an outage or system-wide issue, your issue may be fixed when the outage is resolved.
Clear your launcher’s webcache
Clearing the webcache often resolves display issues that may prevent you from using the launcher. Follow these steps to clear your webcache:
Windows
Exit the Epic Games Launcher by right-clicking the system tray icon in the bottom-right corner, and then clicking Exit.
Press Windows key + R, type “%localappdata%”, and then press Enter to open a File Explorer window.
Open the Epic Games Launcher folder.
Open the Saved folder.
Click the webcache folder, and then delete it.
Restart your computer, and then relaunch the Epic Games Launcher.
Mac
Exit the Epic Games Launcher.
Open Finder.
Click on Go then Go to Folder...
Type ~/Library/Caches/com.epicgames.EpicGamesLauncher and press Enter.
Drag the webcache folder to the Trash.
Press control and click on Trash.
Click on Empty Trash.
Relaunch the Epic Games Launcher.
Run the launcher as an administrator
Running the launcher as an administrator elevates its permissions so it can avoid problems with downloading games, for example. Follow these steps to run the launcher as an administrator:
Right-click your Epic Games Launcher shortcut.
Click Run as Administrator.
Update graphics card drivers
Making sure the player is using the latest graphics card drivers may resolve the launcher crashing. Review this article for steps on how to do update their graphics drivers.
Reinstall the Epic Games Launcher
Note: The following process will remove all of your installed games.
On Windows:
Run system file checker then reinstall the Epic Games Launcher.
Close the Epic Games launcher by right-clicking the system tray icon in the bottom right corner and then clicking Exit.
Click Start.
Type "cmd", right-click Command Prompt,and then click Run as administrator.
In the window that opens, type "sfc /scannow",and then press Enter.
This may take a little while.
Restart your computer.
Click Start.
Type "Add or Remove Programs", and then press Enter.
Select Epic Games Launcher from the list of programs.
Click Uninstall.
Go to www.epicgames.com and click Get Epic Games in the top right corner to download the latest installer.
On Mac:
Close the Epic Games Launcher.
Verify there are no processes associated with the Epic Games Launcher by checking Activity Monitor.
Open the Applications folder.
Click and drag the Epic Games Launcher application to the Trash.
Verify all the following directories no longer have any Epic Games Launcher folders or files:
~/Library/Application Support
~/Library/Caches
~/Library/Preferences
~/Library/Logs
~/Library/Cookies
Go to www.epicgames.com and click Get Epic Games in the top right corner to download the latest installer.
Launcher freezing on macOS 10.15.1 or earlier
If your launcher is freezing on macOS 10.15.1 or earlier, follow the steps above to reinstall the Epic Games Launcher on your Mac.
Verify system requirements
Make sure your computer meets the system requirements to run the Epic Games Launcher using this article here. The system requirements for the Epic Games Launcher are here.
Blinking Epic Games Launcher icon on the taskbar
If you can't start the Epic Games Launcher and see a blinking icon on your taskbar, use these steps to try and fix this:
Right-click your Epic Games Launcher shortcut.
Click Properties.
Select Normal Window from the drop-down menu next to Run.
Click the Compatibility tab.
Uncheck any boxes, and then click Apply then OK.
Click Start,then type "Graphics Settings" and press Enter.
Select Classic app from the drop-down under Graphics performance preference.
Click Browse.
Navigate to the Epic Games Launcher installation directory.
By default, this is C:/Program Files (x86)/Epic Games/Launcher/Portal/Binaries/Win64.
Click the EpicGamesLauncher.exe file, and then click Add.
If you suddenly encountered the PDC WATCHDOG TIMEOUT BSOD Blue Screen stop error with a bug check value of 0x0000014F, then it’s probably due to a system component that has failed to respond with the allocated period which prevents the system from exiting connected standby.
This kind of Blue Screen error could be caused by both hardware and software components. To fix this Stop error, here are some possible fixes you can try that might help but before you proceed, make sure that you create a System Restore point first and boot your computer into Safe Mode with Networking.
Option 1 – Try to rollback, update or disable drivers
The next thing you can do to fix the PDC_WATCHDOG_TIMEOUT Stop error is to roll back, or update, or disable device drivers. It is most likely that after you updated your Windows computer that your driver also needs a refresh. On the other hand, if you have just updated your device drivers then you need to roll back the drivers to their previous versions. Whichever applies to you, refer to the steps below.
Open the Devices Manager from the Win X Menu.
After opening the Device Manager, look for the device driver named “IDE ATA/ATAPI controllers” and expand it.
Then look for the SATA AHCI Controller entry and right-click on it. If you haven’t updated this driver in a while, select the “Update Driver” option. On the other hand, if you’ve just updated this driver, then select the Uninstall Device option.
Next, follow the screen option to update or uninstall it.
Finally, restart your computer. It will just reinstall the device drivers automatically if you have chosen to uninstall them.
Note: You can install a dedicated driver on your computer in case you have it or you could also look for it directly from the website of the manufacturer.
Option 2 – Try to disconnect or disable newly installed hardware
In this option, you will have to disable or remove the hardware you’ve just installed recently since external devices could be the one that’s causing the Blue Screen of Death error to appear. To do that, just disconnect any external device that’s connected to your computer physically and then check if it fixes the PDC_WATCHDOG_TIMEOUT Blue Screen error.
Option 3 – Try running the Memory Diagnostic Tool
The Memory Diagnostic tool in windows can help resolve the PDC_WATCHDOG_TIMEOUT Blue Screen error by checking and automatically fixing any memory-based issues. To run it, refer to these steps:
Tap the Win + R keys to open Run and type mdsched.exe and hit Enter to open the Windows Memory Diagnostic Tool.
After that, it will give two options such as:
Restart now and check for problems (Recommended)
Check for problems the next time I start my computer
Once your computer has restarted, perform a basic scan or you could also go for the “Advanced” options such as “Test mix” or “Pass count”. Simply tap the F10 key to start the test.
Option 4 – Try to update the BIOS
Updating the BIOS can help you fix the PDC_WATCHDOG_TIMEOUT BSOD error but as you know, BIOS is a sensitive part of a computer. Even though it is a software component, the functioning of the hardware depends on it largely. Thus, you must be careful when modifying something in the BIOS. So if you don’t know much about it, it’s best if you skip on this option and try the other ones instead. However, if you are well-versed in navigating the BIOS, then follow the steps below.
Tap the Win + R keys to open the Run dialog box.
Next, type “msinfo32” in the field and press Enter to open System Information.
From there, you should find a search field on the bottom where you have to search for the BIOS version and then press Enter.
After that, you should see the developer and version of the BIOS installed on your PC.
Go to your manufacturer’s website and then download the latest version of BIOS on your computer.
If you are using a laptop, make sure that you keep it plugged in until you have updated the BIOS.
Now double click on the downloaded file and install the new BIOS version on your computer.
Now restart your computer to apply the changes made.
Option 5 – Try running the Blue Screen Troubleshooter
The Blue Screen troubleshooter is a built-in tool in Windows 10 that helps users in fixing BSOD errors like PDC_WATCHDOG_TIMEOUT. It can be found in the Settings Troubleshooters page. To use it, refer to these steps:
Tap the Win + I keys to open the Settings panel.
Then go to Update & Security > Troubleshoot.
From there, look for the option called “Blue Screen” on your right-hand side and then click the “Run the troubleshooter” button to run the Blue Screen Troubleshooter and then follow the next on-screen options. Note that you might have to boot your PC into Safe Mode.
This is a typical system error that occurs during Windows setup. To be precise, this error may pop on your computer screen during the text mode portion of Windows setup.
The setup hangs and stops responding and the error message is displayed in either one of the following formats:
‘The file I386Ntkrnlmp.exe could not be loaded. The error code is 7.’or ‘The file I386L_intl.nlf could not be loaded. The error code is 7.’
Solution
Error Causes
Error 7 may be triggered due to several reasons but the 2 most common causes for this error code are:
Incorrect settings of the BIOS
Faulty RAM modules
Registry corruption
Further Information and Manual Repair
To resolve this error on your system, here are some easy and effective DIY methods that you can try.
Method 1 - Change Back the BIOS to its Default Settings
If the underlying cause of error code 7 is related to incorrect BIOS settings, then it is recommended to restore default settings to resolve.
You can reset your computer’s BIOS (basic input and output system) settings to factory defaults by selecting the restore defaults option within BIOS or by removing CMOS ( Complementary Metal Oxide Semi-Conductor) battery from your unplugged computer for about five minutes.
The battery removal method requires opening the computer case, so only attempt it if you are unable to access BIOS.
To reset BIOS follow these steps, reboot your PC and then press the key assigned to loading BIOS during your computer boot splash screen.
The key assigned to load and access BIOS varies from manufacturer to manufacturer but usually, it's F1, F2, or F12. Once you enter the BIOS, select the ‘Restore Defaults’ option listed in the menu. I
t may be a keyboard shortcut or be under the Advanced settings menu. Confirm settings and then exit BIOS. Hopefully, this will resolve Error 7.
Method 2 - Remove the Faulty RAM
When error code 7 is triggered by faulty RAM modules, then to resolve it simply remove the memory modules that are installed in the computer.
If the error code is displayed again after you remove the memory module, remove a different memory module. This procedure requires you to reboot your PC several times to identify the specific memory module that is not working properly.
Method 3 - Repair the Corrupted Registry
Error code 7 is sometimes also linked with registry issues. If the reason for the error occurrence is a damaged or corrupted registry, then simply download Restoro.
This is a powerful PC Fixer embedded with a registry cleaner. It is easy to operate and user-friendly. The registry cleaner detects and removes all errors in seconds. It cleans the registry and repairs the damages in no time.
Click here to download Restoro.
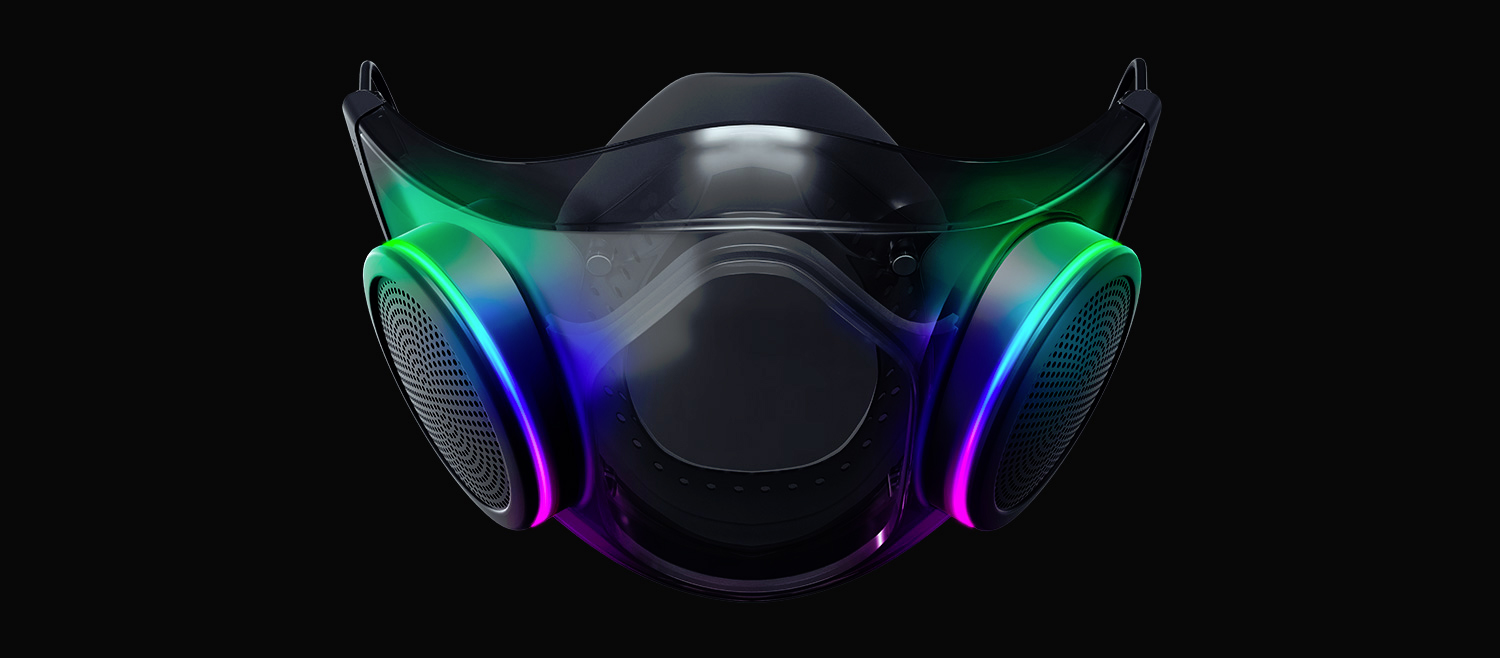
The world today is still sadly under pandemic and by the looks of it, COVID-19 is here to stay, well at least for some time in the near future. Razer seems to think so as well since their upcoming gear is not really what you would expect.
Enter Hazel, a new and upcoming Razer smart mask.
Protection
Hazel mask has a high bacterial surgical N95 filter with fluid resistance that will protect you against large droplets and splashes. A detachable active ventilator regulates airflow and is capable of filtering around 95% of airborne particles. Mask comes with a special charging case that has an auto sterilization UV light that will kill bacteria and viruses inside the case interior while it charges.
When the mask is recharging it will change color from red to green visually showing the level of the current charge. Mask of course has easy to replace filters inside ventilators and Razer is standing by that fully charged mask will last enough for full-day use.
An active ventilation system brings cool air while releasing breathing heat at the same time drastically reducing CO2 inside the mask that could produce dizziness and headache.
Silicon guard is on its edge gluing to around your face in order to prevent exterior air sneaking inside the mask and positioning it firmly so it does not rest on your lips in order for easier and clearer communication.
Hazel personalization and technical features
Hazel has a clear and transparent design making it better for social interaction since other people will be able to see your lips and smiles thus making it more natural. A low light mode that turns on automatically when it is dark outside is also aimed for easier communication.
Speaking of communication, the mask comes with voice Amp technology that has a built-in mic and amplifier thus making your voice lines clear so you are not muffled when wearing the mask itself. Your friends and other people will be able to hear you like you are not wearing a mask at all.
Thicker air loops apply less pressure on ears and can be adjusted for a more secure fit, while the mask itself can be custom-made to fit your face shape.
And of course Hazel comes with 16.8 million colors and a suite of effects with Razer Chroma RBG
Libmysql.dll is missing or not found error appears in Windows when the user is trying to open and run the application.
In this guide, we will offer you solutions on how to fix and remove this annoying error.
Check recycle bin
Some applications or purely by accident itself libmysql.dll gets deleted. If you have not turned recycle bin off go to it and check to see if the file is by any chance there. If you find it, right-click on it, choose restore, the error will be gone.
Update drivers
Press ⊞ WINDOWS + X to open the Windows menu and click on Device manager
In device manager locate device which has alert mark next to it
Right-click on it and choose update driverReboot your computer
Run SFC scan
Press ⊞ WINDOWS + X and choose command prompt (admin)
In command prompt type in sfc /scannow and press ENTERwait for the operation to complete and Reboot your system
Reinstall application
if you are getting an error only on one application or an error has started to appear after the installation of a particular application go to Windows applications, uninstall it and then install it again. There is a chance that the file has been corrupted during the installation process.
If you encounter errors 1603 and 0x00000643 on your Windows 10 computer while trying to install or update your Google Chrome browser. Although most errors can be fixed by some simple troubleshooting steps, that is not the case for these two errors since they have pretty specific solutions.
To resolve errors 1603 and 0x00000643 on your Chrome browser, here are some solutions you need to check out.
Option 1 – Try to run Microsoft Install and Uninstall Troubleshooter
Running the Microsoft Install and Uninstall Troubleshooter could help you fix errors 1603 and 0x00000643 in Chrome as well as the following issue in your Windows 10 computer:
Corrupted registry keys on 64-bit operating systems.
Corrupted registry keys that control the updated data.
Problems that:
Prevent new programs from being installed.
Prevent new programs from being installed.
Problems that block you from uninstalling a program through Add or Remove Programs (or Programs and Features) in Control Panel.
To use the Microsoft Install and Uninstall Troubleshooter, refer to the given steps below.
First, right-click on the downloaded MicrosoftProgram_Install_and_Uninstall.meta.diagcab file and run it with administrative privileges.
Next, it will offer you two scenarios to troubleshoot namely, “Installing” or “Uninstalling” and you have to select Installing to resolve the current errors.
After that, it will show you a list of available programs on your computer. From there, select Google Update Helper and then click Next.
It will then start to troubleshoot the problem and will automatically apply the fixes for you. It will offer you to uninstall Chrome if it turns out that it’s the root cause of the problem.
After that, you need to download Google Chrome again and then reinstall it.
Option 2 – Try to clean reinstall Chrome
There are instances when programs leave files behind after you’ve uninstalled them and the same thing can happen to Chrome so before you reinstall Chrome, you have to make sure that you have deleted the User Data folder. To do so, refer to the following steps:
Hit the Win + R keys to open the Run dialog box.
Next, type “%LOCALAPPDATA%GoogleChromeUser Data” in the field and hit Enter to open the User Data folder.
From there, rename the default folder and name it something else, e.g. “Default.old”.
After that, install Google Chrome again and check if the issue is now fixed.
Option 3 – Try running the Chrome Cleanup tool
You might want to run Google Chrome’s built-in Malware Scanner & Cleanup tool as it could also help in getting rid of any unwanted ads, pop-ups, and even malware, as well as unusual startup pages, toolbars, and anything else that might overtake the network and could affect the performance of the browser.
Option 4 – Try to run the Network Troubleshooter
Open the Search bar on your computer and type in “troubleshoot” to open the Troubleshoot settings.
Next, scroll down and select the “Network Adapter” option from the right pane.
Then click on the Run Troubleshooter” button.
After that, your computer will check for any possible errors and will pinpoint the root cause of the problem if possible.
Option 5 – Reset Chrome
Resetting Chrome can also help you fix the error. This means that you will be restoring its default settings, disabling all the extensions, add-ons, and themes. Aside from that, the content settings will be reset as well and the cookies, cache, and site data will also be deleted. To reset Chrome, here’s what you have to do:
Open Google Chrome, then tap the Alt + F keys.
After that, click on Settings.
Next, scroll down until you see the Advanced option, once you see it, click on it.
After clicking the Advanced option, go to the “Restore and clean up option and click on the “Restore settings to their original defaults” option to reset Google Chrome.
Interesting information has come out from Microsoft, Windows 11 dark theme will include a different sound theme from its standard light one.
When in dark mode on Windows 11, the system sounds generally become softer, and they echo a bit, creating a more soothing experience that matches the overall look and feel of the dark mode. Flipping back to light mode brings the system sounds back to their normal level.
However, even though the light model has slightly louder sounds than the dark mode, Microsoft has taken great care to make sure the audio is more soothing, according to a report from CNBC.
The designers of Windows 11 took inspiration from an approach called calm technology. Microsoft’s Christian Koehn and Diego Baca wrote about calm technology in a post on Medium. In it, they said, “Windows 11 facilitates this through foundational experiences that feel familiar, soften formerly intimidating UI, and increase emotional connection.”
According to a Microsoft spokesperson in a statement to CNBC, “The new sounds have a much rounder wavelength, making them softer so that they can still alert/notify you, but without being overwhelming.”
Anxiety from all these digital threats lurking everywhere? An antivirus program can help put your mind at ease.
What can a virus do to your device?
A virus is malicious software that can affect pretty much any device and does so in a variety of ways. Be it your computer, your phone or your smart lightbulb - as long as there’s access to the internet, malware can get to it.
How exactly does this kind of attack manifest itself? Well, there’s a wide variety of effects ranging from mild to severe. Among other things, they depend on which type of malware attacks your device - a virus, spyware, ransomware, adware or something else.
These are some of the things you can expect to happen:
Slow performance
System crashes
Theft of data and sensitive information
Connectivity issues
Constant browser redirects
Strange messages sent to your contacts
Interference with files
It really can be the stuff of nightmares. So, if you want to sleep peacefully knowing that your devices are completely safe, you should definitely consider getting an antivirus.
P.S. don’t let its name fool you - an antivirus does indeed protect your devices against more than just viruses.
What is antivirus software exactly?
Antivirus software is designed to help you battle and ward off malware. Basically, it scans your device to detect any suspicious activity and offers tools to get rid of the culprit.
At first, antiviruses were developed to fight against viruses only, but nowadays they cover a lot more ground. Here are some of the biggest benefits of getting yourself a powerful defender.
Advantages of antivirus software
1. It fights those pesky ads
Look, constant ads that pop up everywhere aren’t the absolute worst thing that can happen on your computer. If anything, they are annoying, like when you’re trying to sleep but that one fly in your room just won’t stop buzzing.
Now, there’s a free, well-established solution for that - installing an ad blocker. And we’re about a hundred and ten percent sure you’ve already done that on each and every browser you use.
However, “if I can’t see it, it doesn’t exist” isn’t the most ideal approach for your online safety. Ad blockers can’t block everything and they won’t protect you from potential adware. An antivirus on the other hand offers that layer of protection against malware snuck into pop-ups and spammy websites.
2. It protects you from hackers
Hackers don’t target government institutions only. They’ll target regular people too if they have something to gain.
Credit: Clint Patteron (Unsplash)
There are different types of hacking, such as phishing e-mails, transmission of malicious programs, credential reuse, denial of service and more. In any case, they take control of your device and hijack your data.
The good thing is that, as threats evolve, antiviruses evolve too and there are tons of quality programs on the market that can keep you secure for an affordable price.
3. It keeps your files and data safe
When malware enters your device, it can target pretty much any file and get access to any and all data.
Installing an antivirus program will make sure that every single file, new or old, is monitored at all times, warning you against threats immediately. That way, you can make sure to react before your other files become infected and data is lost or stolen.
Another great thing for data protection is that the best antivirus software normally comes with a password manager, so no one can use malware to steal your passwords.
4. It blocks all kinds of malware
As we already stated, malicious attacks can be performed in many ways and malware comes in in different shapes an sizes, such as:
Trojan horse
Spyware
Ransomware
Adware
Rootkit
RAT (remote access Trojan)
Keyloggers
Worms
Botnets
Credit: Growtika (Unsplash)
Nowadays, antivirus software is designed to fight against all of these types. That’s why more often than not we hear the term 'antivirus' used interchangeably with 'anti-malware,' like in this article.
5. It keeps your children protected
You can’t keep your eyes on your kid every second of the day and you can’t protect them from everything. But at least you can limit their exposure to the threats they can encounter at every corner of the digital world.
An antivirus program will block harmful or suspicious websites and ads, which is great both for you and your children. To take it a step further, though, many such programs come with special parental controls and offer monitoring as well. It’s a great solution for keeping your kids safe online without sounding like the irritating, overbearing, controlling parent who “just doesn’t get it!”
How to pick one
There are definitely lots of different antivirus programs out there, both free and paid. We recommend you look for a paid option, since free ones are unfortunately a lot more susceptible to being compromised through malicious attacks.
Now, there are a few factors to consider when choosing the right software. If you use your PC for basic things then a basic antivirus will suffice. However, the more complex your use and the more sensitive the data you deal with, the stronger it needs to be.
It’s also crucial that you take into account the features it includes. As we already mentioned, some programs have additional security options. For example, depending on the package you select, Bitdefender provides:
Some are included in plans and some are separate products, so make sure to check out all the offers.
And don’t worry if you have multiple PCs or you’re looking for protection for your smartphone or tablet as well; Bitdefender has suitable solutions for your needs. Of course, you can also just pick their classic antivirus software if you’re not in need of advanced protection.
Another important point is how regularly the software is updated and enhanced. The more frequent the updates the better, as bugs can make the program more vulnerable. Other things we advise you consider are user-friendliness, impact on performance, reputation (user reviews especially) and, of course, price.
The bottom line
Fact is: anyone can be a malware victim. Don’t let it be you.
You can’t put a price on peace and security, so don’t be reluctant to pay for yours - especially since a lot of options out there are extremely affordable. Is $159.00 a year really too much to pay for cross-platform protection for up to 10 devices? We don’t think so.
Explore your options and protect your files and data before it’s too late.


 The world today is still sadly under pandemic and by the looks of it, COVID-19 is here to stay, well at least for some time in the near future. Razer seems to think so as well since their upcoming gear is not really what you would expect.
Enter Hazel, a new and upcoming Razer smart mask.
The world today is still sadly under pandemic and by the looks of it, COVID-19 is here to stay, well at least for some time in the near future. Razer seems to think so as well since their upcoming gear is not really what you would expect.
Enter Hazel, a new and upcoming Razer smart mask.
 Interesting information has come out from Microsoft, Windows 11 dark theme will include a different sound theme from its standard light one.
When in dark mode on Windows 11, the system sounds generally become softer, and they echo a bit, creating a more soothing experience that matches the overall look and feel of the dark mode. Flipping back to light mode brings the system sounds back to their normal level.
However, even though the light model has slightly louder sounds than the dark mode, Microsoft has taken great care to make sure the audio is more soothing, according to a report from CNBC.
The designers of Windows 11 took inspiration from an approach called calm technology. Microsoft’s Christian Koehn and Diego Baca wrote about calm technology in a post on Medium. In it, they said, “Windows 11 facilitates this through foundational experiences that feel familiar, soften formerly intimidating UI, and increase emotional connection.”
According to a Microsoft spokesperson in a statement to CNBC, “The new sounds have a much rounder wavelength, making them softer so that they can still alert/notify you, but without being overwhelming.”
Interesting information has come out from Microsoft, Windows 11 dark theme will include a different sound theme from its standard light one.
When in dark mode on Windows 11, the system sounds generally become softer, and they echo a bit, creating a more soothing experience that matches the overall look and feel of the dark mode. Flipping back to light mode brings the system sounds back to their normal level.
However, even though the light model has slightly louder sounds than the dark mode, Microsoft has taken great care to make sure the audio is more soothing, according to a report from CNBC.
The designers of Windows 11 took inspiration from an approach called calm technology. Microsoft’s Christian Koehn and Diego Baca wrote about calm technology in a post on Medium. In it, they said, “Windows 11 facilitates this through foundational experiences that feel familiar, soften formerly intimidating UI, and increase emotional connection.”
According to a Microsoft spokesperson in a statement to CNBC, “The new sounds have a much rounder wavelength, making them softer so that they can still alert/notify you, but without being overwhelming.” 
