Error code 0x8007267C is specific to Windows 10. This error is triggered when no DNS server is currently configured in your network settings during the Activation process. If you are fairly confident in your ability to address command-line tools and networking issues, you can follow the steps below to try to remedy the error code on your own. If not, you may need to contact a qualified technician in order to resolve the error successfully.
 Error Causes
The cause of Error Code 0X8007267C within the Window 10 system is fairly straightforward. Windows Activation requires a valid DNS server to be configured in order to complete the Activation process; if one is not available or properly configured, then you may see this error code and Activation will fail.
The following methods may help you to resolve this error, but you’ll need to have some familiarity with command-line tools to complete the steps successfully. If these methods do not work or if you are uncomfortable in using the command prompt, you may need to consult a technician to fully resolve this particular error code on the Windows 10 system.
In order to resolve this error code, client connectivity to a DNS server must first be established. The following steps may help you to determine the root problem with your connectivity status:
ping <DNS Server IP address>
If basic connectivity to the DNS server in question is failing, then you will need to resolve that issue before going further in the process.
After troubleshooting the above basic connectivity issues to the DNS server, you can reattempt Windows Activation by using the command below from within an Elevated Command selection:
cscript windowssystem32slmgr.vbs -ato
If the steps above did not work for you, you may want to try the steps found in method 2.
If a DNS server is not connected to your network, you can use an alternative method to complete the Windows Activation process. Bypass Method 1 by using a MAK product key instead to activate the volume license installation. Certain MAK product key providers have a variation on the specific key numbers that you will need to use. If you are using TechNet media or MSDN media, you will have to change the product key listed to the product key provided. The product keys provided by either TechNet media or MSDN media for Windows Server 2008 or for Windows Vista Enterprise will be the MAK product key that you will enter in a later step.
Like the previous method, you will need to have some familiarity or confidence in your ability to operate Command Line tools before proceeding. Once you have found your MAK product key, you’ll need to open a command prompt and use the following command to change the product key to match the MAK product key, which should look something like the example below:
slmgr –ipk xxxxx-xxxxx-xxxxx-xxxxx-xxxxx-xxxxx
After completing the product key change, use the following command to initiate the phone activation wizard, thereby completing the activation of the system:
slui 04
The activation wizard should be able to walk you through the remainder of the process in a step-by-step manner. In addition to appearing as an error code in Windows 10, this particular error may apply to multiple versions of Windows, including:
Steps to address the error code may be different in any of these other versions of Windows. If you have difficulty in resolving the error effectively, seek professional technical help.

Error code 0xc00007b usually manifests itself via the inability to start an application properly. It can occur when users attempt to run a game or other programs on their computer. In such a case, the application will not start and a message box will pop up stating that error code 0xc00007b has occurred. The error code is likely to occur when users attempt to run a program in the incorrect or inappropriate bit. For instance, if you try to load a 32bit location with a 64bit location.
Error CausesError code 0xc00007b affects various versions of the Windows operating system, including Windows 7, 8, 8.1, and Windows 10. In the case of error code 0xc00007b for Windows 10, the error may be caused by issues related to software you’ve installed on your machine. This may cause software conflict resulting in the need to install programs like DirectX. Left unchecked, error code 0xc00007b could incite other error codes in Windows 10, such as error code 0xc004f034.
To repair error code 0xc00007b for Windows 10 devices, users will need to implement at least one manual repair procedure. Manual repair methods are effective in combating these issues as they can address the issues causing the error in the first place, thus fixing the problem.
The manual repair procedures for fixing error code 0xc00007b are very straightforward and can be implemented with little technical knowledge. However, you may need to contact a Windows repair technician if you have difficulty fixing the error code after completing the manual repair methods listed below.
Microsoft DirectX is an application usually included in the Microsoft operating system. It enables users to access high-speed gaming and multimedia on their PC. The latest version of this Windows technology is available on Microsoft’s official site.
Visit the Microsoft website and search for DirectX End-User Runtime Web Installer. Once you have located the latest version of the program, select the preferred language you would like DirectX to run in, and then click download. Run the program, then be sure to reboot your computer.
Note that this solution should only be applied if you are having issues running or displaying a gaming or multimedia application. Once you’ve correctly installed the latest version of DirectX, it should be able to fix underlying issues that may be causing error code 0xc00007b to occur. If you are still unable to run applications after completing this manual repair procedure, however, you will need to apply another method to fix error code 0xc00007b for Windows 10.
.NET Framework, a framework developed by Microsoft, provides solutions for users who may be having problems with applications. To download the latest version of the .NET framework, follow the steps listed below.
To ensure you successfully download the latest version of the .NET Framework, verify your computer is properly connected to the Internet while downloading the software. Also, follow the instructions provided on the Microsoft website.
After completing the download process, reboot your computer then check if you have successfully resolved error code 0xc00007b for Windows 10. If this manual repair method is successful, you will be able to access your gaming and multimedia programs. Otherwise, the error code message box will reoccur, stating that the application error code is present on your device. Apply the next manual repair procedure to correct the error code if this reoccurs.
In certain instances, application error codes like error code 0xc00007b affect PC users who fail to install the most current Windows updates on their device. That is why it’s important to check your system and ensure you have installed all the latest updates.
The updates, if any are available, will automatically be installed on your PC once you access Windows Update in Settings. Reboot your computer then check if you are able to run programs that previously would not open due to error code 0xc00007b. If problems persist resulting in the reoccurrence of the error code, reinstall the applications you are unable to open or get help from a Windows repair technician.
If you wish to always have at your disposal a utility tool to fix these Windows 8 and other related issues when they do arise, download and install a powerful automated tool.
ExpressFiles is a program developed by Express Solutions. A number of Anti-Virus programs have flagged this program as a Potentially Unwanted Application. In many instances, it is bundled with additional programs on installation.
The program claims it offers users easy to search for various currently popular search terms. During our testing, the software never displays any search results, no matter the search words. Upon installation and setup, it defines an auto-start registry entry which makes this program run on each Windows boot for all user logins. A scheduled task is added to Windows Task Scheduler in order to launch the program at various scheduled times. The program defines an exception rule in Windows Firewall, allowing it to connect to the internet without limitations and auto-update itself.
ChatZum is a Potentially Unwanted Program that installs a Toolbar into your browser. This program allegedly allows users to zoom in on photos without clicking on them, however, upon further research, it was discovered that this function does not work on the latest version of browsers.
From the Author: ChatZum is a Browser add-on (toolbar) that enables its users to hover over images in Major Social network's websites and view a larger version of an image.
While installing this toolbar will track user web browsing sessions and will record website visits, clicks, and sometimes even personal information. This information is later used to display targeted ads to the user. To allow easier user tracking, the program changes the browser home page and default search engine to Nation Search Advanced, which injects additional advertisements and tracks user activity.
Several anti-virus applications have marked this program as Potentially Unwanted, and it is not recommended to keep it on your computer, especially considering the fact it will most likely not work on your browser.
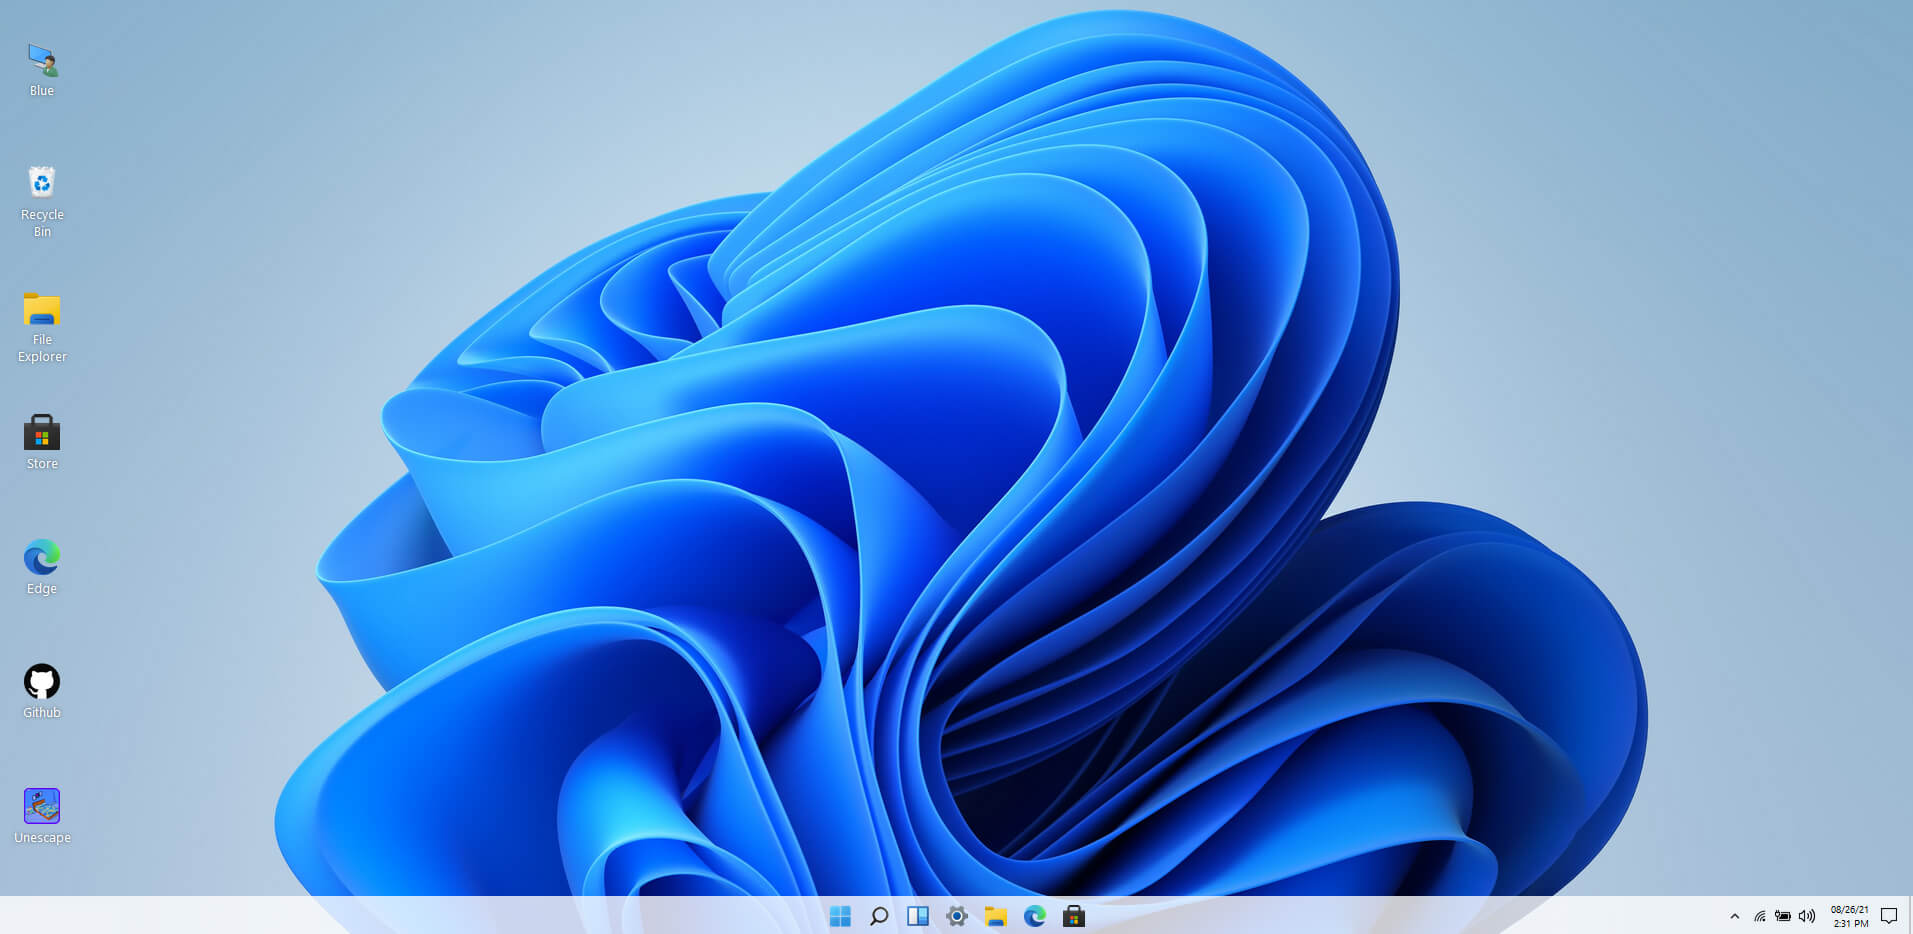 Windows 11 release date is closing in, some people have tried it via insider build, some have decided not to. It has come to our attention that there is a little website made by BlueEdge that offers a virtual Windows 11 desktop.
Opening the Website will put you right inside Windows 11 desktop, now take note that this is not Windows 11, it is a simulation of Microsoft’s newest OS and therefore many things will not work like File Explorer, etc.
One thing you can make sure it is working is UI itself, you can see how you do like the new Taskbar, start menu, widgets, and some other things. You can just pop up on the site and check how you do like the overall new look and feel of Windows 11 UI before installing it or trying it.
We are sure that many more options will come in time but even now you can get a feel of the newest OS.
Windows 11 BlueEdge site: https://win11.blueedge.me/
Windows 11 release date is closing in, some people have tried it via insider build, some have decided not to. It has come to our attention that there is a little website made by BlueEdge that offers a virtual Windows 11 desktop.
Opening the Website will put you right inside Windows 11 desktop, now take note that this is not Windows 11, it is a simulation of Microsoft’s newest OS and therefore many things will not work like File Explorer, etc.
One thing you can make sure it is working is UI itself, you can see how you do like the new Taskbar, start menu, widgets, and some other things. You can just pop up on the site and check how you do like the overall new look and feel of Windows 11 UI before installing it or trying it.
We are sure that many more options will come in time but even now you can get a feel of the newest OS.
Windows 11 BlueEdge site: https://win11.blueedge.me/ “0x8007001F-0x20006, The installation failed in the SAFE_OS phase with an error during REPLICATE_OC operation.”The error pointed out the “Safe OS phase”. It is the phase that’s initiated to install all the required Windows Updates. Thus, the possible cause for this error could have something to do with an interrupted download, internet connection, and many more. Although this error could be caused by a lot of factors, fixing it shouldn’t be that hard. You can try to reset the Windows Update Components or delete the Windows Update cache. You could also disable both the Firewall and your antivirus program temporarily or run the Windows Update in a Clean Boot state, as well as run the Windows Update troubleshooter. To get started troubleshooting the error, follow each one of the suggestions provided below.
This error is quite common and is faced by many Microsoft Outlook users. It is advisable to fix this error immediately because besides restricting you from sending and receiving emails via Outlook, due to this error the data on your Outlook also becomes inaccessible and unreadable, and sometimes Outlook also begins to freeze unexpectedly.‘Receiving reported error (0x800ccc92): Your email server rejected your login.’
Code 29 is a Device Manager error commonly seen whenever a hardware device driver reports a problem. This error code indicates that the resources needed for operation are not available.
The computer hardware basically requires drivers to interface with the operating system. Drivers comprise multiple components and are supplemented with other resources provided by the BIOS (a physical chip on the motherboard).
The BIOS contains a set of basic input and output instructions for the computer system to boot, load drivers, and more.
Its firmware provides resources that drivers require to interface with other essential components. However, when the firmware fails to provide the requested resources, the device drivers stop functioning; this results in error codes like code 29.
Error code 29 is usually displayed in the following format:
“This device is disabled because the firmware of the device did not give it the required resources” Code 29
 Error Causes
Error code 29 may be triggered due to several reasons. These include:
To avoid inconvenience and to ensure your computer keeps working at its optimal pace, it is recommended that you repair error code 29 on your PC immediately. Delay may limit you from using certain hardware attached to your system properly.
To repair error code 29, you don’t have to hire a professional and spend hundreds of dollars. Here are some quick and effective DIY methods that you can try to resolve this issue in minutes even if you don’t have any technical background.
Sometimes, error codes like code 29 may pop up on your computer screen due to some temporary glitch with the hardware. Rebooting can resolve the issue easily.
Therefore, before you do anything, try restarting your PC. It could be all you need to repair code 29. However, if the error code continues to persist, try the other methods given below.
This may sound technical but it isn’t. To begin, with CMOS is an acronym for Complimentary Metal Oxide Semiconductor.
It is a term that is used to describe motherboard memory that contains the BIOS settings. Clearing CMOS helps reset the BIOS settings to their default manufacturer levels. It’s easy to do and is an effective troubleshooting step to resolve error code 29.
To do this, simply:
Error code 29 may appear if a device is disabled. In such a scenario, simply follow the same steps as discussed in method 2, and in the advanced BIOS settings, look for disabled devices.
Enable the devices in the BIOS so that you use them easily.
This will hopefully resolve the issue. If it doesn’t, then this means the error code 29 is caused by either corrupted or outdated drivers. Try method 4 to resolve this issue successfully.
Whether the error code 29 is caused by a misconfigured, corrupted, or outdated driver, simply update the new driver version to resolve. When doing it manually, you will first have to find and identify the problematic device drivers in the Device Manager.
You can access the Device Manager by going to the start menu and then simply typing Device Manager in the search bar.
Access the Device Manager and the properties to identify problematic drivers. Problematic drivers are normally displayed with a yellow exclamation mark.
Once you have spotted problematic drivers, simply update new drivers to resolve them. Though there is nothing technical about it but it may be time-consuming.
A good alternative to manual driver update is DriverFIX. Simply download and install DriverFIX on your PC to update all problematic drivers in seconds. This is a cutting-edge program designed to resolve all kinds of device driver problems.
It is user-friendly and compatible with all Windows versions.
The intelligent programming system deployed inside this software program enables it to identify and detect all problem drivers automatically thereby sparing you from the hassle.
Furthermore, it also matches the drivers with the latest and compatible versions and updates them on a regular basis.
It takes the guesswork out of finding misconfigured and corrupted drivers and fixes driver-related problems and error codes like code 29 right away.
Click here to download DriverFIX to repair Device Manager error code 29 on your system without any hassle.
Error Causes