A lot of users have experienced various issues either in installing a Feature or a Windows Update. One of these errors is the one with the error code 0x80d02002. If you are one of the users who is facing this problem right now, then the working solutions given in this post will surely help.
The Windows Update error code 0x80d02002 indicates that Windows 10 fails to upgrade or install as there is some issue with the files that have been downloaded and Windows encounters an error in installing them. Thus, the best thing you can do in such a case is to start the installation from scratch but before you do that, here are some suggestions that might help.
The Software Distribution folder in the Windows operating system is a folder that can be found in the Windows directory and is used to store files temporarily which might be required to install the Windows Update on your PC. Thus, it is required by the Windows Update and maintained by WUAgent. Aside from that, it also contains all the Windows Update History files and once you delete them, you will most likely lose the Update history. As a result, the next time you run the Windows Update, it may result in a longer detection time.
net stop wuauserv
net stop bits
rename c:windowsSoftwareDistribution SoftwareDistribution.bak
net start wuauserv
net start bits
Since the folder has already been flushed, it will be populated afresh the instant your restart your computer and open Windows Update.
You can also try resetting the catroort2 folder as it is known to fix tons of Windows Update issues including the Windows Update error code 0x80d02002. Both the Catroot and catroot2 are Windows operating system folders that are required for the Windows update process. So when you run the Windows Update, the catroort2 folders stores the signatures of the Windows Update package and helps it in the installation. It makes use of the “%windir%System32catroot2edb.log” file in the updating process. Afterward, the updates are stored in the SoftwareDistribution folder which is used then by the Automatic Updates in order to execute the updating process. Keep in mind that you must not rename or delete the Catroot folder. Although the Catroot2 folder is recreated automatically by Windows, the Catroot folder isn’t.
The Windows update/upgrade error 0x80d02002 might be caused by some issues in the Windows Update client so you need to run the DISM tool to repair it. Note that you have to use another computer or another Windows from a shared network to fix it.
Running the built-in Windows Update troubleshooter could also help you resolve the Windows Update error 0x80d02002. To run it, go to Settings and then select Troubleshoot from the options. From there, click on Windows Update and then click the “Run the troubleshooter” button.
You also have the option to run Microsoft’s online troubleshooter which could help you fix Windows Update errors.

 New Microsoft store
PC Performer is a registry cleaner made by PerformerSoft. The purpose of this program is to remove redundant items from the Windows registry. Registry cleaners remove broken links, missing references within the Windows registry. PC performer is designed to automatically optimize your registry and clean it up.
PC Performer adds registry entries for the current user that allow it to run automatically each time the system is rebooted. It adds a scheduled task to Windows Task Scheduler in order to run at various times. The software connects to the internet, therefore it creates a Windows Firewall exception that allows it to connect without interference. Multiple anti-virus programs detected this software as Malware, it typically comes bundled with other software or is distributed through a pay-per-install bundle.
 It has officially confirmed that many open source and free applications will be in it like Opera, VLC, discord, Libre office, etc. It seems that Microsoft wants to place its store as one place to go for all of your software needs.
Another great surprise is the coming of Epic games store implementation. It was officially confirmed but not explained in detail, will we have Epic store opened in Windows store or we will only get installer as a package we will see but this is some great news.
As for how it states now, it seems that the Windows store aims to eliminate searching the web for applications and bring them all into one environment with reviews and ratings so you know which one to install and use. It also features a great search engine to find proper applications for your needs.
The new store will come to Windows 10 as well but after all Windows 11 has been mostly released and adopted. So expect it via update in two or three months' time.
It would be great if some larger companies decide to join MS stores like Autodesk, Adobe, the Foundry, etc so you can install everything you need from it but one can only hope.
It has officially confirmed that many open source and free applications will be in it like Opera, VLC, discord, Libre office, etc. It seems that Microsoft wants to place its store as one place to go for all of your software needs.
Another great surprise is the coming of Epic games store implementation. It was officially confirmed but not explained in detail, will we have Epic store opened in Windows store or we will only get installer as a package we will see but this is some great news.
As for how it states now, it seems that the Windows store aims to eliminate searching the web for applications and bring them all into one environment with reviews and ratings so you know which one to install and use. It also features a great search engine to find proper applications for your needs.
The new store will come to Windows 10 as well but after all Windows 11 has been mostly released and adopted. So expect it via update in two or three months' time.
It would be great if some larger companies decide to join MS stores like Autodesk, Adobe, the Foundry, etc so you can install everything you need from it but one can only hope. EasyEmailSuite is a browser extension made by MyWay that may come bundled with other free software that you download off of the Internet. When installed EasyEmailSuite will set the homepage and search engine for your web browser to http://search.myway.com. EasyEmailSuite is an application that allows users to access their emails. Initially, this app may seem legitimate and useful, however, EasyEmailSuite is categorized as a browser hijacker. This extension changes your home page and searches engine to MyWay. It monitors your search activity and collects data, that is later sold/forwarded to display additional unwanted ads in your browser. Several anti-virus scanners have classified EasyEmailSuite as a Browser Hijacker / PUP and are therefore not recommended to keep on your computer.
Corsair is well known for RAM memory modules for PC but then it has expanded to PC peripherals and even selling some pre-build computers as well in past few years. New Corsair expansion now includes a laptop line, starting with their new gaming laptop Voyager.

Voyager laptop is packed with a mechanical keyboard and MacBook-like touch bar for your typing and pointing needs. It is built with a 16-inch QHD+ screen packing 240Hz that is run by Radeon 6800M GPU. Also inside lurks AMD 16 thread Ryzen 9 6900HS CPU, Wi-Fi 6E support, Dolby Atmos audio, and full HD 1080p WEB camera.
The keyboard has low-profile mechanical Cherry MX switches with per-key RGB lightning and above is what Corsair calls a macro bar, with 10 shortcut buttons and a small LCD in the center.
Corsair is also including a few features that tie in with its other products. Many of the company’s keyboards, mice, and other accessories use the ‘Slipstream’ USB wireless adapter, which is built into the Voyager laptop. The macro bar is also configured using the same software used for the Elgato Stream Deck, a popular product sold by Corsair.
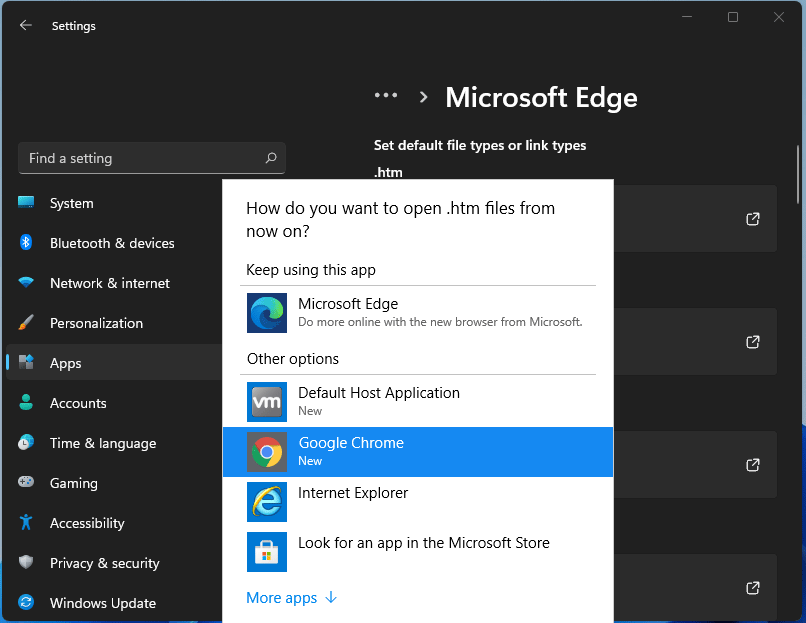 For anyone who is not aware, when Windows 11 was released if you wanted to switch to another browser you had to go into the settings app and choose the default browser for different types of file extensions like HTML, HTM, PDF for opening on the web, etc. Of course, this was completely unnecessary and it was not well received by users. So after some time, Microsoft backpedaled to standard one click, choose your default browser solution that existed in the previous version of Windows OS.
Altho sometimes Microsoft knows how to irritate its users base, it is good to know that they can also listen and fix things that are required.
For anyone who is not aware, when Windows 11 was released if you wanted to switch to another browser you had to go into the settings app and choose the default browser for different types of file extensions like HTML, HTM, PDF for opening on the web, etc. Of course, this was completely unnecessary and it was not well received by users. So after some time, Microsoft backpedaled to standard one click, choose your default browser solution that existed in the previous version of Windows OS.
Altho sometimes Microsoft knows how to irritate its users base, it is good to know that they can also listen and fix things that are required. “Something went wrong, Sorry, installation cannot continue because no compatible office products are detected.”When you have to work on two different languages, that’s where the language packs come in handy. You might have to work on one language but when it comes to proofreading or help, you need another language. Note that some language accessory packs offer partial localization which is why some parts of the Office might show the default language. If you are using Office 365 or Office 2019, 2016, 2013, or 2010, you need to go to the language accessory pack page from office.com and select your language. Once you see the download link, click on it to start downloading the pack. It includes the display in the chosen language, proofing tools for the selected language, as well as the Help in the selected language. Once the installation is complete, follow each one of the given options below to configure the language accessory pack properly.