As you know, Windows Hello offers you quick access to computers since you can log in to your Windows devices three times faster compared to passwords with the help of the camera via Face recognition and fingerprint reader. This way, Windows Hello will recognize you right away. However, there are also times when you might encounter some problems when using Windows Hello. For one, if you are trying to add the PIN method to Windows Hello on your Windows 10 computer but you suddenly encountered an error code of 0x801c004d or if you are trying to use your existing pin and you encounter an error code of 0x80070490 along with an error message that says, “Not recognized”, then read on as this post will guide you on how you can fix both of these errors. Here is the complete content for both errors:
“0x801c004d – Unable to enroll a device to use a PIN for login”
“0x80070490 - Not recognized, Pin and fingerprint are no longer options for signing in”
If you got any of these two errors, there are several potential fixes you can check out to resolve them. You can try to check for any Windows Updates or create the PIN again or check the CNG Key Isolation Service. You could also try to reset the TPM or create a new User Account. For more information, follow the instructions provided below.
Option 1 – Try checking for any available Windows Updates
The first thing you can do is to check for any available Windows Updates. It is possible that your computer may be outdated and is the reason why you’re having troubles with Windows Hello. To check for Windows Updates, just go to Settings and from there, head over to the Update and Security section and click on Windows Updates located on the left pane, and then click on the Check for Updates option. Wait until the process of checking updates is completed and if it finds new updates, install it. After you install the new Windows Updates, check if you can now add the PIN on Windows Hello or not.
Option 2 – Try creating the PIN again
The next thing you can do is to create the PIN again by signing out and signing in again and then try creating the PIN once more. If this does not work, you can try restarting your computer and creating the PIN again. You could also try removing the PIN and then change it.
Remove the PIN by going to Settings > Accounts > Sign-in options.
From there, go to the PIN section and click on the Remove button.
You will be asked to verify your account to proceed in removing the PIN, enter your credentials.
Restart your computer and then set up a new PIN.
Once you’re done, restart your computer and check if the error is gone now.
Option 3 – Try checking the CNG Key Isolation Service
The CNG Key Isolation Service is the one that stores and uses long-lived keys in a secure process complying with the common criteria requirements and it is possible that the error could be related to this service. This service is hosted in the LSA processes and provides key process isolation to private keys and associated cryptographic operations as required by the common criteria. Thus, you need to check this service to see if it’s the one that’s causing the error.
Tap the Win + R keys to open the Run dialog box and type “services.msc” in the field and hit Enter to open the Windows Services Manager.
Next, locate the “CNG Key Isolation Service” and once you find it, double click on it to open its Properties box.
After opening its Properties, check its Startup type and select Manual. This is the default setting and if it is Disabled, then it’s no wonder why you’re getting errors with Windows Hello, thus, you need to enable it.
Once done, restart your computer and check if you can now add the PIN to Windows Hello. If you still get the error, then you might want to try setting the CNG Key Isolation Service from Manual to Automatic and then click on the Start button and see if it fixes the error or not.
Option 4 – Try to reset the Trusted Platform Module or TPM
You might also want to try resetting the Trusted Platform Module or TPM to fix the error. You can do this by opening Windows PowerShell and then executing the “Clear-Tpm” command. After that, check if the error is now resolved.
Option 5 – Try to create a new User Account
You could also try to create a new User Account on your Windows 10 computer to fix the Windows Hello error. Once you have created a new local user or administrator account in Windows 10, check if you are now able to add the PIN from this newly created user account.
A lot of users rely on keyboard shortcuts to carry out tasks on their PCs. One of the most common keyboard shortcuts used is the Ctrl + Shift + Esc which opens the Task Manager. As you can see, the Shift key is not just used to capitalize a text as it can also be used for other functions and plays an essential role in operating a computer. However, if you suddenly find it not working, read on as this post will help you fix the problem.
If your Shift key is not working, there are several potential fixes you can check out to fix it.
These are the different ways to get rid of the Shift key not working issue on Windows 10:
Physically clean the key and keyboard
Disable Sticky Keys.
Update, Reinstall, or Rollback Keyboard driver.
Test the keyboard on another system.
Check your connections
Run the Hardware troubleshooter
Troubleshoot in Clean Boot State.
Option 1 – Clean the keyboard keys physically
Your keyboard might not be working properly due to some dirt or other corrosion. Thus, you need to clean your keyboard, especially the Shift key. First, you need to shut down your computer and then unplug the keyboard if you are using a desktop computer and then prepare it for cleaning. After that, use a small cotton ear cleaning tool to get between the creases and clean them. You can dip it slightly in alcohol to make it more efficient in cleaning dust and dirt. And if you can, you have the option to pull apart the keyboard completely and then wipe away all the corrosion from the inside. Once you’re done, put the keyboard back together and then plug it back into your PC. Now turn your PC on and check if the Shift key is now working.
Option 2 – Try to disable the Sticky keys
Another thing you can try is to disable the Stick keys. How? Refer to these steps:
Tap the Win + I keys to open the Settings app.
After that, navigate to the Ease of Access section, and here, select Keyboard.
Next, make sure that the option for Press one key at a time under the Sticky Keys is toggled off.
Option 3 – Reinstall, update or rollback your keyboard driver
Once you’ve determined that the problem is in the software part of the keyboard, it is now time to try to reinstall, update or roll back your keyboard drivers. To reinstall the driver for your keyboard, refer to these steps:
From the WinX Menu, open the Device Manager.
In the Device Manager, you should find your laptop’s keyboard under the “Keyboards” option. Right-click on it and select the “Uninstall” option.
Note: If you’re not quite certain about your laptop’s keyboard, you can uninstall all the keyboards if there’s more than one.
After that, restart your PC and see if the keyboard driver is installing automatically. If not, open the Device Manager again and right-click on Keyboards, and select the option “Scan for hardware changes” to install it.
Once the keyboard driver is installed again, check if your keyboard is now working properly or not.
Option 4 – Try connecting the keyboard to a different USB port or another computer
The problem might have something to do with the USB port that’s currently in use by your keyboard. It could be that it’s not working so it makes sense to unplug it and attach it to another USB port. You can also clean the USB port on both ends to ensure that they are not affected by corrosion. In addition, you can also try connecting the keyboard to a different computer and see if the Shift key works there or not.
Option 5 – Try to check your connections
You can also try checking if the connection mode you are using for your keyboard is functioning properly. For instance, if you are using a Surface 2-in-device, you can clean the connection pins and see if it resolves the problem.
Option 6 – Run the Hardware and Devices Troubleshooters
The first thing you need to do is click on Start and then on the gear-like icon to pull up the window for Settings.
After opening Settings, look for the Update and Security option and select it.
From there, go to the Troubleshoot option located on the left-hand side of the list.
Next, select Hardware and Devices from the list and open the Troubleshooter and run it. Once it is doing its job, wait for it to complete the process and then restart the system.
After the system restarts, check if the problem’s now fixed. If not, refer to the next option given below.
Option 7 – Put your PC in a Clean Boot State
You might also want to put your computer in a Clean Boot State to fix the problem with the Shift key. It could be that there is a third-party program that’s preventing the Shift key from functioning. To isolate this possibility, you need to put your computer in a Clean Boot State.
Log onto your PC as an administrator.
Type in MSConfig in the Start Search to open the System Configuration utility.
From there, go to the General tab and click “Selective startup”.
Clear the “Load Startup items” check box and make sure that the “Load System Services” and “Use Original boot configuration” options are checked.
Next, click the Services tab and select the “Hide All Microsoft Services” check box.
Click Disable all.
Click on Apply/OK and restart your PC. (This will put your PC into a Clean Boot State. And configure Windows to use the usual startup, just simply undo the changes.)
Now try to connect the external devices and check if the error is now gone.
Hello everyone and welcome to our Windows 10 security basics where we will provide you with common practices you should aim to follow in order not to cough some viruses, malware, keylogger, worm, etc.
As you are all aware, we live in a digital age where we are surrounded by luxuries of unlimited information, video chats all over the globe, free calls via the internet, applications that track stuff for us, and many many more things that make our lives easier. Sadly with this kind of technology comes risks of cyber attacks that aim to steal your information, credit card numbers, or any other relevant stuff which could be used illegally in order to make purchases, loans, and other theft in your name so ones doing that could not get caught.
Think of data stealers the same as you think of armed robbers in a dark alley, just this time their pray is data about your life so they can make purchases for themselves more than once.
This article aims to provide you with some common logic, tips, and tricks of what should you do and where should you pay attention in order not to provide wrong people with your crucial information and data. we hope that you will find reading informative and helpful.
Keep Windows updated.
Microsoft is working hard on their Windows defender and firewall to provide protection to its users and fixing any introduced security leaks which are found in Windows itself. By updating and keeping Windows updated you make sure that every security leak that is found is patched and removed from Windows and that you have the latest database of known malware inside the firewall and defender.
This common practice, however, should not be limited to Windows only, you should update every application you are using for the same reasons.
Use antivirus, anti-malware, and firewall
These applications exist for a reason and that reason is to protect your data. Dedicated applications specifically made for purposes of defending your data are better than any kind of I am careful mentality since sometimes is enough to just visit a website or just click on some link and you are compromised. You can use Windows Defender and firewall if you wish, they are already in Windows but if you are serious about your data and like to surf the internet some better protection is worth the investment.
Get a dedicated password manager
Your password is bad, if you use the same password everywhere then it is even worse. Computers have come a long way in the last 50 years and so have cyber attack applications which make your commonsense passwords extremely vulnerable and all of your accounts open to cyber attacks. Dedicated password managers that can hash passwords and automate them are your safest bet that your passwords will not be compromised, get one, and get it today.
Do not click on anything inside emails
Cyber attacks come in vast variety and one of them is sending you emails informing you that for example your Paypal or anything else has been hacked and that you must click this link to reset your password. These you do not click, no matter how convincing they sound or how good they look, if you need to update your information on a specific service or website, you delete email, open browser and go to that service and change stuff. The same goes with different offers, discounts, women seeking you, men seeking you, prince sending you 1 billion in gold. Only click on links in emails from a trusted and verified source.
Do not click on pop-ups
Similar to clicking on links in emails you should not click on pop-ups, the same rules, same stuff apply as with emails.
Be careful what you are downloading
Be careful from where you download your software and be careful what are you downloading and stop using pirated software, any kind of malicious applications, keyloggers, viruses, etc could be hidden in these downloads, and by downloading them you are opening doors to your private information. Only use legal software from trusted sources.
Never leave your phone or computer unattended
You can never tell who can implement malicious software or get some crucial information from unattended devices, lock them all time and take them with you.
There you go, 7 common tips and tricks for the basic security of your computer. Thank you for reading and I hope to see you again on our site.
Today most people have Facebook accounts where they keep in touch with friends and family. But large Facebook network of users is also very interesting to another party as well, hackers.
There are many ways hackers can steal your data via direct hacks, trickery, and social engineering in order to get your credentials, emails, and many other things using them to wreak further havoc.
Once a hacker has needed information it is very difficult to minimize impact and all of your information could be compromised from a list of friends to credit card numbers. Keep on reading to learn how can you protect yourself against these attacks and learn about common practices that hackers use in order to steal your data.
Stealing Facebook data via email
A couple of years ago there was a lot of talk about not opening suspicious emails. Well, it still holds today. The difference is that today’s fake emails have become very difficult to differentiate from official ones since hackers put the effort into creating them copying fonts and layout, making them identical to original ones.
So if emails look and feel like original ones how do you know if it is fake? Very simple, you do not click anything in it. If Facebook or for that matter any company wants to contact you they will do via their platform.
Clicking inside a hacker's email will lead you probably to a fake Facebook website replica where you will have to type in your username and password providing an attacker with your login credentials, etc.
If you receive this kind of mail where there are threats about terminating an account, missing payments, etc. it is always the best thing to go directly to Facebook and see if you have any kind of notifications there. Do not trust any emails that ask for account information, request money, or threaten to suspend your account.
Phishing attacks
As stated previously if you click on the link inside fake mail it will probably lead you to a website replica of the original.
Although hackers can pretty much copy all things from an original website like layout, fonts, colors, etc. There is one thing that he cannot, web address. Take a good look into your browser address bar to see if there is a typo or anything strange in the address of a website.
Also, make sure to check for the secure icon in the web address before signing in.
Fake Facebook buttons
If by any chance and for whatever reason, you end up on a fake Facebook site be vary careful about like and other buttons since buttons themselves behave and act like links inside your browser.
IF when you click on like you get a prompt to sign in, it is almost 100% that you ended up on a phishing fake website.
Password brute force attack
Having complex and long passwords is a must. If your Facebook password is 12345 there is a very high chance that if a hacker wants he can easily guess it via trying out the most used and simple passwords via simple guessing.
To avoid being hacked just for having poor passwords try to think of something longer, combine letters and numerical characters, place special characters inside it or just simply as the best solution use a password manager and create passwords with it.
Password grab outside Facebook
If you use the same password for multiple accounts which is a big no-no and you should not do it then hackers can use passwords from other services and login into your Facebook in order to steal data.
Avoid these situations by having different passwords for different accounts or use a password manager to keep everything in order.
Hacking via key logger
Some time ago we have made an article which explained in detail everything you need to know about key loggers here: https://errortools.com/windows/how-to-know-if-you-have-keylogger-in-windows/
Anyway, this is a more advanced hacking technique in order for hackers to steal your data and it includes placing malicious applications into your system that records your keystrokes and sends them directly to hackers.
Since this is an application best protection against this type of attack is to have a security suite installed and active on your PC or device you use to go to Facebook.
Connecting and surfing on an unsecured network
Using no password and unsecured WI FI or any other type of network is risky at least. You can have all protection installed on your device and have a strong password but hackers also logged in to the same network can track all outgoing stuff going through mentioned network leaving you again exposed to attacks.
It is better to connect to your mobile operator network than on free WI FI, at least there is some level of security in your operator network while free WI FI is completely unsecured.
Getting a virtual private network or VPN is also one thing you could think about for protection since almost all VPN services will encrypt your data thus providing you with a security layer even on unsecured Wi-FI.
Conclusion
Hacking and stealing have come a long way from their infant stages and in today’s world when we use a lot of gadgets and have plenty of online presence taking some steps for security is a must.
I hope that you have found anything here informational and helpful so you can avoid getting your data compromised.
Many Minecraft players are experiencing Realms internal server error 500, luckily for all of that players, we are offering you solutions.
Preliminary Fixes
Before heading towards the fixes here it is suggested to try some quick tweaks that might work in your case to fix Minecraft Internal Server Error 500.
Restart your PC – Very first it is suggested to shut down your computer and after that restart the system. This worked for many players to get rid of the server outages issue.
Update your Windowsversion – Check if you are running an outdated Windows version then make sure to install the latest Windows update and then run the game.
Update Your Game Version – Also make sure you are running an updated version of Minecraft Realms. Installing the latest updates not only makes the game more stable but also helps you to solve common glitches and issues with the game. So, check if any recent updates are available to make sure to download and install them
Modify the Game Settings – Check if you have tweaked some of the game settings then this might be the reason for the problem. So try to reconfigure the settings to default. This may work for you.
Now after following the preliminary solutions check if the Minecraft Realms Internal Server Error 500 is resolved or else head to the next solution.
Check your Internet Connection
As said above if the internet connection is not working properly or it is preventing you from accessing the servers, then this can also cause the Internal Server Error 500 in the Minecraft server.
So, very first make sure your internet connection is stable and working properly. Also if you are using Wi-Fi then use a wired connection to get a stable network.
Moreover, if your internet connection is working fine then there is a possibility that your internet connection is causing interruption and preventing you from accessing the Minecraft Realms server.
So, if this is the case then here it is suggested to use a VPN connection to get exceptionally fast & reliable speeds without getting detected.
Check for the Minecraft Server Outage
Well, there is a possibility the Minecraft servers are down and if this is the case then you don’t have any other option than just waiting for the servers to get restarted and the service becomes available again.
Also, the service outages can affect the ability of the game and as a result, you are unable to play the game. Additionally, you can also inquire about Minecraft’s server status by visiting the Downdetector website.
But if you find the services are running fine then the issue is from your side.
Disable Background Applications
If you are still getting the Minecraft Realms Internal Server Error 500, then there are chances that other applications running in the background are causing a limit to your internet bandwidth.
It is suggested to disable the internet-connected apps and after that try connecting to Microsoft Realms again.
Hit CTRL + SHIFT + ESC keys > to open the Task Manager.
Then under the Process tab,> right-click on unwanted background process, > click on the End Task
After disabling the applications running in the background, relaunch Minecraft and check if the internal server error 500 still appears or not.
Delete UUID Files in Minecraft
If you are still getting the Minecraft Realms Internal Server Error 500 then here it is suggested to delete the UUID files in Minecraft.
First, visit the website by clicking the https://mcuuid.net/ and enter all the credentials to get the player’s UUID
Then login to the server > proceed to server files > head to the world
Here locate the PlayerData folder > click to open it.
And from here choose the file containing the same name like the player’s Username or UUID > after that hit the Delete
Lastly, restart your server to save the changes
Remove Resource Packs & Mods
If you are getting the Minecraft realms internal server error 500 after the installation of a particular mod or the resource pack then this is what causing the issue while playing the realm.
So, here it is suggested to delete it immediately, also uninstall the mod as well as the resource pack you installed recently.
It is estimated this works for you but if you have a doubt related to any specific mod or the resource pack causing an error you should uninstall then also and check if the Minecraft internal error 500 is fixed.
Disable the Plugins
If you are still encountering the error then check for the plugins installed on your PC. Many times the installed plugin starts causing issues with the game as they are not compatible with the game version.
So here it is recommended to try disabling the plugins on the PC and check if this works for you.
On your system > open the plugin window > rename the plugins files from “[plugin name].jar to [plugin name].jar.disabled”.
Next restart the server and check if the Minecraft Realms Internal Server Error 500 problem is resolved or not.
Uninstall & Reinstall Minecraft
If none of the above-given solutions works for you then here it is suggested to uninstall and reinstall Minecraft.
Well, it is suggested to uninstall the game using the third-party uninstaller. Manually uninstalling the program won’t remove it completely, some of its registry entries, junk files are left behind and causes interruption when the next time you install it.
If you are looking to uninstall it manually then follow the steps given:
Hit Window + R key > to open the Run box
And in the run box type appwiz.cpl command > hit Enter
Now the application manager window pops up on your screen > locate the Minecraft application > right-click to Uninstall
And as the uninstalling process is completed > head to the Minecraft official website and tries downloading and installing the game.
Check if the Minecraft Realms Internal Server Error 500 is resolved or not.
Contact Support Center
If after trying all the solutions given you are still unable to fix the error then the only option left is to contact the Customer Support Center and fill the form in the link and describe the problem in a detailed way.
And within few days you will get feedback from them to fix Minecraft Realms internal error 500.
Valve has released a big update to its online store and distribution platform Steam. Among typical bugs fixing and making the user experience a little more fluid, we have received some major updates as well. Please take note that you need to update Steam itself to the latest version in order to get new features.
Storage management Page update
The storage management page has received a complete redesign and UX overhaul and it is now much easier to manage your game libraries and create new ones. The page itself looks and feels a little console more like but thanks to that it offers a much easier and clearer look and feel.
Another thing with the Steam store management page is the ability to move installation files from one location to another. Let’s say that you have two or more hard disk drivers in your machine and that you have SSD that you use for running stuff since it is fast and larger and slower one for storage. Now you can easily and quickly move one installation from one to another in order to take advantage of your faster SSD for quicker LOAD game times without making a new installation.
Steam Download page improvements
The download page has also received some love from Valve by enabling us to now see the installation progress. So far on the download page of Steam, you would only get download progress but it has been updated to show installation progress after download as well now making it more straightforward and giving you a general idea of how much more time there is to wait in order to start gaming.
Also, you can now drag and drop items in the download bracket to reorder download orders or place them as active downloads to start downloading right away.
If you connected your Hard Disk, USB, or SD card to your Windows 10 computer and you suddenly encounter an error that says, “Windows was unable to repair the drive”, read on as this post will help you fix the problem. This kind of error indicates that the file system on the drive has become corrupted and that ChkDsk was not able to repair the problem. You can also encounter this error when you try to run the ChkDsk utility to repair the system.
This kind of error is most likely due to the general corruption of the contents in the drive. It is also possible that you removed the external drive without using the “Safely remove hardware” option or it could be that the drive is still in use. To fix the problem, the obvious thing to do is to safely remove the external drive by using the “Safely remove hardware” option. If it didn’t work, you can try to run the CHKDSK utility from the command line or you could also restart your computer in a Clean Boot State and then run the scan. Before you proceed with the potential fixes provided below, make sure that you create a system restore point first or you could also create a backup copy of the data to an external drive.
Option 1 – Run the CHKDSK utility from the command line
Although some users reported getting the “Windows was unable to repair the drive” when they run a CHKDSK scan, other users reported that running it also fixed the error. Thus, you can try to run it and see if it works or not.
In the Windows Search box, type “command prompt” and from the search results, right-click on Command Prompt and select “Run as administrator”.
After opening Command Prompt, type this command and tap Enter: chkdsk <Partition Letter>: /f
The command you entered will start to check for errors and fix them automatically. Else, it will throw an error message saying, “Chkdsk cannot run because the volume is in use by another process. Would you like the schedule this volume to be checked the next time the system restarts? (Y/N)”.
Tap the Y key to schedule Disk Check the next time your computer restarts.
Option 2 – Restart your computer in a Clean Boot State
There are some instances that some conflicting programs installed in your computer might be the one that triggers the “Windows was unable to repair the drive” error to appear when you connect your external drive or run the CHKDSK utility. To identify which program is causing the problem, you need to put your computer in a Clean Boot State. To do so, follow the steps below.
Log onto your PC as an administrator.
Type in MSConfig in the Start Search to open the System Configuration utility.
From there, go to the General tab and click “Selective startup”.
Clear the “Load Startup items” check box and make sure that the “Load System Services” and “Use Original boot configuration” options are checked.
Next, click the Services tab and select the “Hide All Microsoft Services” check box.
Click Disable all.
Click on Apply/OK and restart your PC. (This will put your PC into a Clean Boot State. And configure Windows to use the usual startup, just simply undo the changes.)
Once your computer has restarted in a Clean Boot State, perform your scan again and see if it now works, and then start to isolate the problem by checking which one of the programs you installed recently is the root cause of the problem.
As we near the end of 2022 we look at the current best antivirus software for popular platforms, why they are the best, and why you should get them.
Avira, a great free Antivirus
Avira has been around a long time with its free antivirus version of the larger protection suite. It had its ups and downs but the latest versions are really great. With high-speed scans and low system impact, Avira antivirus is really one of the best free antivirus software currently on the market.
The software itself has also received UI & UX updates making it straightforward and easy to use. The virus scanning engine is the same as in paid version that ranks among the top engines in the world for this type of work. The package also gives you some great browser protection and a good firewall as well, there is really no excuse to skip on this if you want a free solution.
The only thing that we would say is not so great in Avira is reporting some false positives, sometimes even for MS updates, it is rare but it can happen.
Malwarebytes, a powerful Windows antivirus
Malwarebytes Premium is easy to use, simple antivirus solution that shies away from complicated UI, and simply put, it just works. Its scanning engine is well-known and places among the top and best in the world often finding some malware that other can miss.
Another great thing is its integration with Windows itself, it is one of the rare applications that can and will work incredibly well beside your typical Windows protection tools so you can have both of them running at the same time.
Installation and running are really simple and every typical PC user will find it as easy as walking in the park. On the other hand, sadly system impact is a little high and it will have issues running on lower-end systems due to its memory requirements.
Intego MAC Internet Security X9, the best Mac antivirus
Gone are the days when MAC had no virus issues, since MAC rose in popularity among the users, also rose the number of viruses and malware. The system itself has some great protection built it inside but for more security and better control of it, you will need a third-party dedicated solution.
Intego was made by Mac antivirus experts who have been building this kind of software last 25 years. The interface is easy to use and premade presets are really helpful, but the security suite can also be customized to fit your needs and desires.
Since this is only available as a security suite, you are getting a firewall and some other security tools along with your antivirus that will run as a part of it.
The bad side is that scans can sometimes run slow, most of the time they are OK in terms of speed but occasionally they can switch to slower speeds and impact scanning time to some annoying times. Also, there is no webcam protection nor VPN service included where others on this list have them.
Bitdefender mobile security: best Android protection
While protection is not only needed for your gaming or workstation, software suites that are dealing with mobile and tablet security exist. The best of them is the Bitdefender antivirus mobile suite. Low on system resources and low on performance impact with the really great virus detection rate Bitdefender is at the top of suites for your phone.
Consistent high virus detection packed with low battery impact is great but the suite comes with tons of other tools as well like browser security tools, email protection, and real-time link and notification protection.
The application will always scan each file and newly installed application in the background and alert and cut off any found threat. App itself is easy to install and use and most of the time it will do everything in the background for you but offer you customization if you need it.
The package also includes VPN and application lock that will let you protect the critical applications from being accessed as well as an online account scanner. Anti-theft and anti-loss tools, which allow you to find, remotely lock or wipe a stolen or lost device, add yet another layer of protection.
One thing that is missing from this great package is fraudulent call protection. Newer Android phones have this feature inside but it would be nice if Bitdefender had it as well.
Bitdefender, the best antivirus software
Now that we have covered specific cases of each platform, there is one player that has all of them covered and with a quality product, that player is BitDefender and it is great. Personally, this is my protection suite of choice and as I type this it is running in the background.
Bitdefender has it all, low system impact, as a matter of fact, it is one, if not, the lowest performance impact engine on the market currently and that is packed with a great and highly consistent virus & malware detection suite. Along with real-time malware protection, browser security, and anti-spam tools, you also get anti-phishing defenses, ransomware protection, and a strong firewall.
Bitdefender scores are very high in both the zero-day threat and real-world protection tests at AV-Test, an established organization that tests antivirus software. Despite being tested against tens of thousands of well-known and widespread malware threats, the software consistently achieves a 100% blocking rate.
The suite also comes with a restricted free VPN and with parental controls as well. Webcam and microphone protection are also included in the suite and on top of all, it has great pricing plans and constant discounts.
BitDefender is really a great package and it might sound too good, but after years and years of personally using it I have not had single malware or virus issue, the only thing that I would put as a negative is that system is severely slowed down when system scans are performed so be sure to run or schedule them when you are not using your computer. This, of course, can put some people off and I will admit it is a serious drawback but for me, the security of my workstation is more important than leaving the computer for 20 or so minutes in order to perform a full scan of the system.
DriverPro is a program developed by PC Utilities Pro. This program is often found bundled in other installations.
From the author: PC Utilities Pro is a leading software development company founded in 2009. As a group of young enthusiastic programmers, we constantly strive in creating powerful, yet easy-to-use solutions that would enable even the most basic computer users to keep their PCs running like new.
When installed, DriverPro will add registry entries for the current user that allow it to run each time to computer is started. It will also add a scheduled task in Windows, that allows it to run at various times. The optimizing nature of the application allows it to access any file and information on your computer without your knowledge.
Multiple anti-virus programs have marked this application as a Potentially Unwanted Program, and it is not recommended to keep it on your computer.
About Potentially Unwanted Applications
Have you ever discovered an unwanted program running on your PC and wondered exactly how the heck it got there? A PUA / PUP (potentially unwanted application / potentially unwanted program) is a software program that comes bundled with freeware/shareware and you agree to install on your computer. These are programs you certainly don’t want on your computer since it doesn’t provide any useful service.
Despite being regarded very dangerous, PUPs aren’t necessarily computer viruses or malware What makes a PUP different from malware is the fact that whenever you download one, you are doing it with your consent – though in most instances unwittingly and unwillingly. PUPs might not be malware but still, they’re harmful programs to your computer. At best, these unwanted applications provide hardly any benefit, and at worst, they could be quite damaging to your computer.
What do PUPs do on your computer, really?
Most Potentially Unwanted Programs will come in the form of adware, which typically aims to exhibit numerous irritating pop-up ads, banners, coupons, and bargains on websites you go to. PUPs that come as browser add-ons and toolbars are readily identifiable. They’ll track your online activities, redirect your search results to unsafe websites where spyware and adware can be downloaded, hijack your home page, and slow your internet browser down to a crawl.
PUPs load up a dangerous bite if kept unchecked. They will often include things like information gathering program code which could gather and send your sensitive information back to 3rd parties. These are programs that don’t really do anything good for you; in addition to occupying space on the hard drive, they also slow down your PC, often alter settings without your authorization, the list of annoying features goes on and on.
Great tips on protecting yourself from unwanted software
• When setting up anything on your computer system, always study the fine print, like the license agreement. Don’t accept terms of use that are for bundled programs.• Only Use the “custom” or “manual” install method – and never blindly click Next, Next, Next.• Use an advert blocker/pop-up blocker; Install anti-malware products such as Safebytes Anti-malware. These software programs could establish a wall between the computer and cybercriminals.• Think twice before you decide to download any type of freeware or shareware. Just before adding a plug-in or web browser extension, think about whether it is really necessary.• Only download programs from the original providers’ websites. Avoid download portals because they use their very own download manager to pack extra programs along with the initial download.
Help! Malware Blocking Anti-virus Installation And Access To The Web
All malware is bad, but certain kinds of malicious software do a lot more damage to your computer than others. Some malware is meant to hinder or block things that you wish to do on your computer. It may well not allow you to download anything from the net or it will stop you from accessing some or all websites, particularly the anti-malware sites. So what you should do if malware prevents you from downloading or installing Safebytes Anti-Malware? Do as instructed below to get rid of the malware in alternate ways.
Get rid of malware in Safe Mode
The Windows operating system has a special mode known as “Safe Mode” where just the bare minimum required programs and services are loaded. In the event, the virus is set to load automatically when the PC starts, shifting to this mode may well prevent it from doing so. To start the computer into Safe Mode, press the “F8” key on the keyboard just before the Windows boot screen appears; Or right after normal Windows boot up, run MSConfig, check the Safe Boot under the Boot tab, and click Apply. After you restart into Safe Mode with Networking, you could download, install, and update the anti-malware program from there. Now, you are able to run the anti-virus scan to eliminate computer viruses and malware without any interference from another malicious application.
Switch to some other internet browser
Web-based viruses could be environment-specific, aiming for a particular internet browser or attacking particular versions of the browser. If you appear to have malware attached to Internet Explorer, then switch over to a different internet browser with built-in safety features, such as Firefox or Chrome, to download your favorite antivirus program – Safebytes.
Run anti-virus from your USB drive
Another way is to download and transfer an anti-malware program from a clean computer to run a scan on the affected system. Adopt these measures to run the anti-malware on the infected computer system.
1) On a clean computer, download and install Safebytes Anti-Malware.2) Plug the pen drive into the uninfected computer.3) Run the setup program by double-clicking the executable file of the downloaded application, which has a .exe file format.4) Select the USB flash drive as the location when the wizard asks you where you intend to install the software. Follow the activation instructions.5) Remove the flash drive. You may now utilize this portable antivirus on the infected computer.6) Run the Safebytes Anti-malware directly from the flash drive by double-clicking the icon.7) Press the “Scan” button to run a full system scan and remove viruses automatically.
Detect And Remove Viruses With SafeBytes Anti-Malware
Want to download the very best anti-malware software for your laptop or computer? There are many applications available that come in paid and free versions for Microsoft Windows computers. A few are worth your money, but many aren’t. You need to pick a company that creates industry-best antimalware and has earned a reputation as reliable. Among few good programs, SafeBytes Anti-Malware is the strongly recommended software for the security-conscious end user.
Safebytes is one of the well-established PC solutions firms, which provide this complete anti-malware software program. This software program can easily detect, remove, and protect your computer from the most advanced malware intrusions such as adware, spyware, trojan horses, ransomware, parasites, worms, PUPs, along with other potentially harmful software applications.
SafeBytes anti-malware offers a plethora of advanced features that set it apart from all others. The following are some of the good ones:
Real-time Protection: SafeBytes provides complete and real-time security for your personal machine. It will regularly monitor your computer for hacker activity and also gives users superior firewall protection.
Best AntiMalware Protection: This deep-cleaning anti-malware program goes much deeper than most antivirus tools to clean out your computer system. Its critically acclaimed virus engine finds and disables hard to remove malware that hides deep within your PC.
Web Protection: SafeBytes gives an instant safety rating about the web pages you are about to check out, automatically blocking unsafe sites and ensuring that you are certain of your safety while browsing the world wide web.
Fast Scan: SafeBytes Anti-Malware has a multi-thread scan algorithm that works up to 5x faster than any other antivirus software.
Very Low CPU and RAM Usage: This software program is not “heavy” on your computer’s resources, so you’ll not notice any overall performance problems when SafeBytes is operating in the background.
Fantastic Tech Support Team: You will get 24/7 technical assistance to promptly resolve any issue with your security application.
Technical Details and Manual Removal (Advanced Users)
To remove Driver Pro manually, navigate to the Add/Remove programs list in the Control Panel and choose the offending program you want to get rid of. For web browser plug-ins, go to your web browser’s Addon/Extension manager and select the add-on you want to remove or disable. You may also want to reset your web browser settings, as well as clear your web browser cache and cookies.
Lastly, check your hard disk for all of the following and clean your registry manually to remove leftover application entries after uninstalls. Please note that only professional computer users should try to manually edit the system files mainly because removing any single vital registry entry leads to a major problem or even a computer crash. Also, certain malware is capable of replicating itself or preventing its removal. Carrying out this in Safe Mode is suggested.
Windows uses 2 types of keys for its activation, KMS or MAK. These keys should work without any issues since they are elevated with higher permissions but in some cases, they are by accident run without their proper permission, and then we have access denied error or error 0x80070005
To resolve this issue please first check if not by any chance your antivirus or firewall is preventing slmgr.bs file to access the right permissions, that being said if the previous solution is not working note that you have to be an administrator of the system or have administrator privileges. As an administrator, you will have to use Software Licencing Management Tool or short SLMGR.VBS, a VBS file in Windows used for its activation purposes.
As an administrator, open Command prompt with admin permissions and then run slmgr.vbs
This will make sure that activation goes through, make sure to use proper options like:
The Free Wifi Hotspot is offered to users that own a laptop and a desktop PC that has a wired connection to the Internet and no WiFi modem. The Free Wifi Hotspot is said to help users share their Internet connection with mobile devices that support the 2G/3G/4G/USB tethering connectivity. However, users will need a 2G/3G/4G modem attached to the computer/laptop with access to the Internet if they intend to benefit from the Free Wifi Hotspot software. Additionally, the Free Wifi Hotspot may collect data like your Internet history, downloads log, and software configuration for product placement optimization. PC users that run the Free Wifi Hotspot software may be shown pop-up windows with marketing materials from time to time and maybe redirected to promotional offers.
Several anti-virus applications have flagged Free Wifi Hotspot as a Potentially Unwanted Applications and may come bundled with other PUP-s that may harm your computer or steal some information, due to these risks it is marked for optional removal.
About Potentially Unwanted Applications
Everybody has experienced it – you download a piece of free application, then you see some unwanted applications on your computer or find a strange toolbar has been included with your browser. You didn’t install them, so how did they appear? These unwanted applications, which are referred to as Potentially Unwanted Programs, or PUPs in short, typically tag along as a software package when downloading the application and can ruin your PC or cause major annoyances.
PUP does not involve malware in the traditional sense. The reason is, the majority of PUPs end up in a computer not because they slip through the security holes, for example, but because the users have got installed them themselves – totally unintentionally needless to say. A PUP might not be regarded as malicious or harmful but nonetheless, it is a standard reason for clunky OSs; some PUPs are a lot more aggressive by deliberately slowing down your computer or laptop.
How does unwanted software impact you?
Unwanted programs come in many forms. Usually, they can be seen in adware bundlers that are known to utilize aggressive and misleading advertising. The majority of bundlers install many adware programs from several vendors, each of which has its own EULA policy. Safebytes Anti-malware totally eliminates this threat and safeguards your machine against PUP or adware infection. The PUPs likewise get installed into your computer in the form of browser add-ons and toolbars. They will modify web browser settings, change the default search engine, substitute the default home page with their very own websites, slow down browsing speed, and also will ruin your system also.
Potentially unwanted programs apply aggressive distribution methods to get onto your personal computer. The worst part of installing a PUP is the spyware, adware, and keystroke loggers that may hide inside. These are software programs that don’t do anything good for you; in addition to occupying space on the hard disk, they will also slow down your PC, often change settings without your approval, the list of troublesome features goes on and on.
Tips on avoiding PUPs
• When installing anything on your desktop, always read the fine print, like the license agreement. Do not accept terms of use that are for bundled programs.• Don’t accept standard, express, default, or any other installation settings which are recommended. Always opt for “custom” installation.• Make use of an antivirus program to boost your protection. Anti-malware programs like Safebytes Anti-malware has got real-time features that will block PUPs before they harm your computer.• Avoid adding freeware software you won’t make use of. Nowadays ‘freeware’ isn’t actually freeware – but ‘crapware’ bundling nonsense.• Always download programs from the original website. Most PUPs find their way onto your PC is through download portals, so avoid it entirely.
Comply with these tips and you will almost never get potentially unwanted programs on your computer.
How To Get Rid Of Malware That Is Blocking Antivirus Downloads?
Every malware is bad and the level of the damage can vary greatly depending on the type of malware. Some malware sits in between the computer and the internet connection and blocks some or all websites that you really want to check out. It will also block you from adding anything to your PC, especially the anti-virus program. If you’re reading this, you may have affected by a virus that prevents you from downloading a security application such as Safebytes Anti-Malware. There are some options you could try to get around with this particular issue.
Use Safe Mode to resolve the problem
In the event the malware is set to run at Windows startup, then booting in safe mode should avoid it. Since just the bare minimum programs and services launch in “Safe Mode”, there are rarely any reasons for conflicts to happen. Listed here are the steps you need to follow to boot into the Safe Mode of your Windows XP, Vista, or 7 computers (check out Microsoft site for directions on Windows 8 and 10 PCs).
1) At power on, press the F8 key before the Windows splash screen starts to load. This will conjure up the “Advanced Boot Options” menu.2) Make use of the arrow keys to select Safe Mode with Networking and hit ENTER.3) When you are into this mode, you should have access to the internet once again. Now, use your browser normally and navigate to https://safebytes.com/products/anti-malware/ to download and install Safebytes Anti-Malware.4) Following installation, run a complete scan and allow the program to delete the threats it detects.
Switch over to some other internet browser
Certain malware might target vulnerabilities of a particular web browser that obstruct the downloading process. If you suspect that your Internet Explorer happens to be hijacked by a trojan or otherwise compromised by cybercriminals, the most effective thing to do is to switch to an alternate browser such as Chrome, Firefox, or Safari to download your chosen security application – Safebytes Anti-Malware.
Install security software on a USB drive
Another solution is to download and transfer antivirus software from a clean PC to run a scan on the affected computer. Abide by these steps to run the antivirus on the infected computer.
1) On a virus-free PC, install Safebytes Anti-Malware.2) Plug in the pen drive to a USB slot on the uninfected computer.3) Double-click the Setup icon of the antivirus software to run the Installation Wizard.4) Select the flash drive as the destination for saving the software file. Follow activation instructions.5) Now, insert the thumb drive into the infected system.6) Double click the Safebytes Anti-malware icon on the pen drive to run the application.7) Click “Scan Now” to run a complete scan on the infected computer for viruses.
SafeBytes Anti-Malware Benefits
If you are looking to download anti-malware software for your PC, there are lots of tools on the market to consider however, you should not trust blindly anyone, regardless of whether it is free or paid software. Some are very good ones, some are decent, and some are just bogus anti-malware software that will harm your computer themselves! You should opt for a tool that has gained a good reputation and detects not only viruses but other kinds of malware too. On the list of recommended software by industry leaders is SafeBytes Anti-Malware, a popular security application for Microsoft Windows.
Safebytes is one of the well-established PC solutions companies, which provide this complete anti-malware software program. When you have installed this software, SafeByte's state-of-the-art protection system will ensure that no viruses or malware can seep through your computer.
SafeBytes anti-malware provides a plethora of enhanced features which set it apart from all others. Below are some of the best ones:
Live Protection: SafeBytes offers an entirely hands-free active protection and is set to monitor, block, and get rid of all computer threats at its first encounter. They’re very efficient in screening and getting rid of different threats because they are continuously revised with new updates and safety measures.
World-class AntiMalware Protection: This deep-cleaning anti-malware program goes much deeper than most anti-virus tools to clean out your computer. Its critically acclaimed virus engine finds and disables hard-to-remove malware that conceals deep inside your personal computer.
Safe Web Browsing: SafeBytes checks and provides a unique safety rating to every single website you visit and block access to webpages considered to be phishing sites, thus safeguarding you from identity theft, or known to contain malware.
Lightweight Tool: SafeBytes is a lightweight and easy-of-use antivirus and antimalware solution. As it uses minimum computer resources, this program leaves the computer power exactly where it belongs to: with you actually.
Fantastic Technical Support: Expert technicians are at your disposal 24/7! They will promptly resolve any technical issues you may be encountering with your security software.
SafeBytes can keep your PC protected from most advanced malware threats automatically with almost no input needed from you again. Once you’ve downloaded and installed SafeBytes Anti-Malware, you will no longer need to bother about malware or other security worries. If you want sophisticated forms of protection features & threat detections, buying SafeBytes Anti-Malware could be worth the dollars!
Technical Details and Manual Removal (Advanced Users)
If you’d like to perform the removal of Free Wifi Hotspot manually instead of using an automated software tool, you may follow these steps: Go to the Windows Control Panel, click the “Add or Remove Programs” and there, select the offending application to uninstall. In case of suspicious versions of browser extensions, you can actually remove them via your web browser’s extension manager. You’ll probably also want to totally reset your internet browser to its default configuration settings.
To ensure the complete removal, manually examine your hard drive and Windows registry for all of the following and eliminate or reset the values accordingly. Please remember that only professional users should attempt to manually edit the registry because incorrect file removal leads to a major problem or even a computer crash. Furthermore, certain malware is capable of replicating itself or preventing deletion. It is advisable that you carry out the removal procedure in Windows Safe Mode.
Files:
%APPDATA%\Microsoft\Windows\Start Menu\Programs\Free WiFi Hotspot
%ALLUSERSPROFILE%\Microsoft\Windows\Start Menu\Programs\Free WiFi Hotspot
%ALLUSERSPROFILE%\Application Data\Start Menu\Programs\Free WiFi Hotspot
%Appdata%\Free WiFi Hotspot New Version Available
Registry:
HKEY_LOCAL_MACHINE\Software\[APPLICATION]\Microsoft\Windows\CurrentVersion\Uninstall..Uninstaller
Free WiFi Hotspot_is1

 Today most people have Facebook accounts where they keep in touch with friends and family. But large Facebook network of users is also very interesting to another party as well, hackers.
There are many ways hackers can steal your data via direct hacks, trickery, and social engineering in order to get your credentials, emails, and many other things using them to wreak further havoc.
Once a hacker has needed information it is very difficult to minimize impact and all of your information could be compromised from a list of friends to credit card numbers. Keep on reading to learn how can you protect yourself against these attacks and learn about common practices that hackers use in order to steal your data.
Today most people have Facebook accounts where they keep in touch with friends and family. But large Facebook network of users is also very interesting to another party as well, hackers.
There are many ways hackers can steal your data via direct hacks, trickery, and social engineering in order to get your credentials, emails, and many other things using them to wreak further havoc.
Once a hacker has needed information it is very difficult to minimize impact and all of your information could be compromised from a list of friends to credit card numbers. Keep on reading to learn how can you protect yourself against these attacks and learn about common practices that hackers use in order to steal your data.
 Storage management Page update
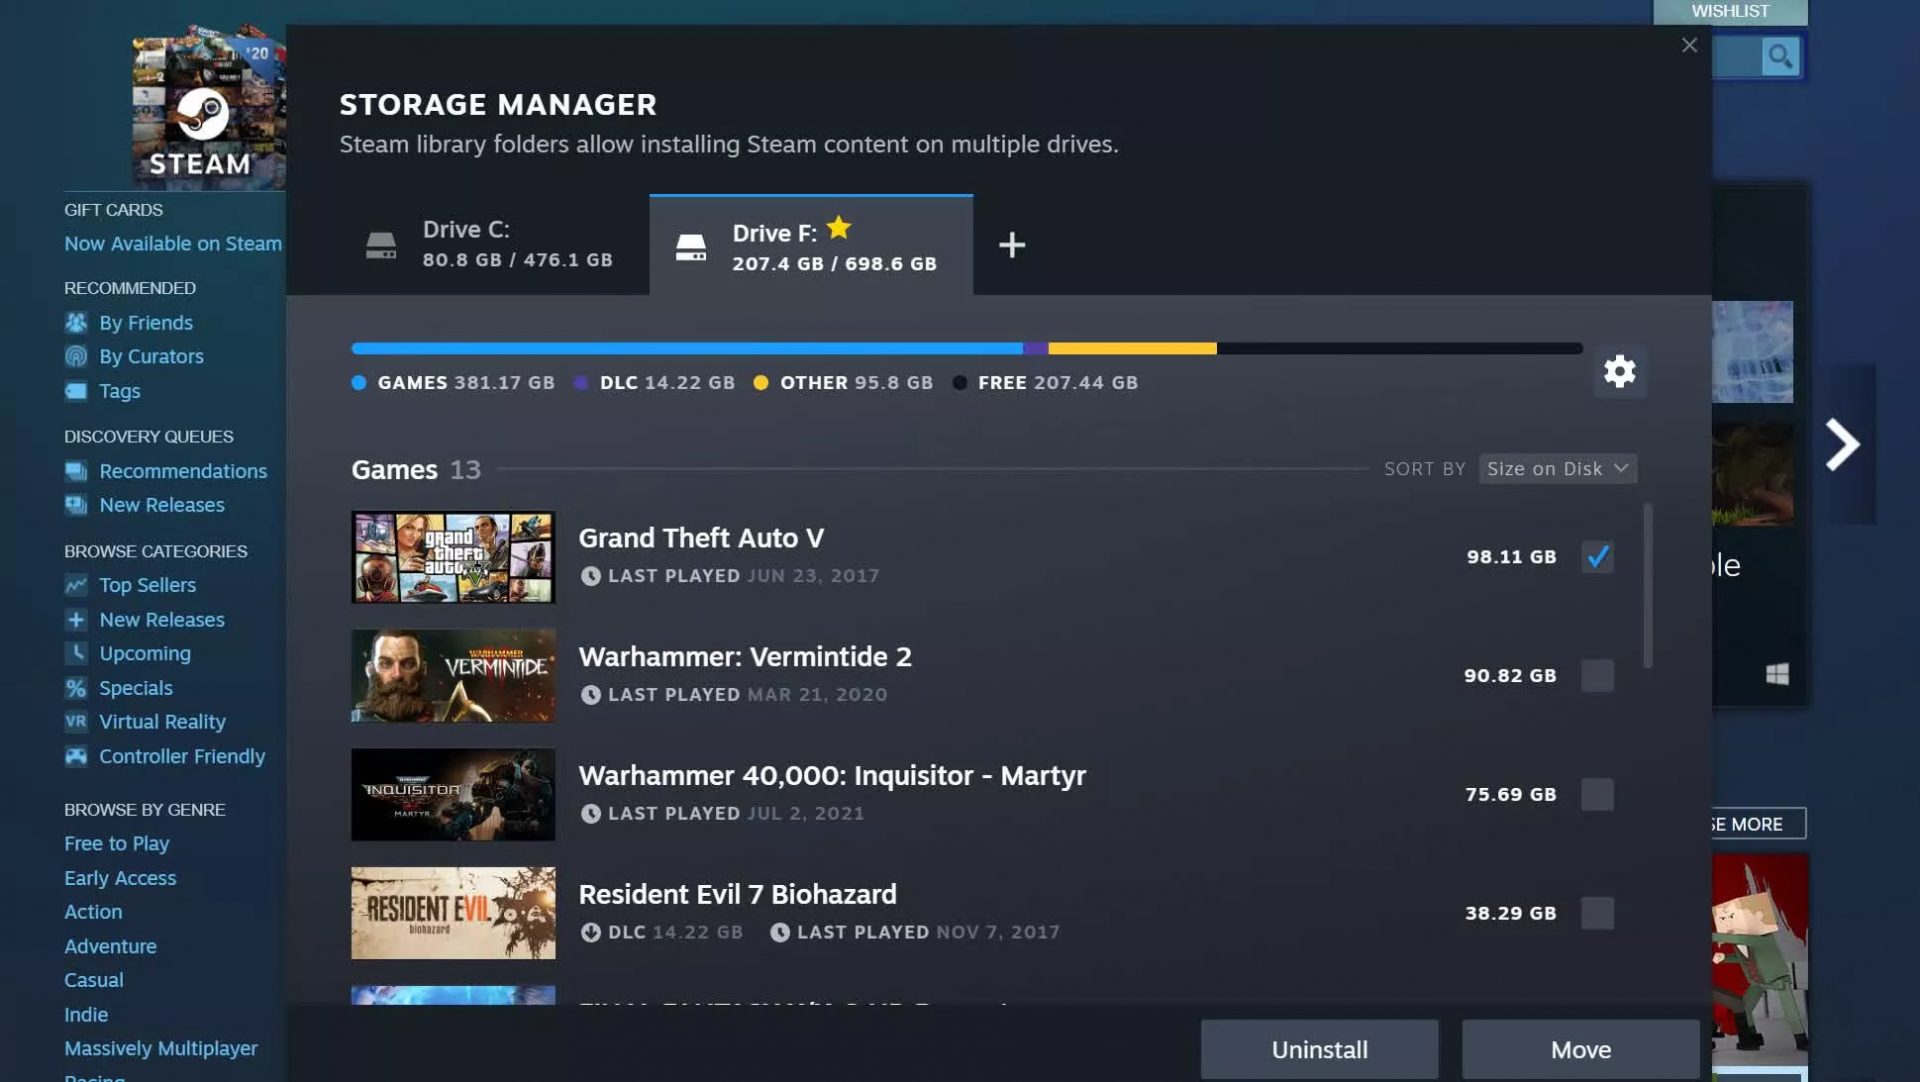 Another thing with the Steam store management page is the ability to move installation files from one location to another. Let’s say that you have two or more hard disk drivers in your machine and that you have SSD that you use for running stuff since it is fast and larger and slower one for storage. Now you can easily and quickly move one installation from one to another in order to take advantage of your faster SSD for quicker LOAD game times without making a new installation.
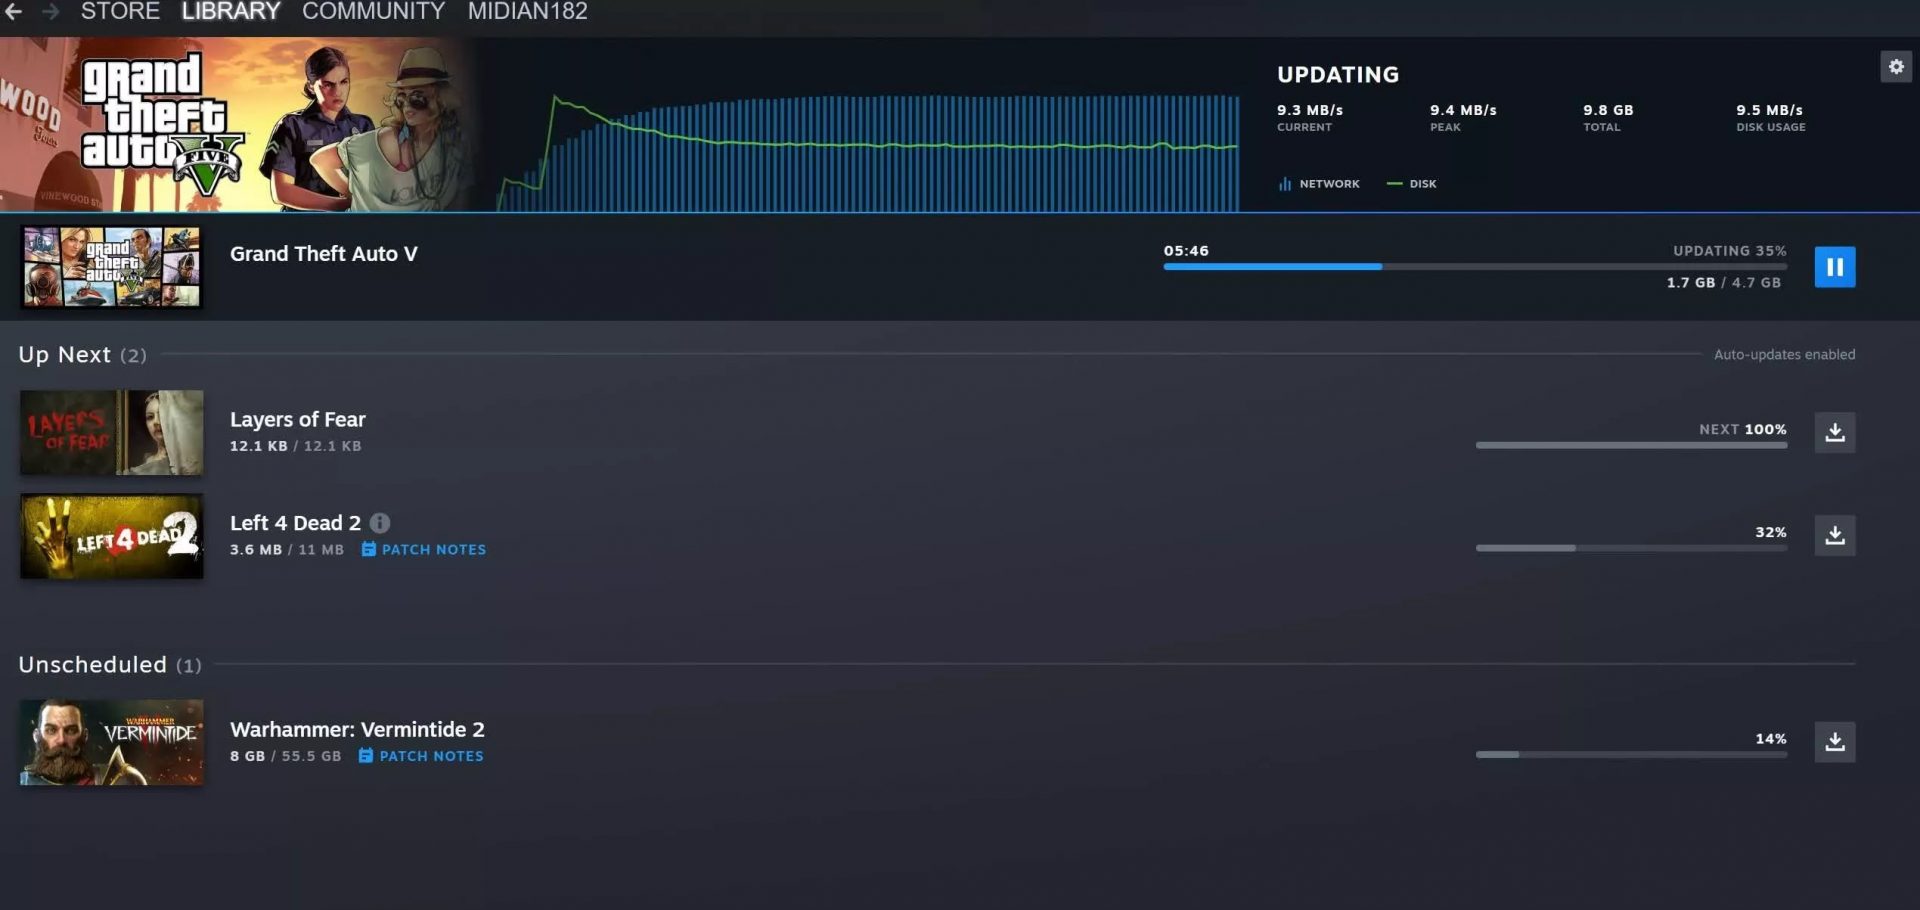 Also, you can now drag and drop items in the download bracket to reorder download orders or place them as active downloads to start downloading right away.


