What is Error 2200?
Error 2200 is an error code that you are likely to experience if you have Dell Photo All in One Printer 926. Dell Photo Printer 926 is an inkjet multifunction device. It offers features like print, copy, scan, and fax.
Error 2200 may stop you from scanning and printing documents on your Dell Photo All in One Printer 926.
Solution
 Error Causes
Error 2200 may occur due to several reasons. However, the most common causes include:
- Registry issues
- Broken or missing system files
- Corrupted driver
- Malware
Further Information and Manual Repair
To resolve error 2200 on your system try the methods listed below. These DIY methods are easy and effective and can repair this error in no time. These solutions require zero technical expertise and knowledge.
This means if you are not technically sound or you are not a computer programmer, you can try these solutions and repair error 2200 on your system easily.
Method 1
When the underlying cause of error 2200 is related to a corrupted driver then follow these steps to resolve the issue. Go to the Start menu, click Control Panel, Performance and Maintenance tab, System and Device Manager.
Navigate the device, click properties, driver, and then uninstall. Now reboot your PC to activate changes. Now download the latest version of the Dell Photo All in One Printer 926 drivers from a reliable website and save install it on your PC.
Method 2
Malware can also damage and corrupt drivers and system files. If the reason for error 2200 on your PC is malware then download a powerful antivirus and scan your entire PC. Remove all malware and viruses infecting your system to resolve the error.
Method 3
The Windows registry is that part of the computer that stores much of the information and settings for software programs, operating system configurations, and hardware devices.
It also saves unnecessary and obsolete files like junk files, cookies, internet history, bad registry entries, and invalid files. If these files are not removed from the registry frequently, they accumulate in the registry and corrupt it thereby triggering different error codes.
These files damage the registry and other important system files.
To repair the registry and error codes triggered due to registry issues, it is suggested you download Restoro. This is a cutting-edge and user-friendly PC Fixer deployed with a powerful and intuitive registry cleaner.
The registry cleaner scans your entire PC, removes all the bad entries and obsolete files. It cleans the registry, repairs the damaged and corrupt system files thereby resolving registry issues instantly.
Click here to download Restoro and repair error 2200.
Method 4: Locate and Install the Driver
As was pointed out, you might need to reinstall the printer driver again. Using
DriverFIX, you’ll be able to automatically update your computer system and install the drivers your computer needs to operate smoothly.


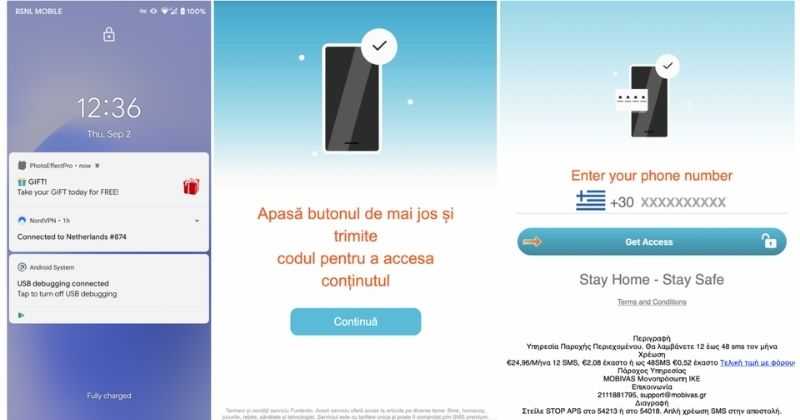 According to Zimperium zLabs, this malware that was recently detected has been doing its scams and attacks even in November of 2020 and has thus far accumulated hundreds of thousands of dollars in its scam.
On the surface it looks very harmless, asking for typical permissions like internet access, calls, and other related needed functions, and then it waits. After few months the real attack happens when users get charged with premium service they never subscribed to in the first place.
According to Zimperium zLabs, this malware that was recently detected has been doing its scams and attacks even in November of 2020 and has thus far accumulated hundreds of thousands of dollars in its scam.
On the surface it looks very harmless, asking for typical permissions like internet access, calls, and other related needed functions, and then it waits. After few months the real attack happens when users get charged with premium service they never subscribed to in the first place.
 If we are to believe news from Intel, new series of processors based on Alder Lake architecture are about to be released somewhere in October. Alder Lake is the 12th Generation Core of Intel processors and it is meant to have all advantages of the current CPU structure.
I9 is aimed to pack a punch against its competitors with technology including eight high-performance Golden Cove cores (P-cores) with Hyper-Threading and eight energy-efficient Goldmont (E-cores) equipped with a 30MB L3 cache and operating at high clock speeds.
During the benchmark test, the new CPU outperformed all of Intel’s previous Rocket Lake structure processors which is logically expected but the big surprise came from results that indicate better performance than Apple’s new M1 processor even in single-threaded performance which is supposed to be best in that field.
Another surprise was really beating AMD Ryzen 9 in each field. If we take into account that i9 has 16 cores in total and can process 24 threads against Ryzen 9 with 16 Cores and 32 threads this is an impressive feature.
Now truth to be told Alder lake has massive L3 cache and microarchitectural advantages and consumes much more power but the results of performance are high. Also, note that this early CPU is not really a mass production one and maybe some things will still change but early results are very satisfactory.
We will see what will price tag be since in this age of shortage and competition that will also play a big role in its overall success. Speaking of competition I eagerly await AMD’s response to this, in any way it seems that the CPU market is for some turbulence which is always a good thing for the final customer and I welcome it.
If we are to believe news from Intel, new series of processors based on Alder Lake architecture are about to be released somewhere in October. Alder Lake is the 12th Generation Core of Intel processors and it is meant to have all advantages of the current CPU structure.
I9 is aimed to pack a punch against its competitors with technology including eight high-performance Golden Cove cores (P-cores) with Hyper-Threading and eight energy-efficient Goldmont (E-cores) equipped with a 30MB L3 cache and operating at high clock speeds.
During the benchmark test, the new CPU outperformed all of Intel’s previous Rocket Lake structure processors which is logically expected but the big surprise came from results that indicate better performance than Apple’s new M1 processor even in single-threaded performance which is supposed to be best in that field.
Another surprise was really beating AMD Ryzen 9 in each field. If we take into account that i9 has 16 cores in total and can process 24 threads against Ryzen 9 with 16 Cores and 32 threads this is an impressive feature.
Now truth to be told Alder lake has massive L3 cache and microarchitectural advantages and consumes much more power but the results of performance are high. Also, note that this early CPU is not really a mass production one and maybe some things will still change but early results are very satisfactory.
We will see what will price tag be since in this age of shortage and competition that will also play a big role in its overall success. Speaking of competition I eagerly await AMD’s response to this, in any way it seems that the CPU market is for some turbulence which is always a good thing for the final customer and I welcome it.  In Windows 11 if you do not own a mouse or it has suddenly malfunctioned you can still move your arrow on-screen using the numeric pad.
In this guide, we will guide you on how to turn this option ON, follow this easy guide step by step.
In Windows 11 if you do not own a mouse or it has suddenly malfunctioned you can still move your arrow on-screen using the numeric pad.
In this guide, we will guide you on how to turn this option ON, follow this easy guide step by step.