A couple of Windows 10 users have reported an error on domain-connected systems when they tried accessing their computer systems remotely. This occurs when the network level authentication or NLA is enabled on the computer. If you are one of these users, you better keep reading as this post will guide you on how you can fix this error. To resolve this issue, there are several workarounds you can try. You can either disable this option directly via properties or you can also modify some registry entries or sub-keys and restart the system.
When you encounter this problem, an error message pops up that states:
“The remote computer that you are trying to connect to requires network level authentication (NLA), but your windows domain controller cannot be contacted to perform NLA. If you are an administrator on the remote computer, you can disable NLA by using the options on the Remote tab of the System Properties dialog box.”
Or you could also see this error message instead:
“The remote computer requires Network Level Authentication, which your computer does not support. For assistance, contact your system administrator or technical support.”
Before you proceed in troubleshooting the problem using the options provided below, you need to create a backup for your data or system restore point as well as make a copy of any registry entries you are going to modify.
Option 1 – Disable Network Level Authentication via Properties
The NLA is a useful tool that provides your computer with extra security and helps network administrators in controlling who can log into the system with just a click of a single box. However, there are times when it can become a disadvantage and could prevent you from accessing your system remotely. Thus, you need to disable it using Properties.
- Tap the Win + R keys to open the Run dialog box.
- After that, type in “sysdm.cpl” and tap Enter to open System Properties.
- Next, go to the remote tab and uncheck the checkbox for the “Allow connections only from computers running Remote Desktop with Network Level Authentication (recommended)” option.
- Now click the Apply button to save the changes made and exit System Properties and then try logging into the remote computer again and see if the problem is fixed or not.
Option 2 – Disable NLA via Registry Editor
Note that you can only use this option if the first one didn’t work for you. Take note that this option will require you to restart your PC completely which could mean some downtime if your computer is running a production server. So make sure to save all your work.
- Tap the Win + R keys to open the Run dialog box and then type in “Regedit” in the field and tap Enter to open the Registry Editor.
- From there, click on File > Connect Network Registry and input the details of the remote computer and then try to connect.
- Navigate to the path below after you’re connected:
HKLM >SYSTEM > CurrentControlSet > Control >Terminal Server > WinStations > RDP-Tcp
- After that, change the values given below to “0”
- SecurityLayer
- UserAuthentication
- The navigate to PowerShell and execute this command – restart-computer
Option 3 – Disable NLA via PowerShell
PowerShell allows you to tap into the remote computer and once you’ve targeted the machine, you can execute the commands given below to disable NLA.
- Tap the Win + S to open Search and then type in “PowerShell” in the field. Right-click on the related result and select the “Run as administrator” option.
- After opening PowerShell, execute the command below:
- Once in the PowerShell, execute the following command:
$TargetMachine = “Target-Machine-Name”
(Get-WmiObject -class “Win32_TSGeneralSetting” -Namespace rootcimv2terminalservices -ComputerName $TargetMachine -Filter “TerminalName=’RDP-tcp'”).SetUserAuthenticationRequired(0)
Note: In the command given, the “Target-Machine-Name” is the name of the machine you are targeting.
Option 4 – Use the Group Policy Editor to disable NLA
Another option you can use to disable NLA is via the Group Policy Editor. This is ideal for you if you are blanket disabling. Just take note that the Group Policy Editor is a powerful tool and that if you make some mistakes by changing values you have no clue about, you can render your computer useless so make sure that you create a backup for all the values before you proceed.
- Tap the Win + R keys to open the Run dialog box.
- Then type in “gpedit.msc” and tap Enter to open the Group Policy Editor.
- From there, go to this path – Computer Configuration > Administrative Templates > Windows Components > Remote Desktop Services > Remote Desktop Session Host > Security
- After that, search for “Require user authentication for remote connections by using Network Level Authentication” and set it to disabled.
- Now check if the error is fixed or not.

 Error Causes
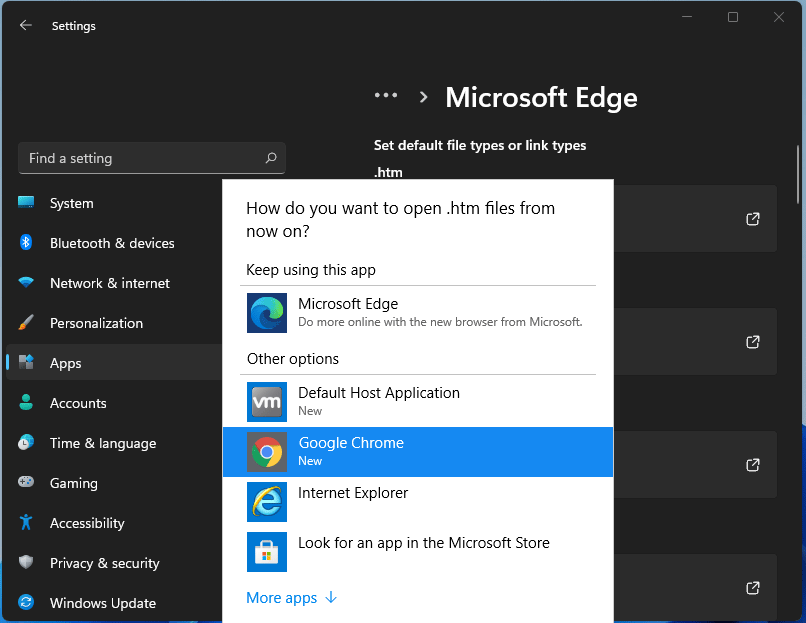 For anyone who is not aware, when Windows 11 was released if you wanted to switch to another browser you had to go into the settings app and choose the default browser for different types of file extensions like HTML, HTM, PDF for opening on the web, etc. Of course, this was completely unnecessary and it was not well received by users. So after some time, Microsoft backpedaled to standard one click, choose your default browser solution that existed in the previous version of Windows OS.
Altho sometimes Microsoft knows how to irritate its users base, it is good to know that they can also listen and fix things that are required.
For anyone who is not aware, when Windows 11 was released if you wanted to switch to another browser you had to go into the settings app and choose the default browser for different types of file extensions like HTML, HTM, PDF for opening on the web, etc. Of course, this was completely unnecessary and it was not well received by users. So after some time, Microsoft backpedaled to standard one click, choose your default browser solution that existed in the previous version of Windows OS.
Altho sometimes Microsoft knows how to irritate its users base, it is good to know that they can also listen and fix things that are required. 
 Is There Any Deal
 Cheap Shark
 Humble Bundle
 Fanatical
 Slick Deals
 Green Man Gaming
 Following a two-year investigation by the California Department of Fair Employment and Housing, the state has filed a lawsuit against Activision Blizzard for fostering a "frat boy" culture in which female employees are allegedly subjected to unequal pay and sexual harassment.
As reported by Bloomberg, Activision Blizzard is being accused by the state of California of discriminating against female employees at nearly all levels of employment, including in regards to compensation, promotion, assignments, and termination. The state alleges Activision Blizzard’s leadership has failed to address any of these outstanding issues or prevent them from occurring within the workplace. You can read the full details of the lawsuit here.
The suit, filed Tuesday in the Los Angeles Superior Court, says Activision Blizzard, which is made up of about 20 percent women, assigns women, and women of color, to "lower paid and lower opportunity levels" with lower starting pay for similar work as their male counterparts.
The documents also accuse Activision Blizzard of fostering a "pervasive 'frat boy' workplace culture in the office. Male employees are said to drink "copious amounts of alcohol" as they make their way through cubicles and "often engage in inappropriate behavior toward female employees."
Male employees are said to come to work hungover, play video games during work "while delegating their responsibilities to female employees, engage in banter about their sexual encounters, talk openly about female bodies, and joke about rape."
The lawsuit also cites one particular incident where a female employee, who was already subjected to intense sexual harassment at the company, committed suicide during a work trip with a male supervisor who allegedly brought inappropriate, sexual items with him on the trip.
The lawsuit is asking for an injunction that will force Activision Blizzard to comply with workplace protections, as well as deliver unpaid wages, pay adjustments, back pay, and lost wages and benefits for female employees.
Following a two-year investigation by the California Department of Fair Employment and Housing, the state has filed a lawsuit against Activision Blizzard for fostering a "frat boy" culture in which female employees are allegedly subjected to unequal pay and sexual harassment.
As reported by Bloomberg, Activision Blizzard is being accused by the state of California of discriminating against female employees at nearly all levels of employment, including in regards to compensation, promotion, assignments, and termination. The state alleges Activision Blizzard’s leadership has failed to address any of these outstanding issues or prevent them from occurring within the workplace. You can read the full details of the lawsuit here.
The suit, filed Tuesday in the Los Angeles Superior Court, says Activision Blizzard, which is made up of about 20 percent women, assigns women, and women of color, to "lower paid and lower opportunity levels" with lower starting pay for similar work as their male counterparts.
The documents also accuse Activision Blizzard of fostering a "pervasive 'frat boy' workplace culture in the office. Male employees are said to drink "copious amounts of alcohol" as they make their way through cubicles and "often engage in inappropriate behavior toward female employees."
Male employees are said to come to work hungover, play video games during work "while delegating their responsibilities to female employees, engage in banter about their sexual encounters, talk openly about female bodies, and joke about rape."
The lawsuit also cites one particular incident where a female employee, who was already subjected to intense sexual harassment at the company, committed suicide during a work trip with a male supervisor who allegedly brought inappropriate, sexual items with him on the trip.
The lawsuit is asking for an injunction that will force Activision Blizzard to comply with workplace protections, as well as deliver unpaid wages, pay adjustments, back pay, and lost wages and benefits for female employees.