MovieGoat is a browser extension that allegedly lets you search for your favorite videos using its simple search engine.
From the author:
Search for your favorite movies online, stay updated with the latest news and trends, and keep an eye on what’s up and coming in the world of cinema.
Simply type goat+ SpaceTab + query at the chrome search bar.
MovieGoat hijacks your browser, replacing your default search engine, displaying sponsored videos when you use its search and will display pop-up ads during your browsing experience. This extension has been detected as a Browser Hijacker by several anti-virus scanners and is not recommended to keep on your computer, especially because it serves no other purpose than to display pop-up ads and negatively impact your browsing experience.
About Browser Hijackers
Browser hijack is a common type of internet fraud where your internet browser configuration settings are modified to make it carry out things you never intend. There are numerous reasons why you may have an internet browser hijack; however commercial, advertising, and marketing are definitely the primary reasons for their creation. Usually, hijackers are made for the benefit of cyber hackers usually through income generation from forced ad clicks and site visits. Most people assume that these types of websites are legitimate and harmless but that is incorrect. Almost every browser hijacker poses an actual threat to your online safety and it’s important to categorize them under privacy risks. Some browser hijackers are designed to make particular modifications beyond the web browsers, like altering entries on the system registry and permitting other types of malware to further damage your PC.
How you can recognize a browser hijack
When your browser is hijacked, the following could happen: your homepage has been reset to some unfamiliar webpage; you find yourself regularly directed to some other site than the one you meant; The default search page of web browser is altered; you are finding new toolbars you have never witnessed before; you’ll notice random pop-ups start showing regularly; websites load very slowly and sometimes incomplete; Inability to navigate to particular websites, particularly anti-malware as well as other computer security software websites.
How it infects your computer
Browser hijackers can get into a computer in some way or other, for example via downloads, file sharing, and email too. They may also be deployed through the installation of a web browser toolbar, add-on, or extension. A browser hijacker can also come bundled up with some freeware which you unwittingly download and install the browser hijack, compromising your computer security. A good example of some infamous browser hijackers includes Anyprotect, Conduit, Babylon, SweetPage, DefaultTab, Delta Search, and RocketTab, however, the names are constantly changing.
Browser hijacking can bring about severe privacy problems and even identity theft, affect your browsing experience by taking control over outbound traffic, substantially slows down your computer by consuming lots of resources, and cause system instability also.
Removal
One thing you could try to eliminate a browser hijacker is to locate the malicious software within the “Add or Remove Programs” list of the Windows Control Panel. It might or might not be there. If it is, uninstall it. But, most browser hijackers are hard to eliminate manually. Irrespective of how much you attempt to get rid of it, it could come back again and again. On top of that, manual removal demands you to carry out several time-consuming and complicated procedures which are very hard to complete for new computer users.
What you can do if Virus Prevents You From Downloading Or Installing Antivirus?
Malware can cause all sorts of damage if they invade your PC, ranging from stealing your personal information to erasing files on your computer. Some malware is created to restrict or block things that you want to do on your PC. It may not allow you to download anything from the net or it will prevent you from accessing a few or all of the internet sites, particularly the antivirus sites. If you’re reading this article, odds are you’re stuck with a virus infection that is preventing you to download or install Safebytes Anti-Malware software on your computer system. There are a few solutions you can attempt to get around with this particular obstacle.
Boot your computer in Safe Mode
If the malware is set to load automatically when Microsoft Windows starts, entering safe mode could block this attempt. Just the minimum required applications and services are loaded whenever you boot your computer or laptop in Safe Mode. Here are the steps you need to follow to boot into the Safe Mode of your Windows XP, Vista, or 7 computers (visit Microsoft site for directions on Windows 8 and 10 PCs).
1) At power on, hit the F8 key before the Windows splash screen begins to load. This would conjure up the Advanced Boot Options menu.
2) Select Safe Mode with Networking using arrow keys and hit Enter.
3) Once you get into this mode, you will have internet access once again. Now, obtain the malware removal program you want by using the internet browser. To install the software, follow the directions in the installation wizard.
4) Following installation, do a complete scan and allow the program to remove the threats it detects.
Use an alternate web browser to download security software
Malicious code could exploit vulnerabilities in a particular browser and block access to all antivirus software websites. If you are not able to download the anti-virus software program using Internet Explorer, it means malware may be targeting IE’s vulnerabilities. Here, you need to switch over to another web browser such as Chrome or Firefox to download Safebytes Anti-malware software.
Install and run anti-malware from a USB drive
Here’s yet another solution which is utilizing a portable USB antivirus software package that can check your computer for viruses without the need for installation. Follow these steps to use a USB flash drive to clean your corrupted computer system.
1) Download Safebytes Anti-Malware or Windows Defender Offline onto a clean PC.
2) Insert the USB drive into the clean computer.
3) Double-click the exe file to run the installation wizard.
4) When asked, choose the location of the USB drive as the place in which you would like to store the software files. Follow the on-screen instructions to complete the installation.
5) Disconnect the flash drive. You can now utilize this portable anti-malware on the affected computer system.
6) Double-click the antivirus program EXE file on the USB flash drive.
7) Hit the “Scan” button to run a full computer scan and remove viruses automatically.
Protect your PC from Malware With SafeBytes Security Suite
If you are looking to install anti-malware software for your computer, there are plenty of tools on the market to consider nonetheless, you should not trust blindly anyone, no matter whether it is a paid or free software. A few are good ones, some are ok types, and some are simply just bogus anti-malware applications that can damage your personal computer themselves! You need to pick one that is efficient, practical, and has a strong reputation for its malware protection. On the list of strongly recommended software by industry analysts is SafeBytes Anti-Malware, the safest program for Microsoft Windows.
SafeBytes anti-malware is a trusted software that not only secures your computer permanently but is also very user-friendly for people of all ability levels. With its outstanding protection system, this tool will automatically detect and remove most of the security threats, including browser hijackers, viruses, adware, ransomware, PUPs, and trojans.
SafeBytes possesses a plethora of amazing features that can help you protect your PC from malware attack and damage. Here are a few of the best ones:
Most effective AntiMalware Protection: Using its enhanced and sophisticated algorithm, this malware removal tool can identify and eliminate the malware threats hiding within your computer system effectively.
Active Protection: Malware programs trying to get into the system are identified and stopped as and when detected by the SafeBytes active protection shields. It will constantly monitor your laptop or computer for hacker activity and also gives users advanced firewall protection.
Web Protection: SafeBytes checks and provides a unique safety rating to every single website you visit and block access to web pages considered to be phishing sites, thus safeguarding you against identity theft, or known to contain malware.
High-Speed Malware Scanning Engine: This tool has got one of the fastest and most efficient virus scanning engines in the industry. The scans are very accurate and take a little time to complete.
Lowest CPU and Memory Usage: SafeBytes is a lightweight tool. It consumes a very small amount of processing power as it operates in the background so you are free to use your Windows-based PC the way you really want.
24/7 Online Support: For any technical queries or product support, you can get 24/7 expert assistance through chat and e-mail.
Technical Details and Manual Removal (Advanced Users)
If you wish to manually remove MovieGoat without the use of an automated tool, it may be possible to do so by removing the program from the Windows Add/Remove Programs menu, or in cases of browser extensions, going to the browsers AddOn/Extension manager and removing it. You will likely also want to reset your browser.
To ensure the complete removal, manually check your hard drive and registry for all of the following and remove or reset the values accordingly. Please note that this is for advanced users only and may be difficult, with incorrect file removal causing additional PC errors. In addition, some malware is capable of replicating or preventing deletion. Doing this in Safe Mode is advised.
The following files, folders, and registry entries are created or modified by MovieGoat
Files:
%Documents and Settings%All UsersApplication DataMovie Goat virus
%program files %internet explorer Movie Goat[random].mof
%program files (x86)%common filesspeechengines
%programData%suspicious folders
%windows%system32drivermessy code.dll
%AppData%[malware program name]toolbar uninstallStatIE.dat
%app data% Movie Goat virus
Registry:
[HKEY_LOCAL_MACHINESOFTWAREMicrosoftMATSWindowsInstallerEAF386F0-7205-40F2-8DA6-1BABEEFCBE8914.07.30.07.52.18]”ProductName”=”Movie Goat”
[HKEY_LOCAL_MACHINESOFTWAREWow6432NodeMicrosoftTracingMuvic_RASAPI32]
[HKEY_LOCAL_MACHINESOFTWAREWow6432NodeMicrosoftTracingMuvic_RASMANCS]
[HKEY_LOCAL_MACHINESOFTWAREWow6432NodeMicrosoftWindowsCurrentVersionUninstallEAF386F0-7205-40F2-8DA6-1BABEEFCBE89]
“DisplayName”=”Movie Goat”
[HKEY_USERSS-1-5-21-3825580999-3780825030-779906692-1001SoftwareMicrosoftWindowsCurrentVersionUninstall50f25211-852e-4d10-b6f5-50b1338a9271]
“DisplayName”=”Movie Goat”

 Error Causes
 The true cause is that there is no working Border Gateway Protocol (BGP) routes into Facebook's sites. BGP is the standardized exterior gateway protocol used to exchange routing and reachability information between the internet top-level autonomous systems (AS). Most people, indeed most network administrators, never need to deal with BGP.
Cloudflare VP Dane Knecht was the first to report the underlying BGP problem. This meant, as Kevin Beaumont, former Microsoft's Head of Security Operations Centre, tweeted,
"By not having BGP announcements for your DNS name servers, DNS falls apart = nobody can find you on the internet. Same with WhatsApp btw. Facebook has basically de-platformed themselves from their own platform."
Many people are very annoyed by this and with the fact that they cannot use their social media platforms but it seems that Facebook employees are in even bigger annoyance as it was reported that Facebook employees can't enter their buildings because their "smart" badges and doors were also disabled by this network failure. If true, Facebook's people literally can't enter the building to fix things.
Reddit user u/ramenporn, who claimed to be a Facebook employee working on bringing the social network back from the dead, reported, before he deleted his account and his messages:
"DNS for FB services has been affected and this is likely a symptom of the actual issue, and that's that BGP peering with Facebook peering routers has gone down, very likely due to a configuration change that went into effect shortly before the outages happened (started roughly 1540 UTC). There are people now trying to gain access to the peering routers to implement fixes, but the people with physical access is separate from the people with knowledge of how to actually authenticate to the systems and people who know what to actually do, so there is now a logistical challenge with getting all that knowledge unified. Part of this is also due to lower staffing in data centers due to pandemic measures."
Ramenporn also stated that it wasn't an attack, but a mistaken configuration change made via a web interface.
Both BGP and DNS are down, the "connection to the outside world is down, remote access to those tools don't exist anymore, so the emergency procedure is to gain physical access to the peering routers and do all the configuration locally."
Technicians on site don't know how to do that and senior network administrators aren't on site.
It seems that it will all be down for a couple of more hours before the issue is resolved.
The true cause is that there is no working Border Gateway Protocol (BGP) routes into Facebook's sites. BGP is the standardized exterior gateway protocol used to exchange routing and reachability information between the internet top-level autonomous systems (AS). Most people, indeed most network administrators, never need to deal with BGP.
Cloudflare VP Dane Knecht was the first to report the underlying BGP problem. This meant, as Kevin Beaumont, former Microsoft's Head of Security Operations Centre, tweeted,
"By not having BGP announcements for your DNS name servers, DNS falls apart = nobody can find you on the internet. Same with WhatsApp btw. Facebook has basically de-platformed themselves from their own platform."
Many people are very annoyed by this and with the fact that they cannot use their social media platforms but it seems that Facebook employees are in even bigger annoyance as it was reported that Facebook employees can't enter their buildings because their "smart" badges and doors were also disabled by this network failure. If true, Facebook's people literally can't enter the building to fix things.
Reddit user u/ramenporn, who claimed to be a Facebook employee working on bringing the social network back from the dead, reported, before he deleted his account and his messages:
"DNS for FB services has been affected and this is likely a symptom of the actual issue, and that's that BGP peering with Facebook peering routers has gone down, very likely due to a configuration change that went into effect shortly before the outages happened (started roughly 1540 UTC). There are people now trying to gain access to the peering routers to implement fixes, but the people with physical access is separate from the people with knowledge of how to actually authenticate to the systems and people who know what to actually do, so there is now a logistical challenge with getting all that knowledge unified. Part of this is also due to lower staffing in data centers due to pandemic measures."
Ramenporn also stated that it wasn't an attack, but a mistaken configuration change made via a web interface.
Both BGP and DNS are down, the "connection to the outside world is down, remote access to those tools don't exist anymore, so the emergency procedure is to gain physical access to the peering routers and do all the configuration locally."
Technicians on site don't know how to do that and senior network administrators aren't on site.
It seems that it will all be down for a couple of more hours before the issue is resolved. 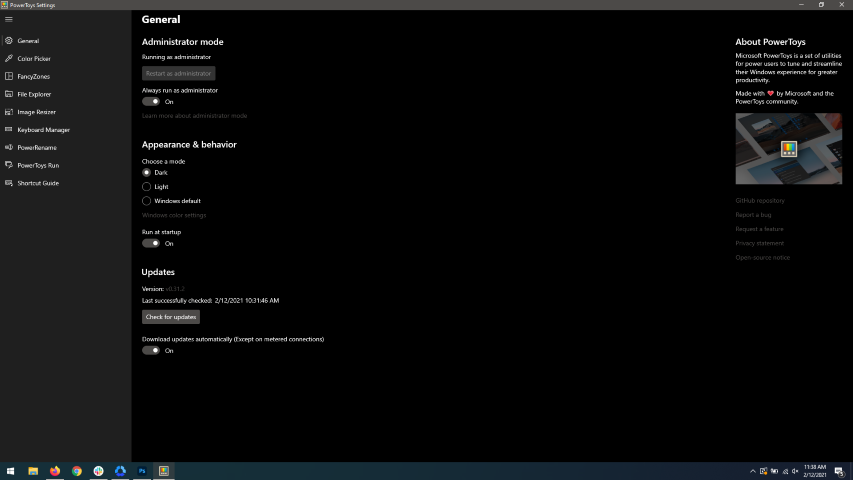 When opened you will be greeted with general settings window. These are settings for power toys themselves, Here you can check for updates, change the looks of power toys, run it on system startup and run them as administrator. Set them up so they best suit your needs.
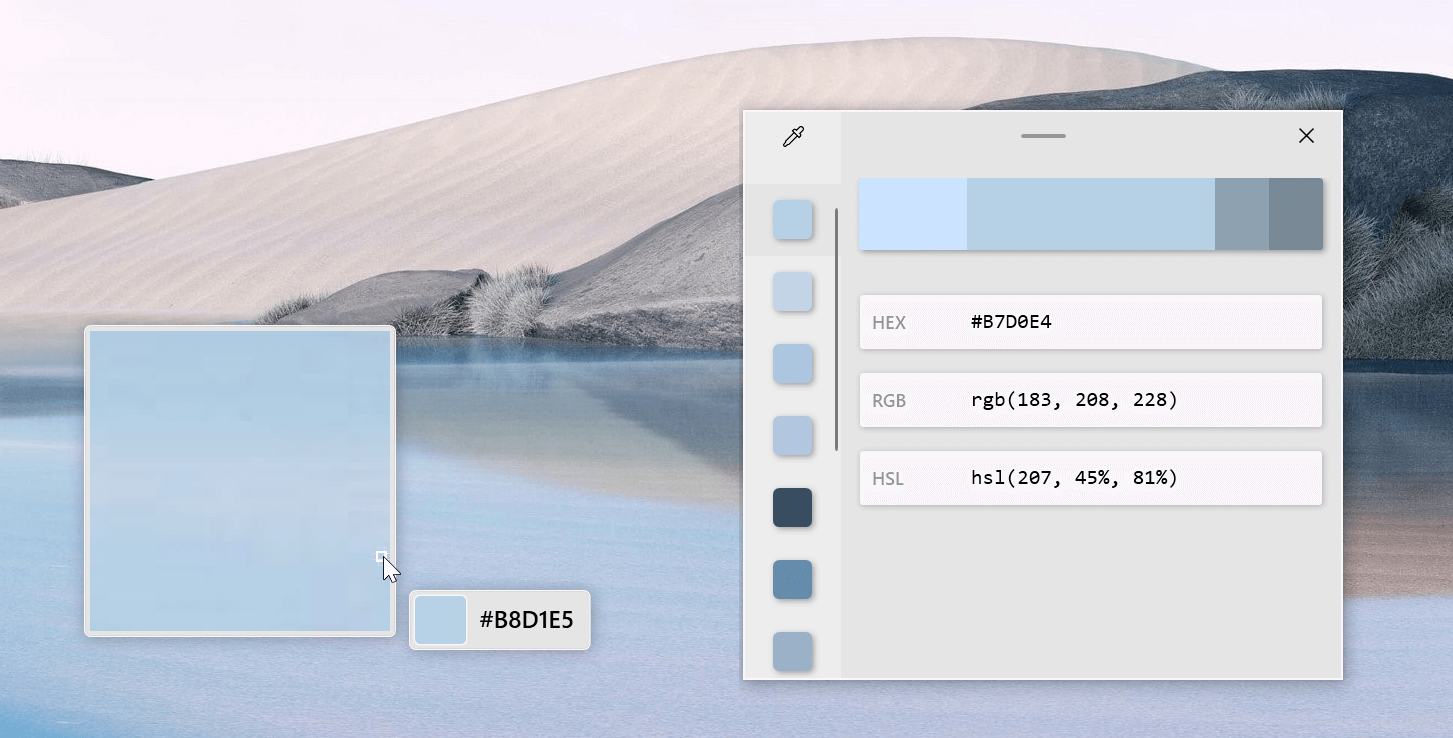 The color picker will let you as the name suggests pick colors, it will sample colors from running applications and windows, snap their values, and place them in the clipboard. A useful application if you are working as a graphic designer, want to create some cool word document, or just want to compare the difference between colors.
After the Color Picker is activated, hover your mouse cursor over the color you would like to copy and left-click the mouse button to select a color. If you want to see the area around your cursor in more detail, scroll up to zoom in. The copied color will be stored in your clipboard in the format that is configured in the settings (HEX by default). The editor lets you see the history of picked colors (up to 20) and copy their representation in any predefined string format. You can configure what color formats are visible in the editor, along with the order that they appear. This configuration can be found in PowerToys settings. The editor also allows you to fine-tune any picked color or get a new similar color. Editor previews different shades of currently selected color - 2 lighter and 2 darker ones. Clicking on any of those alternative color shades will add the selection to the history of picked colors (appears on the top of the colors history list). Color in the middle represents your currently selected color from the history of the colors. By clicking on it, the fine-tuning configuration control will appear, which will let you change the HUE or RGB values of the current color. Pressing OK will add newly configured color into the history of the colors.
The color picker will let you as the name suggests pick colors, it will sample colors from running applications and windows, snap their values, and place them in the clipboard. A useful application if you are working as a graphic designer, want to create some cool word document, or just want to compare the difference between colors.
After the Color Picker is activated, hover your mouse cursor over the color you would like to copy and left-click the mouse button to select a color. If you want to see the area around your cursor in more detail, scroll up to zoom in. The copied color will be stored in your clipboard in the format that is configured in the settings (HEX by default). The editor lets you see the history of picked colors (up to 20) and copy their representation in any predefined string format. You can configure what color formats are visible in the editor, along with the order that they appear. This configuration can be found in PowerToys settings. The editor also allows you to fine-tune any picked color or get a new similar color. Editor previews different shades of currently selected color - 2 lighter and 2 darker ones. Clicking on any of those alternative color shades will add the selection to the history of picked colors (appears on the top of the colors history list). Color in the middle represents your currently selected color from the history of the colors. By clicking on it, the fine-tuning configuration control will appear, which will let you change the HUE or RGB values of the current color. Pressing OK will add newly configured color into the history of the colors.
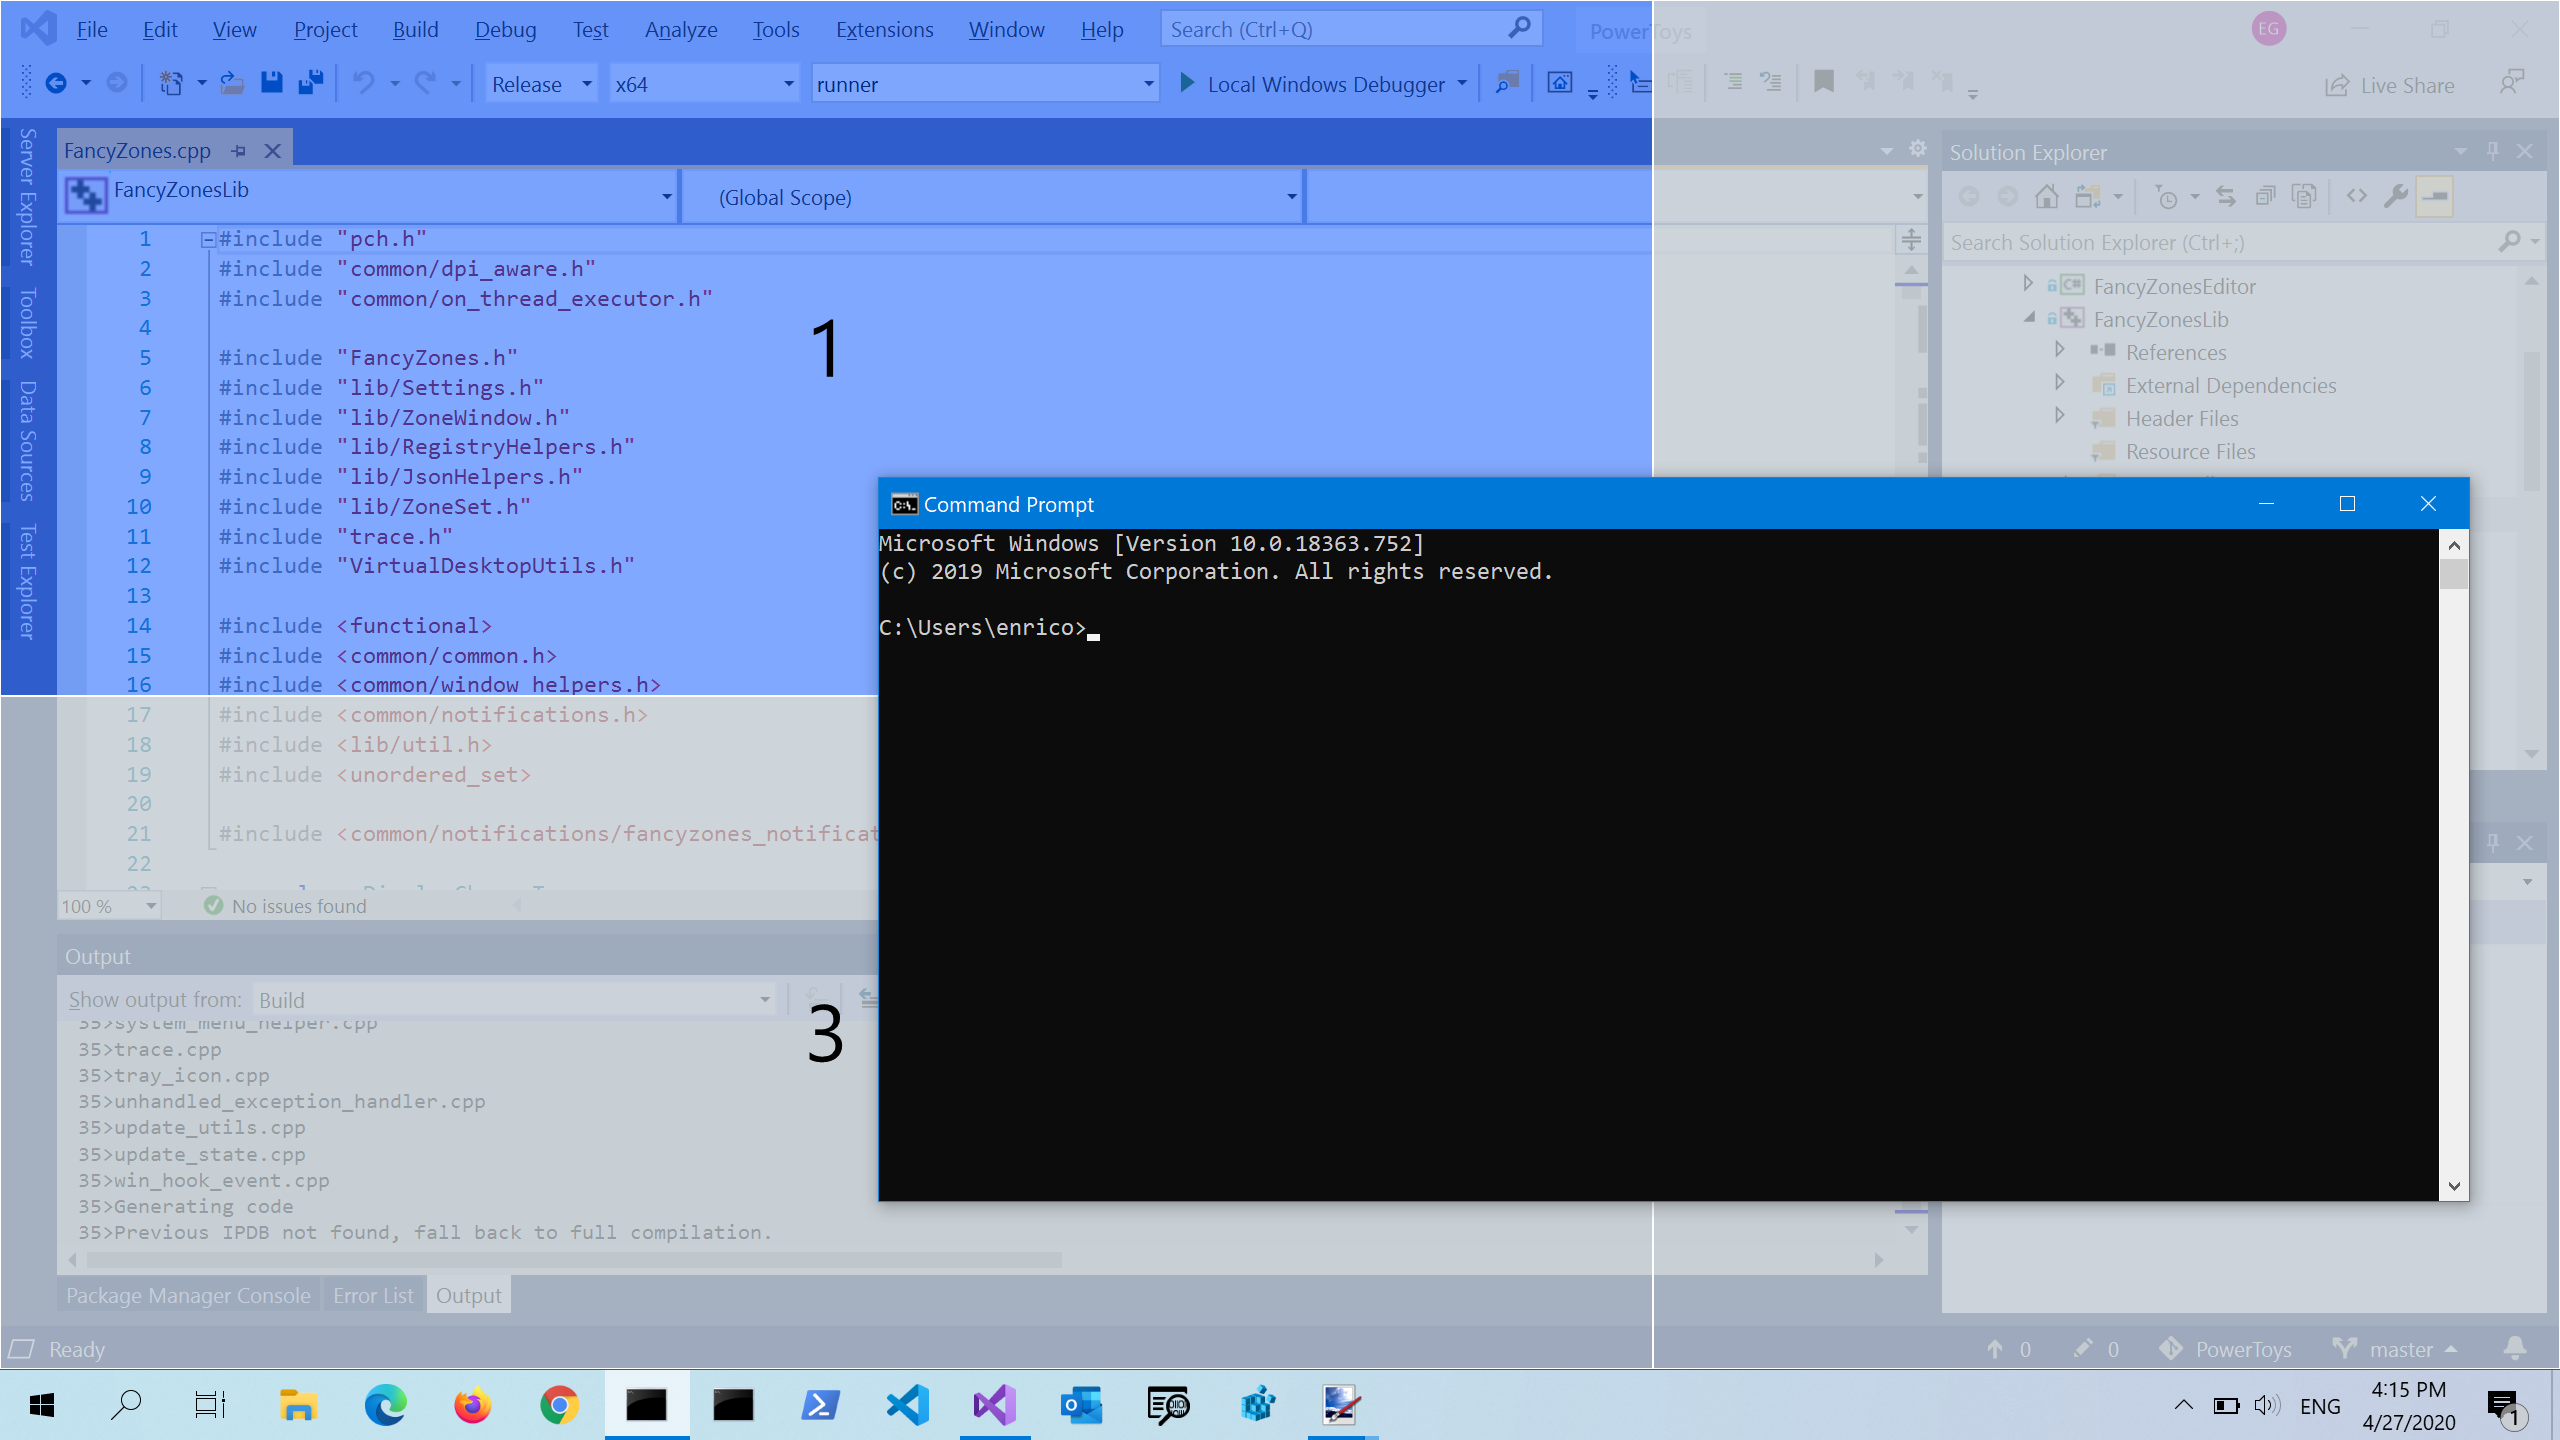 FancyZones is a window manager utility for arranging and snapping windows into efficient layouts to improve the speed of your workflow and restore layouts quickly. FancyZones allows the user to define a set of window locations for a desktop that are drag targets for windows. When the user drags a window into a zone, the window is resized and repositioned to fill that zone. When first launched, the zones editor presents a list of layouts that can be adjusted by how many windows are on the monitor. Choosing a layout shows a preview of that layout on the monitor. The selected layout is applied automatically.
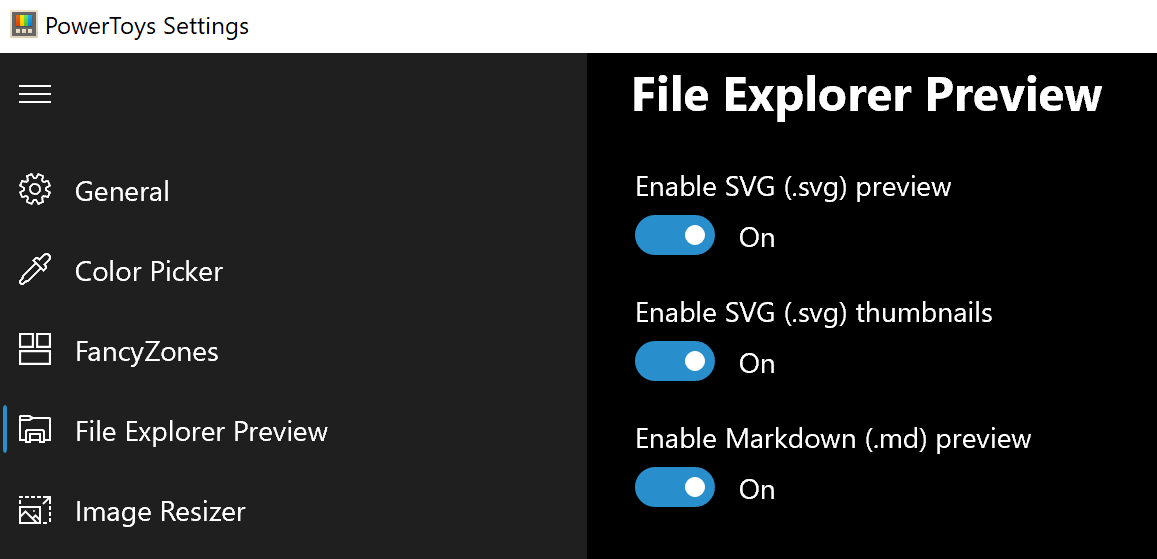 Only 3 options here but maybe some are important to you. This extension lets you enable SVG file preview in File Explorer, enable Markdown preview, and enable SVG thumbnails. Turn on each one you might need.
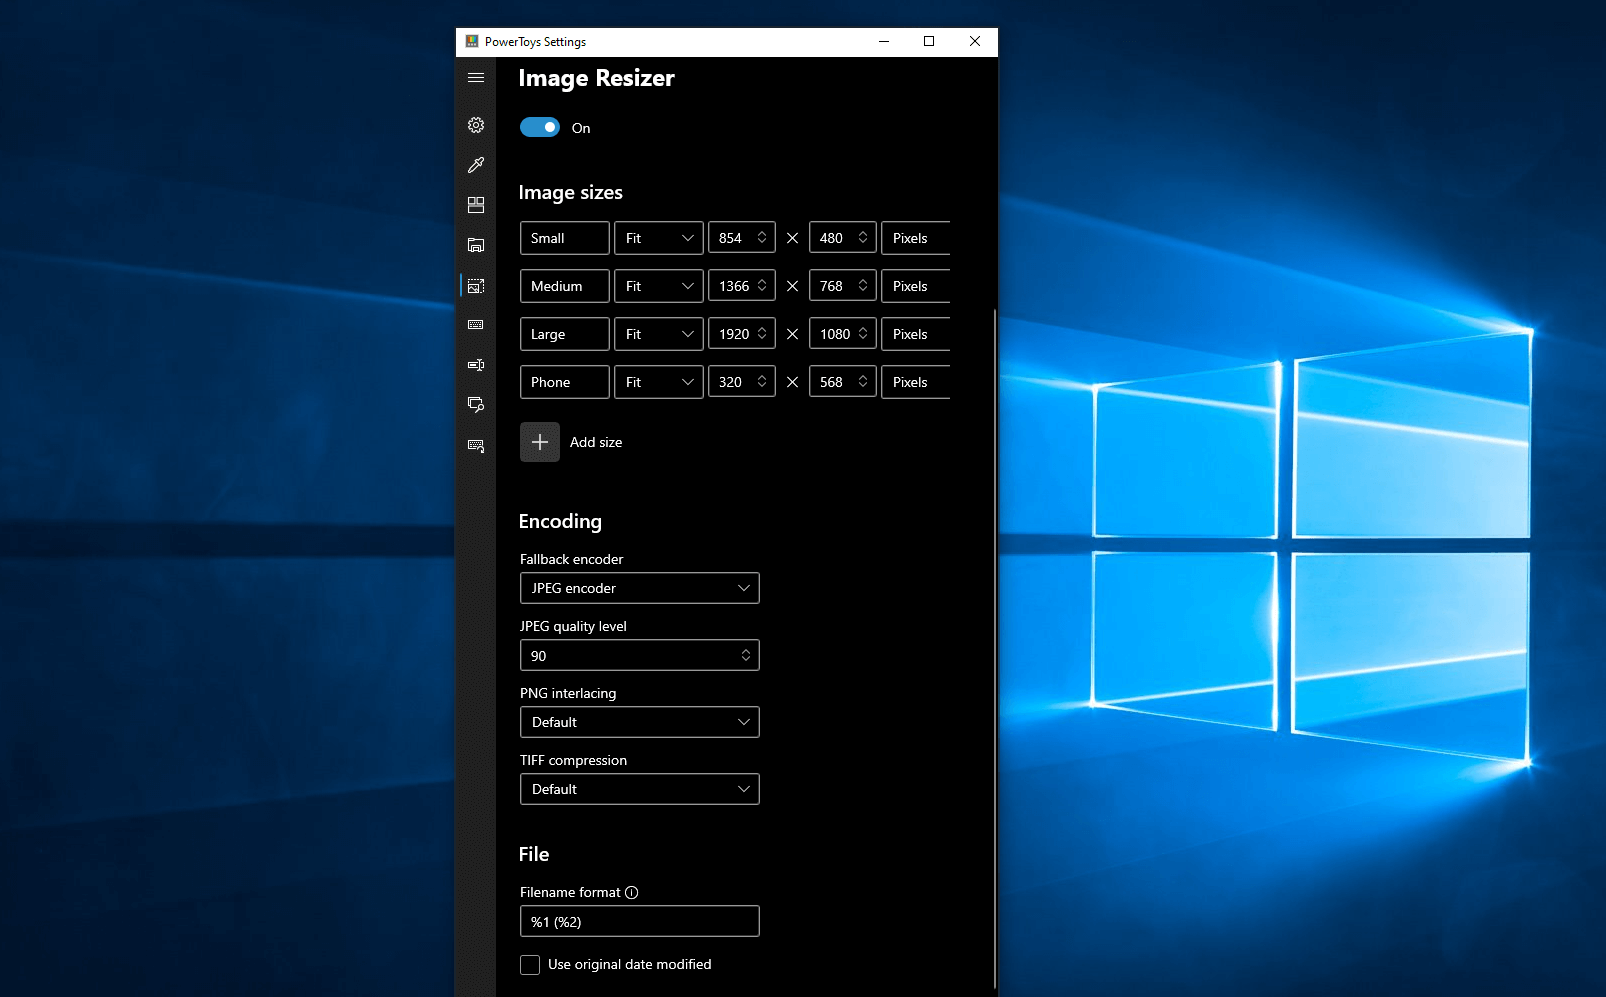 Image Resizer is a Windows shell extension for bulk image-resizing. After installing PowerToys, right-click on one or more selected image files in File Explorer, and then select Resize pictures from the menu. You can specify your own sizes if you want, you can resize when dragging files, you can overwrite files or make new copies of new sizes, and many more options. A very useful tool I am sure plenty of users can use since this eliminates the need for pictures or any other image application for common resizing tasks.
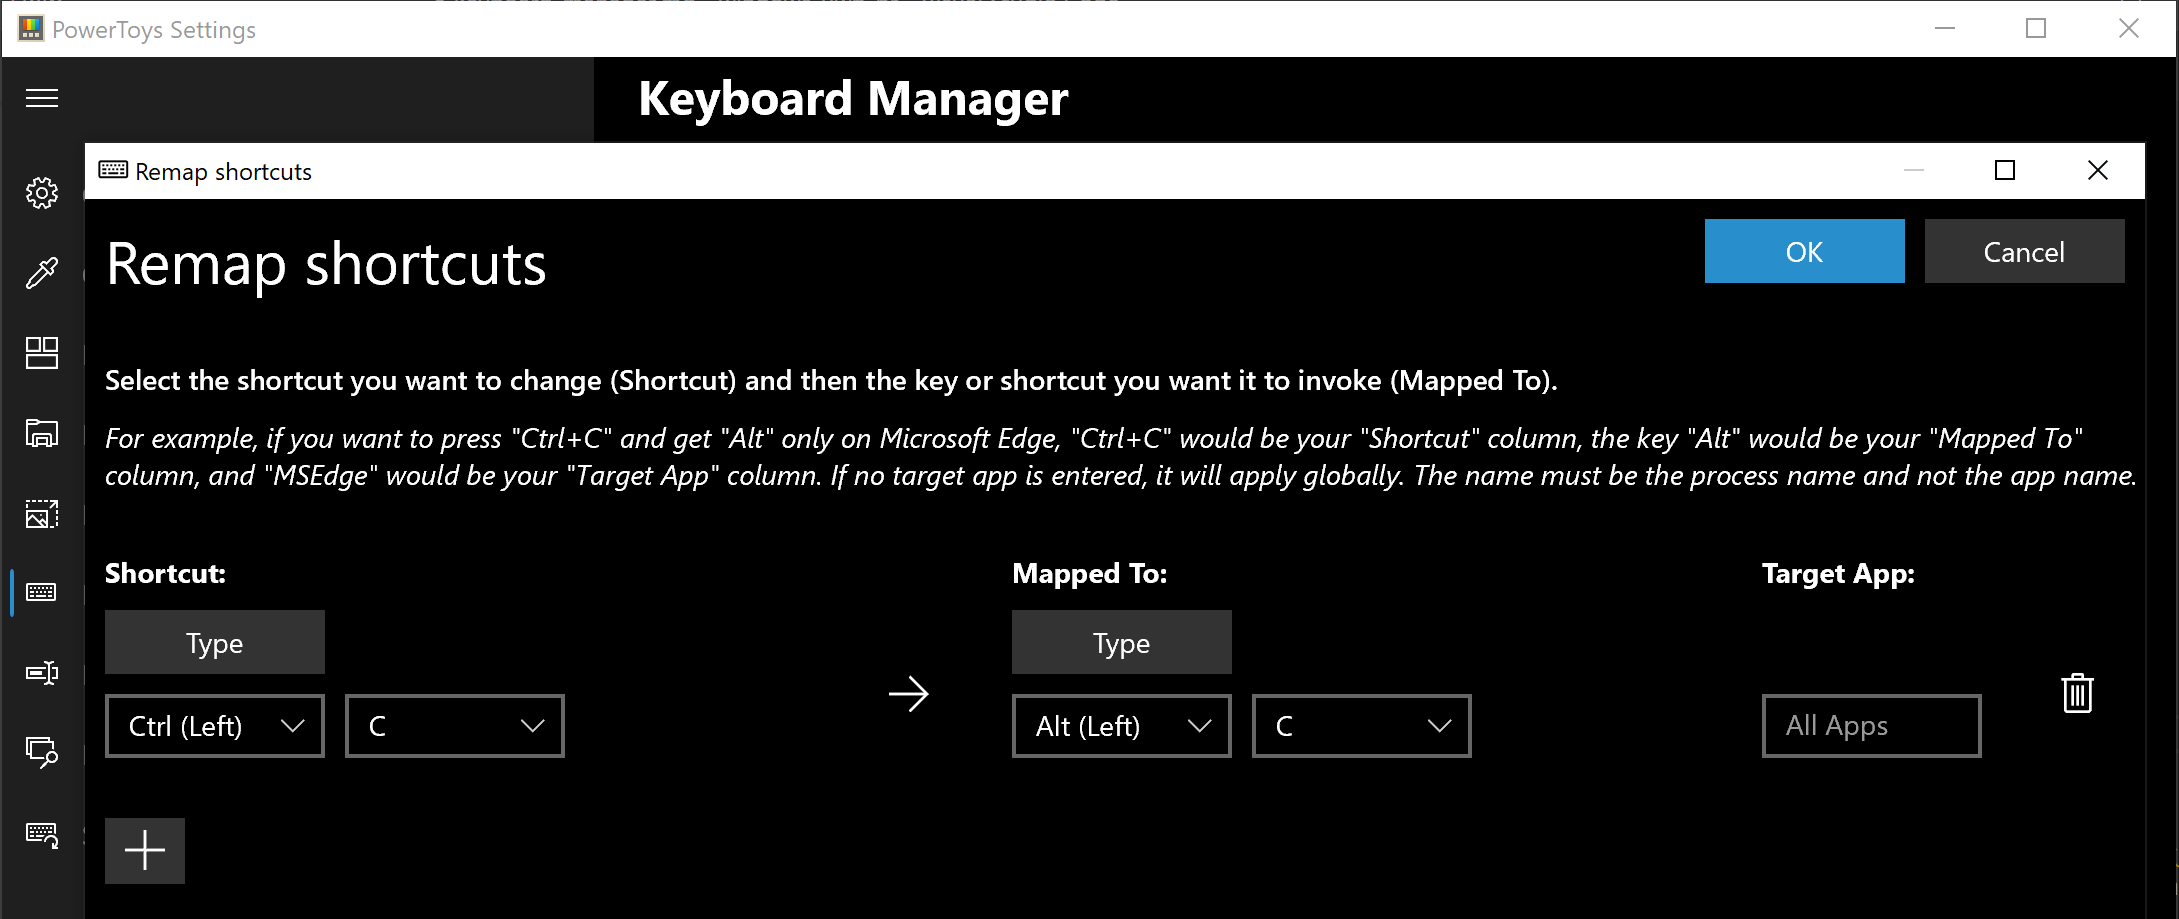 The PowerToys Keyboard Manager enables you to redefine keys on your keyboard. For example, you can exchange the letter A for the letter D on your keyboard. When you select the A key, a D will display. You can also exchange shortcut key combinations. For example, the shortcut key, Ctrl+C, will copy the text in Microsoft Word. With the PowerToys Keyboard Manager utility, you can exchange that shortcut for ⊞ Win+C). Now, ⊞ Win+C) will copy text. If you do not specify a targeted application in PowerToys Keyboard Manager, the shortcut exchange will be applied globally across Windows. PowerToys Keyboard Manager must be enabled (with PowerToys running in the background) for remapped keys and shortcuts to be applied. If PowerToys is not running, key remapping will no longer be applied.
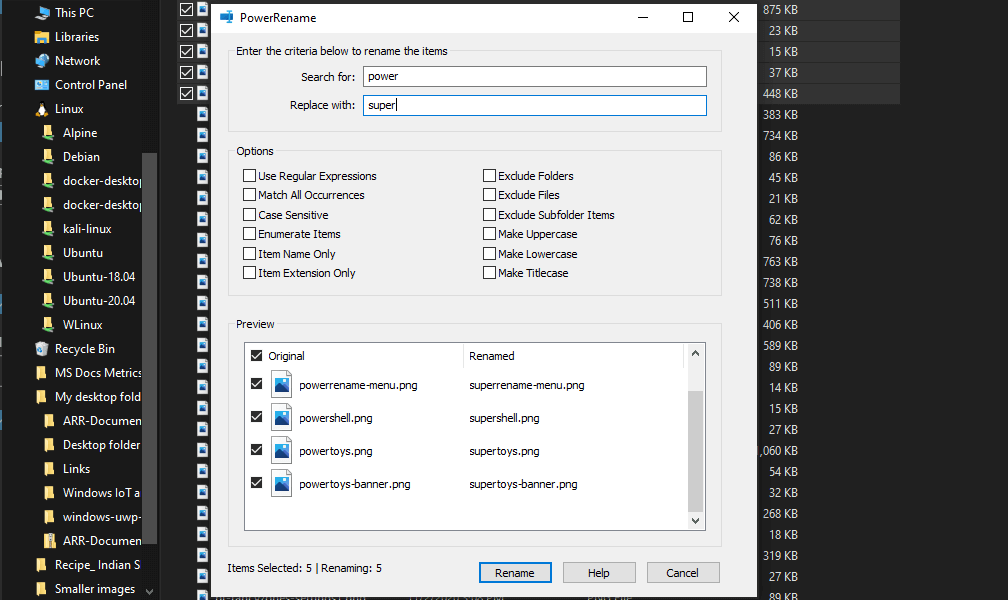 PowerRename is a bulk renaming tool that enables you to:
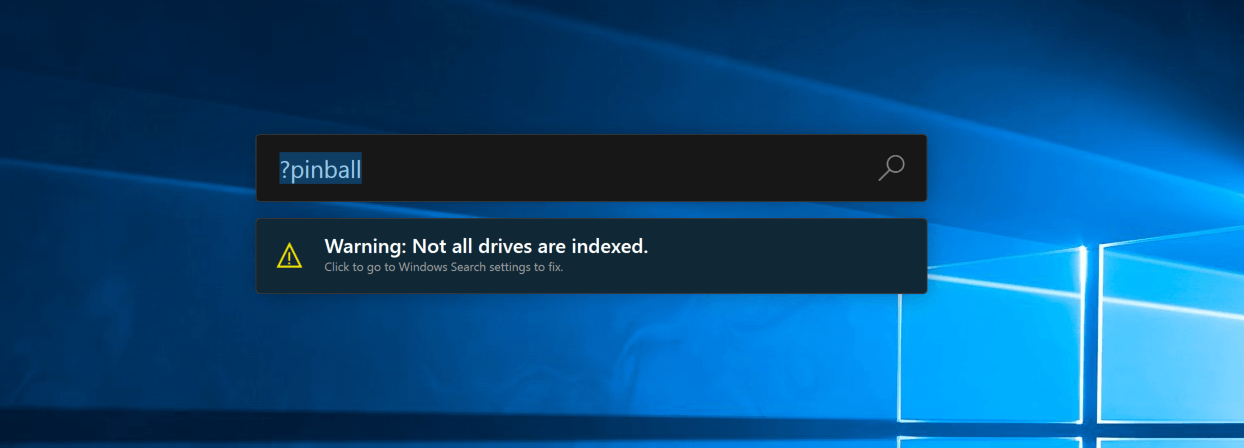 PowerToys Run is a quick launcher for power users that contains some additional features without sacrificing performance.
PowerToys Run features include:
PowerToys Run is a quick launcher for power users that contains some additional features without sacrificing performance.
PowerToys Run features include:
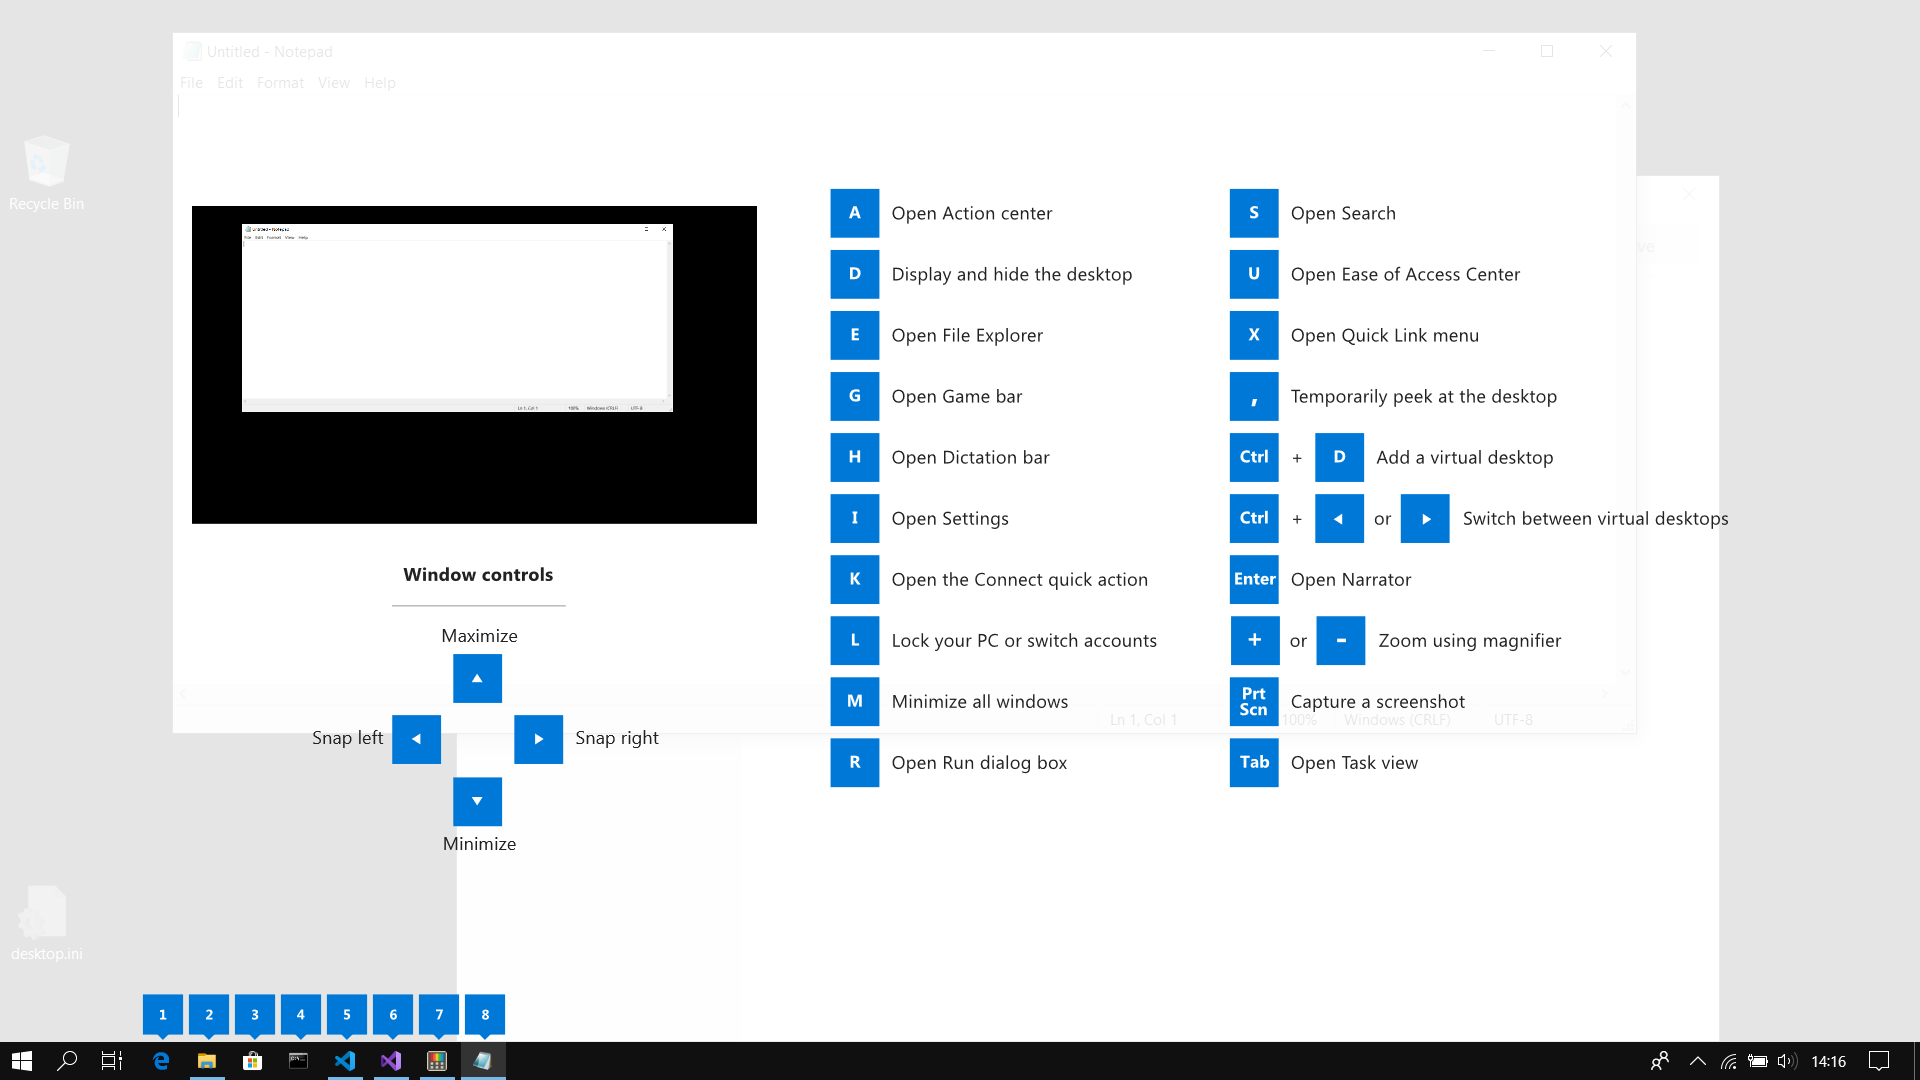 This guide uses PowerToys to display common keyboard shortcuts that use the Windows ⊞ key. Windows key keyboard shortcuts can be used while the guide is being shown and the result of those shortcuts (active window moved, arrow shortcut behavior changes, etc) will be displayed in the guide. Releasing the Windows ⊞ key will make the overlay disappear. Tapping the Windows ⊞ key will display the Windows Start menu.
Hey, you made it till the end, thank you for reading and I hope to see you soon.
This guide uses PowerToys to display common keyboard shortcuts that use the Windows ⊞ key. Windows key keyboard shortcuts can be used while the guide is being shown and the result of those shortcuts (active window moved, arrow shortcut behavior changes, etc) will be displayed in the guide. Releasing the Windows ⊞ key will make the overlay disappear. Tapping the Windows ⊞ key will display the Windows Start menu.
Hey, you made it till the end, thank you for reading and I hope to see you soon. 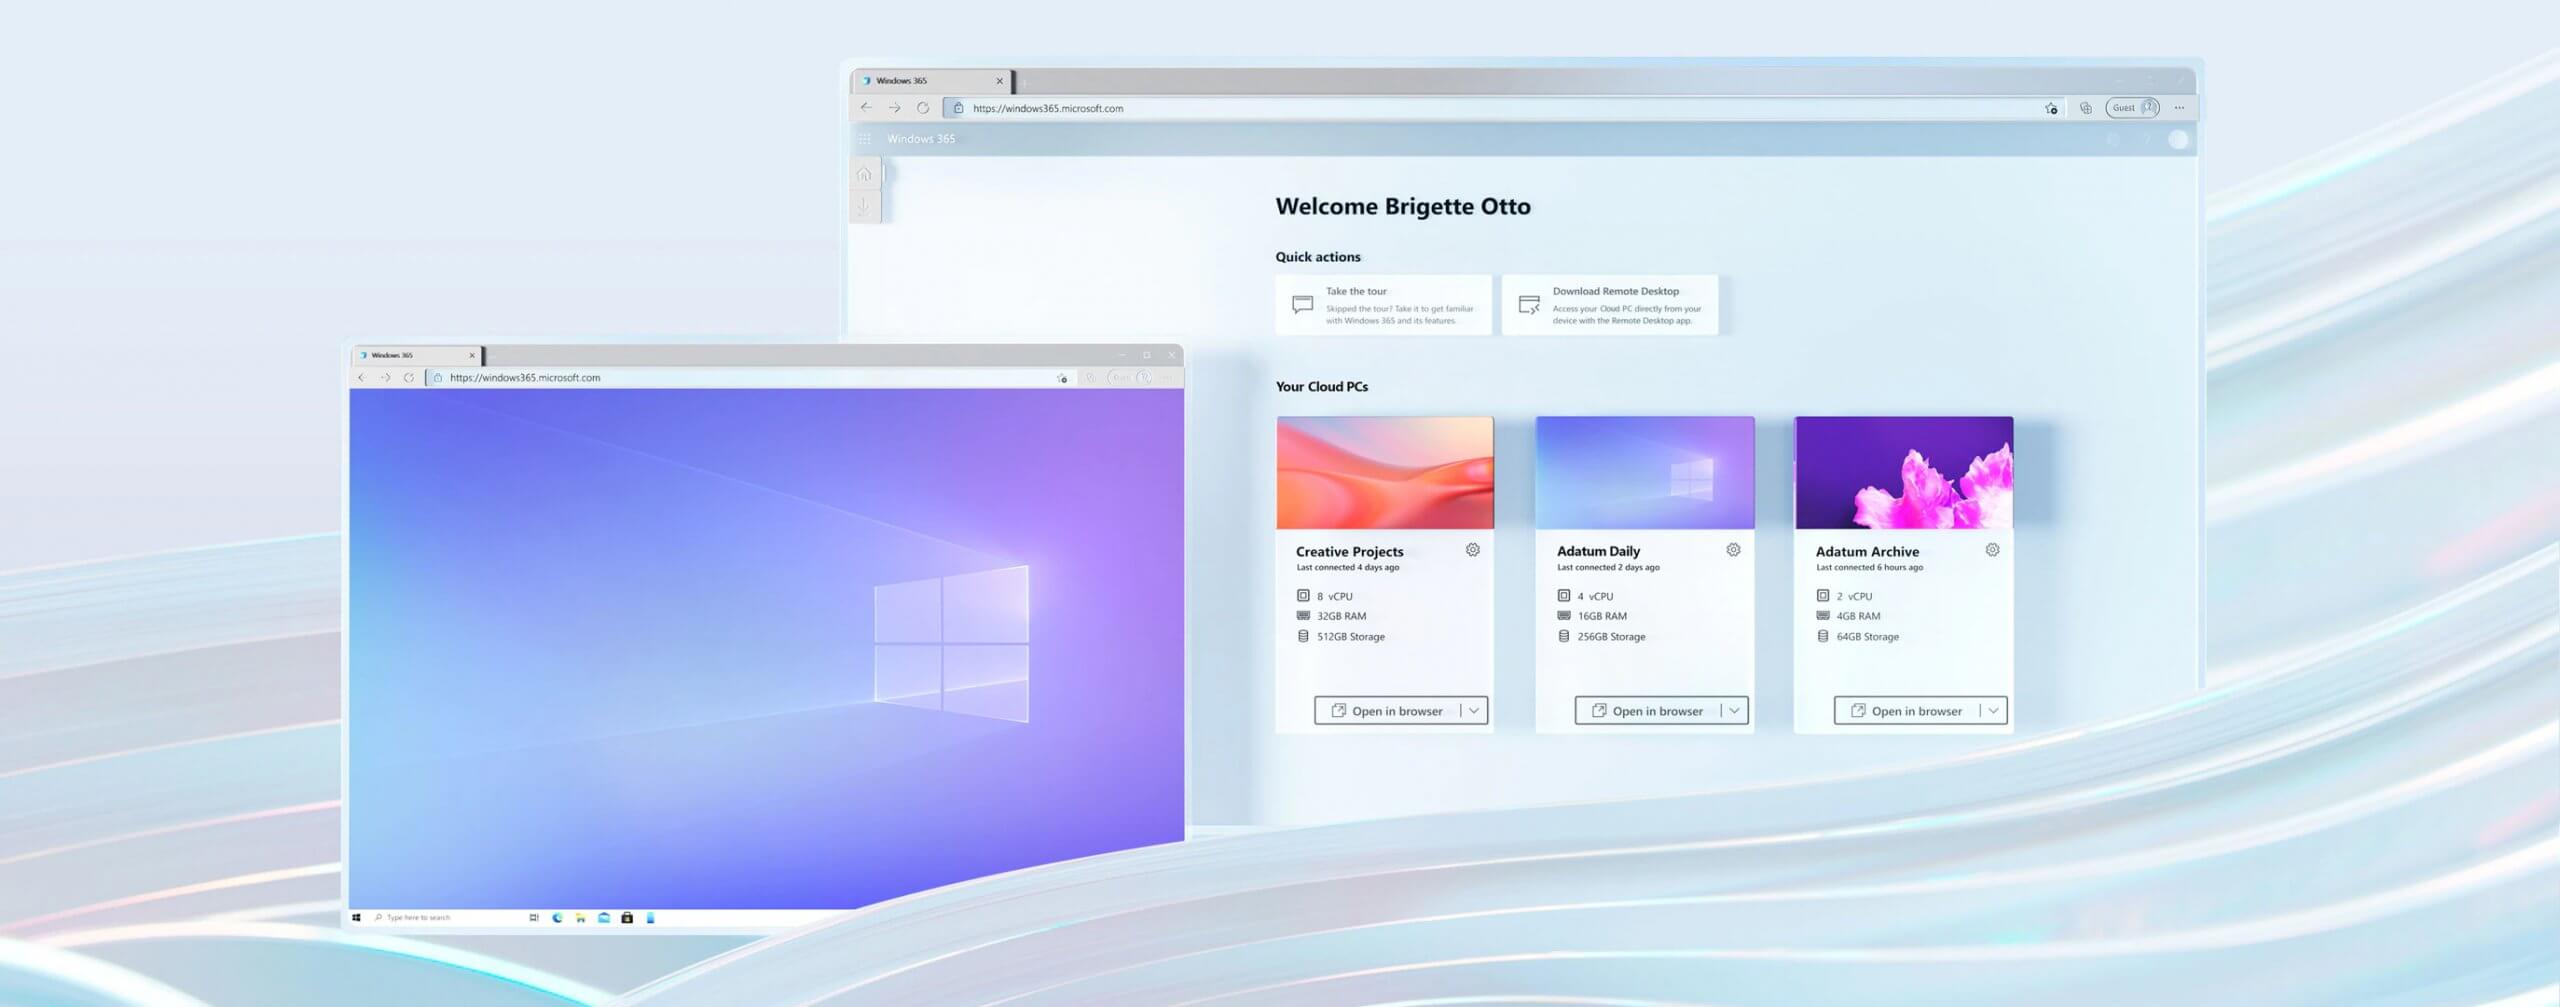 Microsoft has announced Windows 365, a new cloud-based operating system aimed mainly at businesses of all sizes.
Just after Windows 11 announcement and presentation, we are seeing another Windows announcement from Microsoft. Dive into the following text in order to find out what exactly is new Windows 365, its role in today's IT world, and do you need it?
Microsoft has announced Windows 365, a new cloud-based operating system aimed mainly at businesses of all sizes.
Just after Windows 11 announcement and presentation, we are seeing another Windows announcement from Microsoft. Dive into the following text in order to find out what exactly is new Windows 365, its role in today's IT world, and do you need it?