In case you don’t know, when you visit a website that uses HTTPS, it also offers an SSL certificate to the browser in order to verify the website’s identity. Although it may contain lots of things inside it, one of them is the URL of the website. So if the certificate does not match the URL to what you entered, you will most likely get the “Server’s certificate does not match, ERR CERT COMMON NAME INVALID” error which indicates that the connection is not private and the site may try to steal your data but worry not, as this post will guide you in resolving this issue.
To fix the ERR_CERT_COMMON_NAME_INVALID error, here are some suggestions that might help.
Option 1 – Check the website’s certificate
If you own the website where you’re getting the error, then you might have to check if the website’s certificate is installed properly and configured on the server as it could be the reason why you’re suddenly getting the error.
Option 2 – Check the Windows Host file
You can also try to cross-check the Windows Hosts file to find out if the website you are trying to open has been blocked, because if it is, then it’s no wonder why you’re getting the ERR_CERT_COMMON_NAME_INVALID error. There are instances when some third-party application modifies the file and adds some websites to the blocklists. So if the website is indeed blocked, you need to remove it from the list.
Option 3 – Use the Google Public DNS
You might want to change your DNS to Google Public DNS as it could also help you in fixing the ERR_CERT_COMMON_NAME_INVALID error in Chrome. To do so, follow the steps below.
The first thing you have to do is right-click on the network icon in the Taskbar and select Network and Sharing Center.
Next, click on the “Change Adapter Settings” option.
After that, search for the network connection that you are using to connect to the internet. Note that the option might be “Wireless Connection” or “Local Area Connection”.
Right-click on your network connection and click on Properties.
Then select the new window to choose the “Internet Protocol 4 (TCP/IPv4)” option.
After that, click on the Properties button and click the checkbox in the new window for the option “Use the following DNS server addresses”.
Type in “8.8.8.8” and “8.8.4.4” and click OK and exit.
Option 4 – Run the built-in Malware Scanner and Cleanup Tool in Chrome
In case you don’t know, there is actually a built-in malware scanner and cleanup tool in Chrome that helps you get rid of any unwanted ads, pop-ups, and even malware, as well as unusual startup pages, toolbars, and other things that could affect the performance of the browser. In addition, this built-in tool in Chrome might also help in fixing the ERR_CERT_COMMON_NAME_INVALID error.
Option 5 – Reset Chrome
Resetting Chrome can also help you get rid of the error. Resetting Chrome means restoring its default settings, disabling all the extensions, add-ons, and themes. Aside from that, the content settings will be reset as well and the cookies, cache, and site data will also be deleted. To reset Chrome, here’s what you have to do:
Open Google Chrome, then tap the Alt + F keys.
After that, click on Settings.
Next, scroll down until you see the Advanced option, once you see it, click on it.
After clicking the Advanced option, go to the “Restore and clean up option and click on the “Restore settings to their original defaults” option to reset Google Chrome.
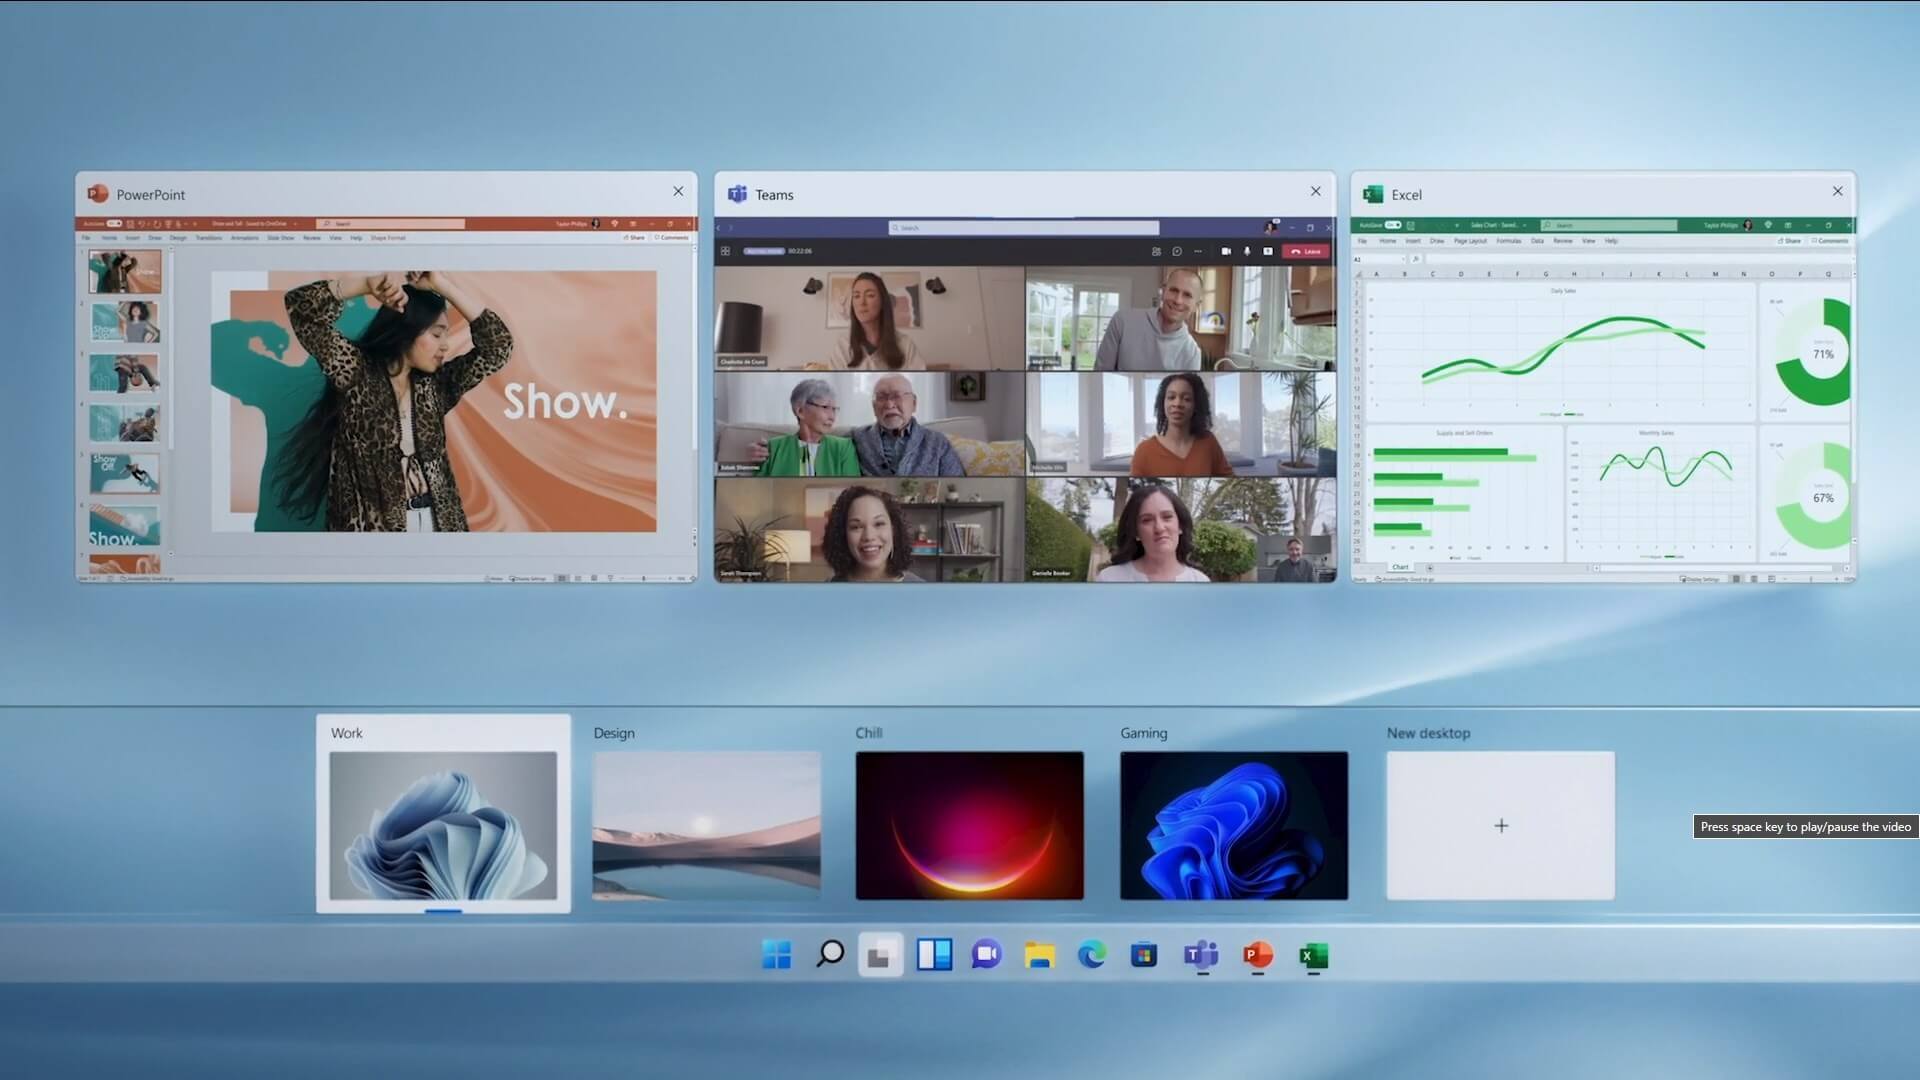
The feature that was originally planned for now scrapped Windows 10X is included in Windows 11. You will be able to customize your Virtual desktop with different wallpapers for each screen.
In order to fully customize your virtual desktops with different wallpapers follow this easy step-by-step guide.
Click on the Task View button in the taskbar
When the Task View opens, select the desktop on which you want to set wallpaper
The view will switch to the selected desktop. Right-click anywhere on the desktop and select personalize
In personalization settings, click on the background
Select wallpaper which you would like to have on the desktop by clicking on browse and navigating to the desired one
Close the settings
Repeat for each virtual desktop you would like to customize
Graphic cards are essential to our computers but from time to time in the race to make better GPU and to grab a large portion of the market bad drivers get released and can create really unwanted and unpleasant experiences, from Windows freezes to the black screen of death, to AMD driver Windows crashing down and many more.
This article will cover basic troubleshooting with AMD drivers and offer you solutions on how to fix them.
Rollback the previous version of the driver.
Installing the new driver version is the reason for this particular error, so naturally rolling back the previous version which was stable and did not cause issues will solve the problem.
To roll back the previous version of drivers follow the next steps:
Open Start menu and click on settings, go to system and choose Apps and features
Find: AMD Catalyst Install Manager, right-click on it, and choose to uninstall
Go to AMD official website and download the previous driver version, install it on your computer
Turn off automatic driver updates and reboot your system
Reinstall the driver
Sometimes it is not a bug in the released driver, it is a corruption of files because of file transfer or any other specific reason. The reinstalling driver will fix an issue if this is the case.
To reinstall the driver Press ⊞ WINDOWS + X and choose Device Manager
Expand Display adapters, right-click on AMD device and choose to uninstall
Go to the official AMD website, download the latest driver and install it
Reboot your system
Disable browser extensions
Some users have reported that error occurs only when they are watching videos online, if this is your case, go to your browser options and disable extensions to see if this will remove the problem.
Remove Lucid Virty MVP
If by any chance have this relic installed on your system, go to Applications and remove it. It is an old program shipped with old drivers and it is usually present in your Windows that was upgraded from 8.1 to 10. Uninstall it and see if this fixes your issue.
Clean your graphic card
Sometimes this error can happen due to excessive dust on your GPU, if you have the expertise, clean it or take it somewhere to be cleaned.
In case you don’t know, there is a built-in tool in Windows 10, known as Reliability Monitor that provides a day-to-day snapshot of the health of your system. It warns users of any looming issues or disasters before your computer breaks down finally. So obviously, Reliability Monitor is useful, however, there are times when it could behave incorrectly. For instance, it might fail to show you any updates even when they are installed. Thus, if you experience any malfunctions with the Reliability Monitor tool in Windows 10, read on as this post will guide you in updating or working in Windows 10.
To fix the problem with the Reliability Monitor, there are several fixes you can check out. You can try to enable the data collection for Reliability Monitor or reset it, as well as put your computer in a Clean Boot State. For more information, refer to each one of the options given below.
Option 1 – Try to enable the Data Collection for Reliability Monitor
The Reliability Monitor tool uses data provided by the RAC Agent scheduled task and it will start to display a Stability Index rating and specific event information 24 hours after the system installation. The RACAgent scheduled task, by default, runs after the operating system is installed. And if it is disabled, it must be manually enabled from the Task Scheduler snap-in for MMC or Microsoft Management Console. Thus, you need to enable the Data Collection for Reliability Monitor to fix the problem.
Option 2 – Try to reset the Reliability Monitor
The next thing you can do to fix the issue with the Reliability Monitor might want to reset it to resolve the problem. If the Reliability Monitor is already open, you have to close it and open it again. After the reset is done, it may take up to 24 hours for the Reliability Monitor to display results again. This should fix the problem.
Option 3 – Troubleshot the problem in a Clean Boot State
There are some instances that some conflicting programs installed in your computer might be the one that’s causing the Black border issue. To identify which program is causing the problem, you need to put your computer in a Clean Boot State. To do so, follow the steps below.
Log onto your PC as an administrator.
Type in MSConfig in the Start Search to open the System Configuration utility.
From there, go to the General tab and click “Selective startup”.
Clear the “Load Startup items” check box and make sure that the “Load System Services” and “Use Original boot configuration” options are checked.
Next, click the Services tab and select the “Hide All Microsoft Services” check box.
Click Disable all.
Click on Apply/OK and restart your PC. (This will put your PC into a Clean Boot State. And configure Windows to use the usual startup, just simply undo the changes.)
From there, start to isolate the problem by checking which one of the programs you installed recently is the root cause of the problem.
DuckDuckGo has risen in the public eye as a private search engine offering searches without tracking. A less known fact about DuckDuckGo is that they have their own browser, well they have it for the Android platform and it was stated that it is coming for desktops soon.
People were excited for this new browser for a few reasons, one of them being privacy and another that it is built from scratch, not using existing chromium runtime that assured users that privacy is the main focus. Still, lately, things got a little out of control. Duckduckgo is under fire from users since a security researcher has discovered that there is an exception for Microsoft trackers inside Browser.
The main feature of their browser is that it blocks tracking scripts and most online advertising with the goal of preventing servers from collecting data about your online behavior. Of course, tracking protection is never 100% effective since it requires a lot of manual labor from people to add sites and links to blocklists but it was discovered that DuckDuckGo has a defined exception in the browser for Microsoft owned ad networks and tracking scripts giving them free pass even when they are related to privacy compromisation.
Zach Edwards first pointed out the exception in a series of tweets, after noticing DuckDuckGo on iPhone and Android wasn’t blocking LinkedIn and Bing advertisements on Facebook’s Workplace site.
You can capture data within the DuckDuckGo so-called private browser on a website like Facebook's https://t.co/u8W44qvsqF and you'll see that DDG does NOT stop data flows to Microsoft's Linkedin domains or their Bing advertising domains.
DuckDuckGo’s CEO and founder, Gabriel Weinberg, replied with his own series of tweets.
Most of our other protections also apply to MSFT-owned properties as well. This is just about non-DuckDuckGo and non-Microsoft sites, where our search syndication agreement prevents us from stopping Microsoft-owned scripts from loading, though we can still apply protections post-load (like 3rd party cookie blocking). We are also working to change that.
DuckDuckGo says it uses over 400 sources for search engine results, including the company’s own web crawler, but typical link results are sourced most commonly from Bing. According to Weinberg, DuckDuckGo’s ability to use Bing search results depends on a carved-out exception for Microsoft’s ads in the mobile browser. A representative from DuckDuckGo told that third-party cookies from Microsoft services are still blocked.
Of course, the main aim and campaign of DUckDuckGo's rise was private search and private browsing so this kind of news did not go well among long supporters. The latest statement from them is as follows:
We have always been extremely careful to never promise anonymity when browsing, because that frankly isn’t possible given how quickly trackers change how they work to evade protections and the tools we currently offer. When most other browsers on the market talk about tracking protection, they are usually referring to 3rd-party cookie protection and fingerprinting protection, and our browsers for iOS, Android, and our new Mac beta, impose these restrictions on third-party tracking scripts, including those from Microsoft.
What we’re talking about here is an above-and-beyond protection that most browsers don’t even attempt to do — that is, blocking third-party tracking scripts before they load on 3rd party websites. Because we’re doing this where we can, users are still getting significantly more privacy protection with DuckDuckGo than they would using Safari, Firefox and other browsers. This blog post we published gets into the real benefits users enjoy from this approach, like faster load times (46% average decrease) and less data transferred (34% average decrease). Our goal has always been to provide the most privacy we can in one download, by default without any complicated settings.
Although there are several Windows 10 devices that are touchscreen-based, the mouse still remains to be an important part of usage for many users especially the ones who do some hardcore work on their Windows 10 computers or laptops. If you’re one of the users who often edit images or videos either for fun or work, using Touch is difficult as it’s a bit hard to drag on the screen so nothing really beats the mouse. However, as awesome as the mouse is, there are times when you encounter issues while using it. One of these issues is when your mouse pointer lags or freezes so in this post, you can try out a few tips that can help you resolve the issue.
Option 1 – Clean both the mouse and the mousepad
It might sound silly but it is a fact that either the mouse or the mouse pad themselves is the problem. Even though mouse balls are long gone, the laser lights that replaced them are not immune to some dirt which is why you need to clean the bottom of the mouse and then clean the mouse pad afterward.
Option 2 – Try changing the USB port
This is another basic thing you can do to resolve the problem since there are instances when USB ports where either your mouse is connected have gone rogue so you need to try switching to a different port and then see if the problem’s fixed or not.
Option 3 – Switch back to the default settings of the mouse
Switching your mouse back to its default setting is always a good idea since you are dealing with a pointer issue. To go back to the default settings of the mouse, here’s what you have to do:
Click on Mouse and Touchpad.
Next, click on Additional Mouse Settings located in the right pane.
After that, click on the “Use Default” option under the Pointer tab.
Then click on Apply and OK to save the changes made.
Option 4 – Try disabling Smooth Scrolling
You have to slow down both the horizontal and the vertical scrolling of the mouse in the settings which are called “Smooth scrolling”. This will help if you think that the websites you are visiting scroll up and down way too fast.
Option 5 – Try to update or rollback mouse drivers
If the first few options didn’t work for you, then it’s time to either update or roll back the mouse drivers. It is most likely that after you updated your Windows computer that your driver also needs a refresh. On the other hand, if you have just updated the mouse driver then you need to roll back the driver. Whichever applies to you, refer to the steps below.
The problem may be caused by a corrupted or outdated driver. So you have to update or reinstall the mouse driver. How? Follow these steps:
Open the Devices Manager from the Win X Menu.
Then locate the Mouse and other pointing devices and right-click on the mouse driver to open the Properties.
After that, switch to the Driver tab and click on the Uninstall Device button.
Follow the screen option to completely uninstall it.
Finally, disconnect the mouse and plug it back in to reinstall the mouse driver.
Note: You can install a dedicated driver on your computer in case you have it or you could also look for it directly from the website of the manufacturer.
Option 6 – Try to check if your laptop is turning off the mouse
In case you don’t know, the power management can turn off the devices that are not in use to save battery power if you use a laptop. And this can also happen on USB-based devices like the mouse. Thus, you need to verify if your laptop is turning off the mouse.
Go to Device Manager > Universal serial bus controllers > USB Root Hub > Power Management.
After opening Power Management, uncheck the “Allow the computer to turn off this device to save power” option.
If you have lots of USB Root hubs, you can try changing each one of them and see if it works or not.
Option 7 – Try updating the Graphics Drivers
Tap the Win + R keys to launch Run.
Type in devmgmt.msc into the box and tap Enter or click OK to open the Device Manager.
After that, a list of device drivers will be displayed. If you see a red or yellow sign that shows up against the driver, right-click on the driver’s name and select “Update Driver Software” or “Uninstall”. And if you find any “Unknown device”, you need to update it as well.
Select the “Search automatically for updated driver software” option and then follow the instructions to complete the process.
Restart your PC.
Note: You also have the option to go directly to the website of your graphics card manufacturer and check if there’s a new update – if there is, download it.
Option 8 – Try setting the No Delay option for Touchpad
If you are using a laptop that’s touchscreen-based, you can try setting the delay to zero in the settings. To do so, simply go to Settings > Devices > Mouse and Touchpad. From there, you can set the delay before clicks to “No Delay”.
If you get an Error Code 15 or Error Code 16 while you are browsing the web and you notice that your access is blocked to a particular website, then read on as this post will guide you in resolving this problem. Both Error Code 15 and Error Code 16 have the same message that states, “Access Denied: This request was blocked by the security rules”.
Note that the error depends on what kind of browser you are using, as well as the operating system and network that you are using. On the other hand, the fixes for this error are the same and there is a handful of them that you can check out just make sure to follow each one of them carefully.
Option 1 – Sync Date and Time
The first thing you can try is to sync the Date and Time of your computer as the wrong Date and Time settings are one of the most common causes of connection problems like Error code 15 or Error code 16. This is because of the incompatibility between the SSL Certificate validation date and the System Clock. Thus, you have to sync your System Clock. Refer to the steps below to do so.
Right-click on the Taskbar and click on the Adjust Date and Time option.
Next, click on the Sync Now button to synchronize the Date and Time with the Microsoft Servers.
Now make sure that the Time Zone that’s set on the same page is correct.
Option 2 – Try to reset the affected browser
Resetting the affected browser might help in fixing Error Code 15 or Error Code 16.
Mozilla Firefox
Open Firefox and click the icon that looks like three stacked lines located at the top-right section of the browser.
Next, select the question mark icon from the drop-down menu.
Then select “Troubleshooting information” from the slide-out menu.
After that, click on the “Reset Firefox” button located at the top-right section of the newly opened web page.
Now select “Reset Firefox” in the confirmation pop-up window that appears.
Google Chrome
Open Google Chrome, then tap the Alt + F keys.
After that, click on Settings.
Next, scroll down until you see the Advanced option, once you see it, click on it.
After clicking the Advanced option, go to the “Restore and clean up option and click on the “Restore settings to their original defaults” option to reset Google Chrome.
Now restart Google Chrome.
Internet Explorer
Launch Internet Explorer.
Next, click the wrench icon for Settings.
Then click Internet Options.
After that, go to the Advanced tab.
From there, click the Reset button. This will reset Internet Explorer’s settings to their default condition.
Now click OK to save the changes made.
Option 3 – Temporarily disable Firewall and third-party antivirus
Firewall and antivirus programs are known to block files the instant it detects a threat to the system. However, there are some cases when it can also block a file even when it’s a safe one. Thus, your antivirus or firewall programs might be the reason why you can’t download anything on your Windows 10 computer. To isolate the issue, you need to temporarily disable both the Firewall and antivirus programs and then check if you can now download anything from the internet. Do not forget to enable them again as disabling them can leave your computer vulnerable to cyber threats.
Option 4 – Disable the Proxy server
You can also try to disable the Proxy server for your LAN to fix Error code 15 or Error code 16 especially if your computer was attacked by some malware or adware recently. In such cases, there is a chance that the malware or adware has changed your network settings in order to generate intrusive advertisements. Thus, you have to disable the proxy server and you can do that by following these steps:
Tap the Win + R keys to open the Run dialog box.
Then type “inetcpl.cpl” in the field and hit Enter to pull up the Internet Properties.
After that, go to the Connections tab and select the LAN settings.
From there. Uncheck the “Use a Proxy Server” option for your LAN and then make sure that the “Automatically detect settings” option is checked.
Now click the OK and the Apply buttons.
Restart your PC.
Note: If you are using a third-party proxy service, you have to disable it.
Option 5 – Check your VPN
If you are using a VPN application, there are times when it causes some issues like this error. If that’s the case, you can try to disable your VPN temporarily and see if the error is resolved or not and if turns out that your VPN is the culprit, you have to uninstall it and install a new one or its latest version. To uninstall it, follow the steps below.
Tap the Win + R keys to open the Run dialog box
Then type “appwiz.cpl” in the field and hit Enter to open the Programs and Features in Control Panel.
From there, look for the VPN service you are using, select it and then click on Uninstall to remove it.
After that, restart your computer and try to install the latest version of the program again. It should work now. If not, proceed to the next available option below.
Microsoft starting as of today will block its Office 365 users if they are using Internet Explorer or early versions of Edge browsers.
So if you are using older non Chromium Edge versions of Microsoft browsers you can no longer access Office services until you switch. Now normally I would fully support this kind of decision since Internet explorer is a slow and vulnerable browser and the edge is similar in that regard.
The new edge browser is great and it should be used but the issue I have is that Office 365 is not free, it is a premium feature and I am wondering how Microsoft plans to deal with people that have already paid for service but suddenly cannot access it anymore.
It is common knowledge that when you open a file that contains viruses, it will automatically infect the operating system. This is why most antivirus programs like Windows Defender won’t allow the opening of a file or execution of any associated program if they detected that the file or program could potentially harm the computer. In situations like this, you may get an error stating, “Operation did not complete successfully because the file contains a virus”.
In addition, it is also possible that this error message can pop up even for known programs. To open the program or file that triggered the error, you will be given a couple of options in this post but make sure that the program or file is really safe to open and does not contain any virus. You can open the file or execute the program by disabling the Windows Defender or any antivirus program temporarily. You could also try to add an exclusion in your antivirus program or repair File Explorer or run the Disk Cleanup tool. For more details, refer to each one of the options provided below.
Option 1 – Try to temporarily disable the Windows Defender program
Although you could encounter this error with any antivirus program, it is more common in Windows Defender. Thus, you can try to disable it for a while when you open the file or execute the program. To do so, follow these steps:
First, click on the Start button and go to Settings > Update and Security > Windows Security.
Here, select the “Open Windows Security” option located in the right pane.
After that, click on the “Virus and threat protection” option.
Next, click on Manage settings under the Virus and threat protection settings.
Then turn off the switch for both Real-time protection and Cloud-delivered protection.
Now restart your computer and try to open the file or execute the program again and see if it works.
Note: Do not forget to enable the Real-time protection and Cloud-delivered protection back in Windows Defender.
Option 2 – Try adding an exclusion in the Windows Defender program
Open the Windows Defender Security Center from the system tray area.
Next, click the “Virus & threat protection” option and then open the “Virus and threat protection settings”.
After that, scroll down until you find the “Exclusions” and click on the “Add or remove exclusions” option.
Then click the plus button and select the type of exclusion you want to add and from the drop-down list, select Folder.
Next, navigate to the path where the file or program is located.
When a User Account Control or UAC prompt, just click on Yes to proceed.
Now try to run the program or file again and see if it worked. If it did, then make sure to turn on your antivirus. However, if it didn’t work, proceed to the next given options below.
Option 3 – Try to run a System File Checker scan
System File Checker or SFC is a built-in command utility that helps in restoring corrupted files as well as missing files. It replaces bad and corrupted system files with good system files that might be the cause why you’re getting the errors 0x8024a11a and 0x8024a112. To run the SFC command, follow the steps given below.
Type “cmd” in the Start search and then right-click on the appropriate search result.
Next, select “Run as administrator” to open Command Prompt with admin privileges.
After opening Command Prompt, type in sfc /scannow
The command will start a system scan which will take a few whiles before it finishes. Once it’s done, you could get the following results:
Windows Resource Protection did not find any integrity violations.
Windows Resource Protection found corrupt files and successfully repaired them.
Windows Resource Protection found corrupt files but was unable to fix some of them.
Now restart your computer and see if the problem is fixed or not.
Option 4 – Run the Disk Cleanup tool
You can also try using the Disk Cleanup tool. To use it, refer to these steps:
Tap the Win + R keys to open the Run dialog box and then type “cleanmgr” in the field and hit Enter to open the Disk Cleanup window.
After that, select the drive you want to clean.
Now click OK to clean the disk and restart your computer.
USB storage devices, peripherals, and other devices are almost used on a daily basis. And as you know, when removing the USB storage devices, it is recommended to always use the “Safely remove the USB storage device” option in order to prevent data corruption in the USB storage device. However, there are times when you may see the following error message after you use the “Safely remove the USB storage device” option:
“Problem ejecting USB Mass Storage – This device is currently in use, close any programs or windows that might be using this device, and then try again.”
This kind of error message occurs when the device is still interacting with the operating system in the background. There are several ways you can fix this error but before you check them out below, you need to close all the open windows and programs that may be using the USB storage device and then wait for a couple of seconds and then try safely removing it again. However, if you are still getting the same error message, then here are some tips you should try:
Option 1 – Try to use the Task Manager
Tap the Ctrl + Shift + Esc keys on your keyboard to open the Task Manager.
After that, look for the running processes and programs hogging on your USB Storage device. The error could be due to a program or process that’s using the USB device. This program or process will hog onto some Disk or CPU while transferring data and interacting with the device.
Once you find the culprits, right-click on each one of them and select End Process or End Task. You could also try to restart the process for “Explorer.exe” and see if it fixes the problem.
Option 2 – Try using DISKPART
The next thing you can try to resolve the issue is to use DISKPART. Refer to the given steps below to do so.
Tap the Win + R keys to launch Run and then type “cmd” in the field and tap Enter or click OK to open an elevated Command Prompt.
Next, type and enter this command to execute it: diskpart
The command you entered will initiate the DISKPART utility. After that, type and enter this second command: list disk
Next, type and enter this third command: list volume
The commands you just executed will help you in either listing all the Disk connects or all the partitions on those disks formed and from there, you need to select one command depending on the “list” command you entered. You can execute either of the two following commands:
select disk #
select volume #
After that, it will select the Disk or Partition you want to select.
Now type either one of the following commands:
offline disk #offline volume #
The command you entered will mark the selected disk is Offline. Afterward, try to safely remove your USB Storage device. Just remember that when you plug it back in again, you have to carry out the same method except for the last given command as this time you will have to enter either of these commands in order to get your USB storage device back online:
online disk #
online volume #
Option 3– Try using the Disk Management utility
Tap the Win + R keys to open Run.
Then type “diskmgmt.msc” in the field and hit Enter to open the Disk Management utility.
Next, look for the entry for your USB Storage device and once you’ve found it, right-click on it and select Offline.
After that, try to safely remove your USB Storage device again and see if the error is fixed. Note that you need to go over the same steps again if you want to plug your USB Storage device back in but make sure to select the Online option instead of Offline to get your device back online.
Even with the new Groove Music in Windows 10, a lot of users still prefer to use the old Windows Media Player. This isn’t surprising since Windows Media Player still remains to be one of the best players you can find. However, that does not mean that it is without flaws as it could still encounter some issues from time to time.
One of the issues you might encounter when using the Windows Media Player is when you try to burn DVDs or CDs but end up failing due to an error that pops up that says, Windows Media Player cannot detect the length of the file. At the time of writing, it isn’t clear yet what the real cause of the error is. However, there are several fixes that are provided in this post for you to check out so you can resolve the problem. You can try to get rid of any unsupported files from the burning list or you could also try running the Windows Media Player troubleshooters. Aside from that, you could also try to drag and drop music or change the burning speed. For more details, refer to the following options.
Option 1 – Get rid of the unsupported files from the burning list
You must get rid of the unsupported files from the list of files to burn. This list can be found on the right-hand side of the Windows Media Player. One of the indications that a file is causing problems is when there is a white cross in a red circle next to the file. You can simply click on that icon to remove the file from the burning list. Once you’ve gotten rid of all the unsupported files, try to burn your files to the CD or disk once more.
Option 2 – Try running the Windows Media Player troubleshooters
The next thing you can do to fix the error is to run the built-in troubleshooters for the Windows Media Player. Windows 10 actually comes pre-packed with three troubleshooters designed for Windows Media Player. They can help in fixing the “Windows Media Player cannot detect the length of the file” error. To run these troubleshooters, simply tap the Win + R keys to open the Run dialog box and type “msdt.exe -id WindowsMediaPlayerConfigurationDiagnostic” for the Windows Media Player Settings troubleshooter or type “msdt.exe -id WindowsMediaPlayerLibraryDiagnostic” for the Windows Media Player Library troubleshooter, or type “msdt.exe -id WindowsMediaPlayerDVDDiagnostic” for the Windows Media Player DVD troubleshooter.
Option 3 – Try to drag and drop music
Another thing you can check out is to drag and drop all the tracks into the Windows Media Player before you burn them. All you have to do is open the folder where the tracks are located and highlight all of them and then drag them to the Windows Media Player. It should now be able to detect the length of each one of the tracks without any errors.
Option 4 – Try to change the burning speed
Since the burning speed is set to fastest by default, you can try to change the burning speed to resolve the problem. Just open the Options window and then go to the Burn tab. From there, select either Medium or Slow burning speed and save the changes made. Now try to burn your files to the CD or disk once again.

 The feature that was originally planned for now scrapped Windows 10X is included in Windows 11. You will be able to customize your Virtual desktop with different wallpapers for each screen.
In order to fully customize your virtual desktops with different wallpapers follow this easy step-by-step guide.
The feature that was originally planned for now scrapped Windows 10X is included in Windows 11. You will be able to customize your Virtual desktop with different wallpapers for each screen.
In order to fully customize your virtual desktops with different wallpapers follow this easy step-by-step guide.

 Microsoft starting as of today will block its Office 365 users if they are using Internet Explorer or early versions of Edge browsers.
So if you are using older non Chromium Edge versions of Microsoft browsers you can no longer access Office services until you switch. Now normally I would fully support this kind of decision since Internet explorer is a slow and vulnerable browser and the edge is similar in that regard.
The new edge browser is great and it should be used but the issue I have is that Office 365 is not free, it is a premium feature and I am wondering how Microsoft plans to deal with people that have already paid for service but suddenly cannot access it anymore.
Microsoft starting as of today will block its Office 365 users if they are using Internet Explorer or early versions of Edge browsers.
So if you are using older non Chromium Edge versions of Microsoft browsers you can no longer access Office services until you switch. Now normally I would fully support this kind of decision since Internet explorer is a slow and vulnerable browser and the edge is similar in that regard.
The new edge browser is great and it should be used but the issue I have is that Office 365 is not free, it is a premium feature and I am wondering how Microsoft plans to deal with people that have already paid for service but suddenly cannot access it anymore.