Logo

Fix an Unformattable and Unusable USB Drive

If you have a USB that has stopped working and does not show any signs of life do not throw it away just jet.

Hello and welcome to another great tutorial on errortools.com, today we will explore how to bring back to life dead USB memories.

Detect a Corrupted  Drive:

If your computer is still able to detect your USB drive, you might want to know if it’s been corrupted. Select the Properties of the drive folder and check the device status. If it says This device is working properly this USB drive is worth saving. There’s no need to worry if you can’t see the USB drive folder.

Erase the USB Drive with Diskpart Tool

Press ⊞ WINDOWS + X top open start menu and choose Command prompt (admin)

Type diskpart and press ENTER

Type in list disk and press ENTER

Locate your USB drive by size and type in select disk#, where # is the number of removable disks.

Reallocate the USB Drive Volume

Press ⊞ WINDOWS + R to open the run dialog and type in diskmgmt.msc

Select the USB drive and Right-click on it and select create simple volume. It will lead to a new simple volume wizard window.

Once you click next, you can specify the volume size for the pen drive. Select the maximum volume, which is shown as a default unit in MB.

As soon as you see the next step, select assign drive letter which will help you view your pen drive once again.

Format the partition in the next step. This may be just an extra step because you have already wiped the data clean. But it is always better to be sure.

Click Finish to complete the new simple volume wizard which will now be allocated to the USB drive.

After you reallocate the unallocated USB drive space, you will be able to view the USB drive storage once again.
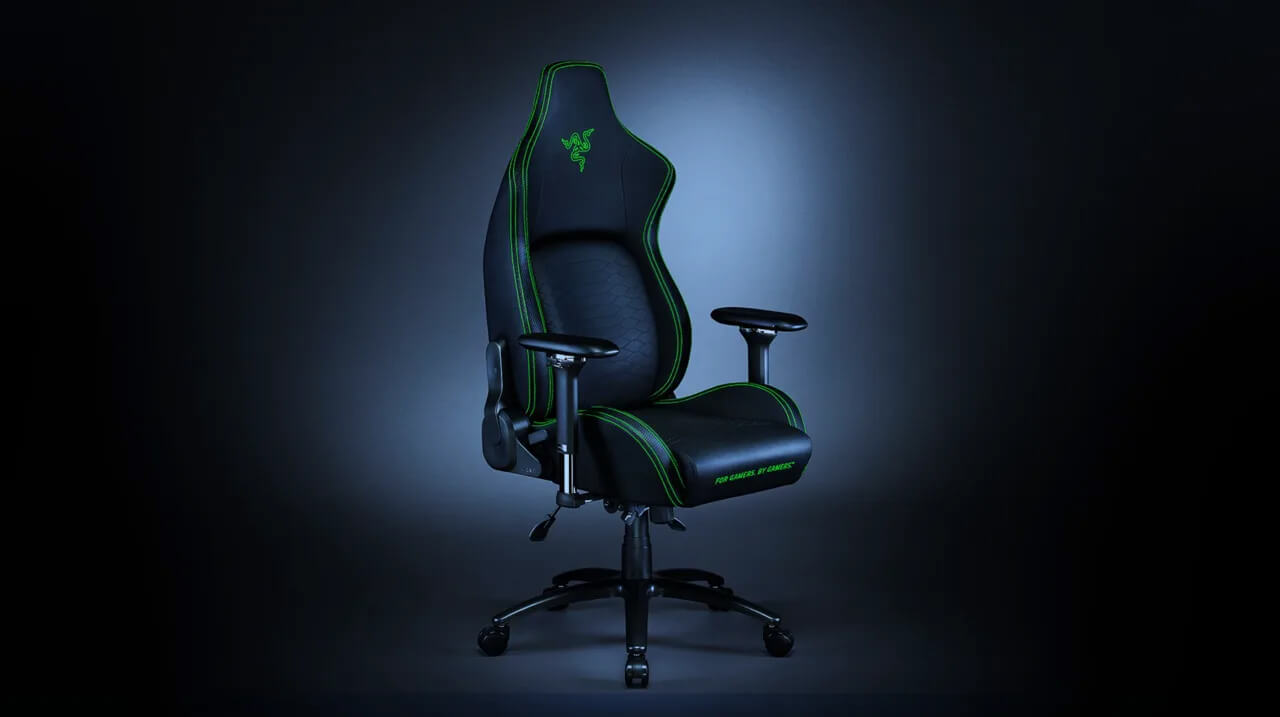
Do You Need Help with Your Device?

Our Team of Experts May Help
Troubleshoot.Tech Experts are There for You!
Replace damaged files
Restore performance
Free disk space
Remove Malware
Protects WEB browser
Remove Viruses
Stop PC freezing
GET HELP
Troubleshoot.Tech experts work with all versions of Microsoft Windows including Windows 11, with Android, Mac, and more.

Share this article:

You might also like

How to get rid of My Maps Wizard

My Maps Wizard is a browser extension for Google Chrome Developed by Mindspark Inc. This extension offers users access to different websites that offer route planning, map views, and other traveling tools.

While all this might sound interesting and useful, this extension has been marked as a Browser Hijacker by several popular anti-virus applications.

When installed this extension changes your default home page and new tab page to MyWay.com or Ask.com depending on the extension version. It also monitors and records user browsing activity that it later uses to display sponsored / unwanted ads throughout your browsing sessions. While browsing the internet with this extension active and installed you will see additional pop-up ads, sponsored links, and injected ads into search results.

About Browser Hijackers

Browser hijacking is a form of unwanted software, often a browser add-on or extension, which causes modifications in the browser’s settings. There are lots of reasons why you may experience a browser hijack; however commercial, advertising, and marketing are the primary reasons for their creation. It redirects you to the sponsored websites and injects ads on your internet browser that assists its creator to generate earnings. Although it may seem naive, these tools were created by malicious people who always attempt to take full advantage of you, so that hackers can easily earn money from your naive and distraction. Browser hijackers could also allow other harmful programs without your knowledge to further damage your personal computer.

How you can know whether the web browser is hijacked?

There are numerous symptoms of web browser hijacking: 1. you notice unauthorized modifications to your web browser’s homepage 2. you find new unwanted favorites or bookmarks added, usually directed to ad-filled or pornography sites 3. the default search engine and the default web browser settings are altered 4. you find many toolbars on the internet browser 5. never-ending pop-up ads appear and/or your browser pop-up blocker is disabled 6. your browser has instability problems or exhibits frequent errors 7. you can’t visit specific websites such as homepages of anti-malware software.

So how does a PC get infected with a browser hijacker?

There are a number of ways your PC can get infected by a browser hijacker. They generally arrive by way of spam email, via file-sharing websites, or by a drive-by download. They may also originate from any BHO, browser extension, toolbar, add-on, or plug-in with malicious intent. A browser hijacker may also come bundled up with some freeware that you unwittingly download to your PC, compromising your internet security. An example of some infamous browser hijacker includes Conduit, Anyprotect, Babylon, SweetPage, DefaultTab, RocketTab, and Delta Search, however, the names are often changing. Browser hijacking can lead to severe privacy problems and even identity theft, affect your web browsing experience by taking control of outgoing traffic, drastically slows down your personal computer by consuming lots of system resources, and cause system instability as well.

Learn how to remove a browser hijacker

Certain browser hijacking can be quite easily stopped by finding and eliminating the corresponding malware software through your control panel. Having said that, the majority of hijackers are quite tenacious and need specialized tools to remove them. Furthermore, manual removals require in-depth system knowledge and therefore could be a very difficult task for novice computer users. Industry experts always suggest users eliminate any malicious software including browser hijacker by using an automatic removal tool, which is simpler, safer, and quicker than the manual removal solution. One of the best tools for correcting browser hijacker infections is SafeBytes Anti-Malware. It will help you remove any pre-existing malicious software on your system and provides you real-time monitoring and protection against new internet threats. Employ a system optimizer (such as Total System Care) along with your antivirus software to correct various registry issues, eliminate computer vulnerabilities, and boost your computer performance.

What To Do When You Cannot Install Safebytes Anti-Malware?

All malware is bad, but certain types of malware do much more damage to your computer or laptop than others. Certain malware variants modify web browser settings by adding a proxy server or change the PC’s DNS configuration settings. In these instances, you’ll be unable to visit certain or all of the sites, and thus not able to download or install the required security software to eliminate the computer virus. So what to do if malicious software keeps you from downloading or installing Anti-Malware? There are a few actions you can take to get around this issue.

Install the anti-malware in Safe Mode

Safe Mode is actually a unique, basic version of Microsoft Windows in which just bare minimum services are loaded to stop viruses as well as other troublesome applications from loading. If the virus is set to load automatically when PC boots, shifting to this mode may prevent it from doing so. To get into Safe Mode or Safe Mode with Networking, press F8 while the system is starting up or run MSConfig and find the “Safe Boot” options under the “Boot” tab. Once you are in safe mode, you can try to install your antivirus application without the hindrance of malicious software. Now, you are able to run the antivirus scan to remove computer viruses and malware without hindrance from another malicious application.

Download the security software in an alternate browser

Malicious code may exploit vulnerabilities in a particular internet browser and block access to all anti-malware software sites. The best solution to avoid this issue is to go with a browser that is well known for its security features. Firefox contains built-in Malware and Phishing Protection to keep you secure online.

Run antivirus from a pen drive

Another way is to download and transfer anti-malware software from a clean PC to run a virus scan on the affected computer. Try these simple measures to clean up your infected computer by using portable anti-malware. 1) Download Safebytes Anti-Malware or Windows Defender Offline onto a virus-free computer system. 2) Mount the USB drive onto the same computer. 3) Double-click on the downloaded file to open the installation wizard. 4) When asked, select the location of the pen drive as the place where you want to store the software files. Follow activation instructions. 5) Remove the pen drive. You can now utilize this portable antivirus on the infected computer. 6) Double click the Safebytes Anti-malware icon on the flash drive to run the application. 7) Press the “Scan Now” button to begin the malware scan.

Let's Talk About SafeBytes Anti-Malware!

If you’re looking to download an anti-malware application for your PC, there are lots of tools out there to consider however, you cannot trust blindly to anyone, regardless of whether it is paid or free software. A few are very good ones, some are decent, and some are merely fake anti-malware applications that will harm your PC themselves! You must pick one that is efficient, practical and has a good reputation for its malware protection. One of the recommended software programs is SafeBytes Anti-Malware. SafeBytes has a superb history of excellent service, and customers are very happy with it. Safebytes is among the well-established computer solutions firms, which provide this complete anti-malware software. Using its cutting-edge technology, this software will help you remove multiples types of malware like viruses, PUPs, trojans, worms, ransomware, adware, and browser hijackers.

SafeBytes anti-malware provides a plethora of advanced features which sets it aside from all others. The following are some of the features you may like in SafeBytes.

World-class AntiMalware Protection: Built upon a greatly acclaimed anti-virus engine, this malware removal application can identify and get rid of numerous obstinate malware threats such as browser hijackers, potentially unwanted programs, and ransomware that other typical anti-virus programs will miss. Live Protection: SafeBytes offers complete and real-time security for your PC. It’ll constantly monitor your pc for hacker activity and also provides users with superior firewall protection. Safe Browsing: Through its unique safety rating, SafeBytes informs you whether a site is safe or not to visit it. This will make sure that you’re always certain of your online safety when browsing the web. Light-weight Utility: SafeBytes is a lightweight and user-friendly anti-virus and anti-malware solution. As it uses minimum computer resources, this application leaves the computer power exactly where it belongs to: with you. Fantastic Tech Support Team: You can get high levels of support 24/7 if you’re using their paid version. SafeBytes can keep your personal computer safe from the latest malware threats automatically, thus keeping your internet experience secure and safe. You can be sure that your computer system will be protected in real-time once you put this tool to use. If you want advanced forms of protection features & threat detections, buying SafeBytes Anti-Malware could be worth the money!

Technical Details and Manual Removal (Advanced Users)

To remove My Maps Wizard manually, go to the Add/Remove programs list in the Windows Control Panel and select the offending program you want to get rid of. For internet browser extensions, go to your browser’s Addon/Extension manager and select the add-on you would like to remove or disable. You will additionally also want to totally reset your web browser to its default configuration settings. To ensure complete removal, find the following Windows registry entries on your computer and remove them or reset the values appropriately. But bear in mind, this can be a tricky task and only computer professionals could carry it out safely. In addition, some malicious programs are capable to defend against its removal. You’re advised to do this process in Safe Mode.
Registry: [HKEY_LOCAL_MACHINE\Software\Microsoft\Windows\CurrentVersion\explorer\Shell Folders] Common Startup = C:\windows\start menu\programs\startup [HKEY_LOCAL_MACHINE\Software\Microsoft\Windows\CurrentVersion\explorer\User Shell Folders] Common Startup = C:\windows\start menu\programs\startup [HKEY_LOCAL_MACHINE\Software\Microsoft\Windows\CurrentVersion\RunServices] Whatever = c:\runfolder\program.exe
Read More
Guide How to Remove PCOptimizerPro

PC Optimizer Pro is a PC optimizer utility developed by Xportsoft Technologies. It is classified as a potentially unwanted program, due to its aggressive scan and registration reminders, and that it is often distributed bundled with other programs in a manner that leads many users to not know how it got on their computer. While not inherently malicious, PC Optimizer Pro adds numerous registry keys, startup entries and while running consumes a relatively high amount of system resources, especially during its scans. The software installs from a .exe file that is around 5.20 MB or 5.453.240 Bytes (depending on the version). As of the publication of these videos, the current version of PC Optimizer Pro was detected as malicious or potentially unwanted by at least 21 AntiViruses.

About Potentially Unwanted Applications

If you have ever installed freeware or shareware, chances are high that your computer can get installed with a bunch of unwanted applications. A Potentially Unwanted Program, also called PUP, in short, is actually software that contains adware, installs toolbars, or has other hidden goals. These kinds of programs are almost always bundled up with free software which you download from the net or are also bundled within the custom installers on many download sites. PUPs did not really constitute pure “malware” in the strict sense of the term. Just like malicious software, PUPs cause problems when downloaded and installed on your PC, but what makes a PUP different is that you give consent to download it – although the truth is vastly different – the software installation package actually tricks you into accepting the installation. Irrespective of whether it is regarded as malware or not, PUPs are nearly always harmful to the user as they might bring on adware, spyware, keystroke logging, and also other bad crapware features on your computer.

What do PUPs do on your computer, exactly?

Potentially Unwanted Programs come in many forms and varieties, but in most instances, these are adware programs that show annoying pop-up adverts and advertisements on websites you check out. The PUPs also get installed into your computer in the form of web browser add-ons and toolbars. Not only they needlessly take up space on your computer screen, but toolbars may also manipulate search engine results, watch your web browsing activities, decrease your web browser’s efficiency, and decelerate your internet connection to a crawl. Potentially Unwanted Programs at times act quite similarly to viruses or spyware. Some PUPs include keyloggers, dialers, along with other software to gather your private details that may result in identity theft. These are programs that don’t do anything good for you; in addition to taking over space on your hard drive, they also slow down your computer, often modify settings without your approval, the list of bothersome features goes on.

Ways to avoid PUPs

• Always study the EULA and privacy statement. Don’t agree until you know precisely what you are acknowledging. • Choose the “custom” install whenever installing a software program. In particular, look closely at those small boxes that have been checked as default, where you may ‘agree’ to receive promotions or install software bundlers. • Use good antivirus software, like Safebytes Anti-Malware that offers real-time protection against PUPs. • Avoid adding a freeware program you do not use. Turn off or remove toolbars and web browser extensions you don’t really need. • Always download software from reliable sources like official sites as opposed to untrustworthy sharing space. Avoid file-hosting sites where/when possible.

What you can do if Malware Prevents You From Downloading Or Installing Antivirus?

Practically all malware is bad, but certain types of malware do much more damage to your computer than others. Certain malware goes to great lengths to stop you from downloading or installing anything on your personal computer, particularly antivirus applications. If you are reading this right now, you have probably recognized that a malware infection is the real cause of your blocked web connectivity. So what to do if you need to install an antivirus program like Safebytes? There are a few steps you can take to circumvent this problem.

Install in Safe Mode

The Windows OS has a special mode known as “Safe Mode” in which just the bare minimum required programs and services are loaded. In the event the malware is blocking the internet connection and affecting the computer, running it in Safe Mode will let you download antivirus and run a diagnostic scan while limiting possible damage. To start the computer into Safe Mode, press the “F8” key on your keyboard right before the Windows boot screen comes up; Or right after normal Windows boot up, run MSConfig, look over “Safe Boot” under Boot tab, and click Apply. After you reboot into Safe Mode with Networking, you can download, install, and update anti-malware software from there. Right after installation, run the malware scanner to remove standard infections.

Switch to an alternate browser

Some malware may target vulnerabilities of a specific browser that block the downloading process. If you seem to have malware attached to Internet Explorer, then switch over to an alternate web browser with built-in safety features, such as Firefox or Chrome, to download your favorite antivirus program – Safebytes.

Install and run anti-virus from the USB drive

Another solution is to create a portable anti-malware program on your USB stick. Adopt these measures to employ a thumb drive to clean your infected computer system. 1) Download Safebytes Anti-Malware or MS Windows Defender Offline onto a clean PC. 2) Plug the Thumb drive into the clean computer. 3) Run the setup program by double-clicking the executable file of the downloaded software, with a .exe file format. 4) Choose the flash drive as the location for saving the file. Do as instructed on the screen to complete the installation process. 5) Now, plug the pen drive into the corrupted computer. 6) Double-click the anti-malware software EXE file on the USB flash drive. 7) Press the “Scan” button to run a full system scan and remove viruses automatically.

SafeBytes Anti-Malware: Lightweight Malware Protection for Windows PC

These days, an anti-malware tool can protect your computer from different types of online threats. But how to choose the best one amongst numerous malware protection application that’s available out there? You may be aware, there are numerous anti-malware companies and tools for you to consider. A few are well worth your money, but many aren’t. You have to be very careful not to choose the wrong application, especially if you buy a paid application. In terms of commercial anti-malware application options, many people select well-known brands, such as SafeBytes, and are quite happy with it. SafeBytes anti-malware is a powerful, highly effective protection tool created to help end-users of all levels of IT literacy in detecting and eliminating malicious threats from their computer. Using its cutting-edge technology, this software can assist you to eliminate several types of malware such as computer viruses, trojans, PUPs, worms, ransomware, adware, and browser hijackers. SafeBytes has excellent features when compared to other anti-malware programs. Let’s have a look at a few of them below: Robust, Anti-malware Protection: Safebytes is made on the best virus engine within the industry. These engines will find and get rid of threats even during the initial phases of a malware outbreak. Active Protection: Malware programs aiming to enter the system are discovered and stopped as and when detected by the SafeBytes active protection shields. It’ll check your PC for suspicious activity at all times and safeguards your personal computer from unauthorized access. High-Speed Malware Scanning Engine: SafeBytes’s high-speed malware scanning engine minimizes scan times and extends the life of the battery. Simultaneously, it will effectively detect and eliminate infected computer files or any online threat. Website Filtering: SafeBytes checks the hyperlinks present on a webpage for possible threats and informs you whether the site is safe to explore or not, through its unique safety rating system. Lowest CPU/Memory Usage: SafeBytes is a lightweight and user-friendly antivirus and antimalware solution. Since it utilizes negligible computer resources, this tool leaves the computer’s power exactly where it belongs to: with you. Premium Support: You may get high levels of support round the clock if you’re using their paid software.

Technical Details and Manual Removal (Advanced Users)

If you wish to manually remove PCOptimizerPro without the use of an automated tool, it may be possible to do so by removing the program from the Windows Add/Remove Programs menu, or in cases of browser extensions, going to the browsers AddOn/Extension manager and removing it. You will likely also want to reset your browser. To ensure the complete removal, manually check your hard drive and registry for all of the following and remove or reset the values accordingly. Please note that this is for advanced users only and may be difficult, with incorrect file removal causing additional PC errors. In addition, some malware is capable of replicating or preventing deletion. Doing this in Safe Mode is advised.

The following files, folders, and registry entries are created or modified by PCOptimizerPro

Files: DesktopPC Optimizer Pro.lnk. %Programs%PC Optimizer ProLive Support.url. %Programs%PC Optimizer ProPC Optimizer Pro.lnk. %Programs%PC Optimizer ProUninstallation Guide.url. %Programs%PC Optimizer ProVisit Website.url. %ProgramFiles%PC Optimizer ProPCOptimizerPro.exe. %ProgramFiles%PC Optimizer ProPCOptProCtxMenu.dll. %ProgramFiles%PC Optimizer ProPCOptProTrays.exe. %ProgramFiles%PC Optimizer ProStartApps.exe. %ProgramFiles%PC Optimizer Prouninst.exe. %QuickLaunch%PC Optimizer Pro.lnk. WindowsTasksPC Optimizer Pro Idle.job. WindowsTasksPC Optimizer Pro Scan.job. WindowsTasksPC Optimizer Pro startups.job. WindowsTasksPC Optimizer Pro Updates.job. C:DOCUME1USER1LOCALS1Tempoptprosetup.exe C:WINDOWSsystem32netmsg.dll C:DOCUME1USER1LOCALS1Tempoptprosetup.exe C:DOCUME1USER1LOCALS1Tempis-SJGJ9.tmpoptprosetup.tmp C:DOCUME1USER1LOCALS1Tempis-NTRVH.tmp_isetup_shfoldr.dll C:WINDOWSsystem32shfolder.dll C:DOCUME1USER1LOCALS1Tempis-NTRVH.tmpOptProHelper.dll C:DOCUME1USER1LOCALS1Tempis-NTRVH.tmpitdownload.dll C:1e4e2d65e12311cac2c0eeb8c5c1d7bd1ddc865b367b98b56bc2330bf18436 C:WINDOWSRegistrationR000000000007.clb C:DOCUME1USER1LOCALS1Tempoptprosetup.exe C:WINDOWSsystem32shfolder.dll C:1e4e2d65e12311cac2c0eeb8c5c1d7bd1ddc865b367b98b56bc2330bf18436 C:WINDOWSRegistrationR000000000007.clb C:WINDOWSsystem32shell32.dll C:DOCUME1USER1LOCALS1Tempis-SJGJ9.tmpoptprosetup.tmp C:Program FilesOptimizer Pro 3.99OptimizerPro.exe C:Program FilesOptimizer Pro 3.99unins000.exe C:Program FilesOptimizer Pro 3.99OptProStart.exe c:autoexec.bat C:DOCUME1USER1LOCALS1Tempoptprosetup.exe C:DOCUME1USER1LOCALS1Tempis-SJGJ9.tmpoptprosetup.tmp C:DOCUME1USER1LOCALS1Tempis-NTRVH.tmp_isetup_shfoldr.dll C:DOCUME1USER1LOCALS1Tempis-NTRVH.tmpOptProHelper.dll C:DOCUME1USER1LOCALS1Tempis-NTRVH.tmpitdownload.dll C:Program FilesOptimizer Pro 3.99is-BDCDJ.tmp C:Program FilesOptimizer Pro 3.99is-DB4S5.tmp C:Program FilesOptimizer Pro 3.99is-C16E7.tmp C:Program FilesOptimizer Pro 3.99is-QE691.tmp C:Program FilesOptimizer Pro 3.99is-GQ78C.tmp Registry: Key 003B9C22-6FE0-4BCA-A73F-9AA99B9BBDAA at HKEY_CLASSES_ROOTTypeLib. Key 12AB121E-44C6-488B-8773-B0AE25E662E1 at HKEY_CLASSES_ROOTInterface. Key 203ABD21-41F1-4F1B-BAE3-D6A89A90D239 at HKEY_CLASSES_ROOTCLSID. Key PC Optimizer Pro at HKEY_CURRENT_USERSoftware. Key PC Optimizer Pro at HKEY_LOCAL_MACHINESOFTWARE. Key PC Optimizer Pro at HKEY_LOCAL_MACHINESoftwareMicrosoftWindowsCurrentVersionUninstall. Key PCOptimizerPro.exe at HKEY_LOCAL_MACHINESOFTWAREMicrosoftWindowsCurrentVersionApp Paths. Key PCProCtxMenu at HKEY_CLASSES_ROOT*shellexContextMenuHandlers. Key PCProCtxMenu at HKEY_CLASSES_ROOTlnkfileshellexContextMenuHandlers.
Read More
INF file doesn't support this installation
If you got an error message saying, The INF file you selected does not support this method of installation while trying to install a driver using the “Install” option in the right-click context menu, read on as this post will guide you in fixing the problem. The INF file mentioned in the error message is a text file that’s divided into different types of formatted sections. Each one of the sections is designed for a particular purpose. For instance, one section is designed to copy files or to add entries to the registry. INF files are used to install drivers. However, if something is wrong, you might encounter this error while installing a driver on your Windows 10 computer. To resolve this problem, you can try to download the driver again from the official manufacturer website or check if the driver is compatible with your computer’s operating system architecture or you can also try installing the driver from the Device Manager. For more details, follow the given options below.

Option 1 – Try downloading the driver again from the official website of the manufacturer

Usually, you shouldn’t encounter this kind of issue no matter what installation method you used on your Windows 10 PC. However, there are times when the driver itself is corrupted for some reason which is why you are unable to complete the installation and receive an error message instead.

Option 2 – Try checking if the driver is compatible with the OS architecture

It is possible that you’re getting this error if you have a driver that is compatible with a 32-bit system and you are trying to install it on a 64-bit system and vice versa. Thus, you need to check if the driver you are trying to install is compatible with your operating system if you haven’t done it when you’ve downloaded the driver from the website of the manufacturer. To check the system architecture, in the Start Search, type “msinfo32” in the field and hit Enter to open the System Information window. From there, you should see all the information about your operating system. In addition, you can also search “system information” in the Cortana search box and look for the System Type entry and open it.

Option 3 – Try installing the driver from the Device Manager

If you have the driver files on your PC and you have to update a driver, refer to the steps given below to be guided on how to install the driver from the Device Manager.
  • First, click the Start button and type “device manager”.
  • Then click on the “Device Manager” from the search results to open it.
  • From there, look for the driver you want to update, and then right-click on each one of them and select the Update Driver from the menu.
  • After that, click on the “Browse my computer for driver software” option.
  • Next, select the “Let me pick from a list of available drivers on my computer” option and then click the Next button.
  • On the next screen, you should see the “Have Disk” option. Click on this option and then click on the Browse button to go to the location of the file. After that, you shouldn’t have any problem installing the INF file.

Option 4 – Try running the System File Checker Scan

The SFC or System File Checker scan could detect and automatically repair damaged system files that could be causing the “The INF file you selected does not support this method of installation” error. SFC is a built-in command utility that helps in restoring corrupted files as well as missing files. It replaces bad and corrupted system files with good system files. To run the SFC command, follow the steps given below.
  • Tap Win + R to launch Run.
  • Type in cmd in the field and tap Enter.
  • After opening Command Prompt, type in sfc /scannow
The command will start a system scan which will take a few whiles before it finishes. Once it’s done, you could get the following results:
  1. Windows Resource Protection did not find any integrity violations.
  2. Windows Resource Protection found corrupt files and successfully repaired them.
  3. Windows Resource Protection found corrupt files but was unable to fix some of them.
 Now restart your computer.
Read More
Fix Communication with service process failed
This post will guide you in fixing the “Communication with service process failed” error in Windows 10. This error is related to the Intel Driver and Support Assistant application. Although this error does not reportedly cause any loss of functionality in the computer, however, it still indicates that there is something wrong with some of your driver modules. Intel has taken a bold step and combined its older modules into this new application (Intel Driver and Support Assistant) recently. This application enables users to scan their computers for any available updates from Intel. This is the main application of Intel and provides users a way to update their driver software automatically instead of manually updating it. However, with the recent reports submitted by some users, it seems that something is wrong with this application, and users to have to deal with the “Communication with service process failed” error. This error might be caused by several reasons, for one, it could be that the application is corrupted or incomplete in its nature which is possible since this is still a developing and newly released app. It could also be that there are other utilities or modules that conflict with the Intel software. Whichever the reason may be, you can try out the options given below to resolve the problem but before you proceed, make sure that you have an administrator account as well as an active and stable internet connection.

Option 1 – Disable DSATray in Startup

If you receive this error message every time you start your computer then this means that the application is not able to launch properly. Like pointed out, it could be that it is still incomplete in nature or it conflicts with other applications. Thus, you can try to disable the service from the startup and check if it fixes the problem.
  • Tap the Win + R keys to open the Run dialog box.
  • Then type “taskmgr” in the field and hit Enter to open the Task Manager.
  • After that, go to the Startup tab and look for the Intel Driver and Support Assistant app.
  • Right-click on the app and select Disable.
  • Restart your PC and check if the error is now fixed or not

Option 2 – Reinstall the Intel Driver and Support Assistant

If the first option did not work, you can try reinstalling the Intel Driver and Support Assistant app. To do so, follow these steps:
  • In the search box, type in “control” and then click on Control Panel (desktop app) among the search results.
  • After that, select Programs and Features from the list which will give you a list of all the programs installed on your computer.
  • From there, look for Intel Driver and Support Assistant and select it and then uninstall it.
  • After you have the app uninstalled, open your browser and go to Intel’s official website. From there, download the driver utility manually.
  • Once the download is finished, right-click on it and select “Run as administrator” and install the app on your PC with elevated access.
  • Restart your PC and then check if the error is now fixed.
Read More
Combine Hard drives with storage spaces
Why combining hard drives with storage spaces? Ok, I will admit it, I am a modern digital hamster when it comes to digital goods. I like to collect stuff and more than anything else I like to have all of that at the tip of my fingers. And how digital goods grow in size themselves (movies on Blu-ray are like 50GB each) and the collection grows in size single hard drive is starting to be completely obsolete when it comes to storage. Sometimes we will need large storage for these kinds of personal collections, sometimes we will need it for work reasons. Whatever your reason might be Windows 10 is offering us a solution via Storage spaces. Storage spaces is an integral part of Windows and it is meant as a tool to provide you with a RAID environment without a RAID controller. Of course, combining multiple hard drives via storage paces instead of RAID will not be so fast or stable but for home use of storing a large quantity of data is perfectly enough. With Storage Spaces you will also have an option to reduce some space for increased security of data loss if by any chance one of your HDD fails.

How to Create a Storage Space

To create storage space in Windows, press ⊞ WINDOWS + R to open the run dialog. keyboard with windows and r markedIn the run box type in Control Panel and press ENTER run dialog with control panel typed inIn Control Panel find Storage Spaces and left-click on it. Control panel with storage spaces markedOnce storage spaces open, left-click on Create a new pool and storage space storage spaces manage storage spacesOnce you click on create new, you will be greeted with a list of hard drives you can use for this operation. storage spaces select drivesPlease note that all hard drives you choose will be completely erased and formatted and then assign a single drive letter. Click on Create pool. storage spaces resiliency type optionsYou will find yourself in new storage options where you can assign a drive letter, give storage space a name, etc.

Storage spaces types

One thing I would like to focus on here is resiliency type, when you expand the resiliency type drop-down menu you will see 4 options inside. Simple, Two-way mirror, Three-way mirrors, and Parity. Simple: If you choose Simple as an option, you will have maximum hard drive space but no resiliency at all, meaning that if by any chance any of your hard drives malfunction, you are losing your data from that drive completely. Two-way mirror: This option will save your data if one of your drives fails but you need at least 2 drives and storage space will be limited since some of it will be a safe backup option for the case of a drive failure. However if one of your drives fails, you can replace it in a second and keep on working as nothing happened. Three-way mirror: This option similar to the previous one will offer you safe data-keeping from a hard drive failure. this option will save your data even if 2 hard drives malfunction but it will require having 5 of them connected in order to be able to choose this option. Parity: Maybe the most popular option among people who want to have 2 or 3 drives merged but do not want to lose too much space of the two-way mirror option. It offers some protection and it does not take so much space as two-way does, let us say it is a kind of win-win situation.

Conclusion

I personally go for simple and have an important backup on optical drives but only for reason I could use more space, know that this way is requiring from me to always have a backup in optical media and that I will need to restore all of it back if even one HDD fails which could take time. But if this way is ok with you, go for it, you will have more space to use.
Read More
Fix Windows Update error 0x80244022
Installing Windows Updates in your Windows 10 computer does not always go smoothly as there are instances when you could encounter some errors along the way. One of these errors is error code 0x80244022 –WU_E_PT_HTTP_STATUS_SERVICE_UNAVAIL HTTP 503. This kind of error can be encountered when you check, download or install any updates. At the time of writing, it isn’t known yet what the exact cause of this error is. However, there are some potential fixes you can check out to fix it. When this error occurs, you will see the following error message on your screen:
“There were some problems installing updates, but we’ll try again later. If you keep seeing this and want to search the web or contact support for information, this may help: (0x80244022).”
To fix error code 0x80244022, refer to the potential fixes provided below.

Option 1 – Disable the Proxy server

The first thing you can do is to try disabling the Proxy server as it might be the reason why you’re getting error 0x80244022 for Windows Updates. To disable the proxy server, refer to the steps below.
  • Tap the Win + R keys to open the Run dialog box.
  • Then type “inetcpl.cpl” in the field and hit Enter to pull up the Internet Properties.
  • After that, go to the Connections tab and select the LAN settings.
  • From there. Uncheck the “Use a Proxy Server” option for your LAN and then make sure that the “Automatically detect settings” option is checked.
  • Now click the OK and the Apply buttons.
  • Restart your PC.
Note: If you are using a third-party proxy service, you have to disable it. In addition, if you are also using a VPN, you can try to disable it as well.

Option 2 – Run the DISM tool

You can run the DISM tool as well to help fix the error code 0x80244022 during Windows Update. Using this built-in tool, you have various options such as the “/ScanHealth”, “/CheckHealth”, and “/RestoreHealth”.
  • Open the Command Prompt with admin privileges.
  • Then type in the following commands and make sure to hit Enter right after you type each one of them:
    • Dism /Online /Cleanup-Image /CheckHealth
    • Dism /Online /Cleanup-Image /ScanHealth
    • exe /Online /Cleanup-image /Restorehealth
  • Do not close the window if the process takes a while as it will probably take a few minutes to finish.

Option 3 – Perform a System File Checker scan

The SFC or System File Checker scan could detect and automatically repair damaged system files that could be causing error code 0x80244022 to appear when you try to update your Windows 10 computer. SFC is a built-in command utility that helps in restoring corrupted files as well as missing files. It replaces bad and corrupted system files with good system files. To run the SFC command, follow the steps given below.
  • Tap Win + R to launch Run.
  • Type in cmd in the field and tap Enter.
  • After opening Command Prompt, type in sfc /scannow and hit Enter.
The command will start a system scan which will take a few whiles before it finishes. Once it’s done, you could get the following results:
  1. Windows Resource Protection did not find any integrity violations.
  2. Windows Resource Protection found corrupt files and successfully repaired them.
  3. Windows Resource Protection found corrupt files but was unable to fix some of them.
  • Once done, restart your computer.

Option 4 – Try disabling the Firewall or antivirus program

Disabling the antivirus program or Firewall or any other security software installed in your computer is always a good idea you can try when the Windows Update process does not go smoothly. So before you try updating your computer again, make sure to disable the antivirus or security program and once the Windows Update is done, don’t forget to enable the antivirus program back again.

Option 5 – Try resetting the Windows Update components

  • Open Command Prompt with admin privileges.
  • After that, type each one of the following commands and hit Enter after you key in one after the other.
    • net stop wuauserv
    • net stop cryptsvc
    • net stop bits
    • net stop msiserver
Note: The commands you entered will stop the Windows Update components such as Windows Update service, Cryptographic services, BITS, and MSI Installer.
  • After disabling WU components, you need to rename both the SoftwareDistribution and Catroot2 folders. To do that, type each one of the following commands below, and don’t forget to hit Enter after you type one command after the other.
    • ren C:/Windows/SoftwareDistribution/SoftwareDistribution.old
    • ren C:/Windows/System32/catroot2/Catroot2.old
  • Next, restart the services you’ve stopped by entering another series of commands. Don’t forget to hit Enter after you key in one command after the other.
    • net start wuauserv
    • net start cryptsvc
    • net start bits
    • net start msiserver
  • Close Command Prompt and reboot your PC.

Option 6 – Run the Windows Update Troubleshooter

You might also want to run the Windows Update Troubleshooter as it could also help in fixing Windows Update Error. To run it, go to Settings and then select Troubleshoot from the options. From there, click on Windows Update and then click the “Run the troubleshooter” button. After that, follow the next on-screen instructions and you should be good to go.
Read More
A Quick Guide to Resolving Error 0x800ccc17

What is error 0x800ccc17?

This is a typical Outlook Express error code. Outlook Express is email software by Microsoft. This error may pop up when sending or receiving emails on your Outlook Express. It cancels email sending and receiving operations. In other others, the 0x800ccc17 error code hampers your email communication via Outlook Express account. This error message is displayed in the following format:
0x800CCC17 - User cancelled operation

Solution

Restoro box imageError Causes

0x800ccc17 error code may appear on your PC due to multiple reasons. These include:
  • Issues with Pop3uid.dbx file (this file supports Outlook Express software on Windows Vista)
  • Viral infection
  • Registry corruption
No matter what the underlying reason for this error code may be, it is advisable to resolve the issue right away without any delay. This error may cause great deal of inconvenience. It may lower your office productivity badly especially if you interact and communicate with people of other office departments via your Outlook Express account.

Further Information and Manual Repair

Here are some of the best and efficient do-it-yourself methods to resolve the 0x800ccc17 error code on your system. These methods are very easy to work around and do not require any kind of technical expertise.

Method 1 - Restart Your PC

Sometimes this might error can be resolved by simply rebooting your system. So, restart your PC and try using your Outlook Express account again. If it works, the error is resolved. However, if it persists then try other methods given below.

Method 2 - Rename pop3uid.dbx File on Your System

If the underlying cause of error 0x800ccc17 is related to pop3uid.dbx file damage, then simply rename it to resolve. This can be done by searching for the file pop3uid.dbx. After locating it rename it to ‘pop3uid.bak’. Now reopen Outlook Express and try sending or receiving emails again. If the operations are executed successfully then the error is resolved.

Method 3 - Remove Viruses

Viruses can infect your PC without you knowing about it. These malicious programs usually enter your system through phishing emails and file downloads. If the error 0x800ccc17 is triggered due to viral infection then it is advisable to install a powerful antivirus and remove all viruses from your PC.

Method 4 - Repair the Registry

If you don’t clean the registry frequently it fills up with unnecessary and obsolete files like junk files, cookies, internet history, and bad registry entries. These files then corrupt and damage the registry thereby generating codes like error 0x800ccc17. To resolve this, you first need to remove all these unnecessary files and repair the registry. Though this can be done manually if you are not technically sound, it may be time-consuming and slightly tricky. Therefore it is advisable to download Restoro. This is a powerful registry cleaner that wipes away all obsolete files instantly, cleans the registry, and repairs it in seconds. Click here to download Restoro and fix error 0x800ccc17 on your PC today.
Read More
PowerShell script Error 0xFFFD0000 in Windows
If you like to schedule different tasks on your Windows 10 computer and automate them, then you would find the Windows Task Scheduler very useful. It is commonly used by a lot of users to schedule various tasks like scheduling periodic execution of scripts and some programs to make sure that the intended tasks are automatically carried out. Apart from being a preinstalled application, the Task Scheduler is already available on your computer. However, there are times when you might encounter some errors while using it. One of these errors is error 0xFFFD0000. You can encounter this error while executing some PowerShell scripts. It can occur to any tasks as well especially to the ones that have a file executed using a particular program. And just like the PowerShell script, files also use PowerShell to be executed. To fix Error 0xFFFD0000, you need to follow the instructions provided below carefully. Step 1: In the Start Search, type “task scheduler” and click on Task Scheduler from the results to open it. Step 2: After opening Task Scheduler, right-click on the task that’s giving you the error and then click on Properties. Step 3: After that, navigate to the Actions tab in the new mini window that appears. Step 4: From there, select the action for the task and click on the Edit button which will open another mini window. Step 5: Next, make sure that the path to the executing program is properly typed inside the field of Program/script. Note that it should be set to the executable file for that particular program. For instance, you have to set it to “C:WindowsSystem32WindowsPowerShellv1.0powershell.exe” for the Windows PowerShell program. Step 6: You can also utilize the Browse button and navigate through Windows Explorer to locate that particular executable file for the program. Step 7: Now make sure to use the file argument in the Add arguments field followed by the path of the file to be executed. It should look like this:
-file "C:/Users/Ayush/Desktop/Powershell Script Sample.ps1"
Step 8: Once done, click on OK to save the changes made and see if the task is still giving you an error or not. On the other hand, if you are still getting the same error, you can try to repair the Task Scheduler by deleting corrupted tasks. Note that a single corrupted file can cause big problems so this option is quite important. And for you to delete a corrupted task or any task from the Task Scheduler, you have to use the Registry Editor if you are not able to use the Task Scheduler interface. To do so, follow these steps:
  • Tap the Win + R keys to open the dialog box for Run.
  • Next, type in regedit and click on OK or tap Enter to open the Registry Editor.
  • Then navigate to this path: ComputerHKEY_LOCAL_MACHINESOFTWAREMicrosoftWindows NTCurrentVersionScheduleTaskCacheTree
Note: In this path, you can see all the tasks that are currently set in the Task Scheduler. And since it would be hard to tell which one of them is corrupted, you have to delete the latest one in Task Scheduler last. But before you do so, make sure that you take a note of the ID of the tasks. And for you to get the ID, you have to select the task you wish to delete and double click on the ID string located on your right-hand side, and then copy it in the Notepad.
  • Right-click on the task name and then delete it.
  • After that, delete the very same GUID which you have copied earlier from these folders:
  • ComputerHKEY_LOCAL_MACHINESOFTWAREMicrosoftWindows NTCurrentVersionScheduleTaskCacheBoot
  • ComputerHKEY_LOCAL_MACHINESOFTWAREMicrosoftWindows NTCurrentVersionScheduleTaskCacheLogon
  • ComputerHKEY_LOCAL_MACHINESOFTWAREMicrosoftWindows NTCurrentVersionScheduleTaskCacheMaintenance
  • ComputerHKEY_LOCAL_MACHINESOFTWAREMicrosoftWindows NTCurrentVersionScheduleTaskCachePlain
  • ComputerHKEY_LOCAL_MACHINESOFTWAREMicrosoftWindows NTCurrentVersionScheduleTaskCacheTasks
Note: You might not see the same GUID from these folders but if you see it, delete it right away.
  • Next, navigate to this location: C:WindowsSystem32Tasks
  • Delete the very same tasks you just deleted from the Registry Editor.
  • Restart your PC and check if the Task Scheduler is back to its normal state or not.
Read More
Check Windows 11 UI inside your Browser
windows 11 websiteWindows 11 release date is closing in, some people have tried it via insider build, some have decided not to. It has come to our attention that there is a little website made by BlueEdge that offers a virtual Windows 11 desktop. Opening the Website will put you right inside Windows 11 desktop, now take note that this is not Windows 11, it is a simulation of Microsoft’s newest OS and therefore many things will not work like File Explorer, etc. One thing you can make sure it is working is UI itself, you can see how you do like the new Taskbar, start menu, widgets, and some other things. You can just pop up on the site and check how you do like the overall new look and feel of Windows 11 UI before installing it or trying it. We are sure that many more options will come in time but even now you can get a feel of the newest OS. Windows 11 BlueEdge site: https://win11.blueedge.me/
Read More
Fix Bugcode 0xA – IRQL_NOT_LESS_OR_EQUAL
Interrupts are designed so that the resource requests don’t get into a headlock when it comes to the hardware level. To simply put it, it is used to break a loop that never ends. Aside from that, developers also designed levels in order to prioritize interrupts. It is also known as “Interrupt Request Level” or IRQL. And if you suddenly encounter a “Bugcode 0xA –IRQL_NOT_LESS_OR_EQUAL” error, this means that a driver has accessed a memory location illegally while NT is operating at a specific IRQL. The Bugcode 0xA –IRQL_NOT_LESS_OR_EQUAL is a fatal driver coding error and as an end-user, there isn’t much that you can do to resolve it but if you’re a developer, then this means that your code is trying to access an invalid memory location. You could check on different parameters such as memory location that was referenced and code addressed which referenced memory. The technical parameters are:
  • a memory location that was referenced
  • IRQL at time of reference
  • 0 = read, 1 = write
  • code addressed which referenced memory
As mentioned earlier, if you are an end-user, there is nothing much that you can do to resolve this problem, but worry not for there are still possible solutions that could help you in fixing it. Refer to the suggestions laid out below to fix Bugcode 0xA –IRQL_NOT_LESS_OR_EQUAL error.

Option 1 – Try running the Hardware and Devices Troubleshooter

The first thing you can do to fix the problem is by running the Hardware Troubleshooter. Although it won’t make much of a difference, there’s still a possibility that it could automatically fix the problem. To use it, refer to these steps:
  • The first thing you need to do is click on Start and then on the gear-like icon to pull up the window for Settings.
  • After opening Settings, look for the Update and Security option and select it.
  • From there, go to the Troubleshoot option located on the left-hand side of the list.
  • Next, select Hardware and Devices from the list and open the Troubleshooter and run it. Once it is doing its job, wait for it to complete the process and then restart the system.
  • After the system restarts, check if the problem’s now fixed. If not, refer to the next option given below.

Option 2 – Try to update or rollback your device drivers

If the first option didn’t work for you, then it’s time to either update or roll back the device drivers. It is most likely that after you updated your Windows computer that your driver also needs a refresh. On the other hand, if you have just updated your device drivers then you need to roll back the drivers to their previous versions. Whichever applies to you, refer to the steps below.
  • Open the Devices Manager from the Win X Menu.
  • Then locate the device drivers and right-click on them to open the Properties.
  • After that, switch to the Driver tab and click on the Uninstall Device button.
  • Follow the screen option to completely uninstall it.
  • Finally, restart your computer. It will just reinstall the device drivers automatically.
Note: You can install a dedicated driver on your computer in case you have it or you could also look for it directly from the website of the manufacturer.

Option 3 – Run the Memory Diagnostic Tool to check for Memory leaks

  • Tap the Win + R keys to open Run and type exe and hit Enter to open the Windows Memory Diagnostic Tool.
  • After that, it will give two options such as:
    • Restart now and check for problems (Recommended)
    • Check for problems the next time I start my computer
  • Once your computer has restarted, perform a basic scan or you could also go for the “Advanced” options such as “Test mix” or “Pass count”. Simply tap the F10 key to start the test.
Note: After you select the option, your PC will restart and check for memory-based issues. If it finds any issues, it will automatically fix them and if there’s no issue found, then it’s most likely not a memory-based issue so you should try the other options given below.
Read More
1 2 3 171
Logo
Copyright © 2023, ErrorTools. All Rights Reserved
Trademark: Microsoft Windows logos are registered trademarks of Microsoft. Disclaimer: ErrorTools.com is not affiliated with Microsoft, nor claims direct affiliation.
The information on this page is provided for information purposes only.
DMCA.com Protection Status