
Google Chrome is the most used browser in the world with the most user downloads. Most users are using browsers how it is, open it up and just surf but Chrome offers more than just plain surfing. Here we are presenting you with some interesting features that most users do not use but should.

Use Omnibox to search inside websites
Chrome's Omnibox, also known as the address bar got its name because it can do much more than just search the internet. You already probably know that just by typing any word you will search the internet with Google or another search engine of choice.
You can also set specific keywords inside Chrome settings to tie them with specific websites, for example, you can tie the letter E with errortools, and then just by typing E windows error you will search term windows error on website errortools. There are some already predefined things and you can add anything you want so this is a great feature in order to speed up your work skipping part of actually opening the site.
Search the internet for selected text
On any webpage, you can simply select any text and right-click on it to get a new menu entry that will say search Google for "your selected text" and by clicking on it you will automatically search the net for the selected term.
Grouping tabs
When we surf the internet some of us tend to have plenty of open tabs and over time they can clutter and shrink in width making the surfing experience an unpleasant one.
Chrome has tab groups and you really need to start using them since you can organize much better all the tabs, even color-code them.
Search all open tabs
On top right part on title bar right next to minimize button there is small arrow pointing down, once you clik on it all opened tabs will be displayed by name as a listand by clicking on it you will automatically switch to it.
Change download location
Google Chrome has its default download destination but you can change that destination and even turn on option to be asked where you would like your download to be saved each time.
Live Captions
YouTube has cations for its videos but Chrome itself has live caption option in order to provide you with automatic AI captions for any type of video or audio on any website. If you are struggling with following what is being said try this awesome option.
Extensions
Using extensions in Chrome is awesome, specialy if extensions are usefull but if you go incognito they are not active. There is an option in Chrome to turn on the extensions even in incognito mode and even better, you can even choose which ones you want to be active, you do not need to turn all of them.

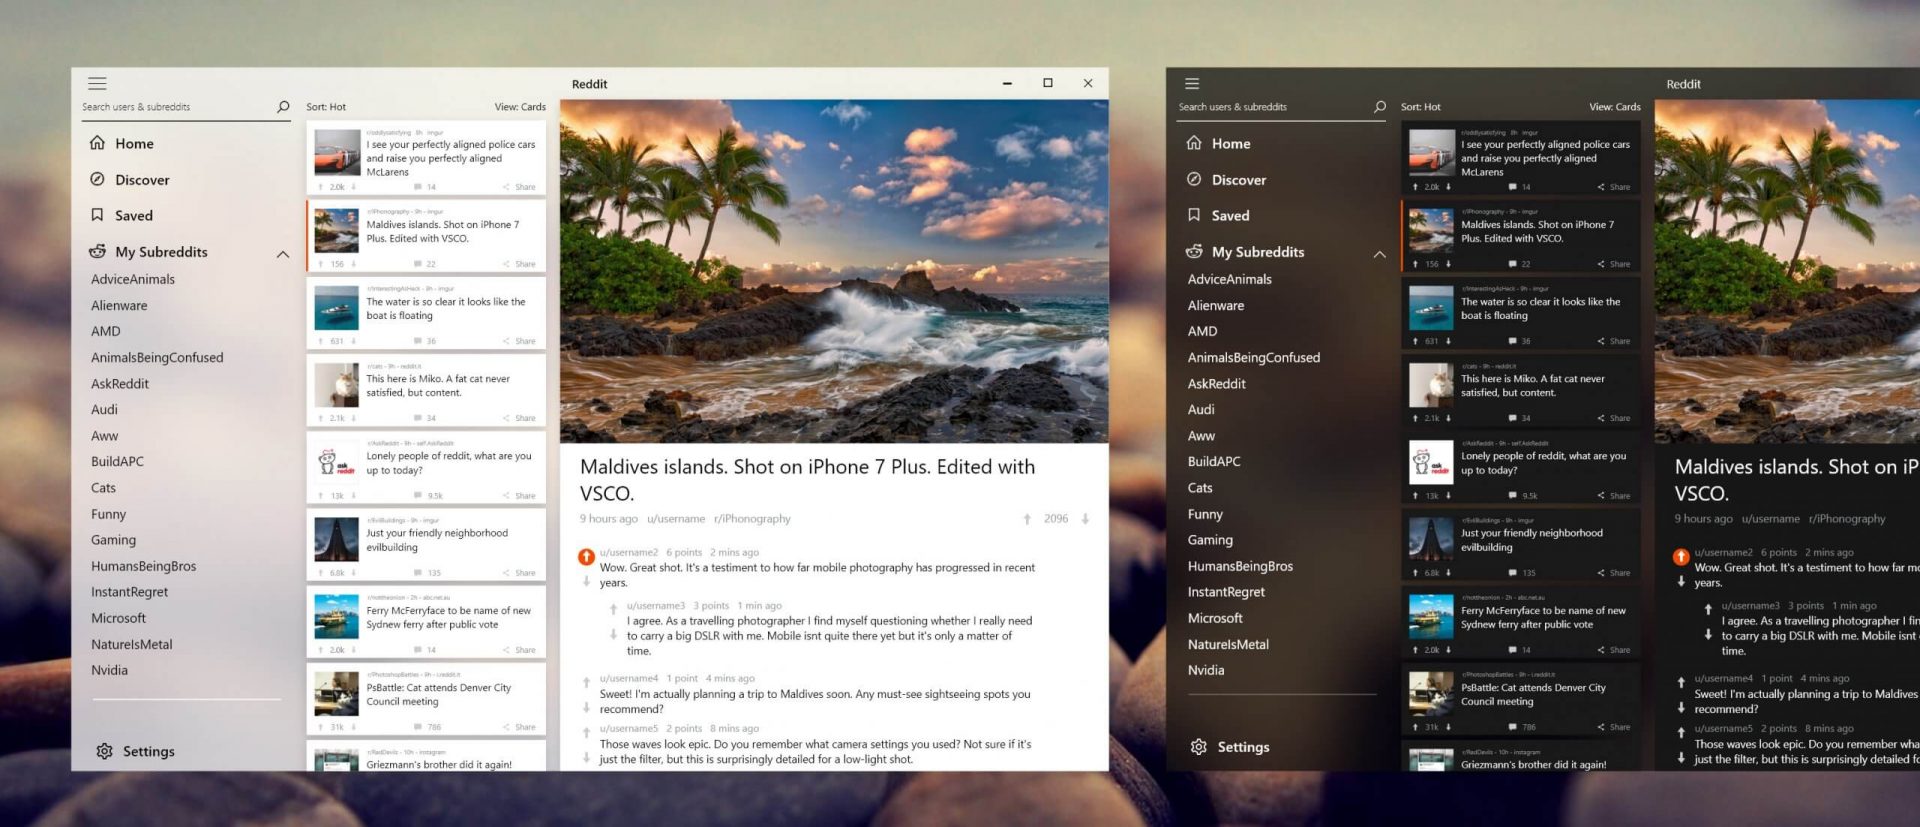 Reddit is one of the most popular websites in the world and how Microsoft is opening doors to everyone in its new store Reddit took a logical step and made a Progressive web application and placed it in it.
Being a Progressive web app makes it more familiar and feels like a home experience using it for a lot of Reddit users.
Reddit itself has a large community and active topics discussions all the time about anything. Bringing it to Windows as an application is, in my opinion, a great move since as an application it is independent, more light-weighted, and offering some other advantages specifically tied to being a standalone windows application.
Everyone familiar with and using the Reddit website will feel right at home in this app and you can start using it right away.
Reddit is one of the most popular websites in the world and how Microsoft is opening doors to everyone in its new store Reddit took a logical step and made a Progressive web application and placed it in it.
Being a Progressive web app makes it more familiar and feels like a home experience using it for a lot of Reddit users.
Reddit itself has a large community and active topics discussions all the time about anything. Bringing it to Windows as an application is, in my opinion, a great move since as an application it is independent, more light-weighted, and offering some other advantages specifically tied to being a standalone windows application.
Everyone familiar with and using the Reddit website will feel right at home in this app and you can start using it right away.  The Clear Linux Project creates an operating system and software stack that offers highly optimized performance, security, versatility, and manageability.
Clearly optimized for Intel CPUs and based on GNOME it will offer you incredible speeds if you are on Intel CPU.
The big news, though, is that Clear Linux sports the shiny new Gnome 40. This is a fresher Gnome than you'll find even on Ubuntu's more experimental 21.04 release. The only big names that let you test drive Gnome 40 are Fedora and Arch Linux.
The Clear Linux Project creates an operating system and software stack that offers highly optimized performance, security, versatility, and manageability.
Clearly optimized for Intel CPUs and based on GNOME it will offer you incredible speeds if you are on Intel CPU.
The big news, though, is that Clear Linux sports the shiny new Gnome 40. This is a fresher Gnome than you'll find even on Ubuntu's more experimental 21.04 release. The only big names that let you test drive Gnome 40 are Fedora and Arch Linux.
 Windows 11 is coming soon, from its typical view and color scheme, Windows 11 will natively support dark mode.
The dark mode is very popular in many applications today, some large companies like Adobe, Autodesk, and many more have already adopted a dark color scheme for their software so it is logical for others to follow and Microsoft is aboard for it.
The dark mode itself has its benefits, for people who work on computer for longer period of time dark mode inside applications will throw less white and blue light on their eyes making workhours easier and pleasant on them.
As a person who does indeed spend a lot of time in front of the screen, I would advise you to switch to dark mode regardless of the time that you spend with a computer, your eyes will be grateful.
Windows 11 is coming soon, from its typical view and color scheme, Windows 11 will natively support dark mode.
The dark mode is very popular in many applications today, some large companies like Adobe, Autodesk, and many more have already adopted a dark color scheme for their software so it is logical for others to follow and Microsoft is aboard for it.
The dark mode itself has its benefits, for people who work on computer for longer period of time dark mode inside applications will throw less white and blue light on their eyes making workhours easier and pleasant on them.
As a person who does indeed spend a lot of time in front of the screen, I would advise you to switch to dark mode regardless of the time that you spend with a computer, your eyes will be grateful.
 Parallels is an application developer for MAC OS mostly known for its PC virtualization software Parallels Desktop, a PC virtualization software running on Macs enabling running Windows and Linux with respective software on your MAC.
With its latest Desktop 17 version, the software can run natively on both Intel-based and M1-based MACs. Thanks to this feature MAC users will be able to benefit from various speed improvements while running both Windows 10 or Windows 11 preview.
On both Intel and M1 setups, Parallels resumes Windows and Linux up to 38% faster, provides an up to 25% bump in 2D graphics and a six-time increase in OpenGL graphics processing. M1-centric stats include 33% faster Windows start-up times, up to 28% faster DirectX 11 performance, and up to 20% better disk performance on Windows 10 Insider Preview.
Parallels Desktop 17 delivers a set of fresh features including a new video driver that enhances video and game playback and boosts Windows UI responsiveness. An improved Coherence mode lets users run Windows apps within the Mac environment, cutting down on distracting changes in appearance during Windows sign-in, shut down, and software updates.
Drag-and-drop operations are also improved, with support for text and graphics between Mac and Windows applications. This function works well with MAC OS Monterey's Quick Note feature, which can accept content from any Windows app.
USB support, disk management, copy and paste unformatted text, and automatic virtual machine optimization also receive upgrades.
Parallels is an application developer for MAC OS mostly known for its PC virtualization software Parallels Desktop, a PC virtualization software running on Macs enabling running Windows and Linux with respective software on your MAC.
With its latest Desktop 17 version, the software can run natively on both Intel-based and M1-based MACs. Thanks to this feature MAC users will be able to benefit from various speed improvements while running both Windows 10 or Windows 11 preview.
On both Intel and M1 setups, Parallels resumes Windows and Linux up to 38% faster, provides an up to 25% bump in 2D graphics and a six-time increase in OpenGL graphics processing. M1-centric stats include 33% faster Windows start-up times, up to 28% faster DirectX 11 performance, and up to 20% better disk performance on Windows 10 Insider Preview.
Parallels Desktop 17 delivers a set of fresh features including a new video driver that enhances video and game playback and boosts Windows UI responsiveness. An improved Coherence mode lets users run Windows apps within the Mac environment, cutting down on distracting changes in appearance during Windows sign-in, shut down, and software updates.
Drag-and-drop operations are also improved, with support for text and graphics between Mac and Windows applications. This function works well with MAC OS Monterey's Quick Note feature, which can accept content from any Windows app.
USB support, disk management, copy and paste unformatted text, and automatic virtual machine optimization also receive upgrades.