In case you don’t know, a teletype network, also known as Telnet, is a protocol that is meant for internet or LAN communication which is used primarily to control other computers effortlessly. And it is available as a command-line utility in Windows and helps users in opening a command-line interface for the remote computer. However, a lot of users have reported an error that states, “Telnet is not recognized as an internal or external command, operable program, or batch file” when you try to use it. If you are one of these users, then you’ve come to the right place as this post will guide you on how to fix this error in Windows 10.
This kind of error means that the Telnet utility is not installed on your computer but Telnet is a default feature in Windows 10 so the protocol mainly is not enabled yet. The Telnet client is disabled by default in Windows 10 and to fix this error, you can try to enable the Telnet Client via Programs and Features or try to install Telnet using an elevated Command Prompt.
Option 1 – Try to enable the Telnet Client via Programs and Features
The first thing you can do is to enable the Telnet client using Programs and Features since it is disabled by default. To do that, follow the steps below.
Tap the Win + R keys to open the Run dialog box and type “appwiz.cpl” in the field and hit Enter to open the Programs and Features window.
Next, select the “Turn Windows features on or off” from the options given on the left-hand side.
After that, look for the Telnet client from the list and check the checkbox next to it and then click on OK to save the changes made.
Now restart your computer.
Option 2 – Try to install Telnet via an elevated Command Prompt
If enabling the Telnet client using Programs and Features didn’t work, then you can try to do it using Command Prompt instead. To get started, follow the steps given below.
In the Windows Search bar, type “command prompt” in the field and right-click on Command Prompt from the search results, and select the “Run as administrator” option.
Next, execute this command to enable the Telnet client: dism /online /Enable-Feature /FeatureName:TelnetClient
Once the command has been executed, close the Command Prompt and restart your computer.
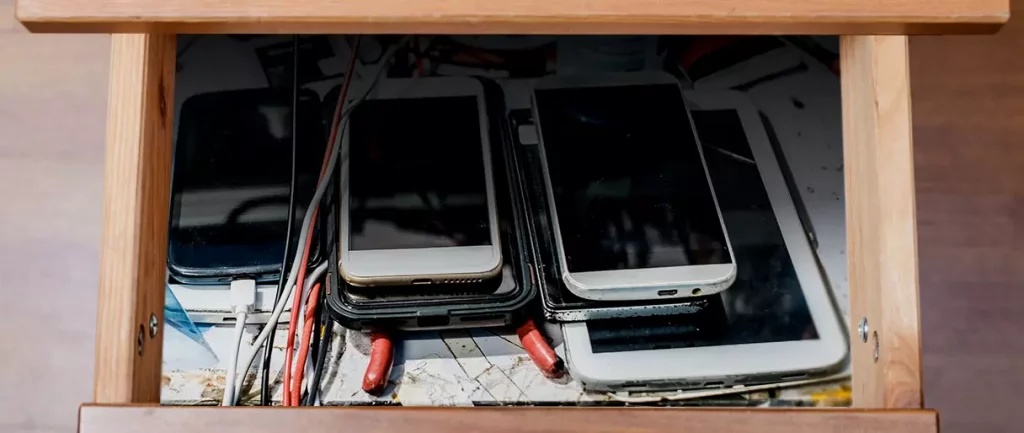
Hello all the wonderful people and welcome to our new article where we take a little different turn than usual and discuss why keeping old electronics around the house is not such a good idea. We all have some drawer or in some bag around the house and in the end of the day if that electronic has battery inside it is probably not the smart thing to keep it.
So naturally, the question comes why it is a bad idea to have old electronics with batteries in them? Well unlike a battery failure with, say, some AA batteries jammed in the back of an old toy, the risk with a lithium-ion battery failing isn’t just some leaking and corrosion in the battery compartment, it’s a potential fire as the battery swells up and the gases (combined with the stored energy) turn the battery into a potential fire hazard.
Good thing is that the battery will not explode just like that, it will swallow over time and get bigger and bigger until the breaking point is reached and all the fire breaks lose. So if by any chance you have some old gadgets lying around you can check up on them and see if has swelling process started, if yes, dispose properly of that piece of the old device immediately.
How to keep old electronics
If you’re not ready to get rid of the gadget then it’s best to charge it properly for storage. Proper charging keeps the battery cells and circuits in optimum health.
While recommendations vary by manufacturer and application, the general consensus is that lithium-ion batteries should be charged to approximately 40%. (Some manufacturers recommend charging 50% or 60% instead.)
Really, the important part here isn’t the exact percentage. What’s important is ensuring that the battery is charged to roughly half capacity and not stored with a completely discharged or completely full battery.
Discharge rates on lithium-ion batteries in completely powered-off devices are very slow, but you should still plan to top off the charge every 12-18 months or so to keep it around 50%.
If you wanted to go above and beyond, a metal storage container with a snug lid on a basement shelf with a desiccant pack inside to control the moisture would offer optimum conditions.
Error Code 0x80240001 usually occurs in Windows 10 and is specific to the process of updating your system. It is similar to an error code found in previous versions of the software during the update process. There are a number of steps that can be taken to solve this error code, most of which are fairly easy for the average user to undertake.
Common symptoms for this particular error code include:
Inability to complete the updating process of your Windows 10 system
A notice that the Windows Update Agent is not able to provide appropriate services through the update module.
While it can be frustrating to have this message appear during the update process, users can resolve the error in a number of ways. However, if you are not confident in your ability to follow the steps below or if the methods listed fail to resolve the problem, contact a certified Windows 10 repair technician to assist you in the process.
Solution
Error Causes
Error Code 0x80240001 occurs when the Windows Update tool is unable to complete its service successfully. This error occurs most often when users attempt to update to Windows 10 from older versions of the software, including Windows 7, 8, or 8.1.
This particular error code can also occur when your system has not been updated in a regular fashion. Stacked updates make it more likely for Error Code 0x80240001 to occur.
In most cases, when Error Code 0x80240001 appears on your screen, the update process will be halted. Sometimes, the screen may display a single color background, removing the appearance of all other windows and applications.
Fortunately, there are several methods that you can use to attempt to circumvent the problem and see the update process through to completion.
Further Information and Manual Repair
While it can be frustrating to deal with an error when you attempt to update your Windows software, there are several ways that you can seek to resolve the issue that causes Error Code 0x80240001. These steps are relatively simple to complete and do not require advanced techniques to be used. However, if you are not confident in your ability to complete the steps listed below, enlist the aid of a qualified Windows technician to help you.
Here are the most common ways that Error Code 0x80240001 can be resolved for Windows 10:
Method One: Download and Use the Windows Repair Tool
From the Windows website, you can download the Windows Repair tool, if it is not already installed on your computer. While there are other tools available through outside sites that claim that they can resolve this error, in many cases, they can be a carrier for viruses and other kinds of malware, so it is inadvisable to use non-Windows tools to fix this particular error code.
Once you have successfully added the Windows Repair tool to your computer, open it up and look for the option to run “Repair Windows Update.” Using this process, your system can search for and resolve the error, allowing you to successfully run the update tool through to completion.
Method Two: Uninstall Recently Added Software
In some cases, software that has been recently added to a non-updated computer can cause the update process to experience issues. If you believe that this may have occurred in your case, simply uninstall the software in question, then attempt to run the Windows 10 Update process again.
The best way to prevent this error from reoccurring when you seek to update your Windows 10 system is to apply updates within a short period of time from their release date. It is recommended that users update regularly, which can allow them to avoid a number of issues that are common to the update process.
If you have any difficulty in resolving Error Code 0x80240001 after you have attempted these steps, you may need to enlist the help of a qualified technician who is familiar with the specific errors related to the Windows 10 Update process. This can especially be helpful if you have recently installed a number of new kinds of software and are unsure of whether or not any specific one may be causing your issues. If you wish to always have at your disposal a utility tool to fix these Windows 10 and other related issues when they do arise, download and install a powerful automated tool.
In today's IT world, if you want a computer for typical day-to-day actions and gaming, there are 3 primary ways you can go. An Apple computer with its proprietary hardware and operating system or a typical machine with Windows or Linux operating system.
Each system has both advantages and disadvantages and picking the right one might be difficult for some users. From hardware differences to specific software and operating system, each system is aimed at a different type of work, and in this article, we will explore each one and help you in choosing the right one for you.
Apple ecosystem
Apple has managed to create a unique ecosystem of its own devices, from its iMac desktop computers to more professional MAC studio and power MAC and all the way to tablet iPad and iPhone are powered by Apple's own operating system that connects all of these devices into one large system. So if you really need one singular ecosystem this is a huge advantage.
The ecosystem on the side, MAC computer systems are great, some would argue best for coding, design, video work, and sound editing. MAC M2 chip is optimized for all of these tasks and a specially tailored operating system is just the icing on the cake. Specific Apple-made software like a logic pro or final cut also helps a lot to position MAC systems on top of the line.
Reading all of this you might think hey this is the computer for me, it does everything! Sadly the truth is not like that. The first thing that is difficult on MAC systems and a maybe big reason that it is not so adopted outside professional working environment is lack of games. If you are a gamer or plan on using MAC for gaming, well I have some bad news. The second big turn-off is that MAC systems tend to be more expensive than PC systems, yes components are of higher quality but rest assured that you will pay for also for branding.
Get MAC as your workstation for serious work and for good tech support, if you need a plain home computer keep reading.
Windows PC machine
There is no better feeling than assembling your own computer, tweaking hardware to make a monster and despite haters hating, Windows is the best all-around operating system on the market. It is supporting the largest variety of hardware and the largest variety of software.
The best platform for serious gaming and streaming Windows machine has cemented itself as a multimedia powerhouse. But, this kind of computer is not alien to being also a professional machine, you can practically do everything that you can do on Apple or Linux machine inside Windows, yes some things might require extra steps or will be slightly slower but in the end, being able to do anything is the greatest strength of Windows machine.
Of course, every system has its flaws and Windows is not immune to that. One of the biggest is being the operating system for every hardware ever made and every software as well while keeping legacy support for old software and hardware, basically, its biggest strength is in the same time its biggest weakness leading to sometimes stability issues. Also being able to place any kind of hardware can also lead to the same stability issues. Executing something a little slower than other systems and having some extra steps can also be looked upon as weaknesses.
Linux system
First and perhaps for some people, the biggest advantage of the Linux operating system is its price, it is completely free! Other advantages include the great server and networking included in the OS itself, the large amount of customization, and unmatched stability. The ability to write scripts inside the OS terminal is also a great thing and coding is much more streamlined and friendlier than on other machines.
The power of Linux is the ability to change anything, even on the system layer, no other operating system will let you change the basic functionality of the OS itself while Linux will let you do this. It is also the only operating system you can fully use by booting it up from a USB stick and having the same experience as it was installed on a local hard drive. Among other OS mentioned earlier, Linux is by far the lightest one, taking the smallest amount of memory among the three.
The bad side of the Linux machine is the steep learning curve, among the three mentioned operating systems rest assured Linux is the most difficult to learn and be comfortable in it. The operating system will require you to know the hardware and how computers work in order to fully use its potential. Other things that place it behind are not so wide hardware support compared to Windows and the somewhat confusing distro model.
Linux versions come in form of different distro packages and first-time users will face many of them being left in awe of which one to choose. Also installing drivers and software via a package system can also be a tedious task as well, often being that some version of the driver will not work on the newer version of the Linux distro.
Get a Linux machine if you are well versed in computer technology, if you want great customization of the OS itself or if you do not want to spend money on OS and software since almost entire Linux software is open source.
If you are typing inside the Search bar, Cortana, Taskbar, Windows 10 apps, etc., and then everything seems invisible then read on as this post will guide you in fixing this issue. At first, you might think that something is wrong with your keyboard but it really has nothing to do with it. The problem actually lies with the apps from Microsoft Store. Thus, if you can’t type anything in any of the apps from Microsoft Store in Windows 10, refer to the options given below to fix them.
Option 1 – Ensure that ctfmon.exe is running
Ctfmon.exe is a Microsoft process in Windows 10 that controls the Alternative User Input as well as the Office Language bar. In other words, it enables end-users to control the computer using on-screen keyboard inputs, speech, and even pen for various languages. It would be better if you launch the program once by going to the C:/Windows/system32 folder. Doing so will ensure that whatever API is needed for the keyboard typing to work properly again. You also have to make sure that its startup status is not disabled. In addition, you can also try the following steps, alternatively.
Open the Task Scheduler.
Then go to Microsoft > Windows > TextServicesFramework.
And on the MsCtfMonitor, right-click and enable the task.
Now restart your computer.
This will ensure that all the text boxes will start to work again. And if the task MsCtfMonitor is missing from the list of tasks, you can import it with the XML file from basics.net. Then download and create a task to run it each time you log in to your PC.
Option 2 – Use the Windows Store Apps Troubleshooter
You might also try running the Windows Store Apps Troubleshooter as it can help in resolving issues with the Windows Store apps. This built-in tool can resolve most of the app-related problems. To use it, go to Settings > Update & Security > Troubleshooting > Windows Store Apps and from there, click the start the troubleshooter button. The Windows Store Apps Troubleshooter will scan the computer for any issues with the Windows store apps and will automatically fix them if it finds any.
Option 3 – Re-register all the Windows 10 UWP apps using PowerShell
First, make sure to close all the running applications on your computer.
Next, in the Start search, type in PowerShell and right click on the result, and select the “Run as administrator” option.
After that, type the following commands to re-register the Windows 10 apps. Make sure to hit Enter on each line:
You can also run the DISM Tool as it helps in repairing the Windows System Image as well as the Windows Component Store in Windows 10. Using this built-in tool, you have various options such as the “/ScanHealth”, “/CheckHealth”, and “/RestoreHealth” which could help in fixing the problem.
Open the Command Prompt with admin privileges.
Then type in the following commands and make sure to hit Enter right after you type each one of them:
Dism /Online /Cleanup-Image /CheckHealth
Dism /Online /Cleanup-Image /ScanHealth
exe /Online /Cleanup-image /Restorehealth
Do not close the window if the process takes a while as it will probably take a few minutes to finish.
Option 5 – Run the System File Checker Scan
System File Checker or SFC is a built-in command utility that helps in restoring corrupted files as well as missing files. It replaces bad and corrupted system files to good system files. To run the SFC command, follow the steps given below.
Tap Win + R to launch Run.
Type in cmd in the field and tap Enter.
After opening Command Prompt, type in sfc /scannow
The command will start a system scan which will take a few whiles before it finishes. Once it’s done, you could get the following results:
Windows Resource Protection did not find any integrity violations.
Windows Resource Protection found corrupt files and successfully repaired them.
Windows Resource Protection found corrupt files but was unable to fix some of them.
Bad_Pool_Header is one of the types of BSOD (Blue Screen of Death) error codes. This error triggers a problem with Windows memory allocation.
When this error message occurs, the screen turns blue and locks the user out of the application running on the system. The computer shuts down or restarts.
Solution
Error Causes
There is no one particular cause for the occurrence of the Bad_Pool_Header error code. It may appear on your system due to multiple reasons such as:
Device driver issues
Cluttered disk
Disk writing issues
Faulty memory hardware
Driver issues and disk writing issues occur when your try to update new driver versions.
During this process, users often forget to remove the files of the uninstalled version from the registry. And due to the presence of the uninstalled driver files in the registry updating and disk writing becomes an uphill task which leads to the Bad_Pool_Header display on the computer screen.
The main database of your system is the registry so you need to keep it clean to avoid disk cluttering. The hard disk clutters because the registry saves all the activities that you perform in your system. It saves junk files, internet history, invalid entries, and other unnecessary files.
This occupies a lot of your disk space thus resulting in disk cluttering and faulty memory hardware issues triggering the Bad_Pool_Header.
Ignoring the Bad_Pool_Header error is not wise. It is advisable to repair the Bad_Pool_Header right away as it can lead to serious threats like system failure and data loss.
Further Information and Manual Repair
The easiest, time and money-saving way to resolve the Bad_Pool_Header error on your system is to install Restoro.
This is a high and multi-functional repair tool that features a powerful inbuilt registry cleaner, anti-virus, and a system optimizer. This tool is the one-stop solution for all your PC-related errors including the Bad_Pool_Header blue screen of death error.
Whether it’s a driver issue, faulty memory, or cluttered disk, all the causes triggering the Bad_Pool_Header error code fall under the registry which is why it is recommended to install Restoro.
Its innovative and powerful registry cleaner scans detect and repair all the errors related to the registry in one go including the Bad_Pool_Header errors.
With this helper, you can easily remove all the unnecessary files cluttering your hard disk and damaging your registry. It wipes out the clutter in seconds and frees up disk space.
Why Should You Clean The Registry?
Sometimes the registry also gets cluttered by malicious software like viruses, spyware, and malware. These may also take up your disk space and prevent you to perform disk writing successfully and also corrupt the registry.
The privacy error finding utility embedded in Restoro helps you scan for such malicious software on your system and removes them immediately. It lends the software anti-virus properties.
When it comes to using repair tools, many users who are not technically sound often worried.
They think it may be difficult to operate. If you think the same way, let us tell you that Restoro is very easy to use. It is integrated with a high-functional yet user-friendly interface complemented by simple navigation.
Restoro Special Features
This makes it simple for all levels of users to operate it regardless of whether they are technically adept or not.
Restoro is compatible with all Windows versions. You can download it with ease and run it for scans on any Windows version you have installed on your system.
To get started, all you have to do is:
Error 0x80070057 is a typical Windows 7 error code.
It may occur when you try to back up files by using Windows Backup on Windows 7 and the backup fails. The error message is often displayed as the following:
“An internal error has occurred: The parameter is incorrect: (0x80070057)”
Besides this, you may also experience this error message when you format a hard disk drive to install Windows 7.
Solution
Error Causes
The error 0x8007005 occurs due to multiple reasons. However, the most common causes for this error code include:
The partition that is reserved for the system is damaged
Misconfigured registry keys
Misconfigured decimal symbol settings
Further Information and Manual Repair
Here are some of the best and easy DIY methods to resolve the error 0x80070057 on your PC.
Solution 1: Change the Decimal Symbol Setting
As mentioned above the error 0x80070057 sometimes can be triggered by misconfigured decimal symbol settings. Therefore, try changing the settings to fix the problem. The error is likely to occur if the decimal symbol is not set to ‘.’ (dot).
This is common in languages and locales other than English such as German.
Here’s what you need to do to change the decimal symbol setting:
First, open the Control Panel, click the clock, then language, and then region.
Now click the formats tab and go to the additional settings menu.
Here you will find the decimal symbol field, now type "." (dot) and then click OK twice.
After that, you must restart your PC to activate the changes.
Solution 2: Create a New Partition and Reinstall Windows 7
If the error 0x80070057 is linked to partition damage, then this method is the best way to resolve it. Here’s what you need to do:
Insert the Windows 7 DVD and start the installation.
Select your language preference to install. Here you will see a screen of the Microsoft License Agreement. Click on the I accept option to proceed with the installation process.
Then click next.
Choose a custom advance option and select the Disk O partition 1 option.
Once selected, click delete. When you do this you will be prompted if you want to confirm the deletion, click OK to continue.
Now repeat the same however now select Disk O partition 2.
Delete this partition as well. Now click New to create a new partition. Here define the disk size and then click apply. Please note, the size of the default value is the maximum size of the disk.
After doing so, select disk 0 partition 2 and then click the formatting tab. Once the formatting is complete, click next to continue Now you will be able to complete the installation of Windows 7 on your PC without any problem.
Solution 3: Add a Registry Key Value
If the underlying cause of the error 0x80070057 is a registry issue, then it is serious as such issues can put your PC at serious risks like system failure, crash, and data loss.
To resolve this error and add a registry key value here’s what you need to do:
Go to the start menu and type Regedit.exe in the search bar and then press enter. Locate and click the following registry sub-key:
HKEY_LOCAL_MACHINESOFTWAREPoliciesMicrosoftSystem. Once you locate it, now go to the edit menu and point to new, and then click DWORD Value. After that, type CopyFileBufferedSynchronousIo and press enter again. Right-click now on the text you just typed and then click Modify.
In the Value data box, type 1 and then click ok and exit the registry editor.
This will fix the error on a temporary basis but not permanently. However, a long-term solution is to clean and repair the registry.
Solution 4: Restoro
The registry gets cluttered with unnecessary and redundant files like junk files, cookies, internet history, and bad registry keys. If these are not removed timely, they can damage the registry and corrupt DLL files. It often leads to disk fragmentation (disk partition) too.
To remove these files immediately, clean and restore the registry and repair the corrupt files, it is advisable to download Restoro.
Why Restoro
This is an advanced and highly functional Registry Cleaner. It is deployed with a cutting-edge and intuitive algorithm that scans your entire PC to detect all registry issues in seconds. It cleans the cluttered disk and restores the registry back to normal.
It is safe, bug-free, and efficient. This software is easy to use and compatible with all Windows versions.
In addition to this, it is also deployed with several other powerful utilities like an antivirus that detects all malicious software and removes them right away. It also functions as a system optimizer and boosts the speed of your PC significantly.
Click here to download Restoro and resolve error 0x80070057 now!
The Recycle Bin is undeniably an important place to make files ready for deletion. To put it simply, it assumes some importance but there are times when it displays an unpredictable behavior. For instance, it just suddenly goes missing and even Cortana is unable to find it. A lot of users have experienced the missing Recycle Bin issue in their Windows 10 computers. If you are one of these users, you might have wondered where the Recycle Bin icon has gone and how you can get it back. Worry not, as this post will provide you a couple of options you can try to bring back Recycle Bin in your Windows 10 computer.
Follow the given options below to get started.
Option 1 – Try to restore Recycle Bin
It could be that you have disabled the Recycle Bin by accident which is why Windows was not able to show it on your desktop. To restore Recycle Bin, follow these steps:
First, click on the Start button and select Settings.
Next, select the Personalization setting and then select Themes from the left pane.
After that, click on the “Desktop icon settings” link under the “Related Settings” heading. This will display a list of icons in the Desktop Icons window.
From there, make sure that you check the checkbox for “Recycle Bin” to make it appear on your Desktop screen once again.
Option 2 – Try to recreate the Recycle Bin
If the first option didn’t work, then it could be that Recycle Bin might have been deleted which is why you fail to restore it. And to resolve this problem, you need to recreate Recycle Bin. Refer to the following steps to do so:
You need to launch the Windows File Explorer first and go to the View tab.
From this tab, select Options and click on the drop-down arrow and then select the “Change folder and search option”.
Afterward, switch to the View tab when the Folder Options window appears on your screen and select the “Show hidden files, folders, and drives” option.
And then unmark the checkbox next to the “Hide protected operating system files (Recommended)” option and click on both the Apply and OK buttons, respectively.
Next, go back to the File Explorer and click on “This PC” located on the left bar and go to the C: drive.
From there, you will find a file named “$Recycle.Bin” located at the top.
Open this folder to access its contents and you should see the Recycle Bin icon located at the top.
After that, right-click on the Recycle Bin icon and click on the “Send To” option and then click on “Desktop (create shortcut)”.
It will then confirm and recreate the Recycle Bin icon on your Desktop screen.
Note: Even though this icon is quite similar to the original one, it actually differs from it. The difference is that you won’t see if fill up when you delete files and you can’t simply empty it by right-clicking on the shortcut. On the other hand, you can still drag items into it just like with the original one. So when you want to empty the content of the newly restored Recycle Bin, you just have to double-click on the shortcut and right-click on the recycle bin in the window that appears, and select the “Empty Recycle Bin” option. In addition, now that you’ve set up the Recycle Bin shortcut, you have to re-activate the “Hide protected operating system files” to keep the important files and folders in your computer hidden.
Option 3 – Try to repair the Recycle Bin
If both the first two options failed to restore the missing Recycle Bin, then you can try repairing it instead. There are times when the Recycle Bin is removed from the Desktop screen due to some corrupted Windows system files. To fix these corrupted system files, you can run the DISM tool. This tool is known to repair potentially corrupted files in your system as having them could also system issues like the missing Recycle Bin. To repair these corrupted system files, you can run the DISM commands:
Tap the Win + X keys and click on the “Command Prompt (Admin)” option.
After that, input each one of the commands listed below sequentially to execute them:
Dism /Online /Cleanup-Image /CheckHealth
Dism /Online /Cleanup-Image /ScanHealth
Dism /Online /Cleanup-Image /RestoreHealth
Once you’ve executed the commands given above, restart your computer and check if the problem is now fixed.
Option 4 – Make sure that you are not in Tablet Mode
Since Windows 10 is designed to work on both desktop and mobile devices, it could be that your computer has slipped into Tablet Mode which explains why you’re not seeing the Recycle Bin. To check if your computer is really in Tablet Mode, follow these steps:
Go to the Start menu and select Settings.
Next, select the System setting and from the left pane select the Tablet Mode.
From there, make sure that the buttons next to the options given below are set to the off position:
Lately on EA forums question has appeared on what to do when Origin client does not load library. It seems that the latest update for the Origin client has brought some issues as not properly showing one library which appears empty.
Do not worry, we have a solution for you, several to be precise and it will fix the issue guaranteed. It is advisable to try solutions in order how they are presented since they go from the most simple and fastest and most common ones.
Delete the cache
Close origin client completely
Press ⊞ WINDOWS + R to bring the run dialog
In the run dialog type in %ProgramData%/Origin and press ENTER
Go into the Origin folder
Delete all files and folders except the LocalContent folder
Press ⊞ WINDOWS + R to bring the run dialog
In the run dialog type in %AppData% and press ENTER
Delete the Origin folder
In the address bar click on AppData
Go into the local folder
Delete Origin folder
Reboot your PC
Clear the temporary files
Press ⊞ WINDOWS + R to bring the run dialog
In the run dialog type in %AppData% and press ENTER
Go into the roaming folder
Delete Origin folder
Go to the AppData folder and delete the Origin folder from there also
Reboot system
Try Windows built-in tools to check compatibility
Locate where Origin is installed and right-click on the executable file
Click on properties
Go to the compatibility tab
Click on Run the compatibility troubleshooter and follow on-screen instructions
Update Origin
Rarely this is the case but check manually to see if you can update your Origin client. Sometimes due to network issues client does not update automatically and can cause this strange behavior.
Add origin as an exception to antivirus and firewall
Not rarely game clients can be detected as some form of malicious software and antivirus along with firewall can automatically block it. Go to your security software settings and add it as the exception.
Reinstall Origin
If everything else fails, reinstall the Origin client
As of late, users have been reporting about getting an error saying, SAFE_OS phase error during Replicate_OC operation when they tried to upgrade their Windows 7 or Windows 8.1 computers to Windows 10. Although the error code in this problem could vary, in this situation, it states:
0xC1900101 – 0x20017, The installation failed in the SAFE_OS phase error during Replicate_OC operation
To fix this issue, you need to follow the given options below. But before you do, you need to create a System Restore point first so that if anything goes wrong, you can always undo the changes you’ve made.
Option 1 – Try to change the Windows 10 installation
According to security experts, one of the main causes of this error is the KB3064209Windows Update. This particular update is the one responsible for updating the CPU Microcode for processors made by Intel. Thus, if you don’t use an Intel processor, you can skip this option and proceed to the next one. However, if you use Intel, make sure to follow the instructions in this option carefully. Take note that in this solution, C: partition is referred to as the OS Partition while H: partition is referred to as the USB Pen Drive.
First, you need to download the Windows 10 ISO from the Windows 10 Media Creation tool and then copy its contents to the Pen Drive H.
Next, tap the Win + X keys and click on the Command Prompt (Admin0 option. If a User Account Control appears, simply click Yes.
After opening Command Prompt, type the following command:
From there, right-click on the file named “mcupdate_GenuineIntel.dll and click on Properties.
Next, go to the Security tab and click on Advanced. In the Advanced section, change the Owner to your User Account and click OK.
And then back to the Security tab, click on the Edit button and check on Full control to make sure that your User Account has all the privileges.
Now click on Apply and then OK.
After that, delete the file you saw earlier which is named mcupdate_Genuine.dll.
Then close all the Windows File Explorer instances and go back to the Command Prompt window and unmounts the image you mounted before by typing the following command:
Afterward, repeat the steps from mounting up until here for these files:
wim /index:2
wim /index:1
wim /index:2
Now delete the mount folder and remove the USB Pen Drive and then boot with the installer.
Option 2 – Try to perform a Disk Cleanup
Chances are, some unnecessary files in your computer might be interrupting the installation process which explains why you’re getting SAFE_OS phase error during Replicate_OC operation instead so you need to perform a Disk Cleanup in order to fix the problem.
Option 3 – Try updating all your drivers
Every now and then, drivers get corrupted or outdated so it’s no surprise that they conflict with the operating system and cause errors like the SAFE_OS phase error during the Replicate_OC operation. To fix the problem, you need to update all your drivers. Follow the steps below to update your drivers.
Tap the Win + R keys to launch Run.
Type in devmgmt.msc into the box and tap Enter or click OK to open the Device Manager.
After that, a list of device drivers will be displayed. If you see a red or yellow sign that shows up against the driver, right-click on the driver’s name and select “Update Driver Software” or “Uninstall”. And if you find any “Unknown device”, you need to update it as well.
Select the “Search automatically for updated driver software” option and then follow the instructions to complete the process.
Restart your PC.
Note: You also have the option to go directly to the website of your graphics card manufacturer and check if there’s a new update – if there is, download it.
Option 4 – Try to update your system’s BIOS
Aside from outdated drivers, outdated BIOS could also be the reason why you’re getting the SAFE_OS phase error during Replicate_OC operation which is why you need to update your system’s BIOS in order to resolve the issue.
Option 5 – Try checking the Windows Services status
In the Cortana search box, search for “Services” and then click on the Services icon.
After that, the Services utility will be opened in a new window.
Next, look for the following services:
BITS (Background Intelligent Transfer Service)
Windows Update Service
Cryptographic Service
Then right-click on each one of the services and click on Properties. From there, select Automatic from the drop-down of the Startup Type menu.
Now click on OK for each one of them and restart your PC to apply the changes made.
Option 6 – Try to check the RAM modules
There are many times when all the components of the RAM weren’t able to be used by the computer so you need to check the RAM modules.
You need to first turn off your PC and then take out your RAM physically.
Next, clean it with a soft cloth and blow some air into the RAM slot in the motherboard.
Have you been feeling anxious in the digital space? Feeling like you have a million eyes on you each time you visit a website? It can definitely make you uneasy. Luckily there’s an easy fix, and it’s called a VPN.
In this article we’ll take you through the basics of what a VPN does and some of the biggest benefits you can reap from buying one.
VPN: definition and how it works
VPN stands for Virtual Private Network, so its name already says a lot about what it does.
A VPN is specialized software that keeps your browsing private and secure. Essentially it hides your identity, preventing possible cyberattacks and data theft. This is especially important in cases of public network use, where you’re highly exposed to potential threats.
To be more specific, this software encrypts your Internet Protocol (IP) address by filtering it through a server hosted by the VPN provider first. That way, it prevents your Internet service provider, third parties and lurking online thieves from tracking the actual you.
Credit: FLY:D on Unsplash
Some providers, such as Surfshark VPN with its IP Rotator feature, even make it a habit to frequently change your IP address to further protect your identity. With most VPN providers, you can also appear to be in a completely different country, adding to your disguise.
There are tons of advantages you can look forward to if you decide to use a VPN. Take a look at some of the crucial ones.
Benefits of using a VPN
When choosing a VPN, you can find both free and paid options. We recommend you go with the paid ones, since they have stronger security, encryption and data protection, as well as more advanced features. Free VPNs come with limitations and risk of malicious attacks on the software itself.
You can choose to buy a singular VPN service or opt for antivirus software that has a VPN built in, for example Bitdefender’s Ultimate Security plan. That depends on what you use your computer for and how much.
When you pick one, here’s what it can do for you.
1. Access region-specific content
When we said you could change your location, we meant it. Say you’re using a streaming service and a show you desperately want to watch isn’t available in your country. You can use your VPN to make it look like you’re browsing from a country where it’s unlocked.
This option is also convenient for gamers who want to access maps, skins and other in-game items unavailable in their location.
In addition, you can use this powerful feature when you’re traveling to a region where some of your favorite content may not be accessible.
Do keep in mind that you need to read the Terms and Conditions (yeah, we know - who does that?) of your games and services before doing this, since you could end up getting a penalty. It’s also important to remember that there are entire countries that have strict regulations or even bans on VPNs, for example Belarus, Russia and China. So make sure to be very cautious with your VPN use, friends.
2. Browse like no one’s watching
VPNs shield your browsing habits from prying eyes on the web. Those can be malicious hackers or just third-party cookies tracking your every move to later bombard you with targeted ads. For example, Surfshark VPN features a Cookie blocker that blocks all cookie-related pop-ups and lets you browse in peace (and secret). It works even when the VPN is turned off, which is also pretty neat.
In addition, their CleanWeb 2.0 technology makes sure ads and especially malware don’t stand a chance at all, since they’re blocked before they can even load.
The inability of sites to track your browsing means they can’t collect and analyze any of your data. So, your personal information - or your company’s information in case that’s what you’re using your computer for - is entirely hidden and secure.
3. Save money
It’s well-known that the prices of certain items and services vary based on your location, browsing time, age and many other factors. This most commonly goes for airline tickets and hotel stays.
You can use your VPN to avoid high prices and surcharges. Clear all cookies, turn on your VPN and visit an online shopping site to check out their prices. Then compare your findings with the offers you see when your VPN is off, when you spend a long time on the site or have an active account with the company.
Sometimes this can really help you find the best deals and avoid breaking the bank. But again, check the Terms and Conditions before you purchase something using a VPN.
4. Secure your smart home
The more smart devices you have connected to your network, the more exposed you are to potential cyberattacks. Phones and computers are generally designed to be decently secure even without a VPN or antivirus, but smart home devices leave a lot to be desired in that regard.
Protecting your home network with a VPN software means all devices connected to it are secure, be it an air purifier or Alexa.
Credit: Bence Boros on Unsplash
5. Prevent connection slowdown
Your ISP can intentionally slow down your internet speed based on how much data you’ve consumed (data throttling) or your activities online (bandwidth throttling).
But with a VPN, what kind of data you send and receive and how much is entirely hidden. Therefore, if your ISP can’t see you, they can’t control you and they can’t throttle down your speed.
The bottom line
You can never be too safe online. So definitely think about getting yourself a solid VPN to pump up your privacy and security as much as you can. And if you have any questions or need help choosing the perfect software for you, feel free to reach out to us.