A number of users have recently reported that they were going through an issue with their Bluetooth devices on their Windows 10 computers. This issue involves an error saying,
“Windows cannot verify the digital signature for the drivers required for this device. A recent hardware or software change might have installed a file that is signed incorrectly or damaged, or that might be malicious software from an unknown source. (Code 52).”
If you are one of the users who encountered this kind of error on your Windows 10 computer, read on as this post will guide you on how you can fix this Bluetooth error. According to security experts, the key to fixing this error is to sign the Bluetooth A2DP files with the built-in tool, System File Checker. Apart from that, you could also run the Hardware and Devices troubleshooter or perform System Restore, as well as update or reinstall the concerned drivers. For more details, refer to each one of the options provided below.
Option 1 – Try to check Bluetooth-related services
In Services, there is a Bluetooth-related service that helps users use Bluetooth so if that particular service suddenly malfunctions for some reason, you will most likely get the “Windows was unable to connect with your Bluetooth network device” error message. That’s why you need to check Services and to do that, refer to these steps:
Tap Win + R keys to open Run prompt and type in “services.msc” then tap Enter to open Services.
Next, look for the Bluetooth Support Service and double click on it to open Properties.
From there, verify if the Service status is showing “Running” or “Stopped”. If it’s the latter, you have to click the Start button.
Lastly, check if the Startup type is set to Manual.
Option 2 – Try running System File Checker or SFC scan
You could also run System File Checker or SFC scan to fix the Bluetooth error. It is a built-in command utility that helps in restoring corrupted files as well as missing files. It replaces bad and corrupted system files with good system files. To run the SFC command, follow the steps given below.
Tap Win + R to launch Run.
Type in cmd in the field and tap Enter.
After opening Command Prompt, type in sfc /scannow
The command will start a system scan which will take a few whiles before it finishes. Once it’s done, you could get the following results:
Windows Resource Protection did not find any integrity violations.
Windows Resource Protection found corrupt files and successfully repaired them.
Windows Resource Protection found corrupt files but was unable to fix some of them.
Reboot your PC.
Option 3 – Try to perform System Restore
You might also want to perform System Restore as the error might be caused by system modifications. Thus, to undo them, you can use System Restore. Run it using these steps:
First, tap the Win + R keys to open the Run dialog box.
After that, type in “sysdm.cpl” in the field and tap Enter.
Next, go to the System Protection tab then click the System Restore button. This will open a new window where you have to select your preferred System Restore point.
After that, follow the on-screen instructions to finish the process and then restart your computer and check if the problem is fixed or not.
Option 4 – Try running the Hardware and Devices Troubleshooter
The next thing you can do to fix the problem is to run the Hardware and Devices troubleshooter. Although it won’t make much of a difference, there’s still a possibility that it could automatically fix the Bluetooth error. To use it, refer to these steps:
The first thing you need to do is click on Start and then on the gear-like icon to pull up the window for Settings.
After opening Settings, look for the Update and Security option and select it.
From there, go to the Troubleshoot option located on the left-hand side of the list.
Next, select Hardware and Devices from the list and open the Troubleshooter and run it. Once it is doing its job, wait for it to complete the process and then restart the system.
After the system restarts, check if the problem’s now fixed. If not, refer to the next option given below.
Option 5 – Try to reinstall or update the Bluetooth driver
The issue might have something to do with the Bluetooth drivers. It could be that it is outdated and needs to be updated or that you recently updated it and since then you have trouble removing the Bluetooth devices and so to fix the issue, you can update, roll back or uninstall the Bluetooth drivers. How? Follow the steps below.
Tap the Win + X keys to open the Device Manager.
Next, look for the Bluetooth device and right-click on it.
Select the option “Update driver”.
After that, a new popup window will appear. In there, select the option, “Search automatically for updated driver software”.
Note: Checking the update may take a few minutes so you’ll have to wait until it finishes. If it is able to find an update, you must install it. And if you want to reinstall the Bluetooth driver, just select the “Uninstall driver” option and follow the next on-screen instructions that follow.
The new razer modular table looks like something that came out from Star Trek. Project Sophia is a desk but, it is a special kind of desk. It comes with modules that attach themselves underneath the table itself for customization purposes so each user can somewhat create a layout on the table itself as he or she desires. The table itself comes packed with intel CPU and Nvidia GPU but it is said that this component and PC parts will overall be easily upgraded to different ones as users desires.
The table itself looks very basic and it comes with a very large OLED screen between two different sizes depending on your table choice. You can choose between 65” or 77” screen sizes and OLED is mounted on the table itself so you cannot move it or adjust the angle of it that I somewhat find annoying but that comes from th4e fact I am used to adjusting my screens, but for this large screen maybe you do not need to adjust its rotation in order to get best viewing angle.
Modules themselves will offer some on-the-fly information and quick settings for the PC itself while being modular in a sense they could be mounted in different positions on the table itself providing some customization and order to suit users needs. Modules, for now, are: THX Spatial Surround Sound Controls, system monitoring, programmable hotkey module, Thunderbolt™ Powered eGPU, RAID Controller, Network Performance Module, 15W Wireless Charger, Thunderbolt™ 4 Hub, Media Controls.
Of course table, itself will have Razer chroma RGB on its surface and Razer says it will have a total of 13 different modules available on launch for a true level of personalization.
Conclusion
Is this Razer table something that you really need or just another expensive toy? Personally, I would not mind this table at all but I would choose modules for work, not gaming. Having some things like media controls or RAID controllers all the time at your fingertips is a great time saver and productivity asset. Razer also advertises some modules and setup already for streamers, creators, or team members and has some according modules like touch screen digitizer with stylus and similar.
If you’ve been experiencing a 0x0000007E error code pop message on your PC frequently then you need to get it fixed before it causes serious damage to your system. 0x0000007E is a Stop error or Blue Screen of Death error code.
This error message turns your computer screen blue and locks you out of the program running on your computer. It freezes your system and hampers your ability to perform any type of task on your PC.
Solution
Error Causes
Error 0x0000007E, a blue screen of death error triggers registry issues. It’s not easy to narrow down the cause of 0x0000007E as it results due to many reasons like memory overload, cluttered disk space, viral infection, malware attack, and if the hardware malfunctions.
Ignoring 0x0000007E error pop up is not wise. It is more like a warning of the serious damage that can happen to your PC if it is not fixed timely. It also leads to slowing down the system and increases boot time.
This error message exposes you to dangerous Windows PC threats like registry corruption and damage. Registry corruption can lead to system crash and failure and you may also lose all your important data saved on your PC.
Further Information and Manual Repair
Install Restoro
You don’t always have to spend hundreds of dollars to hire a technician to fix error pop-ups on your PC try using Restoro
Restoro is an advanced and multi-functional PC repair tool with a comprehensive suite of powerful features designed to resolve almost all types of PC errors in seconds including 0x0000007E error code.
It is a next-generation PC repair tool that serves as a system optimizer, anti-virus, and quality registry cleaner. Its built-in intuitive technology enables Restoro to scan, identify and repair the ultimate cause of the error code 0x0000007E in just a few seconds.
Eventually, it spares you from the hassle of finding the root cause of the 0x0000007E error message and then selecting a tool specifically designed to resolve only that particular cause with limited features. This highly functional PC error tool is the answer for all your registry issues.
By running Restoro on your PC, you can fix the 0x0000007E BSOD error code and avoid registry corruption.
Why Restoro?
The smart registry cleaner utility embedded in this tool enables it to scan for registry errors and clear up disk space accumulated by junk files, internet temporary files, invalid entries, and other types of unnecessary files taking up a good chunk of your disk space.
This clutter also slows down your PC performance as it requires more power than it has to run the system because of the excess load on the RAM.
However, by wiping out the clutter with this helper, you can optimize the speed of your PC and see a significant difference in its performance.
Restoro backup feature enables you to create backup files for safety purposes. Furthermore, it has several other built-in value-adding features like privacy error utility and system stability utility for enhanced functionality.
To resolve the error code 0x0000007E in seconds, all you need to do is download and install Restoro on your system and run it to scan for errors. In a few seconds, you will see a scanning report with comprehensive details of the types of PC damages.
To fix the issue right away, create backups and click ‘fix’ to resolve. In just a few clicks you can repair your PC.
Download Restoro Today!
If you have a laptop that is slowing down and some usual tasks are sluggish you probably mean that it is time to change it and get a new one. Altho it is a good solution and it will guarantee that you will be able to do your tasks with more speed and comfort, straight purchasing is not always the best thing to do.
There are things you can do and some upgrades that are cheaper and will bring your laptop back into the game and extend its usage for a few more years.
1. Clean it
The most common issue for slowing down of computer is dust and dirt that accumulates over time and usage. If the laptop has not been properly cleaned in a while, cleaning it and placing new thermal paste on the CPU can do wonders. If you are not keen on doing this yourself or do not possess the required skillset take it to your local IT center for cleaning.
2. Uninstall software that you are not using
Various software can have speeding effects on computers, it can have some services running in the background and thus take precious resources slowing the whole system. If you are not using software, uninstall it.
3. Do not install the latest software
If you are using your computer for basic tasks there is no really need to install the latest and best. A lot of new software will require new hardware and things that offer are not so much better nor even required to justify the upgrade. Let us take office, for example, if you are using it to just write some text and not using any advanced options there is really no need to switch to a newer version, the old one will do just fine tasks that you are in need of.
4. Replace HD
Now this fits in the domain of upgrading your hardware but still it is much cheaper than replacing the whole laptop. Windows 10 works much better with SSD and SSD itself is faster than your standard HD, especially if it is slower model spinning in only 5400RPM. Operation of HD replacement is simple and straightforward and anyone can do it but the benefits of replacement will be visible right away. With a new SSD instead of an old mechanical one, you will have the feeling that you actually bought a new laptop.
5. Add more RAM
This is basically the last thing you can do in order to speed up your old laptop that will not break your bank account. Upgrading RAM was always the thing that can push your computer to have more power and to behave better while you are doing tasks. One important thing here is to first see how much RAM you have in your computer. If you are packing already 8GB then upgrading will not do much but if you have only 4GB, raising it to 6GB or 8GB will be beneficial. Also, check if the model of the laptop supports more RAM in the first place.
Conclusion
We have covered here a vast array of options in order to get your laptop back into the game with variability between hardware upgrades to taking care of your software. Whatever option you choose to do it will speed up your computer but among all of them, replacing the hard drive will do the most.
A surprisingly large amount of things present at your home can and do interfere with your wi-fi signal making it weak so devices are dropping it, having trouble connecting, or being slow.
Hello and welcome to our latest article where we will take a look at all things that are present in a lot of homes but are very bad for your WI-Fi signal.
Bad router placement
Having a router in a bad position can have some really large effects on WI-Fi signal strength and its availability. Usually, we do not give great attention to where we are placing our router but it has been proved over and over again that being close to certain objects does indeed have a great influence on the wireless signal strength and performance.
So, what are these objects and bad positions where we could place the router and effectively kill his Wi-Fi capabilities?
Fish Tanks
Water will block all radio waves including Wi-FI signals and waves themselves, so having a router next to the aquarium or any large source of water is a bad idea. You should always look at water as something bad for your Wi-Fi and move your router away from it as far as possible.
Bookshelves
Paper is another story and example of the dampening effect on radio waves. Did you know that various patterns of paper are used in silent rooms and recording studios in order to eliminate sound reflection from surfaces? Well besides absorbing sound waves, the paper also absorbs Wi-Fi signals and if you have a large bookshelf with a lot of books packed one beside another you just have a great wall of signal absorbing.
Mirrors
The problem with mirrors is in their coating that goes over the glass in order to turn it into the mirror, that coating is metal and as such, it is absorbing signals in large amounts. If you have an old or high-quality mirror that has a silver coating things are even worse since silver will absorb even more waves than modern cheap ones.
TV
Yup, TV is also on this list and for a similar reason as a mirror, although TV does not have coatings of metal, they have something even worse: a large metal plating on the back. Metal plating is there to produce structural integrity of the TV set and provide it with shielding from electromagnetic waves and as such it will prevent Wi-Fi waves as well. Do not place the router behind your TV.
Things that influence signals in homes
Any kind of metal decoration
Now when we covered mirrors and TV because of the metal they have, we must take a look at the metal itself. Any kind of metal stuff that you might have like baskets, figures, statues, frames, etc will effectively block your signal.
Kitchen appliances and Home utilities
Kitchen appliances like refrigerators, microwaves, ovens, stoves, etc. along with home appliances and utilities like dishwashers, washing machines, dryers, etc are large metal objects enclosed in a metal cage that will block signals from spreading further and it is no secret that most kitchens have weaker Wi-Fi because of this reason.
Home gyms
This is a logical conclusion as to everything explained so far if you have a workout room or small gym at home it is probably filled with weights that are metal and have mirrors inside, all of that will interfere and block signals.
Things blocking your Wi-Fi that you have no easy control over
Walls
Thick walls will dampen signals, thick walls from bricks will dampen even more and concrete walls will kill it almost completely. Any kind of metal reinforcement wiring inside walls will reduce and kill signals as well.
Floors and ceiling
This is somewhat important if you have a floor beneath or under the room where is your router located, but for the same reason how walls are blocking your signal floor and ceiling can do it as well, especially since most of the time they are made of some stronger material like concrete with metal fence inside.
Heating systems
If you have a heating system that is composed of metal radiators with water inside, then in terms of Wi-Fi signal strength you have an aquarium but in a metal box, and as such it will greatly reduce signal strength.
The error code 28 is a driver error. This is one of the many device manager error codes. When this error occurs on your computer, the following message is displayed:
“The drivers for this device are not installed. (Code 28)”
Another driver device error message you might encounter is error code 41.
Error Causes
Error 28 occurs because of unsuccessful device driver installation. This usually happens when you try to update new drive versions on your system. It is advisable to repair this error right away as it can hamper your ability to use certain hardware.
For example, if error 28 occurs due to the unsuccessful installation of the USB driver, then it if not fixed and resolved it may prevent you from using hardware devices.
Unsuccessful driver installation means you either didn’t install it properly or your computer has registry issues. If it’s the registry then you must fix it without any delay because it can expose your PC to serious threats like system crash and failure.
To avoid such inconvenience, repair it.
Further Information and Manual Repair
When it comes to repairing the error code 28, here’s what you can do:
Simply go to the control panel and click on the Device Manager option:
In the details pane with the list of devices, locate the device for which you want to reinstall the driver software.
Double click on it to open the properties dialog box.
Now click on the driver tab and then click update driver.
After updating, try using that device again if it doesn’t work and shows the error code 28 on your computer screen then this means the underlying cause is the registry.
Roblox is a very popular online game with millions of gamers playing it each day and as such it will naturally bring a lot of malware and attack on players trying to steal and exploit them for monetary gains. The latest attack and high-profile stealing of currency and assets happened exactly in Roblox.
Malicious activities have been reported to come from chrome extensions. So far 2 extensions have been identified that have hidden malware inside them but there could be more of them currently undetected. Extensions work as a front while in the back they mine user logins and other data in order to steal stuff from the Roblox platform.
To make things worse some of the malware is within long extensions like SearchBlox. The SearchBlox extension allows you to search quickly for other users if it was legitimate but has been compromised within the last month. There is evidence that people are stealing Roblox currency with the data gathered by the hidden backdoor in it.
SearchBlox extension is still Active in Chrome Web Store, with the primary listing still with the "Featured " badge. Google is actively removing malicious software from its storefront on a regular basis but this one still lingers in it.
If you or your kid have this Chrome extension installed, uninstall it right away and always be careful about which extension you install and give access to your system, keep them updated and check various blogs and article sites to inform yourself when a bad one is found.
Error code 0x8007267C is specific to Windows 10. This error is triggered when no DNS server is currently configured in your network settings during the Activation process. If you are fairly confident in your ability to address command-line tools and networking issues, you can follow the steps below to try to remedy the error code on your own. If not, you may need to contact a qualified technician in order to resolve the error successfully.
Solution
Error Causes
The cause of Error Code 0X8007267C within the Window 10 system is fairly straightforward. Windows Activation requires a valid DNS server to be configured in order to complete the Activation process; if one is not available or properly configured, then you may see this error code and Activation will fail.
Further Information and Manual Repair
The following methods may help you to resolve this error, but you’ll need to have some familiarity with command-line tools to complete the steps successfully. If these methods do not work or if you are uncomfortable in using the command prompt, you may need to consult a technician to fully resolve this particular error code on the Windows 10 system.
Method 1: Register a DNS server within your network properties and test the connection.
In order to resolve this error code, client connectivity to a DNS server must first be established. The following steps may help you to determine the root problem with your connectivity status:
Open a command prompt, after which you'll run IPCONFIG /all
Verify the following values: The IP address that has been assigned, the DNS server, the subnet mask, and the default gateway. Compare each to ensure that all are set with the values that correspond to your specific environment
Check for basic IP connectivity to the DNS server using the PING command. In using the PING command, utilize the address of the DNS server found in Step 1
ping <DNS Server IP address>
If basic connectivity to the DNS server in question is failing, then you will need to resolve that issue before going further in the process.
After troubleshooting the above basic connectivity issues to the DNS server, you can reattempt Windows Activation by using the command below from within an Elevated Command selection:
cscript windowssystem32slmgr.vbs -ato
If the steps above did not work for you, you may want to try the steps found in method 2.
Method 2: Use phone-based authentication with a MAK (multiple activation key).
If a DNS server is not connected to your network, you can use an alternative method to complete the Windows Activation process. Bypass Method 1 by using a MAK product key instead to activate the volume license installation. Certain MAK product key providers have a variation on the specific key numbers that you will need to use. If you are using TechNet media or MSDN media, you will have to change the product key listed to the product key provided. The product keys provided by either TechNet media or MSDN media for Windows Server 2008 or for Windows Vista Enterprise will be the MAK product key that you will enter in a later step.
Like the previous method, you will need to have some familiarity or confidence in your ability to operate Command Line tools before proceeding. Once you have found your MAK product key, you’ll need to open a command prompt and use the following command to change the product key to match the MAK product key, which should look something like the example below:
slmgr –ipk xxxxx-xxxxx-xxxxx-xxxxx-xxxxx-xxxxx
After completing the product key change, use the following command to initiate the phone activation wizard, thereby completing the activation of the system:
slui 04
The activation wizard should be able to walk you through the remainder of the process in a step-by-step manner. In addition to appearing as an error code in Windows 10, this particular error may apply to multiple versions of Windows, including:
Windows 7 Enterprise
Windows 7 Enterprise E
Windows 7 Enterprise N
Windows 7 Professional
Windows 7 Professional E
Windows 7 Professional N
Steps to address the error code may be different in any of these other versions of Windows. If you have difficulty in resolving the error effectively, seek professional technical help.
If you have recently installed a new internal or external hard drive or SSD and you’ve noticed that its status on the left side of the Disk Management tool states “Unknown Not Initialized”, this indicates that Windows can’t initialize the disk and that you won’t be able to use this new SSD or hard drive. You can encounter this kind of issue randomly and not just with a new hard drive or SSD but also with existing drives.
There are times when you won’t be able to find your drive or partition in the File Explorer. In such a case, you have to check the Disk Management if your drive or partition is there physically. You also have to check if you can see it as Not Initialized. If it is, then this means that the disk or partition does not have a valid signature that is if it’s not registered with the system properly. Note that a disk is registered when you format it at least once so if the disk was available before, then it could be somehow corrupted. To resolve the problem, you can try to initialize the disk manually or bring it online and add a drive letter. You can also try checking the Device Manager for issues or check the cable physically.
Option 1 – Try to manually initialize the disk
Since initializing the disk is the most common way to resolve the “Unknown Not Initialized” error, this is what you have to try first.
To initialize the disk manually, you have to open the Disk Management from the WinX menu by tapping Win + X keys and selecting Disk Management.
From there, you can find the non-initialized disk. Right-click on it and select the “Initialize Disk” option.
Next, select the partition style. It is recommended that you use the MBR option instead of the GPT or GUID Partition Table.
Now click the OK button. Your hard drive or SSD should now initialize without any problem.
Option 2 – Set the disk Online and add the Drive letter
If the disk appears to be offline under Disk Management, right-click on it and select the Online option.
On the other hand, if the disk is already set Online but does not have a drive letter, right-click on it and select the Change drive letter and path option.
Select a letter that is not allocated yet.
Once you’re done, you have the option to format the disk in either NTFS or FAT32 but if you are using a 64-bit computer, make sure that you opt for NTFS.
Option 3 – Try to check any issues in the Device Manager
It is also possible that the hard drive is not working properly due to some driver issues. Thus, it’s better if you check the Device Manager and see if that drive is listed with a yellow exclamation mark next to it. And if that’s the case, you have to right-click on that drive and select the Uninstall drive option. After that, click on Action and then run the Scan for hardware changes. It should fix the problem.
Option 4 – Try to physically check the cable
You might also want to check the physical status of the wires and see if they are connected properly or not. Specifically, you have to check two cables, such as:
The first one is the power cable that’s connected to your SMPS.
Next is the one that’s connected to your motherboard.
If any of the two cables are not working or missing, then it’s no wonder why your drive has an “Unknown Not Initialized” status. Thus, you need to have them replaced to fix the problem.
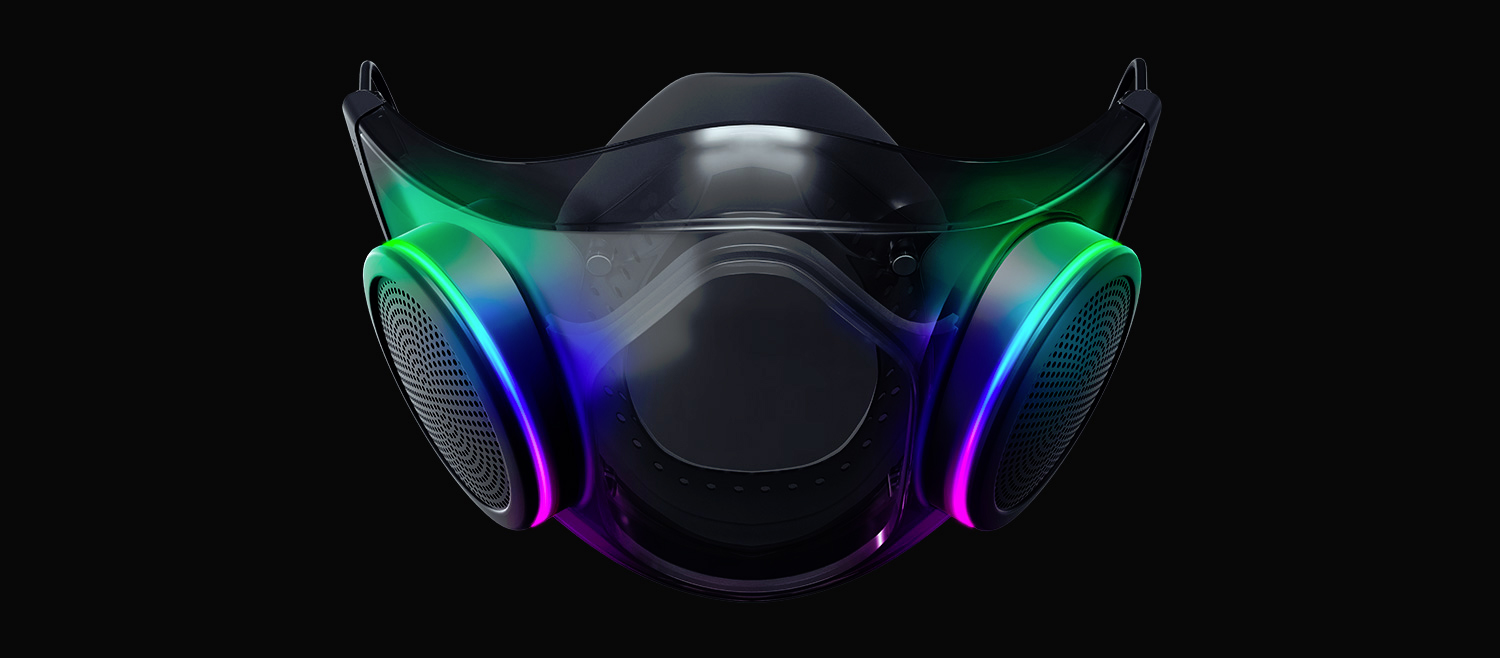
The world today is still sadly under pandemic and by the looks of it, COVID-19 is here to stay, well at least for some time in the near future. Razer seems to think so as well since their upcoming gear is not really what you would expect.
Enter Hazel, a new and upcoming Razer smart mask.
Protection
Hazel mask has a high bacterial surgical N95 filter with fluid resistance that will protect you against large droplets and splashes. A detachable active ventilator regulates airflow and is capable of filtering around 95% of airborne particles. Mask comes with a special charging case that has an auto sterilization UV light that will kill bacteria and viruses inside the case interior while it charges.
When the mask is recharging it will change color from red to green visually showing the level of the current charge. Mask of course has easy to replace filters inside ventilators and Razer is standing by that fully charged mask will last enough for full-day use.
An active ventilation system brings cool air while releasing breathing heat at the same time drastically reducing CO2 inside the mask that could produce dizziness and headache.
Silicon guard is on its edge gluing to around your face in order to prevent exterior air sneaking inside the mask and positioning it firmly so it does not rest on your lips in order for easier and clearer communication.
Hazel personalization and technical features
Hazel has a clear and transparent design making it better for social interaction since other people will be able to see your lips and smiles thus making it more natural. A low light mode that turns on automatically when it is dark outside is also aimed for easier communication.
Speaking of communication, the mask comes with voice Amp technology that has a built-in mic and amplifier thus making your voice lines clear so you are not muffled when wearing the mask itself. Your friends and other people will be able to hear you like you are not wearing a mask at all.
Thicker air loops apply less pressure on ears and can be adjusted for a more secure fit, while the mask itself can be custom-made to fit your face shape.
And of course Hazel comes with 16.8 million colors and a suite of effects with Razer Chroma RBG
The File Explorer in Windows 10 provides several ways to organize the contents of folders and files in the system. Windows users can utilize some efficient styles to view the contents of the file system as per the user’s requirement. A user may opt to display the file picture in large size thumbnails while the other one could opt to set the icons of folder and files in a small or medium size list. On the other hand, while setting up several styles for the folder and file icons, some Windows 10 users have experienced some unusual issues where there is the Black background showing up behind folder icons. They tried refreshing the File Explorer a couple of times but it didn’t help in fixing the problem and the black squares are still visible on some folder icons.
The black squares behind the folder icons might look disturbing though it’s not really a big problem and is merely a graphical glitch that does not cause any damage or whatsoever to the content of the folder and files. The most likely cause of this glitch might have something to do with the corrupted system files or it could also be caused by outdated thumbnail caches. In addition, graphical glitches like this one could also occur if you are using out outdated graphics drivers. To fix this problem, you need to follow the options laid out below.
Option 1 – Try using the Disk Cleanup to remove Thumbnail files
The Disk Cleanup tool is one of the options you can try to fix the black squares behind the folder icons. Through this tool, you can delete all the Thumbnail files on your disk. To use it, refer to these steps:
Open the Search bar and type “disk cleanup” in the field.
After opening Disk Cleanup from the search results, then from the drop-down menu select the C: drive to clean up and click OK.
Wait for the scanning process to complete. Once it’s done, select the files you want to delete.
Ensure that you select the box labeled “Thumbnails” under the Files to Delete section then click on OK.
After that, a confirmation box will appear, just click on Delete files to delete the files permanently.
Restart your PC.
Option 2 – Try resetting the Thumbnail cache
You have the option to manually delete the Thumbnail Cache to resolve the black square background behind the folder icons issue. Follow the steps given below to reset the Thumbnail cache.
Open the File Explorer.
Next, navigate to the View tab and select the option with Hidden items to display all the hidden folders and files.
Next, go to this path: C:Users<username>AppDataLocal
In the given path, make sure that you put your actual username in the username field. Then look for a file named “IconCache.db”. Right-click on this file and click on Delete.
After that, go to this path: C:Users<username>AppDataLocalMicrosoftWindowsExplorer
From there, select all the files and delete them.
Note: If a prompt appears saying, “The files are in use and cannot be deleted”, simply select the “Do this for all current items” option and then click on Try Again. If you get an error message, click on Cancel to close the window and restart your computer.
Option 3 – Try updating or reinstalling the Graphics driver
Tap the Win + R keys to open the Run dialog box and then type in devmgmt.msc and tap Enter or click OK to open the Device Manager.
Expand the section for the outdated device drivers.
And then select the outdated driver(s) and right-click on it/them.
From the drop-down menu, select the Update Driver option if you wish to update the driver or select the Uninstall device if you want to uninstall the driver and then follow the on-screen instructions to install the latest version of the driver.
Restart your PC after the installation to allow the system to reinstall the driver.

 The table itself looks very basic and it comes with a very large OLED screen between two different sizes depending on your table choice. You can choose between 65” or 77” screen sizes and OLED is mounted on the table itself so you cannot move it or adjust the angle of it that I somewhat find annoying but that comes from th4e fact I am used to adjusting my screens, but for this large screen maybe you do not need to adjust its rotation in order to get best viewing angle.
Modules themselves will offer some on-the-fly information and quick settings for the PC itself while being modular in a sense they could be mounted in different positions on the table itself providing some customization and order to suit users needs. Modules, for now, are: THX Spatial Surround Sound Controls, system monitoring, programmable hotkey module, Thunderbolt™ Powered eGPU, RAID Controller, Network Performance Module, 15W Wireless Charger, Thunderbolt™ 4 Hub, Media Controls.
Of course table, itself will have Razer chroma RGB on its surface and Razer says it will have a total of 13 different modules available on launch for a true level of personalization.
The table itself looks very basic and it comes with a very large OLED screen between two different sizes depending on your table choice. You can choose between 65” or 77” screen sizes and OLED is mounted on the table itself so you cannot move it or adjust the angle of it that I somewhat find annoying but that comes from th4e fact I am used to adjusting my screens, but for this large screen maybe you do not need to adjust its rotation in order to get best viewing angle.
Modules themselves will offer some on-the-fly information and quick settings for the PC itself while being modular in a sense they could be mounted in different positions on the table itself providing some customization and order to suit users needs. Modules, for now, are: THX Spatial Surround Sound Controls, system monitoring, programmable hotkey module, Thunderbolt™ Powered eGPU, RAID Controller, Network Performance Module, 15W Wireless Charger, Thunderbolt™ 4 Hub, Media Controls.
Of course table, itself will have Razer chroma RGB on its surface and Razer says it will have a total of 13 different modules available on launch for a true level of personalization.


 The world today is still sadly under pandemic and by the looks of it, COVID-19 is here to stay, well at least for some time in the near future. Razer seems to think so as well since their upcoming gear is not really what you would expect.
Enter Hazel, a new and upcoming Razer smart mask.
The world today is still sadly under pandemic and by the looks of it, COVID-19 is here to stay, well at least for some time in the near future. Razer seems to think so as well since their upcoming gear is not really what you would expect.
Enter Hazel, a new and upcoming Razer smart mask.