Computer crashes are one of the most annoying things that can happen to users. It often loses your data and work, you must spend extra time if you were in the middle of something and can even break Windows itself.
 Before we move to the article I just want to say that technically there are no random crashes, there is always a reason why the system hangs up, why you received blue screen, annoying restarts out of nowhere and many more PC crashes. In this article, we will explore many possible reasons why something may occur and offer you straight forward solution on how to escape the situation and prevent it from happening again.
Without further delay, let's begin:
Yes, sometimes the most basic approach provides the best results, check to see if your power outlet is stable and providing you with constant voltage, if not, maybe you want to invest in a UPS system so you do not face random shutdowns and restarts during work, also while you are at it, check to see if that reset and power switch are connected properly and that they are not dirty or loose.
Dirt can cause many issues with computers, from overheating to shutdowns to blue screens and memory dumps, check to see if your computer is clean enough and that all connectors are connected tight into their respective sockets.
CPU overheating can cause so-called random freezes and blue screens, the computer might shut down or restart also without any visible reason. Check to see if your fan on the CPU is working properly and change the thermal paste if needed.
If your hard drive is beginning to go down the path of dying out, many issues can come from this condition. There are many tools on the internet and in Windows itself to check if your hard drive is working properly.
Random lock-ups or similar issues can also occur if by any chance you have some malware on your system, run protection software, and keep it updated to make sure the issue does not come from the computer being infected with malicious applications.
Have a habit to clean regularly system files and registries, keep removing unnecessary files from your computer and regularly update your Windows and applications along with drivers.
Bad RAM bank can cause many issues during the work, check it out to be sure the problem is not RAM itself.
Some applications require stronger hardware, and some require the latest hardware, if your computer is a little outdated, running a demanding application can cause issues like freezing, restarts, etc.
This does not seem like anything important but if you are not using a specific application just remove it from the system, why? Sometimes an application has some ties to certain services and if it is outdated can cause issues for newer ones.
Yes, that extension for chrome looks cool, yes, that fancy new player seems sick but if it is from an unverified source and from the unknown publisher without any reviews maybe you are better off with it. You can never tell what you might be placing into your system from the internet.
And that's it, 10 reasons and solutions on what to do on random computer freezes, crashes, etc.

Video Download Converter is a potentially unwanted toolbar distributed by Mindspark Interactive network. This toolbar offers users the ability to download and convert youtube and other online videos.
While this may seem useful at the start, this toolbar monitors user browsing activity and records visited websites, clicked links, and even personal data, that it later uses to display injected ads through your browsing session. When the toolbar is installed, it will automatically hijack your home page and search engine setting them to MyWay.com. This search engine uses google to display your search results, however, it injects ads into the search results to generate ad revenue. Several anti-virus scanners have detected VideoDownloadManager as a Browser Hijacker, and are therefore not recommended to keep on your computer.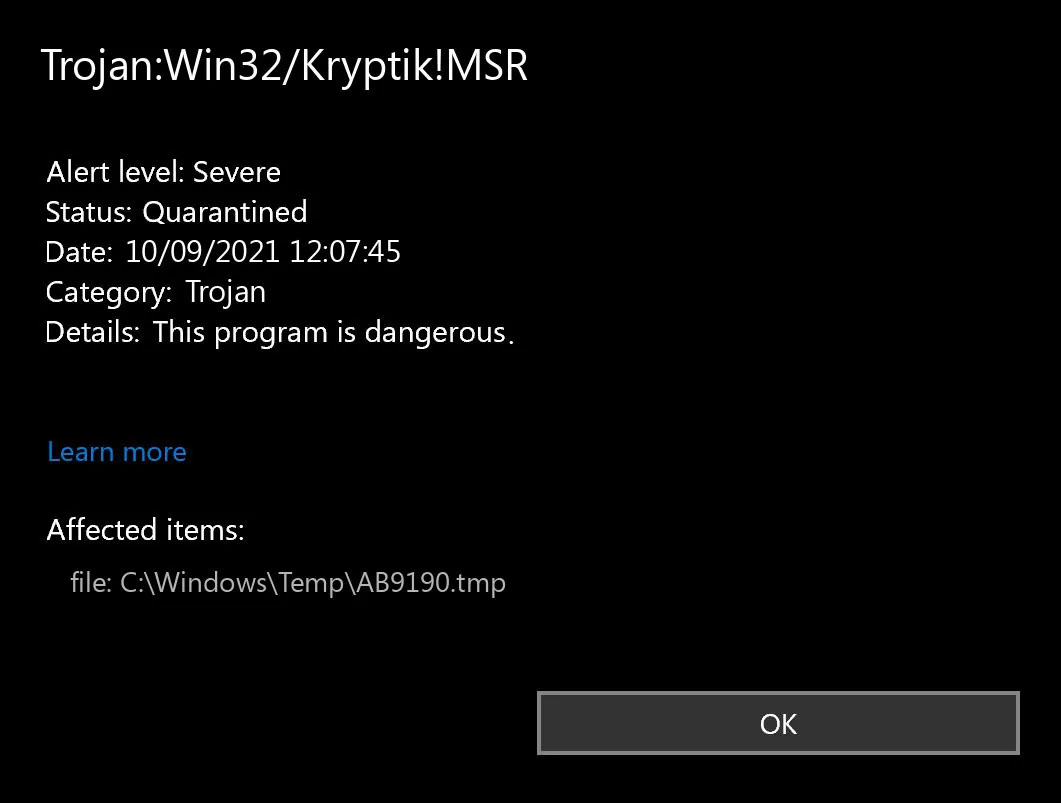 Trojan.Kryptik creates the following registry entry or registry entries:
Blackouts are one of the most annoying things that can happen in the modern age. We have all learned to depend on electricity, maybe too much, so having a backup plan in these unpleasant situations is necessary. Here are some good gadgets for these kinds of situations.

The fully charged power bank is a great item that could fill up your phone or tablet. If it is a larger power bank it could fill them up all the way to the top several times and having charged phone or tablet can help greatly with some fun during dark times. The power bank can also be used to fill up other gadgets on this list so if the power outage is expected to last longer perhaps it would be wiser not to waste it on phone/tablet games.

If the power bank is too short-lived for your needs, a portable generator is always a good option since it can provide power for longer time periods. The solar generator is what we recommend because it is much cheaper to produce electricity but it is limited if a power surge comes at night, one on gasoline is more stable and practical but it costs more to produce electricity.

One more electric-producing device on the list, this one however is aimed at charging your phone, tablet, or laptop by harvesting Sun's energy and turning it into valuable electricity for your devices. Fully silent and easy to operate this is a great tool for power outrage. It will not be able to produce electricity for smaller house appliances but for basic phone/tablet/laptop needs it will suffice.

Self-sustained with its own battery, panic lights are great assets for lightning when power is not present. They can turn automatically when the circuit detects that power is missing but can be also manually switched on or off. There are many versions of panic lights ranging from the light they produce to how long can they work so picking the right one will depend entirely on your home size and needs.

If you lack panic lights USB headlamp is a great choice to light your way and it works even better than a flashlight, although a flashlight is also a great tool, a headlight will provide you with free arms to do various things that you would not be able to by holding a flashlight. Modern headlights come with LED lights so they provide a good amount of light with small power consumption and they can be recharged in a power bank, solar charger, or generator.

LED Lantern is a gadget sitting somewhere between a headlight and a panic light, it offers around the same light amount as a panic light but you can carry it around with you. Of course, it will drain its battery faster than a panic light and it will still need to carry around but it can offer some good options when you need it, like taking it with you to the toilet.

An electric lighter is also one of the things that you will need, it can ignite candles, paper, stoves, etc. Its battery is usually enough for extensive use and there are small chances that it will need to be recharged. Having matches is also smart, just in case.

Great gadget when outbreaks last long or when you get hungry. Not all households have gas ovens so a Solar oven is a great tool to keep you full of food. Granted it will not be on par in speed and quality with a regular oven but when it is the only option it will suffice.
“There were some problems installing updates, but we’ll try again later. If you keep seeing this and want to search the web or contact support for information, this may help – (0x80240438).”To resolve Error Code 0x80240438, here are some potential fixes you need to check out:
“This setting allows you to remove access to Windows Update. If you enable this setting, all Windows Update features are removed. This includes blocking access to the Windows Update Web site at http://windowsupdate.microsoft.com, from the Windows Update hyperlink on the Start menu, and also on the Tools menu in Internet Explorer. Windows automatic updating is also disabled; you will neither be notified about nor will you receive critical updates from Windows Update. This setting also prevents Device Manager from automatically installing driver updates from the Windows Update Web site.”If you enable this policy setting, you can configure one of the following notification options:
 Error CausesError Causes
In the command prompt type sfc/scannow.This will scan the system files and fix any errors. Reboot the computer and try to install updates.
“Windows could not configure one or more system components. To install Windows restart the computer with error code 0xc1900101-0x30018.”When you check on the Windows 10 rollback log, you will see a part with the “iisetup.exe” that’s related to the abort. Usually, the upgrade process completes over 50% and gets stuck and then rolls back later on and generates the error logs. This kind of error, in most cases, appears during the upgrade of Windows 10 and is related to the Internet Information Services or IIS in Windows 10. For some unknown reason, it restricts the installation or the upgrade which causes the error to appear. To fix the “Windows could not configure one or more system components” error, you can try to remove the IIS from the Windows Features or rename the “inetsrv” folder. You could also move all the folders related to IIS to another drive. For more details, refer to the options provided below.
Get-AppXPackage -Name Microsoft.Windows.Cortana | Foreach {Add-AppxPackage -DisableDevelopmentMode -Register "$($_.InstallLocation)AppXManifest.xml"}