Being a streamer altho popular is a very demanding call, there is a lot of technical knowledge involved and one of this knowledge is setting your web camera equipment. On the internet, you can find how to install certain devices and register them in Windows but with little to no information on how to set everything for streaming. In this article, we will try to address as many of this as we can so you can start using your camera right away.
Features of the Logitech C922 Pro Stream Webcam
In the package of your Logitech C922 Pro Stream Webcam, you should have the camera itself with a USB hookup, tripod, and user manual. Tripod, of course, is meant to stabilize the camera for recording using high zoom values so visual shaking of the picture is eliminated.
The camera itself captures natural light without any distortion in full HD and if placed on top of the monitor it can accommodate the field of view to capture two people. Also when in a low-light room, autofocus will correct light and it will sharpen an image in order to compensate for lack of light. The camera also features a dual microphone for clarity of sound.
Assembling the Logitech C922 Webcam
Of course, the first thing when the camera is unpacked is to assemble it. Basically, there are two ways for the camera to be assembled:
- On top of monitor and
- On tripod
The next section will cover both assemblings
Mounting camera on the monitor:
The Logitech C922 Pro Stream Webcam can be used to capture up-close images or video from the top of any computer monitor or TV.
To set up your Logitech C922 Webcam on top of a monitor or TV:
- Completely extend the mounting stand until it reaches the top width of your monitor or TV
- Turn the bottom piece of the mounting stand, so it matches the angle of the back of your monitor or TV
- Place the mounting stand on top of your monitor or TV and tighten the bars until they’re flush with each surface
- Pivot the webcam up, down, or to the sides to center the camera angle
After you have securely mounted the C922 to your monitor or TV, it’s ready to be plugged in and used with any recording application on your computer.
Mounting camera on the tripod
You can set up your Logitech C922 Pro Stream Webcam to record a 78-degree view of a room for presentations or live streams by attaching it to the tripod.
To set up your Logitech C922 Webcam with a tripod:
- Unfold and extend the legs of your tripod
- Place the webcam on top of the tripod, aligning the swivel bolt with the webcam mounting hole
- Swivel the bolt by turning a small knob on the tripod
Once you have assembled your Logitech C922 Pro Stream Webcam on your tripod, plug it into your computer and load up your favorite recording application.
How can you use your Logitech C922 Pro Stream Camera?
Altho this camera is designed and built to be used in a live stream environment it can also be used to record video offline to a file. In this next segment, we will explore further applications in which the camera is meant to be used.
Live video
The Logitech C922 Pro Stream Webcam allows content creators to share content in high definition with thousands of viewers in real-time. Stream full 1080p at 30 frames per second and 720p at 60 frames per second live on platforms such as Twitch or YouTube.
- Stream video games or entertainment in real-time
- Create live presentations for work, customers, or followers
- Discuss matters of interest in live talk shows or podcasts
- Video call family or friends on Skype, Facetime, or Google Hangouts
- Capture crystal-clear, 78-degree video with the Logitech C922 autofocus lens. With two microphones attached on each end, you can stream any live video with little to no audio drops.
Offline recordings
The Logitech C922 Pro Stream Webcam can be used with desktop recording software to create professional videos or snapshots. After you’ve finished recording, you can edit specific spots in the video and add custom presentation details.
- Product demonstrations and tutorials
- Educational or promotional presentations
- Video game or entertainment videos
- Personal vlogs
- Talk shows or podcasts
- Desktop or laptop technical walkthroughs
- Complete offline recording in high definition at 1080p. Use QuickTime Player (Mac) or Microsoft Camera App (Windows) to take photos or record videos offline.
Setting up Logitech C922 Pro Stream Camera using XSplit Broadcaster
XSplit Broadcaster offers live stream support for several platforms, which include Facebook Live, YouTube Live, and Twitch. After you hook up your webcam and create profiles for each platform, you can begin a live stream with XSplit Broadcaster.
Twitch Streaming
- Enable Two-Factor Authentication on Twitch: Navigate to the settings of your profile and the Security and Privacy tab. Before you can start broadcasting with XSplit, you must set up Two-Factor Authentication.
- Set Up Twitch Streaming Profile in XSplit: In XSplit Broadcaster, navigate to Broadcast > Set up a new output > Twitch. Select an account to authorize with XSplit and proceed.
- XSplit automatically chooses a resolution to record based on target server connection quality.
- A settings window opens before you complete the setup, which allows you to customize the server and video recording options. Once you have completed the setup, your Twitch profile is set up in XSplit. You can begin a stream by navigating back to Broadcast and clicking on the new Twitch profile.
YouTube Streaming
- Enable YouTube Streaming Live: Click on your YouTube profile picture to open a dropdown and click on YouTube Studio Beta.
- On the left side of the page, navigate to Other features and click on Live events in the dropdown.
- Click on Enable live streaming to set up live streaming for your YouTube profile.
- Set Up YouTube Streaming Profile in XSplit: In XSplit Broadcaster, navigate to Broadcast > Set up a new output > YouTube. Select an account to authorize with XSplit and proceed.
- Once YouTube Live Properties window pops up, click Authorize to connect your Google account. You can also change any settings as needed before you begin a live stream. Once you’re ready to broadcast live with XSplit, navigate back to Broadcast and click your new YouTube Live profile.
Facebook Live Streaming
- Set Up Facebook Live Streaming Profile in XSplit: In XSplit Broadcaster, navigate to Broadcast > Set up a new output > Facebook Live.
- A prompt opens in XSplit to log in to your Facebook profile.
- Log in and set up permissions and posting options as you’d like them to appear whenever you stream live on Facebook. After you’ve completed the permission process, your Facebook Live profile is ready to use in XSplit. You can navigate anytime back to Broadcast and select your new Facebook Live profile in XSplit to begin a live stream.
Using OBS with Logitech C922 Pro Stream Webcam
OBS live streaming application offers high-quality audio and video performance and video capturing in real-time. This application offers full control over every detail and it is a very good choice for both cases.
Setting up Logitech C922 with OBS
- Add Logitech C922 as a Capture Device: Click the + under the Sources section. Once you are in the drop-menu, select Video Capture Device.
- When this menu pops up, click Create New and hit OK.
- From the Device bar, you can select your Logitech C922 as a default Video Capture Device. Set any configurations up how you want them and click OK before exiting.
- Changing Resolution or Frames Per Second: With OBS open, click on Settings in the bottom-right portion of the screen and then on the Video tab on the next page. Here you can set up the screen resolution, downscale filter, and frames per second defaults for all videos recorded with OBS. Click Apply before exiting.
- After you’ve finished applying the initial settings, you can begin recording or streaming in the bottom right-hand corner of the main menu.


 I going to admit right here that I am a big fan of Cooler Master PC cases, I like them and they are always one of the things that I consider when building a new PC, overall I like their ideas and quality so personal for me it was quite a surprise to see that they are one that is making a new generation gaming chair.
Now truth to be told Orb X is not your typical gaming chair as you can clearly see from the pictures. The chair itself will come in two colors: white or black and RGB lighting looks to be prominently featured throughout.
I going to admit right here that I am a big fan of Cooler Master PC cases, I like them and they are always one of the things that I consider when building a new PC, overall I like their ideas and quality so personal for me it was quite a surprise to see that they are one that is making a new generation gaming chair.
Now truth to be told Orb X is not your typical gaming chair as you can clearly see from the pictures. The chair itself will come in two colors: white or black and RGB lighting looks to be prominently featured throughout.
 The chair itself is advertised as both meant and aimed for professional and gaming crowds but I believe the gaming crowd is in general more interested in this hardware piece.
Hardware is enclosed in a fully motorized shuttle dome which aims to maximize your privacy, it supports a single 49inch display or three 27inch monitors along with surround speakers if you do not wish to use headphones.
The chair itself is advertised as both meant and aimed for professional and gaming crowds but I believe the gaming crowd is in general more interested in this hardware piece.
Hardware is enclosed in a fully motorized shuttle dome which aims to maximize your privacy, it supports a single 49inch display or three 27inch monitors along with surround speakers if you do not wish to use headphones.
 It offers an adjustable headrest, lumbar support, and footrest so you can spend some time in it and be comfortable. Controls on the chair itself allow you to raise or lower the dome for easier getting in and out of it.
Orb X also has a compartment in its backside, it folds out and has a sliding tray designed to hold your PC or console. Everything is enclosed so wiring is not the issue.
Overall Orb X seems really like the computer chair of the future, Cooler Master expects to release the Orb X by December 2021, priced around $12,000-$14,000.
It offers an adjustable headrest, lumbar support, and footrest so you can spend some time in it and be comfortable. Controls on the chair itself allow you to raise or lower the dome for easier getting in and out of it.
Orb X also has a compartment in its backside, it folds out and has a sliding tray designed to hold your PC or console. Everything is enclosed so wiring is not the issue.
Overall Orb X seems really like the computer chair of the future, Cooler Master expects to release the Orb X by December 2021, priced around $12,000-$14,000. 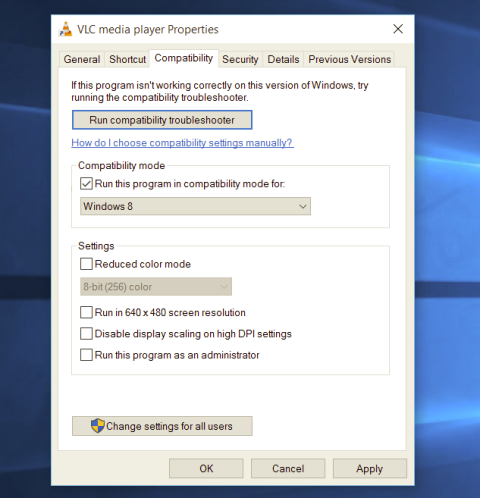 Most of the time running applications with typical settings is fine but from time to time we might have some applications that will require running with administrator privilege in order to work properly. In this case, it is very easy to do it, you just right-click and choose run as administrator.
Although a very easy solution, it can be quite annoying if running the app is on a daily basis or even more times per day. If this is the case then right-clicking and choosing to run as administrator can be a daunting task, sometimes you can even forget to run it like this in heat of work and some unforeseen consequences might occur.
Luckily there is an easy hack so you can open the chosen application each time as an administrator with a simple double click each time.
Most of the time running applications with typical settings is fine but from time to time we might have some applications that will require running with administrator privilege in order to work properly. In this case, it is very easy to do it, you just right-click and choose run as administrator.
Although a very easy solution, it can be quite annoying if running the app is on a daily basis or even more times per day. If this is the case then right-clicking and choosing to run as administrator can be a daunting task, sometimes you can even forget to run it like this in heat of work and some unforeseen consequences might occur.
Luckily there is an easy hack so you can open the chosen application each time as an administrator with a simple double click each time.
