Error 1713 is essentially a programming error. It has specifically been designed in Microsoft applications. This is intended to allow customers to continue using the appropriate setup tool.
The error can be quite annoying and is used by manufacturers to determine what caused the error so that counteractive methods can be employed. The number 1713 is simply the hexadecimal code that informs where the instruction was loaded when the error occurred.
Solution
Error Causes
As far as the causes of Error 1713 are in question, the primary cause is damaged, misconfigured, or corrupt windows system files. There are several other factors that lead to the occurrence of Error 1713.
For instance, if the applications or hardware on your system has been improperly deleted, installed, or uninstalled, Error 1713 will occur.
Similarly, Error 1713 is triggered when the computer has recovered from an attack by some virus, spyware, malware, or adware only recently. This attack corrupts the file and so the error appears. Incorrect system shutdown can also be blamed for this error.
All the scenarios listed above actually damages the registry entries in Windows system files.
The corrupt or damaged files will then lead to improperly linked or missing information. It goes without saying that such problems will keep the applications from performing in the desired manner and this makes it even more crucial to fix this error as soon as it appears.
Further Information and Manual Repair
Two of the most useful workarounds for Error 1713 are listed below.
This solution is for advanced users. Restart your computer. Log on to it as the admin in the safe mode. Now go to the Start button and follow this path All Programs-> Accessories-> System Tools->System Restore. Now an option will appear asking you to ‘Restore your computer to an earlier time’. Select it. This option will actually appear in a new window. Click Next. A list of restore points will be displayed to you. Select the most recent restore point before the occurrence of the error and press Next. Now click on the Next button that appears in the confirmation window. Restart your computer as soon as the restoration is finished.
This solution is for novice users. Download a 1713 repair utility available online. Install this program and use it to scan your system. After the scan is complete, click on repair to fix the error.
To understand Rt170.bpl error code, it is important to have a good understanding of .bpl files first.
BPL is the abbreviation of Borland Package Library. BPL is a developer file format used by Borland. It contains dynamic link libraries which are used for constructing Borland programs. BPL files are most commonly used for Borland Delphi programs.
Delphi competes with Visual Basic as an offering for an object-oriented visual programming approach to application development.
There are many programs/applications on your system that use rtl70.bpl file format to run successfully on Windows PC.
The rtl70.bpl error occurs when this file gets damaged or corrupted. It fails to execute the command and run the application on your system. When your computer experiences this problem with this file, the following error messages are likely to appear:
rtl70.bpl is not responding
Runtime error: rtl70.bpl
Symantec User Session has encountered a problem and needs to close. We are sorry for the inconvenience. Application Name: rtl70.bpl
This error code exposes you to system freeze, crash, abrupt system shutdowns, blue screen of death errors, and it also reduces your PC performance.
Solution
Error Causes
The potential causes of rtl70.bpl error code includes:
DLL file was damaged due to viral infection or spyware
DLL file was overwritten by an incompatible version
Poor program installation
Too many invalid and obsolete registry entries stored in the RAM
Related Registry entries are corrupt
Further Information and Manual Repair
Here are some of the best yet simple solutions for you to resolve rtl70.bpl error on your PC:
1. Reboot Your PC
Sometimes this error can be resolved by simply restarting your system. Try rebooting your system and running .bpl supported program. If the program runs after you reboot your PC, then that’s great! But you should keep in mind that this is a temporary solution. The error may reappear anytime soon.
So, it is advisable to consider a long-term solution for repairing the error code for the longest time.
2. Uninstall and then Reinstall the Program Causing the Error
If the error occurred after a certain program installed on your system, it is advisable to uninstall it and then reinstall the program. Simply go to the control panel, select Add/Remove program option and uninstall the program that you recently installed that could be triggering the rtl70.bpl error code.
Now reinstall and run it on your system. If the error is resolved, then this means the poor installation was the cause. If not, then this means the cause of the error is related to the registry.
3. Registry Restore to Fix rt170.bpl error
There are two ways to go about it.
The first one is to click on the start menu, type registry editor, and press run. This will open the registry editor. Now click on the computer option then click file and import. This helps restore the registry but it is possible that the problem might persist.
The error code may pop up again. Also, if the registry is damaged due to viral infection, then this solution may not work and you may still experience the error on your system. Then you will also have to download an antivirus which may further reduce the speed of your PC.
However, the best way to restore the registry and to get rid of the error code for the longest time is to download Restoro. This is a new, user-friendly, high and multi-functional repair tool that functions as a registry cleaner and a system optimizer.
It cleans the registry by scanning and removing all the unnecessary and obsolete files saved in RAM such as junk files, internet history, invalid registry entries, and more. It also repairs the damaged dll files and restores the registry thereby resolving the rtl70.bpl error.
Restoro is easy to use, safe, efficient, and compatible on all Windows versions.
To get started and resolve the rtl70.bpl error code in just a few seconds on your system click here and download Restoro.
Windows update issue may come up when the configuration for windows update service is not properly configured or this error can also come up when there is corrupt windows installation. Before trying any of the given solutions to this error try first to clean boot your Windows and turn off any 3rd party utility application. If this method fails move to the provided solutions.
Change startup type of UOS service to automatic
UOS or The Update Orchestrator Service is essential for proper Windows updates. If this service is by any means turned on manual it could be the reason for error since it can create incompatibility between OS modules, if this is the case, setting it to automatic will solve the issue.
Press CTRL + SHIFT + ESC on your keyboard to bring the task manager up and click on the services tab.
In the services find orchestrator service, right-click on it, and from the list of startup types choose automatic.
Click on APPLY and reboot your computer.
Try to fix it in the command prompt
If the above method failed, try fixing the issue via command prompt.
Press ⊞ WINDOWS + X to bring up the secret menu and start command prompt (administrator)
In the command prompt write these lines one after another as they are finished:
net stop bitsnet stop wuauservnet stop appidsvcnet stop cryptsvcRen %systemroot%SoftwareDistribution SoftwareDistribution.bakRen %systemroot%system32catroot2 catroot2.bakNet Start bitsNet Start wuauservNet Start appidsvcNet Start cryptsvc
After all this, reboot your system and check if updates are working properly.
Try to fix it via registry editor
Press ⊞ WINDOWS + R to bring run and type in it RegEdit, press ENTER
find Computer\HKEY_LOCAL_MACHINE\SYSTEM\CurrentControlSet\Services\UsoSvc
in the right part, find key START and change its value to 2Reboot your system
Try with a new user account
If by any chance user account data is corrupted this may be the reason why we have this error.
Create a new administrator user account
Shut down your computer
Turn in back ON and log in with the new account
Perform SFC scan
Press ⊞ WINDOWS + X and choose command prompt (administrator)
type in: sfc /scannow
This may take a while, sit back, let it finish, and try again windows update
That is all considering this particular error, we certainly hope that you have managed to fix it using any of provided solutions!
If you encounter the NMI_HARDWARE_FAILURE Blue Screen error while using your Windows 10 computer, then read on as this post will guide you in resolving this kind of Blue Screen of Death error.
NMI HARDWARE FAILURE or “Non-Maskable Interrupt” Blue Screen error occurs when there is some hardware malfunction in your computer. When you encounter this Blue Screen error, you may get a stop code of 0x00000080 which can randomly occur while you use your computer. However, a lot of users reported encountering this error while they were trying to update or install their Graphics Card drivers.
The stop code that you may get for this BSOD error is 0x00000080. The error can occur randomly during your usage of the computer – but a large number of users have reported this error while they are updating or installing their Graphics Card drivers. In this post, we will be covering all the possible fixes for this error.
NMI_HARDWARE_FAILURE error on Windows
The NMI_HARDWARE_FAILURE bug check has a value of 0x00000080. This bug check indicates that a hardware malfunction has occurred. There are various hardware malfunctions that can cause this kind of Blue Screen error. However, pinpointing the exact cause is quite difficult. Worry no more for the following fixes provided below can help you resolve the NMI_HARDWARE_FAILURE Blue Screen error no matter what the cause of the problem is.
Option 1 – Try removing hardware or drivers that you’ve installed recently
If you have recently installed some hardware or drivers, you might want to disable or remove them since external devices are proven to be one of the factors that trigger Blue Screen errors like NMI_HARDWARE_FAILURE. All you have to do is physically disconnect any external devices that are connected to your computer and then check if it fixes the BSOD error or not.
Option 2 – Try to rollback, update, or disable the Graphics card drivers
Since the NMI_HARDWARE_FAILURE Blue Screen error has something to do with Graphics card drivers, you can either roll back, update or disable them depending on your preference in order to resolve the error.
First, boot your computer into Safe Mode.
After that, tap the Win + R keys to launch Run.
Type in devmgmt.msc into the box and tap Enter or click OK to open the Device Manager.
After that, a list of device drivers will be displayed. From there, look for the Display Adapters and click on them.
After that, right-click on each entry under the Display Adapters and select the “Uninstall Device” option from the menu.
Now restart your computer.
After restarting your computer, go to the Settings app and Check for Updates in the Windows Update section.
Note: You also have the option to go directly to the website of your graphics card manufacturers like NVIDIA, Intel, or AMD and go to the section called Drivers then check if there’s a new available update – if there is, download and install it.
Option 3 – Make sure that all memory modules have the same type
This third option is quite technical and tricky. If you often use multiple physical RAMS on your Windows 10 computer, then you have to check first if they are of the same frequency. After that, the first thing you should verify is if the chip is properly compatible or not. And if the sockets are attached using some kind of adapter or non-recommended device, it could cause some issues while giving a performance hit to your computer. If you were able to find such a setup, you have to undo it or install the proper and recommended as well as compatible hardware.
Option 4 – Try to run the Blue Screen Troubleshooter
As you know, the Blue Screen troubleshooter is a built-in tool in Windows 10 that helps users in fixing BSOD errors like the NMI_HARDWARE_FAILURE error. It can be found on the Settings Troubleshooters page. To use it, refer to these steps:
Tap the Win + I keys to open the Settings panel.
Then go to Update & Security > Troubleshoot.
From there, look for the option called “Blue Screen” on your right-hand side and then click the “Run the troubleshooter” button to run the Blue Screen Troubleshooter and then follow the next on-screen options. Note that you might have to boot your PC into Safe Mode.
If you suddenly encounter an error saying, “Something happened and this app couldn't be installed. Error Code: 0x80244018”, when trying to install apps on your Windows 10 computer, then you’ve come to the right place as this post will help you in resolving the problem.
It’s not just you that’s experiencing this problem right now as several users also reported getting this error they try to apply a Windows update or download and install the application from Microsoft Store. There could are several reasons why you’re getting this error. It could be caused by a third-party application, or it could be that the update is blocked by your VPN or proxy server, or that the BITS service is disabled. In addition, the error could also be due to some glitch in the component services or it could be that the system files are corrupted. Whatever the cause is, you can fix the error by following any of the given options below.
Option 1 – Run the Windows Update Troubleshooter
Running the Windows Update Troubleshooter can help in fixing Error Code 0x80244018. To run it, go to Settings and then select Troubleshoot from the options. From there, click on Windows Update and then click the “Run the troubleshooter” button. After that, follow the next on-screen instructions and you should be good to go.
Option 2 – Put your PC in a Clean Boot State
It could be that some third-party application is the one that’s causing the problem so it’s best if you put your computer in a Clean Boot state. During this state, you can start the system with a minimum number of drivers and startup programs that will surely help you in isolating the root cause of the issue.
Log onto your PC as an administrator.
Type in MSConfig in the Start Search to open the System Configuration utility.
From there, go to the General tab and click “Selective startup”.
Clear the “Load Startup items” check box and make sure that the “Load System Services” and “Use Original boot configuration” options are checked.
Next, click the Services tab and select the “Hide All Microsoft Services” check box.
Click Disable all.
Click on Apply/OK and restart your PC. (This will put your PC into a Clean Boot State. And configure Windows to use the usual startup, just simply undo the changes.)
After that, try to install the Windows app again.
Note: If you are able to install the app without any trouble at all then it means that the error is caused by some third-party application on your computer. You need to look for the culprit and uninstall it once you found it.
Option 3 – Restart BITS
The Background Intelligent Transfer Service or BITS is a part of the Windows Update service and is the one that manages the background download of Windows Update, as well as scans for new updates and so on. And if Windows Update is experiencing some problems, you can try restarting BITS but make sure that you have admin privileges to do so.
Tap the Win + R keys to open the Run dialog box.
Next, type “services.msc” in the field and hit Enter to open Windows Services.
From the list of Services, look for the Background Intelligent Transfer Service and double-click on it to open Properties.
After that, you need to set the Startup type to “Automatic (Delayed Start) and click on Apply.
Now click the Stop button to stop BITS and then click the Start button to restart the service.
Click OK to save the changes made and then restart your PC.
Option 4 – Disable the Proxy server
Tap the Win + R keys to open the Run dialog box.
Then type “inetcpl.cpl” in the field and hit Enter to pull up the Internet Properties.
After that, go to the Connections tab and select the LAN settings.
From there. Uncheck the “Use a Proxy Server” option for your LAN and then make sure that the “Automatically detect settings” option is checked.
Now click the OK and the Apply buttons.
Restart your PC.
Note: If you are using a third-party proxy service, you have to disable it.
Option 5 – Try disabling the VPN
As mentioned, if you are using VPN, this could be the reason why you’re getting Error Code 0x80244018 so the most obvious thing to do is for you to turn off the VPN and try to run the Windows Update once more. And if you use a VPN software that works using their software, you can just completely exit or log-off from its account. On the other hand, if you are using a built-in Windows 10 VPN, you can simply turn it off or delete all the settings you have created there. Although it’s understandable that you might have to use a VPN connection to connect to the work network, you really have to disable it at least after you’ve successfully installed the app.
Option 6 – Reset Windows Update components
Open Command Prompt with admin privileges.
After that, type each one of the following commands and hit Enter after you key in one after the other.
net stop wuauserv
net stop cryptsvc
net stop bits
net stop msiserver
Note: The commands you entered will stop the Windows Update components such as Windows Update service, Cryptographic services, BITS, and MSI Installer.
After disabling WU components, you need to rename both the SoftwareDistribution and Catroot2 folders. To do that, type each one of the following commands below, and don’t forget to hit Enter after you type one command after the other.
Next, restart the services you’ve stopped by entering another series of commands. Don’t forget to hit Enter after you key in one command after the other.
net start wuauserv
net start cryptsvc
net start bits
net start msiserver
Close Command Prompt and reboot your PC.
Option 7 – Run the System File Checker Scan
System File Checker or SFC is a built-in command utility that helps in restoring corrupted files as well as missing files. It replaces bad and corrupted system files with good system files that might be the cause why you’re getting the Error Code 0x80244018. To run the SFC command, follow the steps given below.
Tap Win + R to launch Run.
Type in cmd in the field and tap Enter.
After opening Command Prompt, type in sfc /scannow
The command will start a system scan which will take a few whiles before it finishes. Once it’s done, you could get the following results:
Windows Resource Protection did not find any integrity violations.
Windows Resource Protection found corrupt files and successfully repaired them.
Windows Resource Protection found corrupt files but was unable to fix some of them.
Restart your PC.
Option 8 – Run the DISM tool
You can also run the DISM Tool as it helps in repairing the Windows System Image as well as the Windows Component Store in Windows 10. Using this built-in tool, you have various options such as the “/ScanHealth”, “/CheckHealth”, and “/RestoreHealth” which could help in fixing the Error Code 0x80244018.
Open the Command Prompt with admin privileges.
Then type in the following commands and make sure to hit Enter right after you type each one of them:
Dism /Online /Cleanup-Image /CheckHealth
Dism /Online /Cleanup-Image /ScanHealth
exe /Online /Cleanup-image /Restorehealth
Do not close the window if the process takes a while as it will probably take a few minutes to finish.
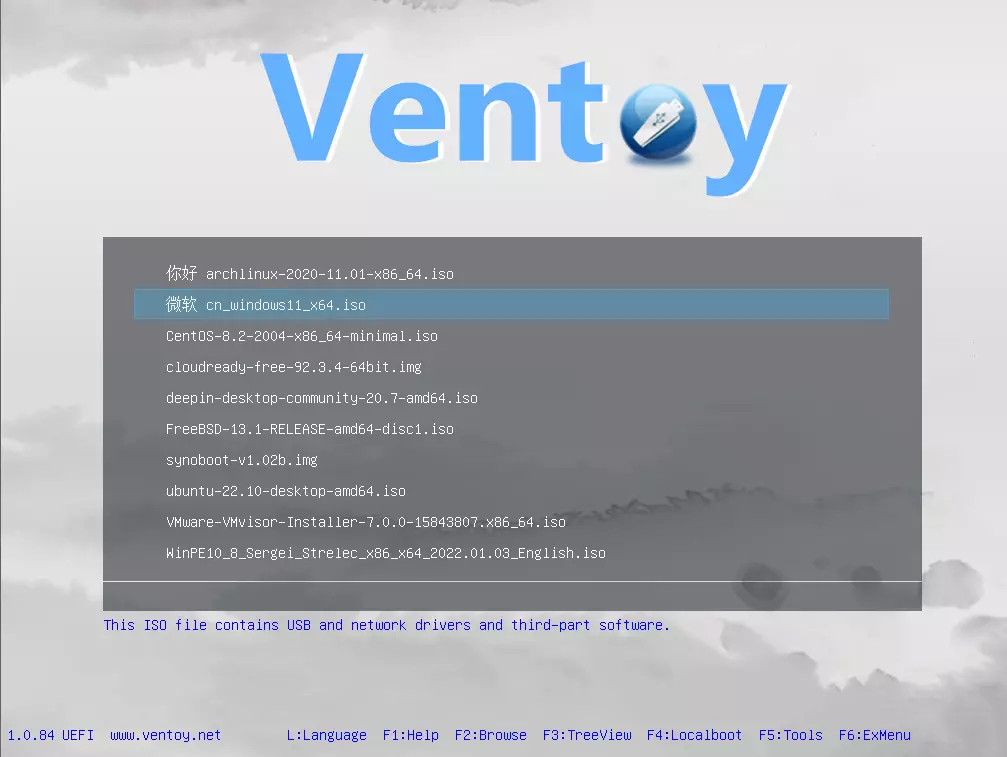
There is a lot of software on the market today, but from time to time we discover something extraordinary and unique worth sharing and today we have a threat for you. Ventoy is a tool that will help you with system reinstallations and system maintenance once and for all.
If you are a computer user that has multiple operating systems or you are installing and maintaining different hardware via different OS there is a high chance that you have multiple USB sticks with different operating systems on them.
Now the problem with that is that there are probably too many unlabeled sticks around or you do not have enough so you keep making system USBs depending on which one you might need.
Ventoy solves all of these problems by letting you have as many operating systems images as your USB has capacity. The only thing you need to do is get the software here: https://www.ventoy.net/en/index.html and make a USB with it, then you can freely just copy your ISO images onto the USB and once it is inserted into the computer you will be given a menu to choose which one you would like to start with, simple as that.
As you know, the internet has changed the world immensely. Nowadays, JavaScript is pushing the modern web ahead. One of the things that make these experiences with the internet seamless and with less clutter is redirection. It is often used on web pages and there are times when a user is prompted about them and most of the time, we barely notice them. However, there are also instances when things can go wrong with redirects as they could become a loop that could mess things up. And since the browser takes a lot of system resources, redirection can result in a poor user experience. That’s why in this post, you will be guided on how you can stop these automatic redirects on browsers such as Microsoft Edge, Google Chrome, and Mozilla Firefox, on your Windows 10 computer.
To get started, refer to each one of the options provided below to stop automatic redirects in Microsoft Edge, Google Chrome, and Mozilla Firefox.
Option 1 – Configure the browsers to stop pop-ups and deceptive contents
There are a lot of browsers with built-in settings that allow users to stop pop-ups and deceptive content. To configure these settings, refer to these steps:
Microsoft Edge:
Click on the three horizontal dots icon or the menu button.
Next, click on Settings and select Privacy & Security from the left side navigation.
After that, scroll down on the right-side panel and look for Block pop-ups and Windows Defender SmartScreen and then turn their toggle buttons to On.
Google Chrome:
Open Google Chrome and click on the three vertical dots icon for the menu located in the top right corner of the browser.
Next, click on Settings and scroll down until you see the Advanced option. Click on it to open the Advanced Settings.
Now scroll down until you reach the Privacy and Security section and look for the Safe browsing option and turn its toggle button to On.
Mozilla Firefox
Open Mozilla and click on the three horizontal lines icon for the menu button located in the top right corner of the browser and click on Options.
Next, go to the Settings section and click the Privacy & Security tab and scroll down and then click on Permissions.
From there, make sure that the Block pop-up windows checkbox is checked.
Finally, scroll down until you reach the Security section and make sure that the checkbox for the Block dangerous and deceptive content is checked.
Option 2 – Try to reset Winsock, TCP/IP & Flush DNS
To stop redirects, you can also reset Winsock and the TCP/IP as well as flush the DNS cache. To do so, follow these steps:
Right-click on the Start button and click on Command Prompt (administrator) so you can pull up an elevated Command Prompt.
After that, execute each one of the commands listed below. And after you typed in one after the other, you have to hit Enter.
netsh winsock reset – type in this command to reset Winsock
netsh int ip reset resettcpip.txt – type in this command to reset TCP/IP
ipconfig /flushdns – type in this command to flush the DNS cache
Next, restart your PC and check if the problem’s fixed.
Option 3 – Edit your Hosts File
Tap the Win + R keys to open then type in %WinDir% and then click OK.
Go to System32/drivers/etc.
Open the host file using Notepad.
Delete all the suspicious entries.
After that, save the changes you’ve made and close the file.
Hello everyone and welcome to our useful tips and tricks and problem-solving article blog. This time we are doing something different, instead of solving issues this time we are focusing on some quality of life tips like keyboard shortcuts in your Windows 10.
Shortcut Keys
Description
Windows Key
Opens/closes the Start menu.
Windows Key + Up Arrow
Maximizes the selected window.
Windows Key + Down Arrow
Reduces the window size. (Restore down.)
Windows Key + M
Minimizes all open windows.
Windows Key + Shift + M
Opens minimized windows.
Windows Key + Tab
Shows Task View.
Windows Key + L
Locks the screen.
Windows Key + A
Opens the Action Center.
Windows Key + V
Opens Clipboard History.
Windows Key + I
Opens the Settings menu.
Windows Key + F
Opens the Feedback hub.
Windows Key + H
Opens the dictation toolbar.
Windows Key + P
Opens the projection settings.
Windows Key + . (Windows Key + ;)
Opens the emoji panel.
Windows Key + C
Opens Cortana in listening mode.
Windows Key + C (Windows Key + Q)
Opens Windows Search.
Windows Key + G
Opens the Xbox game bar.
Windows Key + X
Opens the secondary start menu.
Windows Key + <number>
Opens the app in the taskbar relative to the number input.
For example, if Chrome is the fourth app on the taskbar, using Windows Key + 4 will open Chrome.
Windows Key + Alt + <number>
Opens the right-click menu for the app in the taskbar relative to the number input.
For example, if Chrome is the fourth app on the taskbar, using Windows Key + Alt + 4 will open Chrome’s right-click menu.
Windows Key + D
Shows/hides open apps on the desktop.
Windows Key + E
Opens File Explorer.
Windows Key + U
Opens Ease of Access in the Settings menu.
Windows Key + Print Screen
Takes a screenshot of the desktop.
Windows Key + Control + F
Opens the Find Computers window.
Windows Key + Control + D
Creates a virtual desktop.
Windows Key + Control + Left Arrow
Switches to the virtual desktop on the left.
Windows Key + Control + Right Arrow
Switches to the virtual desktop on the right.
Windows Key + Control + F4
Closes the active virtual desktop.
Windows Key + Space
Switches between installed languages (for writing text).
In today's modern world many households have internet access, most of the connection nowadays is done via Wi-Fi or wireless but there is a high probability that you have also a few devices connected via cable. There are of course many disadvantages and advantages between cable connection and wireless connection.
The main advantages of a hard cable connection are of course faster speed and stability compared to Wi-Fi. But if we look into the cables themselves there is also a big difference between them. Not all cables are the same and quality as well as speed vary a lot between them. Choosing the right cable is essential in order to make a maximum of your internet and we have some great tips and explanations of what cables do so you can make the right choice and enjoy your full internet potential.
Not all cables are the same
Cheap cables and expensive ones are not the same no matter what everyone tells you. The old proverb you get what you pay is true and more expensive cables will be made from better materials and will have a higher transfer rate.
Quality network cables are separated into different categories with proper markings and when buying one you should always look for these markings on the cables themselves, do not buy cables that do not have markings since they will often provide lower transfer rates or will not be shielded from outside influences resulting in packet drops and instability in a network.
Categories and what they mean are:
Cat-5 with a maximum speed of 100Mbps, typically unshielded.
Cat-5e with a maximum speed of 1Gbps, available in both shielded and unshielded varieties.
Cat-6 with a maximum speed of 10Gbps for runs under 55 meters (around 180ft), available in both shielded and unshielded varieties.
Cat-6a with a maximum speed of 10Gbps, shielded.
Cat-7 uses a proprietary GG45 connector rather than the standard RJ-45 connector seen on other cables for speeds of 10Gbps, shielded.
Cat-8 with a maximum speed of 25Gbps (Cat-8.1) or 40Gbps (Cat-8.2) at a distance of around 30 meters (around 100ft), shielded.
Unless stated, these standards are typically rated at their quoted speeds for a run of around 100 meters (around 330 ft) and use a standard RJ-45 Ethernet connector. Each generation of cable is designed to be compatible with the generations that came before it, so it’s possible (for example) to use a Cat-6a cable with a router that only supports speeds of 1Gbps.
Shielded cables
When purchasing higher quality cable you might not be able to choose if you have shielding or not since some standards like Cat-6a, Cat-7, and Cat-8 are always shielded. But if you do not have the need for these and you are satisfied with Cat-5e for example you can choose.
Shielded cables are a little more expensive but they will provide you with a coating that will eliminate interference from outside waves making cables more reliable. Of course, if the cable will go through a room that does not have many radio waves or some other interferences then buying a shielded cable is a waste of money.
Cable platings
Usually, there are two types of connector platings on connectors, silver, and gold, and people usually think that gold is much better but there are major differences between silver and gold platings and truth to be told there is no better one, both are different and should be considered depending on your need.
Silver plating will provide you with faster speed since its conductivity is larger than gold, but gold is slower on the oxidation front so its life span is longer. On the other hand, if your cables are always connecting and disconnecting gold will be first to be scrubbed off from the surface since the gold coating is much thinner.
Overall if you would only connect cable once and have slower internet than cable capacity gold is the way to go, in another case if you would use the cable as always connecting and switching and your internet plan is the same as cable transfer capacity you might want to go with silver one.
Cable material quality
Network cables are made from copper, your standard conduction material but even here there are differences in quality and therefore the chance of pocket losses over it. More quality less loss and more stable connection and this will depend on the purity of copper that is used in the cable itself. More purity in copper, more stability, simple as that.
Conclusion
So as you can see, there are a lot of different things that will influence your pick of proper network cable but the overall best advice is to get one that will fit well into your needs and setup. pair it up with your router and your internet plan since just simply buying something that you can not use is really a waste of money.
SMB which stands for “Server Message Block”, is a protocol used for file sharing. It provides the Read and Writes operating on network devices. Thus, it is why it is widely used when accessing a server-based in Linux. Its latest version is the SMB2 which follows after SMB1. The SMB2 contains more fixes to vulnerabilities that were found in SMB1. The predecessor was vulnerable since it served as a gateway to various modern ransomware which is why Microsoft disabled it by default starting with Windows 10 v1709.
When you try to share a file, you will get the following error message:
“Microsoft Windows Network: You can’t connect to the file share because it is not secure. This share requires the obsolete SMB1 protocol, which is unsafe and could expose your system to attack. Your system requires SMB2 or higher.”
In this post, you will be guided on how to check if the SMB2.0 version can be installed on your Windows 10 computer. To get started, follow the steps below.
Step 1: Tap the Win + X keys to open the Device Manager.
Step 2: After that, click on the Windows PowerShell (Admin) option.
Step 3: In the Windows PowerShell window, type the following command and hit Enter:
Note: After entering the command, you will see the following content on your screen which means that your Windows 10 computer is now capable of running the SMB2 protocol
Now all that’s left for you to do is to enable the SMB 2 protocol on your Windows computer by enabling the SMB 1 protocol first and then upgrading it to SMB 2 afterward. Refer to the steps below for more details.
Step 1: Tap the Win + I keys to open the Settings app.
Step 2: Then type in “control panel” in the search area and click on Control Panel from the search results.
Step 3:After opening Control Panel, click on Programs. From there, select the “Turn Windows features on or off” option under the larger menu of Programs and Features.
Step 4: After that, Windows Features will appear on your screen. And from there, make sure that you select SMB 1.0/CIFS File Sharing Support and then click on OK.
Step 5: Now let it install all the required files and then restart your computer to apply the changes made successfully. After your computer has restarted, the SMB 2 protocol should now be supported on your Windows 10 computer.
Note: On the other hand, you can also enter the following command in the Windows PowerShell window. Just make sure you have admin rights to enable it.
As you know, the USB security keys are a secure medium to validate a lot of components in a computer. They can be used to log in to Windows 10. Now with the advancement of APIs, you can authenticate across the website as well using the same key. However, there are times when it may not work and it could be caused by several factors. It could be due to corrupted or incompatible drivers or it could also be due to compromised integrity of the key, and many more.
So if you happen to encounter an issue with the USB security key on your Windows 10 computer, then there are several potential fixes you can try. You can try toggling the Internet Options settings or reinstall the respective USB drivers. You could also try changing the PIN of the security key or disable the antivirus program on your computer or troubleshoot the web browser. Refer to the potential fixes provided below to fix the problem.
Option 1 – Try to toggle the settings of the Internet Options
In the Windows Search box, search for Internet Options to open it.
Next, go to the Security tab and drag the security slider to the lowest possible security for all the given zones.
After that, click on OK to save the changes made and close the Internet Options.
Note that this option is only a temporary measure as it can make your computer vulnerable. Make sure to press the Reset all zones to default level button.
Option 2 – Try to update or reinstall the respective drivers
If updating the drivers of the device did not fix the problem with the USB security key, you can try to update or reinstall the Universal Serial Bus Controller drivers instead of using the Device Manager. Refer to the following steps:
First, click the Start button and type “device manager”.
Then click on the “Device Manager” from the search results to open it.
From there, look for the “Universal Serial Bus controllers” option and then right-click on each one of the USB drivers and select the Update Driver from the menu.
Note: If it is a regular USB drive, then it will be listed as a USB Mass Storage Device but if you have a USB 3.0 device, then look for a USB 3.0 Extensible Host Controller.
Restart your PC and then click the “Search automatically for updated driver software” option.
Note: If updating the USB Controller drivers didn’t work, you can try to reinstall them instead.
Option 3 – Try to change the PIN of the security key
If the first two options didn’t work, you can try changing the PIN of the security key. There are instances when the PIN for the security key might have been corrupted. Thus, resetting it can help you resolve the problem.
Option 4 – Temporarily disable Firewall and third-party antivirus
Firewall and antivirus programs are known to block the proper functioning of the USB security key. Thus, your antivirus or firewall programs might be the reason why you can’t download anything on your Windows 10 computer. To isolate the issue, you need to temporarily disable both the Firewall and antivirus programs and then check if you can now download anything from the internet. Do not forget to enable them again as disabling them can leave your computer vulnerable to cyber threats.
Option 5 – Try to troubleshoot the web browser
Troubleshooting your web browser can also help you fix the USB security key problem. You can do that by checking if your web browser supports the security key and you can do that by checking on the official website of your browser. You can also try to update your web browser to its latest version but if it didn’t help, you can try to reinstall it or switch to another web browser.

 Error Causes