Error 0x80070780 is a particularly nasty error since it means we can not access files on our hard drive. This might be an important file from work or anything similar and it can be frustrating when we can access it.
In this article, we will address solutions to this error so you can continue with your activities where you have left off.
Follow the guide step by step in the given order to minimize file damage and find the solution quickly.
Run File and Folder built-in troubleshooter
The simple and clean solution, try first by running Windows built-in tools. Leave troubleshooter to scan and attempt repairs and try to access a file after that.
Run disk checker
Maybe the file is corrupted or slightly damaged but repairable, run a built-in Windows disk checker and let it scan and repair any error found. Try accessing your file after the scan.
Try copying file
If the file is under a bad sector or cluster on a disk drive that could be a reason why you can not access it, try copying the file to another location and then opening it, if the operation fails, boot Windows in safe mode and try to copy or move file then. If you are successful with copying files in safe mode, reboot your computer and try to open the file.
Reinstall the driver for the hard drive
Like when the driver for USB is not working and you can not access files same can happen on your hard drive. Go to the device manager and reinstall the driver for your hard drive.
Upgrading your Windows computer may not always go as expected as you could end up getting some error messages along the way. One of the error messages you can encounter is the “STOP 0XC000021A or STATUS_SYSTEM_PROCESS_TERMINATED” error. This error indicates that is some security issue within the Windows operating system. It could be that the system files have an issue and they have been modified incorrectly. Although this does not necessarily mean that malware is behind the modification, one of the applications you installed recently might have something to do with the problem. The application might have modified or corrupted some of the core system files. When you encounter this error, you will see a blue screen along with the following error message:
“Your PC ran into a problem and needs to restart. We’re just collecting some error info, and then we’ll restart for you. (0% complete)If you’d like to know more, you can search online later for this error: 0xc000021a”
This error pops up when a user-mode subsystem like the WinLogon or the Client Server Run-Time Subsystem or CSRSS has been compromised fatally and security can no longer be guaranteed in the system. Thus, the operating system switches to kernel mode, and Windows won’t be able to run without the WinLogon or the Client Server Run-Time Subsystem. This is why it’s one of the few cases where the failure of a user-mode service can shut down the system. To resolve the issue, here are some fixes that might help.
Option 1 – Uninstall programs you installed lately
In the search box, type in “control” and then click on Control Panel (desktop app) among the search results.
After that, select Programs and Features from the list which will give you a list of all the programs installed on your computer.
From there, look for the concerned program and select it and then uninstall it.
Note: If you have downloaded the app from the Windows Store, you can simply right-click on it from the application list and then uninstall it.
Option 2 – Perform System Restore
Performing System Restore can also help you fix the “STOP 0XC000021A or STATUS_SYSTEM_PROCESS_TERMINATED” error. You can do this option either by booting into Safe Mode or in System Restore. If you are already in the Advanced Startup Options, just directly select System Restore and proceed with the next steps. And if you have just booted your PC into Safe Mode, refer to the steps below.
Tap the Win + R keys to open the Run dialog box.
After that, type in “sysdm.cpl” in the field and tap Enter.
Next, go to the System Protection tab then click the System Restore button. This will open a new window where you have to select your preferred System Restore point.
After that, follow the on-screen instructions to finish the process and then restart your computer and check if the problem is fixed or not.
Option 3 – Run the System File Checker or SFC scan
System File Checker or SFC is a built-in command utility that helps in restoring corrupted files as well as missing files. It replaces bad and corrupted system files to good system files that might be the cause why you’re getting the “STOP 0XC000021A or STATUS_SYSTEM_PROCESS_TERMINATED” error. To run the SFC command, follow the steps given below.
Tap Win + R to launch Run.
Type in cmd in the field and tap Enter.
After opening Command Prompt, type in sfc /scannow
The command will start a system scan which will take a few whiles before it finishes. Once it’s done, you could get the following results:
Windows Resource Protection did not find any integrity violations.
Windows Resource Protection found corrupt files and successfully repaired them.
Windows Resource Protection found corrupt files but was unable to fix some of them.
Option 4 – Rebuild the BCD and fix MBR
Rebuilding the BCD can help you in fixing the “STOP 0XC000021A or STATUS_SYSTEM_PROCESS_TERMINATED” error.
You can start by booting into the installation environment for Windows 10 from an installation media.
After that, click on Repair your computer and on the blue screen, select Troubleshoot and then select the Advanced options menu.
Next, select Command Prompt and type in the commands below one by one, and tap Enter right after you do so.
exe /FixMbr
exe /FixBoot
exe /RebuildBcd
The commands you entered should rebuild the BCD and repair MBR.
Option 5 – Run the CHKDSK utility
You can also run the Chkdsk utility to resolve the problem. If your hard drive has issues with integrity, the update will really fail as the system will think that it’s not healthy and that’s where the Chkdsk utility comes in. The Chkdsk utility repairs hard drive errors that might be causing the problem.
Open Command Prompt with admin privileges.
After opening Command Prompt, execute the commands listed below, and don’t forget to hit Enter right after you type in each one of them.
Many Linux users if not all of them can run their distros from a USB drive but did you know you can run Windows 10 from a USB drive as well?
Microsoft has introduced all the way back to Windows 8 one feature called Windows To Go and it kept it in Windows 8.1 and in Windows 10 as well.
This feature is intended as a convenient way for workers to carry their corporate environments with them, but having your own copy of Windows on a thumb drive could be handy for backup purposes, too, or if you frequently use public machines that lack your preferences/applications or that have a restricted OS.
What you will need?
In order to actually make Windows 10 run from a USB drive you will need the following things:
Install Rufus on your Windows 10 and run it. Stick USB in PC and open Rufus. On the screen that follows choose your Windows 10 ISO image and under Image options choose Windows To Go. Click on ready and you are finished, that’s it.
After Rufus finishes you have now fully working Windows 10 bootable drive which you can use on another PC for whatever reason.
The docking station was promised upon release of the Deck but it was pushed back and now the official statement is that it is delayed again.
Valve said in an announcement on June 1:
“Due to parts shortages and COVID closures at our manufacturing facilities, the official Steam Deck Docking Station is delayed. We’re working on improving the situation and will share more info when we have it.”
Valve
The docking station was presented at the same time as Deck itself and the whole idea was to make Steam Deck work like a laptop docking station. It has ports for USB devices, displays, and network connections that became functional the moment Deck is placed on it. Docking supports a mouse, keyboard, and external display making it an almost full PC station if needed.
Valve confirmed that its official dock station will not improve performance so while you wait for its release you can use another docking station with a USB Type-C connector.
If you encounter an error message saying, “ERR SSL VERSION OR CIPHER MISMATCH” while visiting a website, then it is not primarily your fault as an end-user. In fact, it can happen on any website like Chrome, Edge, Firefox, and even Internet Explorer. Getting this error means that the website you are visiting is using an SSL certificate which your browser seems to be rejected because there is some issue with the certificate. It is also possible that the certificate that’s downloaded on your computer is corrupted or that your computer configuration for TSL/SSL is misconfigured.
Here are the complete details of the error message:
“A secure connection cannot be established because this site uses an unsupported protocol, Error code ERR_SSL_VERSION_OR_CIPHER_MISMATCH”
To resolve the ERR_SSL_VERSION_OR_CIPHER_MISMATCH error, refer to the options given below and see which one works for you.
Option 1 – Try to access the website with the only HTTP
The first thing you can do is to try accessing the website using HTTP instead of HTTPS. If you can open the website using HTTP then it means that the problem is in the website itself. And if you are the website owner, you can check the following:
Check if your website’s SSL certificate name is mismatched. Here you need to ensure that the name and alias of the websites match with the actual website URL where the certificate is installed.
Second, check if your server is using the RC4 Cipher. If it is, then you need to fix that.
On the other hand, you may also check if your CDN also supports SSL since most of the CDN nowadays supports SSL. All you have to do is configure it correctly and it should be good to go.
If you were using Google Chrome when you got the ERR SSL VERSION OR CIPHER MISMATCH error, then you need to follow the protocol fixes for SSL3/TLS and QUIC which are usually some of the reasons that cause the SSL version / Cipher Mismatch. It also has a few fixes for Windows 10 computer where you can clear the certificates and make sure that your computer date and time is in sync with your time zone and so on.
If you were using Edge or Internet Explorer when you got the error, then you have to follow the steps below.
Type “Internet” in the search box of your browser. After that, you should see the Internet Options from the search results.
Next, open the Internet Properties window and switch to the Advanced tab and then scroll down to the Security section.
From there, check the “Use TLS 1.1” checkbox as well as the “Use TLS 1.2” checkbox and then click OK to save the changes made.
Restart the browser.
On the other hand, if you were using Firefox when you go the error, here’s what you have to do.
Open Firefox and in the address bar, type “about:config” and hit Enter.
If a warning appears, just click on the “I accept the risk!” button to proceed.
Next, type in “TLS” in the search field and hit Enter.
Then look for “security.tls.version.min” and double click on it and set its integer value to 3 to force the protocol of TLS 1.3.
Now click OK and restart Firefox and do the same thing with SSL.
There is a lot of high resource utilization by any process that slows down a Windows operating system and one of the services that could cause such a thing is the utcsvc.exe process. This particular process at times can cause high CPU and disk usage. So if you are currently facing this problem, read on as this post will guide you on how you can resolve the problem.
UTC which stands for Universal Telemetry Client is a software that runs a service named Diagnostic Tracking Service or DiagTrak. This service is used by Microsoft to collect customer feedback, analyze customer’s problems, and push resolution via updates in order to make the Windows 10 operating system better. This service is an executable file that could be translated to Service Host and even though the process does not usually cause problems, there are actually times when it does especially if it results in high resource utilization. In such cases, you might want to consider disabling it to fix its high CPU and disk usage.
According to Microsoft:
“We collect information about you, your devices, applications and networks, and your use of those devices, applications, and networks. Examples of data we collect include your name, email address, preferences, and interests; browsing, search and file history; phone call and SMS data; device configuration and sensor data; and application usage.”
There are several ways you can disable the utcsvc.exe process. You can disable it using the Service Manager, Registry Editor, and Group Policy Editor. For more details, refer to the instructions laid out below.
Option 1 – Disable the Connected User Experience & Telemetry Service via Service Manager
Note that this option is for standalone systems, so if you’re not using one, refer to the next given options below.
Tap the Win + R keys to open the Run dialog box.
Then type “services.msc” in the field and tap Enter or click OK to open the Services Manager.
From the given list of services, look for the Connected User Experience service. Once you found it, click on it and you’ll see its description which states:
“The Connected User Experiences and Telemetry service enables features that support in-application and connected user experiences. Additionally, this service manages the event-driven collection and transmission of diagnostic and usage information (used to improve the experience and quality of the Windows Platform) when the diagnostics and usage privacy option settings are enabled under Feedback and Diagnostics.”
Next, right-click on it and select Properties.
Now, change its Startup Type to Disabled and click on the Apply and OK buttons to save the changes made.
Option 2 – Disable the Connected User Experience & Telemetry Service via Registry Editor
Tap the Win + R keys to launch the Run utility and type “Regedit” in the field and click OK to open the Registry Editor.
Next, navigate to this registry path: HKEY_LOCAL_MACHINESOFTWAREPoliciesMicrosoftWindowsDataCollection
After that, right-click on the folder named “DataCollection” and select New > DWORD (32-bit) Value.
Now name the new value “AllowTelemetry” and make sure that its Value data is “0” and then click on OK to save the changes made.
Restart your computer.
Option 3 – Disable the Connected User Experience & Telemetry Service via Group Policy Editor
If you have to disable the service related to the Universal Telemetry Client for company-managed systems, then you can do that using the Group Policy Editor.
Tap the Win + R keys to open the Run utility and type “gpedit.msc” in the field and hit Enter to open the Group Policy Editor.
Next, navigate to this path: Computer Configuration > Administrative Templates > Windows Components> Data Collection and Preview Build
After that, double-click on Data Collection and Preview Build to open its settings.
From there, look for the “Allow Telemetry” item and double click on it to open its Properties.
Next, set the radio button to Disabled and then click on the Apply button to save the changes made.
Restart your computer.
Option 4 – Run the Hardware and Devices Troubleshooter or the Performance Troubleshooter
Hardware and Devices Troubleshooter:
The first thing you need to do is click on Start and then on the gear-like icon to pull up the window for Settings.
After opening Settings, look for the Update and Security option and select it.
From there, go to the Troubleshoot option located on the left-hand side of the list.
Next, select Hardware and Devices from the list and open the Troubleshooter and run it. Once it is doing its job, wait for it to complete the process and then restart the system.
After the system restarts, check if the problem’s now fixed. If not, refer to the next option given below.
Performance Troubleshooter:
Tap the Win + R keys to open the Run dialog box.
Type “exe /id PerformanceDiagnostic” in the field and hit Enter to open the Performance troubleshooter.
Then click on Next to get started. Wait until the process is completed.
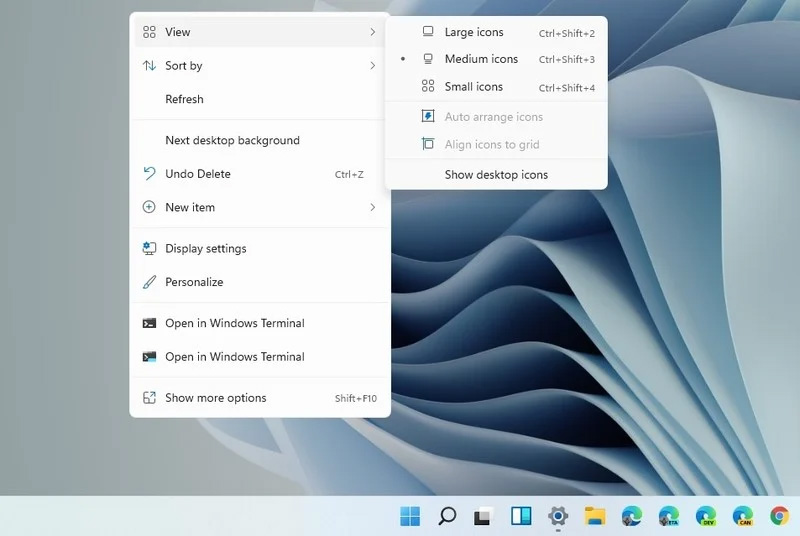
Windows 11 brought with it a simplified right-click menu that has limited options. If you would like to bring the old Windows 10 right-click menu you will have to do some registry tweaking but it is doable.
Since this requires registry tweak, please follow given solution step by step
Press Start and type RegEdit
Click on Registry Editor
Inside registry editor find next key:
Computer\H_KEY_CURRENT_USER\SOFTWARE\CLASSES\CLSID\
Right click in the right part of editor window and select New > Key
Type in as a name: {86ca1aa0-34aa-4e8b-a509-50c905bae2a2}
Right click on {86ca1aa0-34aa-4e8b-a509-50c905bae2a2} key and select New > Key again to create new key inside this one
Name inside key InprocServer32
Double click the “(Default)” key in InprocServer32 to open it
When the Default key opens close it without making any changes by clicking on OK. This will make its value property Blank instead of value not set
Close Registry Editor
Restart your PC
Once the system is up if the followed solution is applied you will now have an old school menu once right-click is used.
Recently Logitech has released a new line of ergonomic mouse products on market, strangely shaped and lifted on a vertical axis Logitech claims that these devices will fix your issues and ease your hand pains for prolonged use of the computer.
The first time I saw this mouse I was not really impressed with its looks and somehow I thought it will not feel good. This all changed when I actually started using it, surprisingly altho strange in looks it does feel much more natural and much less stressful on hand. Also, it felt like I have used it before, personally, I did not need any adjustment period in order to use it fully.
All of that being said I will admit that using it for gaming is still not an option for me, someone might find it ok, especially if they play some games that do not need to be responsive like strategies or similar but for RTS and FPS I will still stick to the typically shaped mouse. This might be just a habit for me but somehow I feel more responsive with the typical mouse, but for anything else, this is the mouse that will keep your hands stress-free.
Now in order to get the mouse to be really recommended it needs to have some good technical specifications as well, looks are not all. The less important detail is that the mouse comes in 3 different colors: Black, white and pink, and its technical specifications are:
Specs & Details
Dimensions
Height: 71 mmWidth: 70 mmDepth: 108 mmWeight: 125 g
Technical Specifications
Sensor technology
Sensor type: Logitech Advanced Optical Tracking
Dpi range: 400-4000 dpi (Fully adjustable with 100DPI increments)
Nominal value: 1000 dpi
Buttons
Number of buttons: 6 (Left/Right-click, Back/Forward, Middle button, Scroll-wheel with a middle click)
Battery
Battery type: 1x AA battery (included)
Battery life: up to 24- months Battery life may vary based on user and computing conditions.
Connection type support
Logi Bolt USB receiver (included)
Bluetooth® Low Energy Technology
Wireless range
10-m wireless range
Personally, I would recommend this mouse for anyone who does work in front of the computer during the whole workday since it really does loosen grip and strain on hands.
Blackouts are one of the most annoying things that can happen in the modern age. We have all learned to depend on electricity, maybe too much, so having a backup plan in these unpleasant situations is necessary. Here are some good gadgets for these kinds of situations.
Power Bank
The fully charged power bank is a great item that could fill up your phone or tablet. If it is a larger power bank it could fill them up all the way to the top several times and having charged phone or tablet can help greatly with some fun during dark times. The power bank can also be used to fill up other gadgets on this list so if the power outage is expected to last longer perhaps it would be wiser not to waste it on phone/tablet games.
Portable Generator
If the power bank is too short-lived for your needs, a portable generator is always a good option since it can provide power for longer time periods. The solar generator is what we recommend because it is much cheaper to produce electricity but it is limited if a power surge comes at night, one on gasoline is more stable and practical but it costs more to produce electricity.
Portable Solar Charger
One more electric-producing device on the list, this one however is aimed at charging your phone, tablet, or laptop by harvesting Sun's energy and turning it into valuable electricity for your devices. Fully silent and easy to operate this is a great tool for power outrage. It will not be able to produce electricity for smaller house appliances but for basic phone/tablet/laptop needs it will suffice.
Panic light
Self-sustained with its own battery, panic lights are great assets for lightning when power is not present. They can turn automatically when the circuit detects that power is missing but can be also manually switched on or off. There are many versions of panic lights ranging from the light they produce to how long can they work so picking the right one will depend entirely on your home size and needs.
USB Headlamp
If you lack panic lights USB headlamp is a great choice to light your way and it works even better than a flashlight, although a flashlight is also a great tool, a headlight will provide you with free arms to do various things that you would not be able to by holding a flashlight. Modern headlights come with LED lights so they provide a good amount of light with small power consumption and they can be recharged in a power bank, solar charger, or generator.
LED lantern
LED Lantern is a gadget sitting somewhere between a headlight and a panic light, it offers around the same light amount as a panic light but you can carry it around with you. Of course, it will drain its battery faster than a panic light and it will still need to carry around but it can offer some good options when you need it, like taking it with you to the toilet.
Electric Lighter
An electric lighter is also one of the things that you will need, it can ignite candles, paper, stoves, etc. Its battery is usually enough for extensive use and there are small chances that it will need to be recharged. Having matches is also smart, just in case.
Solar Oven
Great gadget when outbreaks last long or when you get hungry. Not all households have gas ovens so a Solar oven is a great tool to keep you full of food. Granted it will not be on par in speed and quality with a regular oven but when it is the only option it will suffice.
If you are trying to connect to the internet using a Wi-Fi, Ethernet, or a Wi-Fi connection and you suddenly encounter Error 633, then read on as this post will guide you on how you can fix this problem in your Windows 10 computer.
According to users who encountered the same problem, when they try to connect to the internet, an error pops up that states, “The modem or other connecting device is either already in use or not appropriately configured”. This error is the VPN Error 633 which indicates that the modem is malfunctioning due to some broken configuration. It is possible that this broken configuration is caused by the WAN Miniport device which is associated with your preferred VPN protocol. It could also be due to the TCP port that’s required for the VPN connection to work might be used by another application.
There are instances when Error 622 could occur when there are multiple internet connections set up on one device or when the communication port is exploited by another program. It could also occur when the affected modem is not bound to one specific device. Thus, any model and computer can be affected by this problem.
The first and basic thing you can do to fix the VPN Error 633 is to turn off or unplug the modem your computer is using and then plug it back in to see if the problem is fixed. If not, then there are several other potential fixes you need to check out to resolve the problem. You can try the suggestions provided below and see if any of them help.
Option 1 – Run the Network Adapter Troubleshooter
Open the Search bar on your computer and type in “troubleshoot” to open the Troubleshoot settings.
Next, scroll down and select the “Network Adapter” option from the right pane.
Then click on the Run Troubleshooter” button.
After that, your computer will check for any possible errors and will pinpoint the root cause of the problem if possible.
Option 2 – Try to explicitly reserve the TCP port
The next thing you can do to fix the error is to reserve the TCP port explicitly and to do that, follow the steps below.
Tap the Win + R keys to pull up the Run dialog box and type “Regedit” in the field and hit Enter to open the Registry Editor.
Next, navigate to this registry path: HKEY_LOCAL_MACHINESYSTEMCurrentControlSetServicesTcpipParameters
After that, follow the path New > Multi-String Value on the edit menu and rename the multi-string value as “ReservedPorts” and then double click on it.
Now in the value data of ReservedPorts, input “1723-1723” and click OK to save the changes made.
Close the Registry Editor and restart your PC. Once your computer has restarted, check if the VPN Error 633 is fixed or not.
Option 3 – Try to use the netstat command
In the Windows Start Search, type “cmd” and from the search results that appear, right-click on Command Prompt and then select the “Run as administrator” option.
After opening Command Prompt as admin, type this command and hit Enter: netstat –aon
After that, the output will be displayed and from there, look for the process ID or PID of any program that uses the TCP port 1723 on your computer.
Next, type this next command and hit Enter: taskkill /PID PID /F
Once the command has been executed, the concerned program will be forced to close and the TCP port 1723 will be freed up. Keep in mind that the taskkill command ends the process corresponds to the process ID number and the given command above, “/F” option is used to end the program’s process forcefully.
Now restart your computer and after that, the concerned program should start using a TCP port other than 1723 which leaves the TCP port 1723 free for your internet device to use.
Option 4 – Remove any irrelevant internet device programs
You could also try removing any irrelevant device programs since it is possible that any of these programs could be the one that’s causing the modem to malfunction. These irrelevant programs could be an internet booster or third-party tools that comes with the modem and so on. These programs are not necessarily needed for your modem to function. Thus, if you want to fix the VPN Error 633, you can try uninstalling them and see if it fixed the error.
Option 5 – Update the Network Adapter drivers
You might also want to update the Network Adapter drivers by following these steps:
Tap the Win + R keys to launch the Run window and then type in the “devmgmt.msc” command and hit Enter to open the Device Manager window.
Under the Device Manager, you will see a list of drivers. From there, look for the Network Adapters and expand them.
Then right-click on each one of the Network drivers and update them all.
Restart your PC and see if it helped in fixing the BSOD error.
Note: If updating the network drivers didn’t help in fixing the VPN Error 633, you can also try to uninstall the very same drivers and restart your Windows 10 PC. After that, the system itself will reinstall the drivers you just uninstalled. Alternatively, you can also download and install the drivers from the manufacturer’s website directly.
To reinstall the network adapter driver, refer to these steps:
Open the Devices Manager from the Win X Menu.
Then locate the device drivers and right-click on them to open the Properties.
After that, switch to the Driver tab and click on the Uninstall Device button.
Follow the screen option to completely uninstall it.
Finally, restart your computer. It will just reinstall the device drivers automatically.
Distributed Component Object Model or DCOM is a module on Windows computers that allows computers to run programs over a network to another computer. It is a software component from Microsoft that allows COM objects to communicate with each other while that program is remotely running over the network. The COM Model is another extension of the DCOM model which both work together in order for the intended task to be executed. To make this module work, there are three components needed such as the Class Identifier or CLSID, the Programmatic Identifier or PROGID, and the Application Identifier or APPID.
However, DCOM does not always work as expected as it could still encounter some errors. One of them is error 1084. Because of this error, the execution of programs in a remote computer on the network would be interrupted. So if you encounter the DCOM error 1084 when you try to start a service like running the DISM tool or in other scenarios on your Windows 10 computer, then this post could help you. Refer to the instructions given below to start troubleshooting the problem.
Option 1 – Try checking the status of DCOMLAUNCH Service or DCOM Server Process Launcher and its 3 dependencies
The DCOM Server Process Launcher service launches both COM and DCOM servers in response to object activation requests. This is why if this service is stopped or disabled, the programs that are using COM and DCOM won’t properly function. So you need to make sure that the DCOMLAUNCH service is running.
In the Cortana search box, type “services” and click on the Services icon to open the Services Manager. Alternatively, you can also tap the Win + R keys to launch the Run prompt and then type “services.msc” in the field and hit Enter to open the Services Manager.
Next, check the following services:
DCOM Service Process Launcher
Background Tasks Infrastructure Service
Local Session Manager
Remote Procedure Call (RPC)
Then right-click on each one of the services and click on their Properties.
After that, select Automatic from the drop-down menu of Startup Type and make sure that all the aforementioned services are Running.
Now click OK for each one of the services.
Option 2 – Troubleshoot the problem in a Clean Boot State
There are instances that some conflicting programs installed in your computer might be the one that’s causing DCOM error 1084. To identify which program is causing the problem, you need to put your computer in a Clean Boot State. To do so, follow the steps below.
Log onto your PC as an administrator.
Type in MSConfig in the Start Search to open the System Configuration utility.
From there, go to the General tab and click “Selective startup”.
Clear the “Load Startup items” check box and make sure that the “Load System Services” and “Use Original boot configuration” options are checked.
Next, click the Services tab and select the “Hide All Microsoft Services” check box.
Click Disable all.
Click on Apply/OK and restart your PC. (This will put your PC into a Clean Boot State. And configure Windows to use the usual startup, just simply undo the changes.)
From there, start to isolate the problem by checking which one of the programs you installed recently is the root cause of the problem.
Option 3 – Try to use the DISM tool
You might want to repair potentially corrupted files in your system as having them could also trigger the DCOM error 1084. To repair these corrupted system files, you can run the DISM commands:
Tap the Win + X keys and click on the “Command Prompt (Admin)” option.
After that, input each one of the commands listed below sequentially to execute them:
Dism /Online /Cleanup-Image /CheckHealth
Dism /Online /Cleanup-Image /ScanHealth
Dism /Online /Cleanup-Image /RestoreHealth
Once you’ve executed the commands given above, restart your computer and check if the DCOM error is now fixed.
Option 4 – Reset your computer
Tap the Win key or click on the Start button located in the Taskbar.
Then click on the Power button at the bottom right portion of the screen.
Next, press and hold the Shift key on your keyboard and then click on Restart. This will restart your Pc into the Advanced Startup options.
Note: Once you have access to the Advanced Startup options, you have to go to the setting which allows you to Reset your Windows 10 PC. All you have to do is select Troubleshoot > Reset this PC to reach the following screen
Afterward, select either the “Keep my files” option and then proceed to the next on-screen instructions that follow to reset your Windows 10 computer without losing your files.

 Many Linux users if not all of them can run their distros from a USB drive but did you know you can run Windows 10 from a USB drive as well?
Microsoft has introduced all the way back to Windows 8 one feature called Windows To Go and it kept it in Windows 8.1 and in Windows 10 as well.
This feature is intended as a convenient way for workers to carry their corporate environments with them, but having your own copy of Windows on a thumb drive could be handy for backup purposes, too, or if you frequently use public machines that lack your preferences/applications or that have a restricted OS.
Many Linux users if not all of them can run their distros from a USB drive but did you know you can run Windows 10 from a USB drive as well?
Microsoft has introduced all the way back to Windows 8 one feature called Windows To Go and it kept it in Windows 8.1 and in Windows 10 as well.
This feature is intended as a convenient way for workers to carry their corporate environments with them, but having your own copy of Windows on a thumb drive could be handy for backup purposes, too, or if you frequently use public machines that lack your preferences/applications or that have a restricted OS.

 Since this requires registry tweak, please follow given solution step by step


