The CoreFoundation dll error is a common error associated with Apple Software products. Most of the Apple Software products rely on this dll file to load and run. This dll file is Apple’s proprietary.
The error message is prompted in the following format:
“CoreFoundation.dll was not found”
or
“Apple Application Support is missing’.
 Error Causes
The CoreFoundation.dll error message is triggered because of several reasons. These include:
It is advisable to fix CoreFoundation dll error code right away to avoid inconvenience. This error may stop you from accessing and running your desired Apple application.
Here are some of the best ways to resolve this error on your system:
Since Dynamic Link Library is a shared program, if you happen to delete an Apple program on your PC, chances are you might have deleted that file too in the process.
Therefore, the easiest way to recover and restore the CoreFoundation dll file and resolve the error is to look for the file in the recycle bin. If you can’t locate it, then another way to restore the missing CoreFoundation dll file is to download the files from the internet.
If the error still persists then it is advisable to re-install Apple software via iTunes or any other Apple Software that you have on your PC.
For example, if you have iTunes, then to reinstall it first go to the start menu and then the control panel. Now click on Add/Remove programs and locate iTunes software. Click the Uninstall button next to iTunes. Wait for a while until the program is completely uninstalled.
After the installation is complete, restart your PC and then download the latest version on iTunes and install it. Now try running the software again. Hopefully, this will resolve the issue.
Another way to resolve CoreFoundation dll error on your system is to scan for viruses. Run an antivirus to detect viruses and remove them from your PC.
Remember DLL file errors also indicate a corrupt registry. When you don’t clean the registry it overloads with unnecessary and obsolete files like junk files, cookies, temporary internet history, and bad /invalid registry entries.
When these files accumulate, they damage the registry, dll, and system files too. It also causes disk fragmentation. To repair the registry and fix dll files again, download a registry cleaner.
Whether you want to scan for viruses or clean the registry, it is advisable to download Restoro.
This is a multi-functional and advanced PC Fixer deployed with an intuitive algorithm and multiple powerful utilities. These include an antivirus, a registry cleaner, Active X controls, and class scanner, and a system optimizer.
The registry cleaner detects all registry issues and resolves them instantly. It wipes out the unnecessary files cluttering and damaging the registry. It fixes and restores the damaged dll files including CoreFoundation dll file thereby resolving the error. It takes a few clicks to resolve this error.
The antivirus feature scans your entire PC and removes all kinds of malicious software including spyware, malware, viruses, and Trojans.
To ensure the antivirus does not slow down the speed of your PC, Restoro also features a system optimizer that boosts the performance of your computer significantly.
It is powerful and bug-free software with a user-friendly interface that makes it quite easy to operate. You can download it on any Windows version as it is compatible with all.
Click here to download Restoro and resolve CoreFoundation dll error now!

"Error 1723- There is a problem with this Windows Installer package. A DLL required for this install could not be run. Contact your support personnel or package vendor...”You are most likely to come across the error code 1723 if the Java installation is not completed successfully. In other words, the error indicates that the installation process has failed.
Error CausesRegular and gaming headphones have many differences between them and not knowing what they are can lead you to get yourself the wrong one. In this article, our goal is to analyze the differences between them so you can choose the right one for you.

One thing that goes in both worlds is that the cheapest models on both sides are not really worth the purchase since both the quality and longevity will be very low. If we compare high-end models, regular headphones are far far more expensive than gaming ones. Hi-end gaming models can go as far as 400$, perhaps a little more but hi-end audio regular headphones are going even for over 2000$.
If we compare same-price headphones generally regular ones will offer you a little better sound quality but gaming headphones will offer some features such as positional audio that regular ones do not have.
One of the main advantages of gaming headsets is positional audio and true surround sound. this technology is built-in so you can hear more clearly where your enemy is coming from that is a big help in competitive games. This is achieved by positioning multiple speakers in various positions and angles inside them. Each speaker has a different sound channel that is mixed with another speaker in order to provide you with a full surround experience.
Regular headphones have typically one or two speakers on both sides aimed at the same angle and can not offer precise surround or positional audio.
Both gaming and hi-fi headphones offer some sort of noise cancelation to minimize outside noise but if you really want to focus and have good noise cancelation you will have to look out for headphones with active noise cancelation or ANC.
Let us say this right at the start, most middle and quality regular audio headphones do not have a microphone at all, and ones that might pack one usually have it at a lower quality than gaming ones. This of course makes perfect sense since regular headphones will focus on audio, and gaming ones will focus on playing games where having a good microphone is essential in order to game properly.
Speaker quality will reflect directly on the sound quality and fidelity. This is where audio regular headphones have an advantage over gaming ones. Since they do not have many small speakers positioned at various angled and instead have just a few, usually 2 or 1 large one, that one is of much better quality and range for audio than a pack of small ones. If you are searching for clarity and quality of the audio itself, especially if you are listening to some FLAC uncompressed music, then regular HiFi ones are a much better choice.
Another area where regular ones have an advantage but that is no surprise since their price goes far up compared to gaming ones. Most of the time everything in hi-end audio headphones is made from quality materials and designed to last a long time and therefore advantage. Most of the time gaming headphones will come in plastic versions whereas higher quality audio ones pack a lot of durable metal in frames and in buds making them much more durable. Of course, we are talking here about proper headphone use, not extreme cases of throwing, etc.
PowerShell -Command "Set-ExecutionPolicy -Scope CurrentUser Unrestricted" >> "%TEMP%StartupLog.txt" 2>&1 PowerShell -File "%SystemDrive%ScriptsMapDrives.ps1" >> "%TEMP%StartupLog.txt" 2>&1
-windowsstyle hidden -command .MapDrives.ps1 >> %TEMP%StartupLog.txt 2>&1
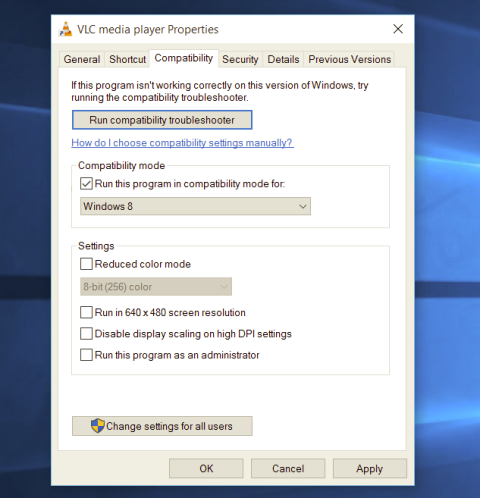 Most of the time running applications with typical settings is fine but from time to time we might have some applications that will require running with administrator privilege in order to work properly. In this case, it is very easy to do it, you just right-click and choose run as administrator.
Although a very easy solution, it can be quite annoying if running the app is on a daily basis or even more times per day. If this is the case then right-clicking and choosing to run as administrator can be a daunting task, sometimes you can even forget to run it like this in heat of work and some unforeseen consequences might occur.
Luckily there is an easy hack so you can open the chosen application each time as an administrator with a simple double click each time.
Most of the time running applications with typical settings is fine but from time to time we might have some applications that will require running with administrator privilege in order to work properly. In this case, it is very easy to do it, you just right-click and choose run as administrator.
Although a very easy solution, it can be quite annoying if running the app is on a daily basis or even more times per day. If this is the case then right-clicking and choosing to run as administrator can be a daunting task, sometimes you can even forget to run it like this in heat of work and some unforeseen consequences might occur.
Luckily there is an easy hack so you can open the chosen application each time as an administrator with a simple double click each time.
Stable Diffusion is a machine learning model developed by Stability AI to generate digital images from natural language descriptions. The model can be used for different tasks like generating image-to-image translations guided by text prompts and upscaling images.
Unlike competing models like DALL-E, Stable Diffusion is open source and does not artificially limit the images it produces. Stable diffusion was trained on a subset of the LAION-Aesthetics V2 data set. It can run on most consumer hardware equipped with a modest GPU and was hailed by PC World as "the next killer app for your PC".

Since Stable Diffusion is run locally and not in the cloud, as mentioned there is no limit to the number of images that you can produce but in order to use it you will have to get down a little dirty with setting your PC environment for it since it is not really an application, it is a command line text based descriptor that will use python to generate your images, so there is no install nor GUI.
In this guide, we will show you how to both install and run Stable Diffusion on your local PC so you can start producing some cool images all by yourself.
Make no mistake, Stable Diffusion will not run on a potato PC, in order to harvest the power of AI-generated imagery this is what you will need:
For this tutorial, we are covering the installation and running of Stable Diffusion on Windows PC. The steps presented here are presented in a way that installation can be performed on any operating system but precise instructions will be for Windows OS.
The first thing to do is to install GIT. It is a tool that will let you easily maintain and install repos from the internet. to install it go to: https://git-scm.com/ and click on download. Follow the instructions for your version of the operating system. If you are a developer you are familiar with GIT and if you already have it installed you can skip this step.
One thing that is important when installing GIT locally is to select to use it via the command line (the second option that says "Git from the command line and also from 3rd-party software").
Now when we have GIT installed, next thing is to use Miniconda3 to install python and all required libraries that are needed. Get the installer at: https://docs.conda.io/en/latest/miniconda.html
Miniconda3 is basically an easy installer so you do not have to install tons of stuff manually from different websites and sources, it is nicely packaged in the installer that will take care of everything.
After the previous two steps, we are ready now to actually install Stable Diffusion. Go to https://huggingface.co/CompVis/stable-diffusion#model-access and install the latest library (as of the writing of this article currently it is stable-diffusion-v1-4-original, the last one on the right), the library is almost 5GB in size so be prepared for big download.
After installing stable diffusion's latest library it is time to update it to the newest version. You can download ZIP from GIT HUB https://github.com/CompVis/stable-diffusion
Once downloaded click on the Windows start button and type in Miniconda3 and click on open. Create a folder and name it how you want on a drive of your choice. For this example, we will install it all in disk C under folder AI_art, follow the instructions below but use your own names and destination instead. Do not close Minicoda3 after typing commands!!!
cd c:/
mkdir AI_art
cd AI_art
Extract GitHub files that you have downloaded into your new folder and get back to Minicoda3 and type the next commands:
cd C:\AI_art\stable-diffusion-main
conda env create -f environment.yaml
conda activate ldm
mkdir models\ldm\stable-diffusion-v1
Let the whole process finish, some files are large and it might take a while. After the whole process is finished and completed, copy the checkpoint file that you have downloaded into: C:\AI_art\stable-diffusion-main\models\ldm\stable-diffusion-v1
After the file is copied rename it to model.ckpt and you are finished.
The created environment is needed in order to actually use Stable Diffusion to create images. Each time you want to use it you will have to run it, so go into Miniconda3, and inside it type:
conda activate ldm
cd C:\AI_art\stable-diffusion-main
after we are inside the folder call the script with the parameters:
python scripts/txt2img.py --prompt "TXT DESCRIPTION OF IMAGE THAT YOU WANT TO CREATE" --plms --n_iter 5 --n_samples 1and that's it, your image is created and it is located in C:\AI_art\stable-diffusion-main\outputs\txt2img-samples\samples