Adobe.DLL is one of the numerous Dll files you are going to encounter on your Personal Computer.
This isn't a system-established service and is usually the consequence of the sort of applications you install on your own Personal Computer.
Because adobe.dll is a low-program process, in the event that you find it present on your pc, you can easily end it. It isn't required for the normal working of your OS but might trigger permanent harm if left unchecked.
Don't forget that the Computer uses the AdobePDF.dll file for assorted tasks, and you need to make sure it's installed correctly.
 Error Causes
When the adobe.dll is left un-fixed, you may shortly have to deal with sluggishness on your Computer. Simply put, this impedes the standard and amount of work you do while using your PC and impacts your productivity.
Sometimes, adobe.dll happens because your computer experiences an overload. As a result, while resolving the malfunction, you've got to look for methods of decreasing the system overload. It's possible that lots of processes are functioning on your PC concurrently. Quit these processes.
Lousy setup of the adobe.dll file causes this error too. Check and fix the files and settings that Adobe.Dll requires to run and you may not have to content with these error anymore.
Even though the adobe.dll may severely influence the functioning of your Computer, it is really a trouble or malfunction that one can fix manually.
Yes, you are able to completely eliminate the adobe.dll issue. The thing you really need to do is un-install it from your own computer fully, and for good.
Adobe.dll regularly happens due to system overload. Thus, the first thing you need to assess is if several processes are operating on the device. If they're, search for methods to stop them, and you'll not have to worry about the adobe.dll error anymore.
The MS System-Configuration Utility will settle the system overload problem, thus freeing up space for your programs to run smoothly and possibly avoid malfunctions, including adobe.dll. The Microsoft System-Configuration Utility manually locates and eliminates all running processes.
Running scans on your own Computer may enhance or increase its operation. This technique may also aid in examining your Computer for adobe.dll, or such associated malfunctions, and resolve them forever.
Considering that the adobe.dll malfunctions can be a result of the existence of malfunctions on your own PC's files and options, fix these properly. Begin by fixing the settings on the files and options utilized by your Computer to perform the adobe.dll, and you may have removed this issue completely.
Finally, establish the source of the error message to effectively solve it. Once you do that and fix it, your PC will resume normal operations and even boost your work and productivity.

 Check cables
powercfg –restoredefaultschemes
"Error 1723- There is a problem with this Windows Installer package. A DLL required for this install could not be run. Contact your support personnel or package vendor...”You are most likely to come across the error code 1723 if the Java installation is not completed successfully. In other words, the error indicates that the installation process has failed.
Error Causes“In Microsoft Windows accounts protected by Family Safety settings, secure connections on popular websites like Google, Facebook and YouTube might be intercepted and their certificates replaced by a certificate issued by Microsoft in order to filter and record search activity.”And if you are connected to a corporate network, there might be a monitoring/filtering product that could be replacing certificates. Moreover, there are also users who reported getting this issue when they use the Nightly version of Firefox. And if that’s the case, you have to try accessing secure websites using only the stable build especially when it comes to payments. However, if you are not doing that, then here are some options you need to check out.

In today's time, Wi-Fi is a common occurrence, each household has it, on town squares, there are free Wi-Fi hotspots, etc. But sometimes when relaxing at home WI-Fi can fail on us and stop working. If this happens to you do not lose your mind because we have several troubleshooting help tips and ways to get it back quickly so you can continue with your browsing and using your internet.

Yes, we will start with this typical cliche in IT and tech in general. Surprisingly this method still proves over and over again to be true and effective. Over time some electric components simply start working a little bit differently, electrostatic electricity can accumulate on some parts and they can cause issues. By turning off the device and leaving it for some time you are discharging accumulated electrostatics and placing it again into normal working mode.
Unplug your router and leave it for at least 30s like that, a full 1 min is recommended, and then plug it back. Turn it on and restart your computer in order to reboot addresses.
If simple have you tried unplugging it and plugging it back in did not work let us reset DHCP. Click on the start button and type in PowerShell, then click on Run as administrator. Once inside the PowerShell type in the following command followed by ENTER: ipconfig /release and after the command finishes, type in: ipconfig /renew also followed by ENTER key. Try the connection again.
The next thing that we will try if the previous one failed is to reset the TCP/IP stack to eliminate corruption of settings files. Like in the previous step, press Start and type in PowerShell and click on run as administrator. inside type in: netsh int IP reset and press ENTER key. Wait for the process to finish and reboot your PC.
WinSock is yet another part of Windows OS that is responsible for network communication and resetting it could solve the issue. Again go to PowerShell as described in previous steps and type in this time: winsock reset and press ENTER. Wait for the process to finish and restart your computer.
Change TCP IP setting back to automatic if you have set manual Ip address on your computer.
Update your network driver via the manufacturer's website of your network adapter. There is a chance that somewhat updates are available to address some issues discovered.
Factory reset your router on the back by locating the reset button on it and pressing and holding it for around 10s.
Turn off your firewall and antivirus protection in order to eliminate it from blocking your internet access.

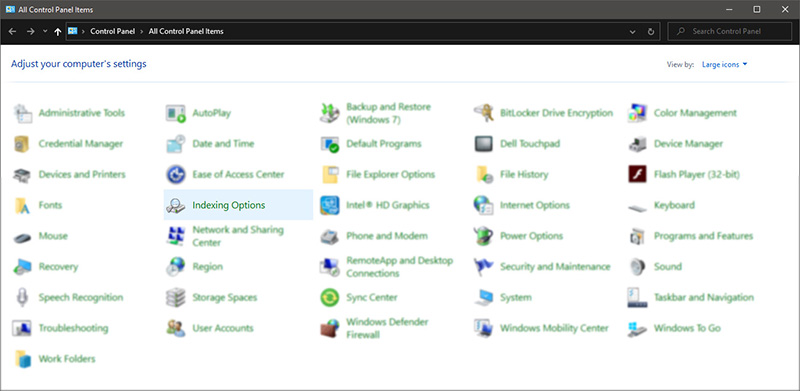
 Once you are in the control panel, switch your view to large icons and locate Indexing options.
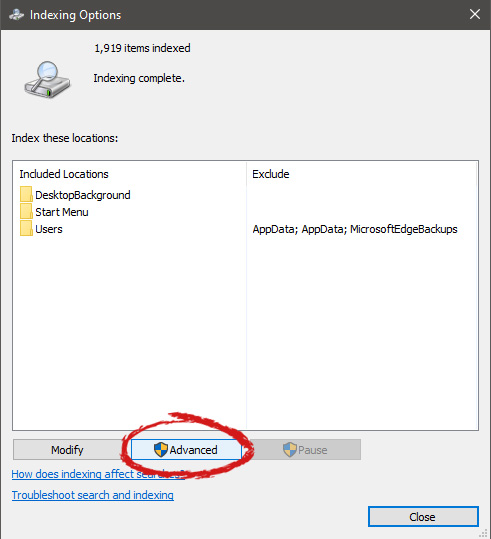
 Inside indexing options, click on advanced.
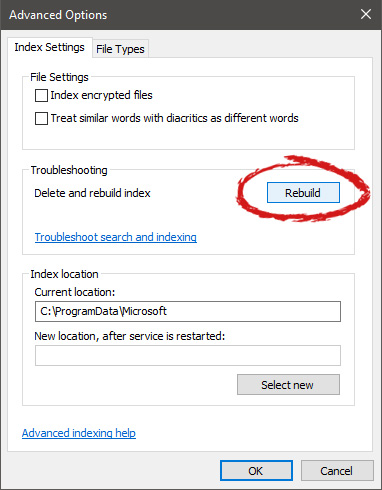
 In advanced options click on the rebuild and confirm.
 Leave your computer to finish and your searches should be working fine now.
  Once the menu appears, click on Command Prompt (admin)
 Once the command prompt with administrator privileges comes on-screen type in it following string:
 This command will force Windows to show all devices in the device manager including old ones that are not used anymore, but since their drivers are still installed, devices will show up.
When you type command press ENTER.
Once again press WINDOWS + X to show the hidden menu but this time choose the device manager
This command will force Windows to show all devices in the device manager including old ones that are not used anymore, but since their drivers are still installed, devices will show up.
When you type command press ENTER.
Once again press WINDOWS + X to show the hidden menu but this time choose the device manager
 The device manager will open, go to view > snow hidden devices in order to show unused devices.

 Right-click on the device and click on uninstall device to remove it completely from your system.
 Please always be careful when removing devices so you do not remove the device which is being used by mistake and always double-check that you are removing something that you used to have on your system. This method will show all hidden devices even ones that are hidden but crucial to the system working properly.