Error 0X800F080C is tied to corrupted system files and .NET framework issues. In this article, we will focus on how to fix it starting first with .NET fixes and then moving to system-related ones. Follow the guide step by step so you can fix this error fast and easily.
As previously stated 0X800F080C error can occur due to issues with .NET framework, 3.5 framework to be more precise and there are two ways we can fix this error. Follow the guide below as presented:
First thing is to try and install the framework from Window features itself. Sometimes installation and activation of .NET 3.5 in other ways can result in this error. To install it do the following:
Press ⊞ WINDOWS + R to open the run dialog
Inside run type in appwiz.cpl and press ENTER to open up the Programs and Features menu
Inside the Programs and Features menu click on Turn Windows features on or off.
Check the box associated with .NET Framework 3.5 (this package includes .NET 2.0 and 3.0)
Press OK
Click on YES and wait for the package to be installed then reboot your PC
If the previous step was not successful or you already had .NET 3.5 installed then run the troubleshooter in order to fix issues.
Go to the official Microsoft .NET framework repair tool website here and download it.
Once downloaded install the tool and follow onscreen instructions.
If the previous solution has not provided you with results then you have system file corruption that needs to be fixed. Move from one solution to another as presented below:
SFC scan is a built-in Windows tool for solving corrupted system files issues, it is fully automated and does not require from the user any kind of knowledge or information. To run it and scan the system do the following:
Press ⊞ WINDOWS + X to open the secret menu
Left-click on the command prompt (admin)
In command prompt type SFC /SCANNOW and press ENTER
Wait for the process to finish, do not interrupt it and once it is done, restart your computer
DISM scan is similar to SFC scan but it tackles different types of system file corruption and it is recommended to run it also after SFC has been completed. Please note that for DISM scan to be successful you will need a stable internet connection since DISM will replace corrupted files with new ones downloaded from Microsoft. To run it do the following:
Press ⊞ WINDOWS + X to open the secret menu
Left-click on the command prompt (admin)
inside command prompt type: exe /online /cleanup-image /scanhealth followed by ENTER, then type: Dism.exe /online /cleanup-image /restorehealth also followed with ENTER.
Leave scan to finish and reboot your PC

 1. File-infecting Virus
This error limits your ability to send and receive emails on Outlook. If you largely communicate at the workplace using your Outlook account, this error may slow down your work productivity and performance dramatically. Therefore it is advisable to fix it immediately.“There was a problem logging onto your mail server. Your User Name was rejected.”
 Error Causes
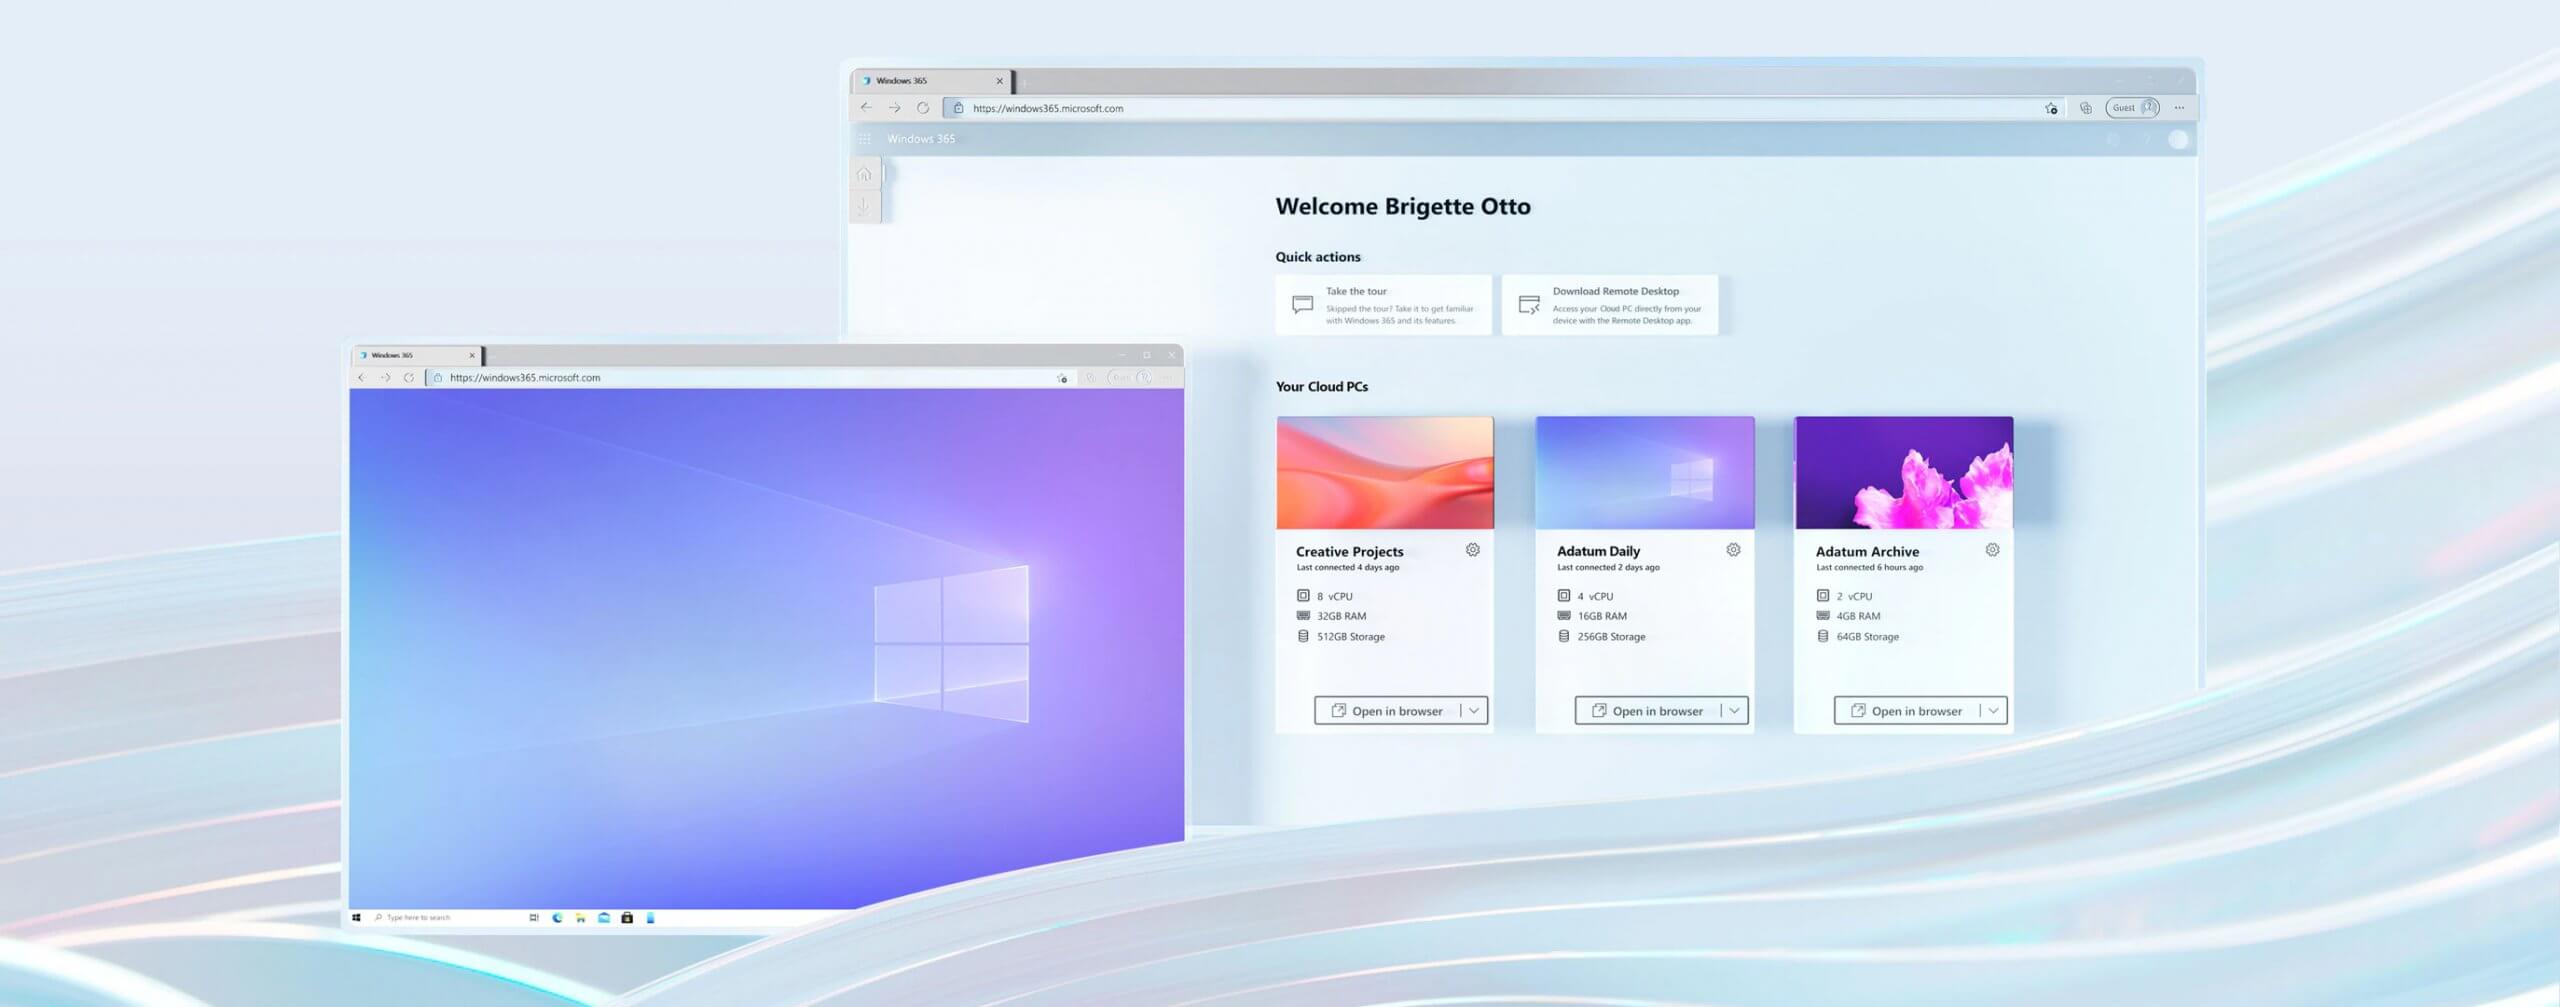 Microsoft has announced Windows 365, a new cloud-based operating system aimed mainly at businesses of all sizes.
Just after Windows 11 announcement and presentation, we are seeing another Windows announcement from Microsoft. Dive into the following text in order to find out what exactly is new Windows 365, its role in today's IT world, and do you need it?
Error CausesError Causes
Microsoft has announced Windows 365, a new cloud-based operating system aimed mainly at businesses of all sizes.
Just after Windows 11 announcement and presentation, we are seeing another Windows announcement from Microsoft. Dive into the following text in order to find out what exactly is new Windows 365, its role in today's IT world, and do you need it?
Error CausesError CausesOnce this error code is encountered, it's a clear indication that your Operating System has malfunctioned. This could be a consequence of an incorrect or failed installation of software. The software might leave invalid entries in the Windows registry. Improper shut down of your system and a malware attack are also causes of error code 0x8007007e. Additionally, someone with little or no technical knowledge might have deleted a system file by accident. Missing system files can also equate to other error codes such as registry error code 19.
You may not always be able to prevent issues from affecting your computer, but proper measures can be taken to limit your risk of experiencing problems like error code 0x8007007e. See the following suggestions below:
System File Checker is a Windows tool that allows users to check their system for corrupt or bad system files. The utility scans for corrupt files and repairs them as well as files that may have gone missing.
Depending on the type of Windows operating system on your computer, you may need to follow varying instructions. However, note that Windows operating systems including Windows 10 and Windows 8 or 8.1 and Windows Vista all provide access to System File Checker via Command Prompt.
Once you run System File Checker, the tool should be able to repair and replace corrupted files. However, in cases where the repair process does not take place, you can attempt a manual repair by replacing the corrupt file the tool identifies with a good file. The process may require technical knowledge of Command Prompt so consider help from a Windows repair technician or consider contacting Windows for instructions based on your computer’s operating system.
The System Recovery Options menu in Windows contains many tools which can enable users to resolve serious errors. In the case of Error Code 0x8007007e, one of the best tools in this menu is System Restore.
When an error occurs which inhibits users from accessing key functions on their system, System Restore enables the user to restores the computer to an earlier period without causing harm to files, photos, or documents.
However, once you run this tool, you will only be able to access files available within the period to which your computer is restored. For this reason, carefully consider which period is best suited to your purposes. Also, ensure you restore the system to a time when error code 0x8007007e was not present on your machine.
If System Restore does not resolve the error, you may undo the restoration changes. Ensure you have sufficient free space on your machine hard disk before you proceed (300 MB at least for hard drives above 500MB or at least 50 MB for smaller sized disks).
When it comes to resolving error codes, it can often be a frustrating and tricky venture, especially when you are attempting to fix the problem manually. The Internet is awash with bits and pieces of instruction, some misleading at best with uncertain success rates.
But what if there was a one-stop-shop or better yet a tool that offered solutions for error codes including 0x8007007e? Download a powerful automated tool that offers easy and effective, user-friendly solutions for users with varying error code problems.