If your WIFI signal is strong but you can not connect to the internet then keep reading in order to find out why this happens and what can you do to fix it.
One very important thing to know and understand is that WIFI and the internet are two different things and that they altho connected and working together are basically 2 things.
WIFI is a name for a group of technologies that are using radio vawes to connect to the router in order to access the internet. The Internet itself is series of computers all connected in LAN. Think of WIFI like some invisible cable that connects your computer to the router. When we put things into perspective this way it becomes clear that we can indeed have a strong WIFI signal and that we are connected to the router but the router itself is not connected to the internet.
So basically troubleshooting an internet connection is troubleshooting the router itself. The most common approach is to reset the router, turn it off, then back on, check cables, etc. But be sure that if your WIFI signal is strong and you can not access the internet it is a router issue.
If you have multiple products with Windows on them, Copy & Paste text between them is easy as 1,2,3 and we will be happy to tell you how can you do it.
Hello and welcome everyone, today we will see how can we share text information between 2 devices using Windows 10 in instant. In order for you to be able to share text information between devices, there are two prerequisites that you must meet. The first is that all devices must be connected to the internet, the second is that you must have a Microsoft account.
If you have both of these things continue with the tutorial, if you do not have a Microsoft account go to Microsoft website and create one for free.
Also, know that this option needs to be turned ON on all devices in order to work. So steps we will explain will have to be done on each device, if you already have some device logged in and connected to Microsoft account, you can skip setting it up.
Click on ⊞ WINDOWS and click on settings.
Then click on System.
Once you are in the system, on the left tabs find and click on Clipboard.If you are not logged in to your Microsoft account do so on the right panel by locating Sync across devices and click on sign in.
When you are signed in click on the option to turn it on.
One option is turned ON, you will be greeted with two choices, to copy everything from the clipboard automatically or to choose text which you want to sync and paste it with ⊞ WINDOWS + V. Choose whatever better suits your needs, and you are done.
Repeat these steps for other devices and you are done.
Recently, a number of users reported that they were not able to run PLEX and other similar streaming services ever since a Windows Update was automatically installed in the system. The error in these streaming services has something to do with a missing Mfplat.dll DLL file from the Windows Media Feature Pack. On the other hand, some users also reported that the mfplat.dll error occurred on several games as well which used the Media Feature Pack.
Usually, the mfplat.dll error is caused by the missing Media Feature Pack in Windows 10. Although most of the time the Media Feature Pack is installed by the application that needs it or through Windows Update automatically, there are just certain installers that do not have it. It could be that the Media Playback service was disabled by a particular Windows Update. Aside from that, the error might be because your computer is using Windows 10 N – a Windows 10 version that does not include the Media Feature Pack by default. Whatever the cause may be, you can troubleshoot the problem with the help of the options given below. But before you go on, keep in mind that downloading the missing DLL file and copying it to the folder of the program where you encounter the error won’t really help and will only make things even more complicated.
Option 1 – Install the Media Feature Pack for Windows 10 N version
As mentioned, the Windows 10 N version does not come with Windows Media Player. Meaning to say, the Media Feature Pack is also not installed by default or won’t be updated by the Windows Update component. So if you are not quite sure what Windows 10 version you currently have installed, refer to these steps:
Tap the Windows key + S and then type “about” in the search box.
From the search results, click on the “About your PC” to open the About tab of the Settings app.
Afterward, scroll down to the Windows specifications and check your Windows version under Edition.
Note: If you’ve determined that your computer is using the Windows 10 N version, you need to install the appropriate Media Feature Pack for your computer. How? Refer to the steps below:
Click this link to download and install the Media Feature Pack from Microsoft’s official website.
Upon installation, select the edition you want to install using the drop-down menu and then click on Confirm. Take note that there are few reasons why you’d want to install the older version since most streaming services like PLEX and most games usually require version 1803.
After that, wait until the request is validated. The download should begin in a few minutes automatically.
Once the download is completed, open the installation executable file and follow the next on-screen instructions to install the Media Feature Pack on your computer.
Restart your computer. After your computer has rebooted, open the application where you’re getting the mfplat.dll missing error and then check if the problem is now fixed.
Option 2 – Enable Media Playback via Command Prompt
If you encounter the mfplat.dll missing error when you attempt to run PLEX or other similar streaming service and you’ve already verified that the Media Feature Pack is indeed installed, you might want to try enabling it using an elevated Command Prompt. There are cases when a particular Windows Update ends up disabling the feature and creates the grounds which results in the mfplat.dll missing error. Thus, you can have to enable the feature via Command Prompt.
Tap the Win + R keys to open the Run dialog box.
Then type “cmd” in the field and hit Enter to open an elevated Command Prompt.
Next, click on Yes if a User Account Control prompt pops up.
After opening Command Prompt, copy and paste the following command and hit Enter to execute it:
Close Command Prompt and then open the app once again to check if the problem is now fixed.
Option 3 – Try extracting a copy of the mfplat.dll file from the windows.old directory
If you encounter the error shortly after you just upgraded to Windows 10 from an older version, the best thing you can do to resolve the problem is to use windows.old directory to fetch an old copy of the mfplat.dll file. To do so, follow the steps below.
Go to the Windows drive and then look for the windows.old directory where it preserves a copy of your old operating system as well as associated files in case something goes out of hand during the upgrade process.
After that, open the windows.old folder and then go to the syswow64 folder.
Next, from the syswow64 folder, copy the mfplat.dll file and paste it to C: windows syswow64.
Restart your computer and check if the error is now resolved or not.
The world today is still sadly under pandemic and by the looks of it, COVID-19 is here to stay, well at least for some time in the near future. Razer seems to think so as well since their upcoming gear is not really what you would expect.
Enter Hazel, a new and upcoming Razer smart mask.
Protection
Hazel mask has a high bacterial surgical N95 filter with fluid resistance that will protect you against large droplets and splashes. A detachable active ventilator regulates airflow and is capable of filtering around 95% of airborne particles. Mask comes with a special charging case that has an auto sterilization UV light that will kill bacteria and viruses inside the case interior while it charges.
When the mask is recharging it will change color from red to green visually showing the level of the current charge. Mask of course has easy to replace filters inside ventilators and Razer is standing by that fully charged mask will last enough for full-day use.
An active ventilation system brings cool air while releasing breathing heat at the same time drastically reducing CO2 inside the mask that could produce dizziness and headache.
Silicon guard is on its edge gluing to around your face in order to prevent exterior air sneaking inside the mask and positioning it firmly so it does not rest on your lips in order for easier and clearer communication.
Hazel personalization and technical features
Hazel has a clear and transparent design making it better for social interaction since other people will be able to see your lips and smiles thus making it more natural. A low light mode that turns on automatically when it is dark outside is also aimed for easier communication.
Speaking of communication, the mask comes with voice Amp technology that has a built-in mic and amplifier thus making your voice lines clear so you are not muffled when wearing the mask itself. Your friends and other people will be able to hear you like you are not wearing a mask at all.
Thicker air loops apply less pressure on ears and can be adjusted for a more secure fit, while the mask itself can be custom-made to fit your face shape.
And of course Hazel comes with 16.8 million colors and a suite of effects with Razer Chroma RBG
Users who constantly use graphic-intensive applications like games or any video-rendering software need to control how their graphics card is used. There are some who always toggle their Graphic Quality settings to get the Frames Per Second or FPS up. While some tend to adjust the size, orientation, scaling, and other display settings in order to use their PCs in a more efficient way or to simply work better. And in all of that, that’s where the NVIDIA Graphics Card comes into the picture. Take note that this software only works on PCs which has NVIDIA Graphics Card attached to them. Thus, if you use another Graphics Card then this post is not for you, otherwise, proceed reading to know what you can do if the NVIDIA Control Panel is not opening on your Windows 10 PC.
Here are a couple of things you can try if the NVIDIA Control Panel is not opening, not responding, or not working:
Restart the process of the NVIDIA Control Panel
Restart the NVIDIA Display Driver Service
Update your NVIDIA Display Drivers
For more details, refer to the instructions provided below.
Option 1: Restart the process of the NVIDIA Control Panel.
Tap the Ctrl + Shift + Esc keys to open the Task Manager.
After opening the Task Manager, look for the process named NVIDIA Control Panel Application.
Once you found it, expand it and right-click on the NVIDIA Control Panel sub-process, and click on End Task.
Now try opening the NVIDIA Control Panel from the Start Menu and see if it now works fine or not.
Option 2: Restart the NVIDIA Display Driver Service
Tap the Win + R keys to open the Run dialog box.
Then type “services.msc” in the field and hit Enter to open the Windows Services Manager.
After opening the Services window, you will see a list of services. From there, look for services named “NVIDIA Display Container LS” and double click on it to open its Properties.
Now make sure that the service is Started. If it isn’t, you need to start it, otherwise, you need to Stop it and Start It again. You also have to make sure that the Startup Type is set to Automatic.
Do the same for the NVIDIA LocalSystem Container service.
Restart your computer and check if the problem’s fixed.
Option 3: Try updating the drivers from the official site of NVIDIA
If both the first and second given options didn’t work, you can also try updating the drivers from the official NVIDIA website. And in case you don’t know the type of Nvidia graphics card that your computer is on, follow the steps below:
Tap the Win + R keys to open the Run dialog box.
Next type in “dxdiag” in the field and click OK or hit Enter to open the DirectX Diagnostic Tool.
From there, you can see what type of Nvidia graphics card that your system is on.
Take note of your graphics card information and then look for the best drivers for your operating system. Once you’ve downloaded and installed the file, restart your PC.
If your Windows PC encounters an error, it will display a Blue Screen of Death or BSOD error which usually comes up for a fraction of second and creates some logs or Dumps Files as what other user prefers to call it and then boots your PC suddenly. This process usually takes place quickly that most users find it hard to get the error code and won’t probably be able to check what really went wrong with their PCs. This is where the dump files come in. They are stored internally in your computer and can only be accessed by an administrator. They are classified into 4 main types and in Windows 10 they are either:
Complete Memory Dump
Kernel Memory Dump
Small Memory Dump (256 KB)
Active Memory Dumps
Dump Files are useful as they could help you in resolving the problem and so you need to configure your Windows 10 PC to create them but first, you need to make a system restore point. This is essential as you are about to modify some system files as well as critical Windows 10 settings. There are two ways you can create Dump files – first is by modifying the settings in the Startup and Recovery and lastly is via the WMIC command line. Refer to the instructions prepared below to be guided on how you can create Dump files after any BSOD error using these options.
Option 1 – via Startup and Recovery
Type in “control panel” in the Cortana Search box and then click on Control Panel from the search results to open it.
After opening Control Panel, you need to make sure that you view the contents by their Category then click on the header link which is labeled “System and Security” or you could also right-click on the This PC icon and then click on Properties.
Next, select the Advanced system settings from the left panel. Once you do, a new and small window will pop up.
Under the newly opened window, look for the section called Startup and Recovery and then click on the Settings button.
And from the System Failure section, you can choose any option from the drop-down for Write debugging information such as:
None – this means that there is no dump file created by Windows
Small Memory Dump – this means that Windows will create a Minidump file on BSOD
Complete Memory Dump – this means that Windows will create a Complete Memory Dump file on BSOD
Automatic Memory Dump – this means that Windows will create an Automatic Memory Dump file on BSOD
Active Memory Dump – this means that Windows will create an Active Memory Dump file on BSOD
Note: The complete dump needs a page file that is allowed to be the size of the physical memory installed in your PC with a dedicated 1 MB of space for just the page header.
Now once you have selected the most suitable option for you, just click on OK/Apply and then exit.
Restart your PC to successfully apply the changes made.
Option 2 – via the WMIC command line
The first thing you need to do to create Dump files via the WMIC command line is to tap the Win + X keys combination or simply right-click on the Start button and then select the Command Prompt (Admin) option. You could also type in “cmd” in the Cortana search box and then right-click on Command Prompt from the results and select Run as administrator.
After that, type in any of the commands given below depending on your preferences so that your Windows 10 PC will be configured to create Dump Files:
No dump file: wmic RECOVEROS set DebugInfoType = 0
Small Memory Dump: wmic RECOVEROS set DebugInfoType = 3
Kernel Memory Dump: wmic RECOVEROS set DebugInfoType = 2
Complete Memory Dump: wmic RECOVEROS set DebugInfoType = 1
Automatic Memory Dump: wmic RECOVEROS set DebugInfoType = 7
Active Memory Dump: wmic RECOVEROS set DebugInfoType = 1
Note: A complete dump has to have a Page file which is allowed to be the size of the physical memory installed on your PC accompanied by a 1 MB space for just the page header.
Now type in “exit” in the Command Prompt to exit it.
Restart your PC to apply the changes made successfully.
A solid reason to switch to Mac from Windows PC is Mac OS. Based on Linux, offers more stability and better security than Windows but you will not be able to find a vast array of applications on it.
Even when Mac OS X (the first big one) was first introduced, it looked and felt like ages beyond Windows (Microsoft just recently made a slick and modern design with Windows 11). Under the hood, it turned out that the operating system itself is stable and incredibly fast & responsive. If you value stability and easiness of use, Mac OS is the Operating system for you.
Apple ecosystem
This one is easy, if you are already invested in apple devices like iPhone and iPad, having an apple computer is one step forward into the apple ecosystem and one more step into easy sharing of documents and data between devices.
Calendars, emails, photos, videos, documents, and many more can easily be shared and synched between devices with a single apple ID making workflows much easier than on other operating systems.
Development
Developers all around the world say that developing on Mac is much better and smoother than on PC, this has probably to do something with OS being based on Linux but whatever the case is, it is much smoother and it just feels better. Apple laptops are often the go-to choice of developers for a reason.
Also if you are in the development business for applications and services aimed at iPhone or iPod then there is no really another way than to be into the apple ecosystem and own apple hardware.
Professional software
A lot of professional-grade software exists for both the Windows platform and Mac OS but there is some software that exists exclusively for Apple hardware like Final Cut Pro or Logic Pro. Both applications are used by professionals and are industry-standard software.
Logic pro is used by industrial audio specialists all around the world and is used in professional studios. Final Cut Pro is also used worldwide by video editors and if you are specializing in any of these two fields Mac seems like a very reasonable platform since the software can not be found on Windows. These two are examples, there are other similar applications that are only available on Mac OS
Longevity
Apple hardware is made of high-quality materials and components and it is proven over time that it lasts longer than usual. There are iPhones out there that have 13 years and they are still working, G3 and G4 Macs that are still functional.
When buying Apple products they will outlive other ones if treated properly so in the end you could be saving money by purchasing them.
If you encounter the NMI_HARDWARE_FAILURE Blue Screen error while using your Windows 10 computer, then read on as this post will guide you in resolving this kind of Blue Screen of Death error.
NMI HARDWARE FAILURE or “Non-Maskable Interrupt” Blue Screen error occurs when there is some hardware malfunction in your computer. When you encounter this Blue Screen error, you may get a stop code of 0x00000080 which can randomly occur while you use your computer. However, a lot of users reported encountering this error while they were trying to update or install their Graphics Card drivers.
The stop code that you may get for this BSOD error is 0x00000080. The error can occur randomly during your usage of the computer – but a large number of users have reported this error while they are updating or installing their Graphics Card drivers. In this post, we will be covering all the possible fixes for this error.
NMI_HARDWARE_FAILURE error on Windows
The NMI_HARDWARE_FAILURE bug check has a value of 0x00000080. This bug check indicates that a hardware malfunction has occurred. There are various hardware malfunctions that can cause this kind of Blue Screen error. However, pinpointing the exact cause is quite difficult. Worry no more for the following fixes provided below can help you resolve the NMI_HARDWARE_FAILURE Blue Screen error no matter what the cause of the problem is.
Option 1 – Try removing hardware or drivers that you’ve installed recently
If you have recently installed some hardware or drivers, you might want to disable or remove them since external devices are proven to be one of the factors that trigger Blue Screen errors like NMI_HARDWARE_FAILURE. All you have to do is physically disconnect any external devices that are connected to your computer and then check if it fixes the BSOD error or not.
Option 2 – Try to rollback, update, or disable the Graphics card drivers
Since the NMI_HARDWARE_FAILURE Blue Screen error has something to do with Graphics card drivers, you can either roll back, update or disable them depending on your preference in order to resolve the error.
First, boot your computer into Safe Mode.
After that, tap the Win + R keys to launch Run.
Type in devmgmt.msc into the box and tap Enter or click OK to open the Device Manager.
After that, a list of device drivers will be displayed. From there, look for the Display Adapters and click on them.
After that, right-click on each entry under the Display Adapters and select the “Uninstall Device” option from the menu.
Now restart your computer.
After restarting your computer, go to the Settings app and Check for Updates in the Windows Update section.
Note: You also have the option to go directly to the website of your graphics card manufacturers like NVIDIA, Intel, or AMD and go to the section called Drivers then check if there’s a new available update – if there is, download and install it.
Option 3 – Make sure that all memory modules have the same type
This third option is quite technical and tricky. If you often use multiple physical RAMS on your Windows 10 computer, then you have to check first if they are of the same frequency. After that, the first thing you should verify is if the chip is properly compatible or not. And if the sockets are attached using some kind of adapter or non-recommended device, it could cause some issues while giving a performance hit to your computer. If you were able to find such a setup, you have to undo it or install the proper and recommended as well as compatible hardware.
Option 4 – Try to run the Blue Screen Troubleshooter
As you know, the Blue Screen troubleshooter is a built-in tool in Windows 10 that helps users in fixing BSOD errors like the NMI_HARDWARE_FAILURE error. It can be found on the Settings Troubleshooters page. To use it, refer to these steps:
Tap the Win + I keys to open the Settings panel.
Then go to Update & Security > Troubleshoot.
From there, look for the option called “Blue Screen” on your right-hand side and then click the “Run the troubleshooter” button to run the Blue Screen Troubleshooter and then follow the next on-screen options. Note that you might have to boot your PC into Safe Mode.
Universal PnP or plug-and-play monitors use a generic PnP Windows driver.
Whenever a user plugs a USB device or monitor into a PC the system will automatically identify the device and it will install the proper driver for smooth running.
Generic PnP Monitor in Windows 10 means that Windows 10 installed a monitor driver as the PNP did not recognize the device. This generic PnP monitor driver may not work perfectly like the manufacturer’s one.
It can lead to issues like unable to set the best monitor resolution and the screen refresh rate. Therefore, it is important to fix this issue.
All of that being said let us fix your PnP display driver issue.
Reconnect monitor
Always try this first, just by unplugging the monitor and then plugging it back may resolve the issue, if the monitor was not detected properly the first time, there are very high chances that this method will resolve the issue.
Check if the Device Manager is reporting an error and update the driver
If the hardware is functioning properly then the issue might be in Windows not detecting device or driver malfunction. In any case, the Device Manager will be the one who will report this problem. In order to check to see if the driver is properly working press ⊞ WINDOWS + X to open the hidden start menu.
Once it opens, click on Device Manager to open it,
If you have a driver device error inside Windows, you should see it immediately when entering the Device Manager, it will have a yellow exclamation mark beside it. Right-click on it and choose update driver.
Reinstall driver
If driver update failed or you already have the latest drivers, reinstalling them could fix the issue since drivers might have corrupted during installation of some update or application. Follow steps from point 3 to get to the driver in Device Manager, then right-click on it but instead of update choose to uninstall. Reboot Windows once the driver is uninstalled and Windows will install a new one automatically. If you do not want to update drivers automatically install the latest driver for your device, then reboot.
Check Windows update
Check to see if the latest Windows update is installed, update your Windows if needed
Fix driver issue with DRIVERFIX
If everything else fails, get DRIVERFIX, a premium solution for your PC issues, and fix driver errors.
Experiencing issues while using Remote Desktop connections is not uncommon. One of the issues that users encountered recently while trying to connect to their Remote Desktop network is the error saying, “Your credentials did not work, The login attempt failed”. If you are one of these users, then you’ve come to the right place as this post will walk you through fixing the problem.
When facing this kind of problem, the first thing you can try before you do some troubleshooting steps is to verify the credentials. But if you are certain that you’ve entered the correct credentials just like what other users reported, then it’s completely a different matter. Based on the reports, this error is common on newly installed versions of Windows 10 or after reinstalling the operating system which could mean that the problem might be due to the Windows security policies or the username might have been recently modified. The latter case is a possibility especially if you’ve reinstalled Windows 10 and had entered a new username. In such a case, you will really have a difficult time connecting to your Remote Desktop connection since its credentials do not really automatically change.
If you’ve verified that your credentials are correct, then now’s the time you troubleshoot the problem with the help of the potential fixes provided below. Just make sure that you follow each one of them in sequence.
Option 1 –Try to run the Network Adapter troubleshooter
To run the Network Troubleshooter, refer to these steps:
Open the Search bar on your computer and type in “troubleshoot” to open the Troubleshoot settings.
Next, scroll down and select the “Network Adapter” option from the right pane.
Then click on the Run Troubleshooter” button.
After that, your computer will check for any possible errors and will pinpoint the root cause of the problem if possible.
Restart your computer.
Option 2 – Try to change the network profile from public to private
According to some reports, this error occurs on systems where the network profile was set to public. Thus, you need to change the network profile to private to resolve the problem. How? Refer to these steps:
Go to Start and from there click on Settings > Network & Internet > Status.
Next, click on the “Change connection properties” option.
After that, set the radio button of Network Profile from Public to Private.
Wait for a couple of seconds until the system is done applying the changes you’ve made and then see if you can now connect to the Remote Desktop connection.
Option 3 – Try changing the account username
As mentioned, one of the possible causes for this error is the reinstallation of the operating system. You might have changed the username for the system but it does not really change the username of the Remote Desktop connection as well. Thus, you have to change the username back to what it was before you’ve reinstalled Windows 10.
Option 4 – Try modifying the Windows Security Policy
You can also try to edit the Windows Security Policy as it could help in resolving the error. This Windows Security Policy, when enabled, will not allow non-admin users to log on to the Remote Desktop connection. So if you want to allow non-admin users to use the Remote Desktop connection, then you need to modify this policy. Note that you can only do that if you are the admin of the system yourself.
Tap the Win + R keys to open the Run utility.
Then type “secpol.msc” in the field and tap Enter or click OK to open the Local Security Policy.
After opening the Local Security Policy window, select Local Policies > User Rights Agreement located on the left pane.
Next, double click on “Allow log on through Remote Desktop Services” located in the right pane.
And in the next window that appears, select Add user or group.
After that, type in the username of the intended non-admin user under the “Enter the object names to select” column.
Once done, click on the Check Names button to fix the username and then click OK to save the changes made.
Restart your computer.
Option 5 – Use the Group Policy Editor
Tap the Win + R keys to open the Run dialog box and then type “gpedit.msc” in the field and tap Enter to open the Group Policy Editor.
Next, navigate to this path: Computer Configuration > Administrative Templates > System > Credentials Delegation.
Double click on the “Allow delegating default credentials with NTLM-only server authentication” policy setting located on the right pane to edit it.
After that, shift its radio button to Enabled and click on Show.
Then type “TERMSRV/*” in the Value box and click OK.
Now repeat the same for the following policy settings:
“Allow delegating default credentials”
“Allow delegating saved credentials”
“Allow delegating saved credentials with NTLM-only server authentication”
Once you’re done, restart your computer and see if the problem is fixed.
Recently, a number of users reported an error while trying to update their computers. This particular Windows Update error has an error code of 0x80073701. If you are one of the users who encounter this error, then read on as this post will guide you on how exactly you can fix it.
Here’s the exact context of the error:
“Updates failed. There were problems installing some updates, but we’ll try again later.2019-07 Cumulative Update for Windows 10 Version 1903 for x86-based Systems (KB4507453) – Error 0x80073701”
The Windows Update Error 0x80073701 also comes with a code “ERROR_SXS_ASSEMBLY_MISSING” which indicates that some system files are missing on your computer that caused the update installation failure error. Although this Windows Update error does not cause any severe issues, it is still being reported in the section of Windows Update where it is marked as “Update failed”. There are several potential solutions you can check out to resolve this error. You can try to run the DISM tool or the SFC or System File Checker scan. You could also try to run the Windows Update troubleshooter. For more information, make sure to follow the options given below.
Option 1 – Restart your computer and try installing the Updates again
Restarting your computer can also help in fixing the Windows Update failed to install error 0x80073701. There are cases where the issue resolves on its own as it could just be some simple network or PC error.
Option 2 – Try to run the DISM tool
Running the DISM Tool helps in repairing the Windows System Image as well as the Windows Component Store in Windows 10. Using this built-in tool, you have various options such as the “/ScanHealth”, “/CheckHealth”, and “/RestoreHealth”.
Open the Command Prompt as admin.
Then type in this command: exe /Online /Cleanup-image /Restorehealth
Do not close the window if the process takes a while as it will probably take a few minutes to finish.
After you run this tool, a log file is created at C:WindowsLogsCBSCBS.log. On the other hand, if the Windows Update client is already broken, you will be prompted to use a running Windows installation as the repair source or use a Windows side-by-side folder from a network share, as the source of the files. Although the chances of this happening is less, if it turns out to be the case, you need to run an advanced command in the DISM tool to repair a broken Windows Update. Just repeat the process above but use the following command instead:
System File Checker or SFC is a built-in command utility that helps in restoring corrupted files as well as missing files. It replaces bad and corrupted system files to good system files that might be causing the error 0x80073701. To run the SFC command, follow the steps given below.
Tap Win + R to launch Run.
Type in cmd in the field and tap Enter.
After opening Command Prompt, type in sfc /scannow
The command will start a system scan which will take a few whiles before it finishes. Once it’s done, you could get the following results:
Windows Resource Protection did not find any integrity violations.
Windows Resource Protection found corrupt files and successfully repaired them.
Windows Resource Protection found corrupt files but was unable to fix some of them.
Restart your computer.
Option 4 – Try running the Windows Update Troubleshooter
Running the built-in Windows Update troubleshooter could also help you resolve the Windows Update error 0x80073701. To run it, go to Settings and then select Troubleshoot from the options. From there, click on Windows Update and then click the “Run the troubleshooter” button. After that, follow the next on-screen instructions and you should be good to go.

 Once you are in the system, on the left tabs find and click on Clipboard.
 If you are not logged in to your Microsoft account do so on the right panel by locating Sync across devices and click on sign in.
 When you are signed in click on the option to turn it on.
 One option is turned ON, you will be greeted with two choices, to copy everything from the clipboard automatically or to choose text which you want to sync and paste it with ⊞ WINDOWS + V. Choose whatever better suits your needs, and you are done.
Repeat these steps for other devices and you are done.
One option is turned ON, you will be greeted with two choices, to copy everything from the clipboard automatically or to choose text which you want to sync and paste it with ⊞ WINDOWS + V. Choose whatever better suits your needs, and you are done.
Repeat these steps for other devices and you are done. 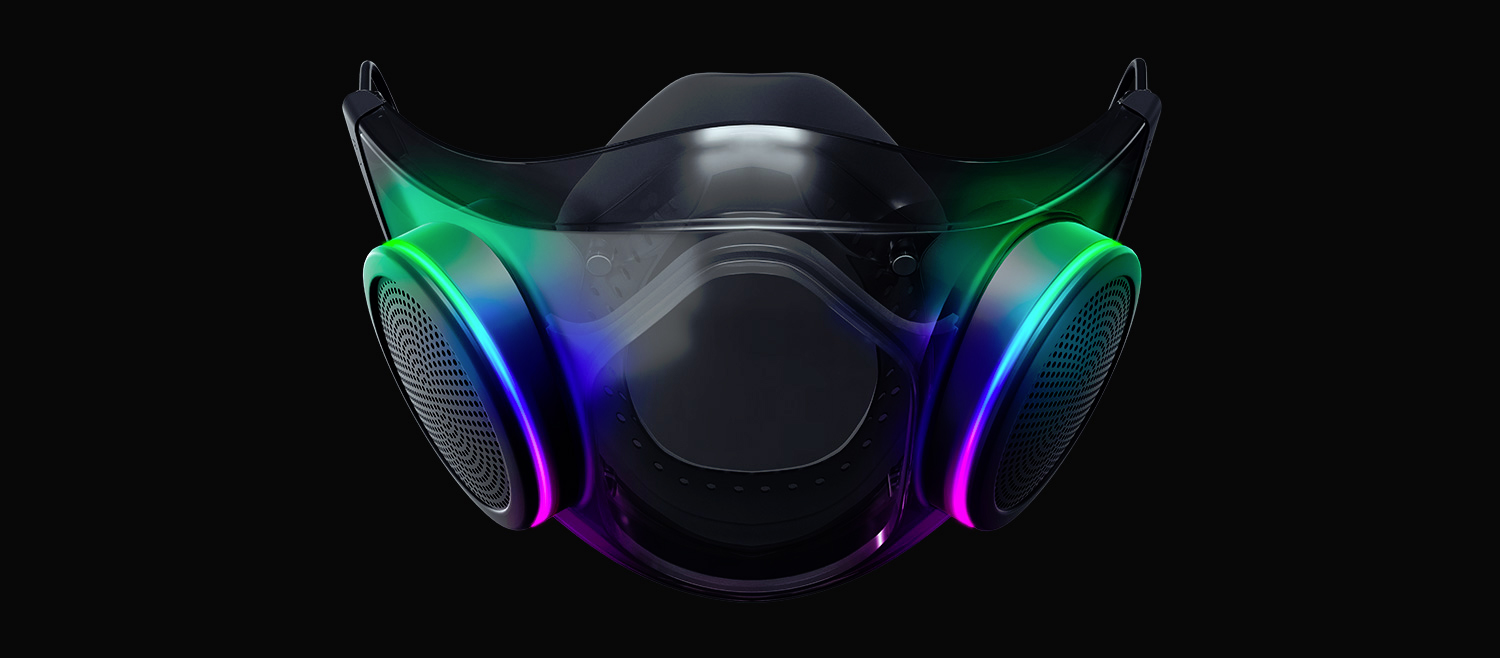 The world today is still sadly under pandemic and by the looks of it, COVID-19 is here to stay, well at least for some time in the near future. Razer seems to think so as well since their upcoming gear is not really what you would expect.
Enter Hazel, a new and upcoming Razer smart mask.
The world today is still sadly under pandemic and by the looks of it, COVID-19 is here to stay, well at least for some time in the near future. Razer seems to think so as well since their upcoming gear is not really what you would expect.
Enter Hazel, a new and upcoming Razer smart mask.

 Once it opens, click on Device Manager to open it,
If you have a driver device error inside Windows, you should see it immediately when entering the Device Manager, it will have a yellow exclamation mark beside it. Right-click on it and choose update driver.
Once it opens, click on Device Manager to open it,
If you have a driver device error inside Windows, you should see it immediately when entering the Device Manager, it will have a yellow exclamation mark beside it. Right-click on it and choose update driver.