Expand right-click menu in Windows 11

Windows 11 brought with it a simplified right-click menu that has limited options. If you would like to bring the old Windows 10 right-click menu you will have to do some registry tweaking but it is doable.

right click menuSince this requires registry tweak, please follow given solution step by step
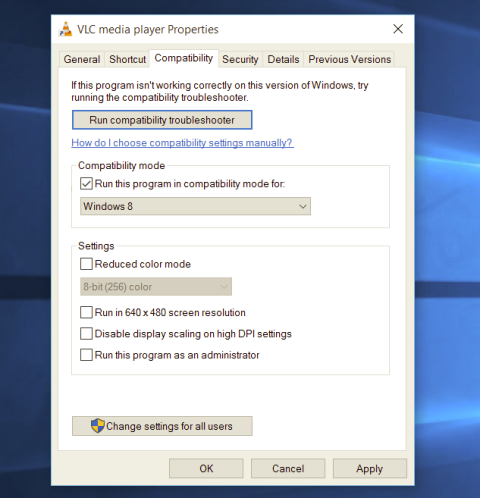
  1. Press Start and type RegEdit
  2. Click on Registry Editor
  3. Inside registry editor find next key:
    Computer\H_KEY_CURRENT_USER\SOFTWARE\CLASSES\CLSID\
  4. Right click in the right part of editor window and select New > Key
  5. Type in as a name: {86ca1aa0-34aa-4e8b-a509-50c905bae2a2}
  6. Right click on {86ca1aa0-34aa-4e8b-a509-50c905bae2a2} key and select New > Key again to create new key inside this one
  7. Name inside key InprocServer32
  8. Double click the “(Default)” key in InprocServer32 to open it
  9. When the Default key opens close it without making any changes by clicking on OK. This will make its value property Blank instead of value not set
  10. Close Registry Editor
  11. Restart your PC

Once the system is up if the followed solution is applied you will now have an old school menu once right-click is used.

Do You Need Help with Your Device?

Our Team of Experts May Help
Troubleshoot.Tech Experts are There for You!
Replace damaged files
Restore performance
Free disk space
Remove Malware
Protects WEB browser
Remove Viruses
Stop PC freezing
GET HELP
Troubleshoot.Tech experts work with all versions of Microsoft Windows including Windows 11, with Android, Mac, and more.

Share this article:

You might also like

Fix ndis.sys failed BSOD error on Windows 10
NDIS or Network Driver Interface Specification is a programming interface for the network interface cards that aids in the proper functioning of a system driver in a computer network. The NDIS helps the computer system in order to communicate with other connected devices and hardware components on a computer network. In relation, the ndis.sys file is a critical system file developed by Microsoft for the Windows operating system. As you know, sys files or system files are important parts of the Windows operating system as well as a repository of system driver settings used by Windows to communicate with the connected hardware and devices. The ndis.sys files are stored mostly in a driver folder at C:/Windows/System32/drivers and as mentioned, these files are essential for the system to function properly. Although the presence of ndis.sys system file is not yet known to affect the normal functioning of the Windows OS, some of the Windows 10 users reported that they encountered ndis.sys blue screen errors on their PCs. Blue Screen of Death errors or Stop errors usually occurs when you open a program or a function. Moreover, it could also occur when the driver gets loaded during the system startup or during system shutdown. It isn’t yet clear what really causes the ndis.sys blue screen error. However, like other Stop errors, it may occur due to corrupted files, misconfigured device drivers, bad drivers, corrupted Windows Registry, missing or damaged system files, and malicious programs. Aside from the aforementioned reasons, the ndis.sys blue screen error might also occur if your hard disk is damaged and if the RAM is corrupted. In such cases, a lot of users usually disable the ndis.sys file. However, it won’t really resolve the issue since the file is required for the normal functioning of the operating system and even when you disable the file, it’s pretty useless as the file will start all over again. In addition, you might want to disable security programs or firewalls and antivirus programs in the meantime to check if these programs are the ones that are causing the error. And if you’ve determined that none of the security programs or firewalls and antivirus programs are to blame, refer to the options below that might help you resolve the DRIVER_IRQL_NOT_LESS_OR_EQUAL or ndis.sys Blue Screen of Death error.

Option 1 – Try to update or reinstall the PC device driver

The Ndis.sys Blue screen error can occur when the device driver in your computer is outdated or corrupted. Thus, you either have to update or reinstall it to fix the issue.
  • Tap the Win + R keys to launch Run.
  • Type in devmgmt.msc into the box and tap Enter or click OK to open the Device Manager.
  • After that, a list of device drivers will be displayed. If you see a red or yellow sign that shows up against the driver, right-click on the driver’s name and select “Update Driver Software” or “Uninstall”. And if you find any “Unknown device”, you need to update it as well.
  • Select the “Search automatically for updated driver software” option and then follow the instructions to complete the process.
  • Restart your PC.

Option 2 – Rollback your Network drivers

If you have updated the driver software as of late and you suddenly got this BSOD error, you might have to roll back the device driver – in other words, switch back to the previous working version. To do that, follow these steps:
  • Tap the Win + R keys to launch the Run window and then type in the “devmgmt.msc” command and hit Enter to open the Device Manager window.
  • Under the Device Manager, you will see a list of drivers. From there, look for the Network Adapters and expand it.
  • Next, select the driver entries that are labeled appropriately other than anything in the context of the WAN Miniport.
  • Then select each one of them and double-click to open a new mini window.
  • After that, make sure that you’re on the Driver tab and if you are not, just navigate to it then click the Roll Back Driver button to switch back to the previous version of your Network adapters.
  • Now restart your computer to successfully apply the changes made.

Option 3 – Try running the System File Checker

The SFC or System File Checker scan could detect and automatically repair damaged system files that could be causing the ndis.sys Blue Screen of Death error. SFC is a built-in command utility that helps in restoring corrupted files as well as missing files. It replaces bad and corrupted system files with good system files. To run the SFC command, follow the steps given below.
  • Tap Win + R to launch Run.
  • Type in cmd in the field and tap Enter.
  • After opening Command Prompt, type in sfc /scannow and hit Enter.
The command will start a system scan which will take a few whiles before it finishes. Once it’s done, you could get the following results:
  1. Windows Resource Protection did not find any integrity violations.
  2. Windows Resource Protection found corrupt files and successfully repaired them.
  3. Windows Resource Protection found corrupt files but was unable to fix some of them.

Option 4 – Try running the CHKDSK utility

Running the CHKDSK utility might also help you resolve the Netwtw04.sys failed BSOD error. If your hard drive has issues with integrity, the update will really fail as the system will think that it’s not healthy and that’s where the CHKDSK utility comes in. The CHKDSK utility repairs hard drive errors that might be causing the problem.
  • Open Command Prompt with admin privileges.
  • After opening Command Prompt, execute the following command and hit Enter:
chkdsk /f /r
  • Wait for the process to be completed and then restart your computer.

Option 5 – Run the DISM Tool

The DISM tool is another command-line tool in the Windows operating system that could help users fix various corrupted system files. To use it, follow these steps:
  • Open the Command Prompt as admin.
  • Then type in this command: DISM /Online /Cleanup-Image /RestoreHealth
  • The DISM command you entered will repair the corrupted system image. Do not close the window if the process takes a while as it will probably take a few minutes to finish.
  • Restart your PC.

Option 6 – Perform a System Restore

Performing a System Restore on your computer can also help you fix the ndis.sys Blue Screen of Death error. You can do this option either by booting into Safe Mode or in System Restore. If you are already in the Advanced Startup Options, just directly select System Restore and proceed with the next steps. And if you have just booted your PC into Safe Mode, refer to the steps below.
  • Tap the Win + R keys to open the Run dialog box.
  • After that, type in “sysdm.cpl” in the field and tap Enter.
  • Next, go to the System Protection tab then click the System Restore button. This will open a new window where you have to select your preferred System Restore point.
  • After that, follow the on-screen instructions to finish the process and then restart your computer and check if the problem is fixed or not.
Read More
INF file doesn't support this installation
If you got an error message saying, The INF file you selected does not support this method of installation while trying to install a driver using the “Install” option in the right-click context menu, read on as this post will guide you in fixing the problem. The INF file mentioned in the error message is a text file that’s divided into different types of formatted sections. Each one of the sections is designed for a particular purpose. For instance, one section is designed to copy files or to add entries to the registry. INF files are used to install drivers. However, if something is wrong, you might encounter this error while installing a driver on your Windows 10 computer. To resolve this problem, you can try to download the driver again from the official manufacturer website or check if the driver is compatible with your computer’s operating system architecture or you can also try installing the driver from the Device Manager. For more details, follow the given options below.

Option 1 – Try downloading the driver again from the official website of the manufacturer

Usually, you shouldn’t encounter this kind of issue no matter what installation method you used on your Windows 10 PC. However, there are times when the driver itself is corrupted for some reason which is why you are unable to complete the installation and receive an error message instead.

Option 2 – Try checking if the driver is compatible with the OS architecture

It is possible that you’re getting this error if you have a driver that is compatible with a 32-bit system and you are trying to install it on a 64-bit system and vice versa. Thus, you need to check if the driver you are trying to install is compatible with your operating system if you haven’t done it when you’ve downloaded the driver from the website of the manufacturer. To check the system architecture, in the Start Search, type “msinfo32” in the field and hit Enter to open the System Information window. From there, you should see all the information about your operating system. In addition, you can also search “system information” in the Cortana search box and look for the System Type entry and open it.

Option 3 – Try installing the driver from the Device Manager

If you have the driver files on your PC and you have to update a driver, refer to the steps given below to be guided on how to install the driver from the Device Manager.
  • First, click the Start button and type “device manager”.
  • Then click on the “Device Manager” from the search results to open it.
  • From there, look for the driver you want to update, and then right-click on each one of them and select the Update Driver from the menu.
  • After that, click on the “Browse my computer for driver software” option.
  • Next, select the “Let me pick from a list of available drivers on my computer” option and then click the Next button.
  • On the next screen, you should see the “Have Disk” option. Click on this option and then click on the Browse button to go to the location of the file. After that, you shouldn’t have any problem installing the INF file.

Option 4 – Try running the System File Checker Scan

The SFC or System File Checker scan could detect and automatically repair damaged system files that could be causing the “The INF file you selected does not support this method of installation” error. SFC is a built-in command utility that helps in restoring corrupted files as well as missing files. It replaces bad and corrupted system files with good system files. To run the SFC command, follow the steps given below.
  • Tap Win + R to launch Run.
  • Type in cmd in the field and tap Enter.
  • After opening Command Prompt, type in sfc /scannow
The command will start a system scan which will take a few whiles before it finishes. Once it’s done, you could get the following results:
  1. Windows Resource Protection did not find any integrity violations.
  2. Windows Resource Protection found corrupt files and successfully repaired them.
  3. Windows Resource Protection found corrupt files but was unable to fix some of them.
 Now restart your computer.
Read More
Communication with service process failed
The Intel Driver and Support Assistant automatically identifies, finds, and installs drivers in a computer and is pre-installed in newer Intel-supported systems. If you are using one of those newer Intel supported systems but encountered an error that says, “Communication with service process failed, Tray cannot start” when you launch a program, read on as this post will guide you in fixing this problem. This kind of issue in Intel supported system could be due to some third party application that’s meant to update drivers could be interfering. It is also possible that the Intel Driver and Support Assistant application is corrupted. Whatever the cause may be, here are some suggestions you have to check out to resolve the problem.

Option 1 – Try to uninstall all the third party driver update applications

One of the reasons why some users install third-party driver update software is that it is kind of tiresome to update each one of the drivers manually. However, as tiresome as it might be, it is still better than using a third-party driver update application as these kinds of applications could mess up the drivers, and the Intel Driver and Support Assistant is still much better. To fix the error, you have to uninstall the previously installed third-party driver update application on your computer.
  • Tap the Win + R keys to open the Run dialog box
  • Then type “appwiz.cpl” in the field and hit Enter to open the Programs and Features in Control Panel.
  • From there, look for the third-party driver update application you are using, select it and then click on Uninstall to remove it.
  • After that, restart your computer and try to install the latest version of the program again. It should work now. If not, proceed to the next available option below.

Option 2 – Try to disable the DSATray in Startup

Another thing about the “Communication with service process failed, Tray cannot start” error is that it keeps on popping up each time you boot your computer. And so to resolve this bug, you can just disable the DSATray from Startup. How? Refer to these steps:
  • Tap the Ctrl + Alt + Del to pull up the Security options window.
  • From there, select the option to open the Task Manager.
  • Once you’re in the Task Manager, go to the Startup tab and look for “DSATray” and right-click on it and then select the Disable option.
  • Now restart your computer and you should be good to go.

Option 3 – Try to reinstall the Intel Driver and Support Assistant

If the Intel Driver and Support Assistant is corrupted, you need to uninstall it from your computer. All you have to do is go to Programs and Features like what you did in the first option to uninstall the program. Once you’ve uninstalled it, download the newer or latest version of the Intel Driver and Support Assistant from the official site of Intel and then install it.
Read More
Windows installation stuck on Set up a Pin
After you fresh install Windows 10 on your computer, it allows you to set up a PIN just before you can start using it. However, a number of users reported that the Windows 10 installation gets stuck on the “Set up a Pin” phase. If you are one of the users who experience the same thing, then read on as this post will walk you through fixing the problem. As users start to use their newly installed Windows 10 computer, they reported that the screen is still stuck even after they enter the correct PIN twice and there is no way for them to go forward or backward. Note that this is a part of the account setup and that your computer must stay connected to your internet connection before you finalize everything. And even though the PIN works when the computer is offline, the account setup still needs an internet connection, at least for a fresh installation. The solution for this kind of issue is quite easy and there won’t be any problem even if your computer shuts down or restarts since the installation is already complete and all that’s left is the account setup. To fix this problem, follow the steps given below. Step 1: The first thing you have to do is to turn off your internet connection or disable all connectivity from your computer. Note: If you are using either an Ethernet cable or a Wi-Fi switch to connect to the internet, you have to disable or remove them. But if you don’t have any options, just completely turn off your internet connection. Step 2: The next thing you have to do is to force your computer to shut down and then restart your computer. The setup process will eventually pick up exactly where it left off. The only difference is that there is no connection to the internet and your screen will no longer be stuck on the PIN setup screen so you now have the option to skip it and wait until you’re logged in for the first time. Step 3: Once you’re done, you can then you can choose to Setup Pin later on and turn your internet connection back on or connect your computer with an internet connection.
Read More
Easy Methods of Fixing Error 1706

What is Error 1706?

Error 1706 is a Windows PC error. It occurs when you insert a Microsoft CD-ROM either to repair an Office or to install a feature set to Installed on First Use. The error message is displayed in the following format: Error 1706. Setup cannot find the required files. Check your connection to the network, or CD-ROM drive. For other potential solutions to this problem, see C:\Program Files\Microsoft Office\Office101033\Setup.hlp.

Solution

Restoro box imageError Causes

Error 1706 may occur due to several reasons. These include:
  • You originally installed MS Office from a network administrative installation
  • You are trying to use Office CD-ROM when the error is prompted by the Windows Installer for an Office source location
  • Viral Infection

Further Information and Manual Repair

The good news is that this error code is not fatal. However, to avoid inconvenience, it is recommended to resolve the error right away. To fix the problem you don’t have to be a computer programmer or hire one. In fact, this error code can be resolved quite easily. Here are some of the best and easiest do it yourself methods to resolve error 1706 on your PC:

Method 1

To resolve this issue find a different administrative installation for the Office source file location. To do this, go to the start menu and then click run. In the open box, simply type this command line new network pathSetup.exe /fvm package name.msi and press OK to continue and update changes. Once the update is complete and finished press OK to save and proceed. Please note after you follow these steps, the Windows Installer uses this new server location whenever it needs to reinstall, repair, or add a feature to your Office Installation.

Method 2

Another alternative method to resolve this method is to use CD-ROM for the Office Source Location. To do this you will have to remove Office and then re-install Office from the CD-ROM. Here are the steps to remove the Office program. First, quit all Office programs.
  1. Go to the Control Panel then click on the Program and Features option.
  2. Now double click the Add/Remove programs and remove the entry for the Microsoft Office 2003 or Microsoft Office XP product installed on your PC.
  3. After that, click on the Maintenance Mode Options dialog box, select Uninstall Office, and then click Next to proceed.
  4. Click Yes to confirm changes.
  5. Now insert Office 2003 or Office XP CD-ROM and follow the setup dialog boxes to reinstall the program on your system from CD-ROM.

Download Restoro to Correct Registry Errors

However, to ensure the installation is successful this time around, it is advisable to clean the registry and ensure the uninstalled program is not located in the registry. To do this, download Restoro and run it on your computer. This is a powerful PC Fixer integrated with a registry cleaner. The registry cleaner wipes out all the unnecessary files and uninstalled program files saved in the registry. Once the registry is cleaned, try reinstalling MS Office again. This will resolve the error 1706. Click here to download Restoro and repair error 1706.
Read More
How to Fix Error Code 0x8024002e

Error Code 0x8024002e - What is it?

Windows 10 error code 0x8024002e is related to the Windows update service. When you see the error code displayed on your screen, it means that the Windows update service has been blocked or not working. As a result of this error code, your computer might lag and the system may freeze while performing normal operations. The error may read as follows:
“There were some problems installing updates, but we’ll try again later. If you keep seeing this and want to search the web or contact support for information this may help: (0x8024002e)”.
Common symptoms include:
  • Slow computer performance
  • System freezes while performing normal operations or freezes while multitasking
  • BSOD error is showing
  • Some unwanted files get opened automatically
  • Updating is not possible

Solution

Restoro box imageError Causes

This error code appears because of the following reasons:
  • Incomplete installation of the Windows operating system
  • Incorrect registry entry
  • Corrupt or damaged system files
  • The computer has come under a virus attack
  • Miscommunication between the computer and the Windows Automatic Update service
The decline in RAM or outdated Hard Disk Drive

Further Information and Manual Repair

Method 1:

  • Remove any external media connected to the computer
  • Crash reboot your PC 2 to 3 times.
  • Now check if you are still having the problem.
If the problem still persists, try the following methods if you are able to boot to the desktop and check for the problem.

Method 2:

Changing Windows Update property to automatic: You might see this error if your Windows update property is set to manual. Follow the steps below to change it to automatic. Open Task Manager.
  1. Click on the Services tab. Find “Open Services” at the bottom of the window.
  2. A new window will pop up. Scroll down and find “Windows Update” from the list. Double click on the Windows Update. It will open its properties.
  3. Select Automatic for ‘Startup Type.’ Click Apply, Start, and OK.
Now, try the Windows Update and check if you are still getting the error message. If the problem isn’t resolved, reboot your PC for the changes to take effect and then try again.

Method 3:

Disable Antivirus program: If you have any antivirus installed on your PC, you might need to disable it first and see if that helps. Although, most of the antivirus makers have made changes to work smoothly with Windows 10, it is a new Operating System and some antivirus may cause conflict. Disable the antivirus and check for updates to see if it is preventing you from updating your system and displaying the error code 0x8024002e.

Method 4:

Run inbuilt Windows update troubleshooter. Follow the steps given below:
  1. Press Windows + W keys on your keyboard to enable the search option.
  2. In the Search box type Troubleshooting.
  3. Click on View all
  4. Click on Windows update and follow the prompts to run the troubleshooter.
If the issue persists, try Method 5

Method 5:

Run the System File Checker tool (sfc.exe):
  1. Open Command prompt.
  2. Type sfc /scannow and hit Enter.
  3. The sfc /scannow will scan all protected system files and replace corrupted files with a cached copy that is located in a compressed folder at %WinDir%System32dllcache. The %WinDir% has the Windows Operating System folder. For example, C:\Windows.
Do not close the Command prompt window until the verification is 100% complete. The command prompt will show the scan results when it is done. After it is done, you may receive one of the following messages:
“Windows Resource Protection did not find any integrity violations.” This means you do not have any missing or damaged system files.
OR you may receive a message saying:
“Windows Resource Protection could not perform the requested operation.”
To resolve this problem, run the System File Checker in safe mode and make sure that the PendingDeletes and PendingRenames folders exist under %WinDir%WinSxSTemp.
OR you may also receive a message saying, “Windows Resource Protection found corrupt files and successfully repaired them. Details are included in the CBS.Log%WinDir%LogsCBSCBS.log.” OR you may receive a message saying, “Windows Resource Protection found corrupt files but was unable to fix some of them. Details are included in the CBS.Log%WinDir%LogsCBSCBS.log.”
Read More
How to Fix Error Code 0x802400d on Your PC

Error Code 0x802400d - What is it?

The Error Code 0x802400d most often occurs when users attempt to use the Windows Update tool on their computers to move from one version of the software to another. In some cases, this error is more likely to appear on your computer during the process if you have not performed regular updates to the software as they have been available.

Common symptoms include:

  • Inability to finish the download of the necessary update to Windows 10
  • Incomplete installation of the desired Windows 10 update

While it can take additional time to deal with the issues that cause Error Code 0x802400d to appear on your computer, there are several steps that you can take to address the problem. These are fairly simple to perform and do not require advanced knowledge of the system to employ.

Solution

Restoro box imageError Causes

The most basic cause for Error Code 0x802400d is that there is a file or a process that is causing the update process to hiccup. In many cases, this error appears when a user attempts to begin the process of updating their computer if they have several stacked updates to perform. Computers that are several updates behind where they should be will display this error more often than computers that are kept on a schedule of recommended updates.

Further Information and Manual Repair

While there are multiple reasons why the Error Code 0x802400d may appear on your computer during the Windows Update process, there are several methods that can be used to attempt to resolve the problem on your own. These are generally easy to do and do not require advanced techniques. However, if you do not feel comfortable addressing the issue on your own, contact a qualified Windows repair technician.

Here are some of the best methods that users can employ to resolve Error Code 0x802400d:

Method 1:  Run the System Update Readiness Tool

There are a number of different processes, files, and settings that could cause Error Code 0x802400d to appear on your computer during the Windows 10 Update process. For this reason, the most efficient way to determine what the culprit is for your specific issue is to download and use the System Update Readiness function.

This tool is available directly from Windows. Although there are other tools available on the Internet that claim to be able to fix the problem, these can contain viruses and malware, so be cautious if you decide to employ these instead. There are also several versions of the tool on the Windows website, so be sure to download the version that matches the operating system and version of your computer.

Once you have downloaded the Readiness tool from the Windows website, allow it to run a scan on your system. At a minimum, this process will take about fifteen minutes to complete. Although you will see a progress bar at the bottom of the window, it does not always update effectively. Some users have reported that the update appears to stop when it is two-thirds complete. Continue to let the scan run if this happens, rather than canceling it out. Even if the progress bar doesn’t update, the scan is still running.

Method 2: Remove New Software and Re-Attempt the Update Process

If you have recently installed new software on your machine, it can sometimes cause problems with the update process. The best way to resolve this issue is to remove or uninstall the software, run the update process again, and then reinstall the software once the Windows system has been successfully updated.

If the above methods are not successful in resolving Error Code 0x802400d from your machine and you are still unable to complete the Windows 10 Update process or if you are not confident in your ability to complete these steps successfully on your own, get in touch with a qualified computer repair technician who is familiar with the issues surrounding Windows 10 in particular. Microsoft offers certifications for Windows repair technicians, so look for a professional who has the experience, skills, and knowledge necessary to adequately address Error Code 0x802400d on your machine.

If you wish to always have at your disposal a utility tool to fix these Windows 10 and other related issues when they do arise, download and install a powerful automated tool.

Read More
How to get Dynamic Wallpapers in Windows 10
Dynamic Wallpapers introduced with Mojave Update in macOS are pretty cool. Dynamic Desktop is a feature introduced in macOS Mojave (10.14), in which the desktop background changes according to the time of Mac's current location. If Location Services are turned off the Privacy pane of the System Preferences, then the time zone specified in the Date & Time preferences will be used. To apply macOS Dynamic Wallpaper on Windows 10 we need to download & use WinDynamicDesktop, a free application that lets you apply macOS Dynamic Wallpaper. After the installation, you will be asked to Configure the Schedule. While doing that you need to make sure that you enter your location correctly. You can even set specific sunrise and sunset timing by selecting “Use specific sunrise and sunset times” and changing the Sunrise and Sunset times manually. Now, you will be greeted with some of the coolest dynamic wallpapers in the market. Select a theme of your choice, click on the Download button (file size can range between 20-200 MB), and click Apply to enjoy macOS Dynamic Wallpaper on Windows 10. If for some reason you want to go back to the default Windows theme but not necessarily delete the application then right-click on the WinDynamicWallpaper icon from the taskbar, click Select Theme, select None (from the theme section) and click Apply.
Read More
0x80071771, The specified file could not ...
If you are tried encrypting or decrypting a file using the default EFS engine but you receive an error message instead saying, “Error Applying Attributes, An error occurred applying attributes to the file: The specified file could not be decrypted”, read on as this post will help you sort out the problem. If you encounter this error you can use the error code in it. You will most likely get error code 0x80071771. This kind of error occurs when the File Explorer’s copy and paste feature was not able to read the source file being encrypted or decrypted. It could also occur if you try to access a file that has been on another computer previously.

To fix error code 0x80071771 when decrypting or encrypting a file, refer to the instructions provided below.

Step 1: You need to check first if you can decrypt the files encrypted by EFS. However, if you can’t, just proceed and then take full control of the file. Step 2: To take control of the file, open File Explorer and right-click on the partition, and then click on Properties. Step 3: After that, click on the Edit button under the Security tab. Step 4: Next, make sure that “Everyone” is selected under the Group or user names section. Step 5: Afterwards, the Permissions for Everyone section will be activated. Just make sure that all the checkboxes for Allow are checked and then click on the Apply button. Step 6: Once you’re done, click on the Advanced button. This will open a new window labeled Advanced Security Settings. From there, click on the Change link under the Owner section. Step 7: Now type your account name in the field and click on Check Names to verify the account name and click OK. Step 8: After that, select the “Replace owner on sub-containers and objects” option and then click OK. Step 9: Next, select Administrators in the Group or User names list and select Full Control in the Permissions for Administrators panel and click OK.
Read More
Mapi32.dll Outlook Error - Quick Fix

What is Mapi32.dll Outlook Error?

Mapi32.dll is a Windows Messaging Application Programming Interface that enables Windows to perform various email functions and launch messaging programs like Microsoft Outlook and Microsoft Office. The inability of the interface to execute email functions properly results in the Mapi32.dll Outlook Error. This error occurs mostly when you are attempting to upgrade the operating system to a new version.

Solution

Restoro box imageError Causes

The common causes of the Mapi32.dll Outlook Error during the OS upgrade are:
  • Damaged or Corrupt Outlook user profile
  • The software is overwritten by some other program
  • Outlook PST file corruption
The Mapi32.dll Outlook Error message is displayed in either of the following forms:
  • Mapi32.dll is missing
  • Cannot start Microsoft Office Outlook. Mapi32.dll is corrupt or the wrong version.
  • Mapi32.dll was not found
  • Mail is not installed

Further Information and Manual Repair

So, what if you experience this issue and how do you fix it? Well, first there is no need to panic as Microsoft has recognized this issue and provided adequate solutions to fix this problem in no time. However, to ensure the Mapi32.dll Outlook error is a quick fix, you must first understand the cause of the issue and the message displayed on the screen.
  1. Let’s say the errors occur because your Outlook profile is corrupt. In this scenario, the best solution is to create a new Outlook profile. Regardless of whether you have Windows Vista or XP, to create your new Outlook profile, first, you will have to click on the Control Panel, then User Account, and then Mail. Once you click on the Mail tab, the mail set up dialog box will open. In this dialog box there will be a ‘Show Profiles’ tab, click and then click the Add tab that appears next. Now type the name for your new Outlook profile and then click ‘OK’. After that, add an email account to go with the profile.
  2. If Mapi32.dll is missing or corrupt, you will have to run ‘Fixmapi.exe’ to resolve the problem. It is located in the System32 folder inside the Windows directory in Windows Explorer.
  • Therefore, first start Windows Explorer and then locate the following folder on your computer: C: /Program Files/Common Files/System/Msmapi1033
  • Now find Fixmapi.exe and double click it
  • After that locate the Mapi32.dll file and rename it to MSmapi32.old and press enter.
  • Restart your computer when finished.
A word of advice for computer users is to scan for viruses with an antivirus program or a registry cleaner regularly to prevent the Mapi32.dll Outlook error from occurring in the first place. Viruses often latch onto .dll files and corrupt them. It’s always best to have a forward-looking approach.
Read More
1 2 3 171
Logo
Copyright © 2023, ErrorTools. All Rights Reserved
Trademark: Microsoft Windows logos are registered trademarks of Microsoft. Disclaimer: ErrorTools.com is not affiliated with Microsoft, nor claims direct affiliation.
The information on this page is provided for information purposes only.
DMCA.com Protection Status