Error Code 0x80004002 is a Windows-based error code that affects Windows 10 and previous operating systems, including Windows XP, Vista, Windows 7, and Windows 8. In most instances, the message box that shows Error Code 0x80004002 pops up as you attempt to install new software or programs on your machine.
Common symptoms include:
Problems running programs that once worked
Slow response time of your computer to commands entered with the keyboard or mouse
Trouble shutting down or starting up your machine
Error message regarding your registry, updates, or response time.
There are a number of different solutions that you can use to attempt to resolve Error Code 0x80004002. Because there are multiple causes to the issue, some of the methods used to successfully address the problems at hand are fairly simple, while others require advanced knowledge or abilities to complete. If the methods below are not successful in the resolution of the issue or if you aren’t confident in your skills to implement these methods, contact a qualified Windows repair technician to assist you. Once this error message is not rectified, you could be exposing your computer to other error messages, including error code 0x80240020.
Solution
Error Causes
There are many different issues that can contribute to the appearance of Error Code 0x80004002. The most common causes for this particular error message include:
Errors in registry files
Missing system files that have accidentally been associated with other programs and deleted
Viruses or malware that cause corruption in program or system files
Installations that have failed to complete fully
Further Information and Manual Repair
Due to the number of causes that can contribute to Error Code 0x80004002, there are a number of methods that you can use to attempt to resolve the issues behind the error. While some of these methods are fairly easy to implement, others may require you to use programs like registry cleaners and driver installation wizards, so if you are not comfortable using these kinds of software, contact a certified Windows repair technician to assist you.
Here are the top ways that you can attempt to address Error Code 0x80004002:
Method One: Run Your Windows Registry Cleaner
Many different registry cleaning tools exist on the Internet, but not all of these are provided by trustworthy sources. Rather than trusting a file from an unknown publisher, you can use the registry cleaning program included in your Windows software package.
Run this tool to complete a scan of your files, discovering which ones may need to be repaired. In most cases, the registry cleaner itself can repair the necessary files and resolve the error.
It is always a good idea to restart your computer after you have run the registry cleaning tool to ensure that your machine can accurately assess the newly repaired files.
Method Two: Update Your Drivers and Software
In some cases, Error Code 0x80004002 arises when drivers are out of date. If you believe that this is the case, you can check on the status of your various drivers by going into the settings for your operating system and selecting the “Update Drivers” option.
You can also check your system for any necessary updates to your Windows software, which may serve to address the error code.
After you have checked and installed any necessary drivers, make sure to restart your computer to fully apply any changes that the installation process has introduced.
Method Three: Reinstall Your Windows Software
In some cases, the best way to address the missing or corrupt files that can cause Error Code 0x80004002 is to simply reinstall your copy of Windows. Always make sure to back up your files before reinstalling your software.
Method Four: Run Your Virus Scan Software
Because Error Code 0x80004002 can also be caused by malware or a virus, you can run your virus scan software to detect and resolve the problem. After doing so, run the registry repair tool to fix any affected files and restart your computer.
Method Five: Use An Automated Tool
If you wish to always have at your disposal a utility tool to fix these Windows 10 and other related issues when they do arise, download and installa powerful automated tool.
If you suddenly encounter an error message saying, “ File Record Segment is Unreadable ” on a blue screen while booting your PC, it means that your hard drive is in an error state. This particular blue screen of death error might have a lot of bad sectors or might have reached its end.
The workarounds you can try to resolve the issue is by locating the bad sectors or checking your hard drive for any discrepancies in the mapping and fix them. Follow the detailed instructions laid out below for these workarounds.
Option 1 – Try to check for any bad sectors and wrong configurations in your hard drive
The first thing you have to check is the boot files on your PC. As you know, your PC boots from these files and if there is anything wrong with any one of them or if one of them ends up getting corrupted, you will most likely see the blue screen of death error or a prompt with an error message saying, “File record segment is unreadable”. According to some users who reported this issue, new hard drives aren’t exempted from this error. That’s why it is recommended that you carry out this solution no matter what kind of scenario you are in. You will have to launch the Command Prompt in recovery mode and see if you can fix the problem by executing the check disk commands.
Upon booting, restart your PC and tap F11 to go to the recovery environment then select Troubleshoot.
Next, click Advanced from the given options and select Command Prompt.
After opening Command Prompt, execute the commands listed below, and don’t forget to hit Enter right after you type in each one of them and if you have installed Windows to some different directory, you must replace “C” with the name of the drive you’ve installed Windows with.
chkdsk C: /r /x
chkdsk C: /f
Note: The Chkdsk function might take a while before it finishes its operations so you need to be patient and wait until the entire process is completed. And depending on the situation, it might even take a day at most so patience is really the key here.
Option 2 – Try connecting the hard drive to a different computer
If option 1 didn’t work for you and you’re still seeing the error, you can try connecting the hard drive to a different computer and then copy the data first. Make it a priority to salvage the data just in case the hard drive won’t make it in the future.
After replicating your hard drive, you can then try running the chkdsk commands that are listed in option 1 above in the new computer you’re connecting your hard drive to and make sure that you key in the correct drive letter that’s assigned to the hard drive you’re using. After executing the chkdsk commands, plug your hard drive back into the previous computer and then check if you can now boot it without any issues.
Option 4 – Replace the faulty hard drive
If none of the options provided above really worked out then maybe it’s time to consider getting a replacement for your hard drive. In about 50% of the cases about this error, some unfortunate users were left with no choice but to replace the hard drive since the problem is with the hard drive itself. Hard drives have a complex running mechanism which includes a head and the disk that rotates accordingly so you can check if the cables connected to the hard drive are connected properly and if it is in a correct position or not. In addition, you also have to make sure that the SATA adapters where the hard drive is connected are working properly.
If the drive is showing problems in the I/O operation, there is little chance for you to use it as a normal hard drive. If the hard drive is in warranty, get it checked and replace it. If not, you might consider taking it to the service center for the specialists to take a look into it.
For PC users that are blind or have low vision, the Narrator accessibility feature in Windows 10, lets you use your PC without a display or mouse to complete common tasks – it reads and interacts with things on the screen, like text and buttons. The narrator can be used to read and write an email, browse the internet, and work with documents.
In Windows 10, there are a lot of options for Narrator that you can customize. You can change its keyboard shortcuts, personalize Narrator’s voice, enable Caps Lock warnings, and more. You can choose the voice for the Narrator, adjust the speaking rate, pitch, and volume.
To change the default audio output device used to play the voice of the Narrator in Windows 10:
Press the ⊞ WINDOWS + I
From the Settings menu, click Ease of Access.
Click Narrator on the left pane.
In the Narrator window, on the right pane, toggle the button to On to enable Narrator if required.
Scroll down to the Personalize Narrator’s voice section.
For the Select where you hear Narrator’s voice option, click the drop-down and select the audio output device you want from the list. Please know that you will not be able to choose if you do not have multiple audio output devices connected to your Windows 10 computer.
Exit Settings when done.
If you would like to read more helpful articles and tips about various software and hardware visit errortools.com daily.
Long working hours on a laptop can have some issues with laptop heating and thus slowing down. Today we will take a look at how can you prevent it from heating and keep it in a normal temperature range so it lasts longer and works better.
Close unnecessary programs or browser tabs
Usually, the main reason for high laptop temperature is the heavy and constant workload. Of course, the solution is very simple, turn off unnecessary browser tabs or applications running in the background, and less power will be needed for operation thus directly reducing workload and temperature.
Place it on a hard flat surface
Laptops generally have vents on the side and even under them, these vents, of course, are made so hot air is disposed of through them but if they are covered that will create issues. Placing computers on textiles, pillows, and legs can obstruct their venting holes and increase heat also since they are materials that are not taking heat away.
Your best practice should be placing the laptop onto a hard flat surface so air can flow freely and if you need to keep it in your lap there are lap desks made for this purpose.
Clean the laptop
With some good cleaning, the laptop can stop overheating, and generally, it will be cooler. Vents that has for ventilation can get clogged over large periods of time due to dust which is always present. Compressed air can be a quick easy solution to open the vents and redust it. Other methods include a compressor, vacuum, or brush in order to quickly remove any dust clogs. Taking it into service for complete redusting and paste change is also a great option.
Place it on the dedicated pad
There is some disagreement about using dedicated cooling pads for laptops, some say they are not effective at all, and some swear by them but from my experience good paired laptop and pad can indeed help with cooling it down. Usually, cooling pads will come with fans that will take away heat from the laptop itself reducing its overall heat.
Change your Windows power plan
If your laptop is constantly hot but you are not doing much with him check Windows power settings. There is a good chance it is set to run on a high-performance plan and if this is the case switch it back to a balanced power setting. Power plan like high performance will drain more power and more power will mean more heating. Of course, this will affect performance as well but for regular work that excludes some power gaming, video, and picture manipulations and other demanding tasks this power plan will work just fine.
Take control of the fans inside your laptop
Internal cooling is important and sometimes fans are not running to their full capacity so increasing their speed or changing their plan of work can cool down the computer nicely. Some laptops have fans controlling application already on them, especially gaming laptops but most of them do not. If your laptop does not have it, go to your laptop brand website and see if such an application exists for your model, if it does, download and install it but if there is no such application try general free ones like SpeedFan or Argus Monitor.
Reduce voltage of CPU and GPU
How more power means more heat, reducing the power that CPU and/or GPU take can be reduced inside BIOS by lowering voltage of these 2 components. First, go to BIOS and write down the voltage that is currently assigned to your CPU and/or GPU so you can bring it back if ever needed, also take note that reducing voltage and thus power will not affect negatively your components but increasing it thus overclocking can and will so be careful when bringing voltage back not to overdo it. You can always also reset your BIOS settings to bring them back to factory settings.
Do not use the laptop when charging it
When the laptop is placed on the charger in order to be charged and used at the same time, more power is drawn to it, and since the battery is taking electric charge instead of providing it more heat will be generated now since two different sources will be generating it, the battery itself and computer. When you really can not wait for the laptop to be charged, use it, but turn it off and wait to be fully charged if you can.
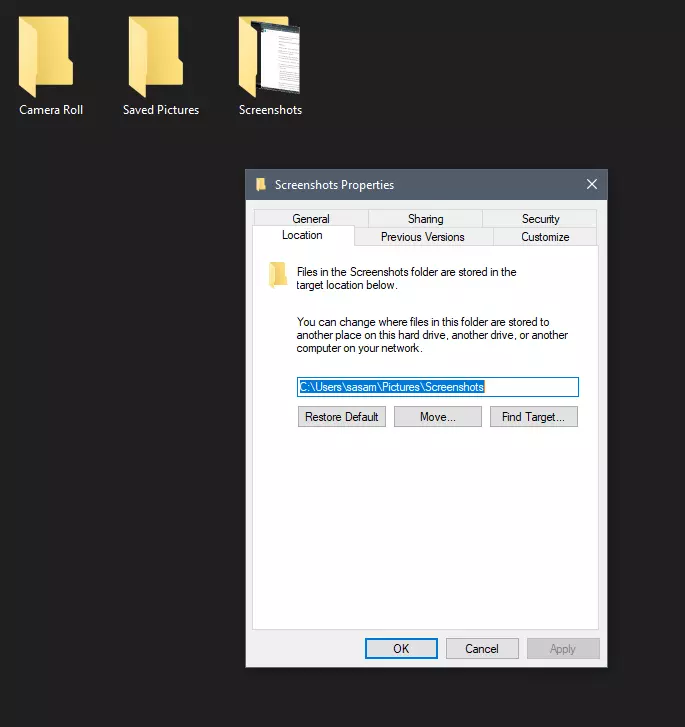
Each time when you press WINDOWS + PrtScn key on your keyboard a screenshot is taken and saved on your Hard drive, to be more precise, it is saved in a specific folder which is in c:\Users\Your user name\Pictures\Screenshots. Now, this specific location is not anything that's bad but it is a little deep and not so user-friendly for quick access.
Luckily this default location can be changed into any folder that you like.
Changing location
First thing is to open File Explorer and then navigate to your PC. Once you go to your PC, go to Pictures, and inside right-click on the Screenshots folder. If there is no screenshots folder inside, this means that since Windows was installed no screenshots were taken with WINDOWS + PrtScn key combination. Please note that just by pressing PrtScn you will create a screenshot but you will place it inside the clipboard ready to be pasted somewhere, with WINDOWS + PrtScn you are saving the screenshot directly in a file on your hard drive.
So once you clicked on the Screenshots folder, go to the bottom and click on properties. Inside properties go to the Location tab. In the location, tab clicks on MOVE and browse to your new location where you would like screenshots to be saved. Once you select the folder for screenshots, click on the Select Folder button and confirm with OK. After this, Windows will ask you would you like to move existing screenshots into the chosen folder. Click YES or NO, depending on your preference.
After this easy setup, all of your new screenshots will be placed now inside the chosen folder.
Thank you for reading and I hope to see you tomorrow. Take care.
All malware is detrimental and the magnitude of the damage will vary greatly depending on the type of infection. Some malware variants modify internet browser settings by adding a proxy server or modify the PC's DNS settings. When this happens, you'll be unable to visit certain or all the sites, and therefore not able to download or install the required security software to clear out the computer malware.
If you’re reading this article, chances are, you’re stuck with a virus infection that is preventing you from downloading and/or installing the Safebytes Anti-Malware program on your computer.
Refer to the instructions below to remove malware through alternate methods.
Method 1: Install Anti-Malware in Safe Mode with Networking
If the malware is set to load automatically when Microsoft Windows starts, entering safe mode may block the attempt. Since only the minimal applications and services start-up in safe mode, there are rarely any reasons for conflicts to happen. You will need to do the following to remove malware in Safe mode.
1) Tap the F8 key continuously as soon as your computer boots, however, before the large Windows logo or black screen with white texts come up. This would invoke the Advanced Boot Options menu.
2) Choose Safe Mode with Networking using arrow keys and press Enter.
3) When you are into this mode, you will have access to the internet once again. Now, utilize your web browser normally and download Safebytes Anti-Malware.
4) After installation, do a complete scan and allow the software to get rid of the threats it detects.
Method 2: Utilize An Alternate Internet Browser to Download Anti-Malware Software
Malicious program code may exploit vulnerabilities in a specific web browser and block access to all antivirus software sites. If you suspect that your Internet Explorer has been hijacked by computer malware or otherwise compromised by cybercriminals, the most effective plan of action is to switch to an alternate web browser such as Chrome, Firefox, or Safari to download your chosen security program - Safebytes Anti-Malware.
Download SafeBytes Anti-Malware for Malware Removal
Method 3: Install and Run Anti-Malware From a USB Drive
To effectively remove the malware, you might want to approach the problem of installing an antivirus software program on the affected computer from a different angle.
Adopt these measures to employ a flash drive to fix your infected computer.
1) Use another malware-free PC to download Safebytes Anti-Malware.
2) Plug the thumb drive into the uninfected computer.
3) Double click on the executable file to open the installation wizard.
4) Choose the drive letter of the USB drive as the place when the wizard asks you exactly where you would like to install the anti-virus. Follow activation instructions.
5) Now, transfer the thumb drive to the infected computer.
6) Double-click the antivirus program EXE file on the USB flash drive.
7) Click on the “Scan Now” button to start the malware scan.
If no other method of downloading and installing the antivirus software works, then you've no other option than to hit the last resort: a full Windows reinstallation, the only approach known to have a 100% rate of success at virus removal.
Windows 10 has displayed one of the most efficient and user-friendly interfaces. However there have been many issues on the backend of this commonly praised operating system: For example, Windows Update is still a wonky and error-laded system application. One example of this error is Windows Update Error 0x80073712 which stands in the way of users just wanting to keep their PCs updated hassle-free.
The error code 0x80073712 signifies that a file needed by Windows Update to function is either damaged, missing, or corrupted. However, this does not mean that your Windows version will forever stay as-is with no mode to update it. Windows Update Error 0x80073712 is perfectly fixable with the set of provided steps below and some of Windows’ built-in troubleshooting steps:
Solution 1: Open Windows Update Troubleshooter
Open the Windows Update Troubleshooter by pressing the Window Key and “S” keys simultaneously.
Enter the word “Troubleshoot” in the search box and select the Troubleshoot result
On the new window, select “Windows Update” to troubleshoot.
Run the troubleshooter, then open Windows Update and try to install the update again.
Solution 2: Run the DISM tool
Open the command prompt by pressing Windows Key and “S” key simultaneously
Enter “cmd” in the search box. Right Click command prompt among the results and select “Run as administrator”
In the Command Prompt window type the following and press the Enter key after every command
To close the Administrator: Command prompt window, type Exit, and then press Enter.
Run Windows Update again.
Solution 3: Rename the Software Distribution folder
Open the command prompt as previously mentioned
Input the following command pressing Enter after every linenet stop wuauservnet stop cryptSvcnet stop bitsnet stop msiserverrename c:windowsSoftwareDistribution softwaredistribution.oldnet start wuauservnet start cryptSvcnet start bitsnet start msiserverexit
Restart the PC and run the updater if it works again.
Solution 4: Restart Windows Update Services
Press the Windows logo key and R together to open Run -> Input services.msc -> and press Enter
Search for the Windows Update service -> Check its status
If it is not indicated, right-click on the service and select Start to force start your Windows Update
If you see an error, locate the Startup Type option and set it to Automatic
Now you should reboot your computer and see if your Windows Update is OK
Solution 5: Fix Registry Issues
If after all the aforementioned solutions, you still experience problems with Windows Update, the problem may lie in the registry that is either damaged or corrupted. You may choose to do manual editing of your Windows registry by opening your Windows registry editor. But doing so is risky as one wrong letter may do incalculable damage to your system. To do so safely for more inexperienced users., we recommend using a third-party registry cleaner/tools, many of which can be found online.
As you know, Diskpart is a useful utility that helps in managing the disks in a computer. It is a very useful tool that even when the GUI-based disk management tools in Windows 10 operating system fails, the Diskpart utility still tends to work. However, it also does not mean that this utility does not experience issues as it still does, from time to time. One of the issues you may encounter when using the Diskpart utility is when you encounter an error message that says, “DiskPart has encountered an error, Access is denied”.
This kind of error in the Diskpart utility could be caused by a number of factors. For one, it could be that the Write-Protection is enabled on the drive where the operating is being performed or it could also be that the Command Prompt terminal does not have administrator-level permissions to carry out the command. Thus, you can try to run the Diskpart utility again but this time with admin privileges or you could also remote the Write-Protection from the concerned drive. For more details, refer to the instructions given below.
Option 1 – Try running Command Prompt with Administrator-level permissions
In the Start Search, type “command prompt” and from the search results that appear, look for Command Prompt.
Once you found it, right-click on it and select the “Run as administrator” option.
After that, try to execute the Diskpart operation once again and see if you still encounter the same error.
Option 2 – Try to remove the Write Protection from the drive
As mentioned, removing the Write-Protection on the concerned drive could also help you fix the problem and there are two ways to get rid of the write protection – you can either use the Diskpart utility or the Registry Editor. How? Refer to the following steps.
Via Diskpart utility:
Open Command Prompt with admin privileges and then type the “diskpart” command and tap Enter to execute it.
Next, type “list disk” and tap Enter to get the list of all the Disk connects or all the partitions that are formed on those disks.
After that, you need to choose one command depending on the list of commands you entered. Type “select disk #” and tap Enter to select the disk or partition you want to select.
Then type “attribute disk clear readonly” and tap Enter to Disable the Write Protection on the selected disk or partition.
Via Registry Editor:
Tap the Win + R keys to open the Run utility and type “Regedit” in the field and then tap Enter to open the Registry Editor.
If you suddenly see a system icon or an application icon that has a blue and yellow shield or icon overlay at the corner, this indicates that the application has to run with admin privileges and each time you run these kinds of applications, a UAC or User Account Control prompt will appear to confirm if you really want to run the application. Although this kind of behavior is for security reasons, it can get quite annoying especially if you use the application on a daily basis. To make it convenient for you, this post will walk you through how you can remove the blue and yellow shield icon from an application on your Windows 10 computer.
The User Account Control or UAC setting is the one that ensures no program can run with administrative privileges unless it is allowed by the user. This stops any program that could be potentially harmful to the computer from making any changes which are why keeping this setting to its default state is for the best and making any changes in its setting is not recommended unless it is really needed.
So if you really have to remove the icon overlay in an application, there are several ways you can do that. You can try reinstalling the program and set Compatibility or change the UAC level. For more information, refer to every option given below.
Option 1 – Try to reinstall the application and set Compatibility
As you know, the application icons where you can see the shields are shortcuts mostly and they signify that the User Account Control will appear each time you launch the app. Thus, if you have an app that you use regularly and you’re certain that the app can be trusted, you can try to reinstall the app and set its compatibility by following these steps:
You need to uninstall the app first and then install its latest version. You must not run or open the app after you reinstall it, not until you’ve completed the steps.
Next, you have to right-click on the shortcut icon of the app, and from the menu, select Properties.
Afterward, go to the Compatibility tab and look for the checkbox labeled “Run this program as an administrator” and uncheck it.
Now click on the Apply and OK buttons to save the changes made. This should remove the shield icon from the app.
Option 2 – Try changing the UAC level
Tap the Win + Q to open the search bar and type UAC to see the User Account Control setting.
From the UAC setting, lower the UAC level by selecting the settings that say, “Notify only when apps try to make changes to my computer”.
After selecting that option, you shouldn’t be getting any warning now when you run the app with the shield icon. But keep in mind that this is not a temporary setting which can be risky especially if the app can’t be trusted.
Windows 11 provides several different ways to make your cursor stand out and be easier to spot inside it. You can make the mouse pointer larger, invert it, or change its color.
Press ⊞ WINDOWS + I to open settings
Click on Accessibility in the sidebar
Select Mouse Pointer and Touch
Adjust mouse cursor size with size slider by clicking on circle and dragging it left or right
Under Mouse Pointer Style pick desired style from White, Black, Inverted, and Custom
White: The cursor is white with a black outline (standard setting)
Black: Cursor is black with a white outline
Inverted: Cursor automatically changes color to an inverted version of the color it is currently hovering over
Custom: You can pick the color for the cursor that you want.
And that is all about it, once you are done with pointer customization just close settings, all changes are saved automatically.
The 0xc000001d error is a common yet critical error that can occur when Windows is damaged or fails to work as a result of either missing system files or corrupt system components.
This error can be extremely dangerous to Windows as it can inflict major damage to data and component files.
Error Causes
A 0xc000001d error code can occur because of a number of reasons, of which corrupt registry files are the most common, and about 94% of the time, this results in the error. However, virus infection or an adware or spyware invasion can also result in this error.
Outdated drivers and missing DLL files can also be critical and will lead to this error causing major damage to computer files. Contrary to popular belief, incomplete installation and unfinished uninstalls can also because of this error.
Other causes include improper shutting down of computers and improper hardware or software deletion.
Solution
Further Information and Manual Repair
Because of this 0xc000001d error code, Windows can fail in starting some processes and the system’s performance can significantly slow down. In some cases, Windows has problems starting up and the system can freeze.
Lastly, this error code can even result in the Blue screen of death error message, just like other critical Windows errors. If any of the above problems and symptoms occur in your PC, then you should immediately seek to resolve this problem.
In order to resolve this 0xc000001d error code or repair the corrupted and damaged Windows files, you will need a 0xc000001d repair tool. There is more than one method of treating this kind of error code, and here is how you can manually do it:
Start the computer and log in as administrator
Go to the start button and select All Programs. Go to Accessories, System Tools, and then System Restore
Click on System Restore and in a new window, select the ‘Restore my computer to an earlier time’ option and click Next
On the new confirmation window that appears, click Next
Restart your computer after the restoration has been completed
Another way to manually repair this 0xc000001d error code is to:


 Windows 11 provides several different ways to make your cursor stand out and be easier to spot inside it. You can make the mouse pointer larger, invert it, or change its color.