Many of us are taking the google search engine for granted and it is no true that it has crawled in almost every spore of our digital lives but if we wanted a little more privacy? Do we have options or we are destined to use google and send our information to this company. What if we really wanted that our searches are well safe, secure, and private? We could try other search engines like BING but since BING belongs to Microsoft we would exchange only one company for another without making any progress in the privacy battle. Enter DuckDuckGo.
DuckDuckGo is a privacy-focused search engine that’s been online since 2008. Find websites, maps, videos, news, and more without tracking your searches and serving you targetted ads. It took DUckDuckGo as you can tell sometimes to gain ground and to be recognized but finally, it got the attention it deserves. Its big breakthrough happened in September of 2014 when Apple offered it as a default search engine in Safari and since it has gained more and more ground. It seems people care about their privacy after all.
Since then DuckDuckGo has been gaining ground and all the major browsers have integrated it as an option for a default search engine.
In this article, we will show you how to switch to DuckDuckGo and set it as your preferred search engine in all major browsers.
Google Chrome
Launch Chrome and click on the three dots in the upper right.
Choose settings.
Choose Search engine in the list on the left of the screen.
Click on the drop-down box next to Search engine used in the address bar and choose DuckDuckGo.
Mozilla Firefox
Launch Firefox, click on the three lines hamburger menu icon in the top-right corner of the window.
Click on Preferences.
Click on Search in the menu to the left of the screen.
Under Default Search Engine, click the drop-down box and choose DuckDuckGo.
Microsoft Edge
Click on the three dots menu button in the top-right corner of the window
Then select Settings.
Click on Privacy, Search and Services in the menu that appears on the left
Scroll down to the Services menu and choose Address bar and search.
Click the dropdown menu next to Search engine used in the address bar and choose DuckDuckGo.
Apple Safari
Click Safari in the menu bar at the top of the screen
Then click Preferences.
You can also use the Command+, shortcut to quickly bring up Safari’s Preferences.
Click on the Search tab, then choose DuckDuckGo under the Search engine drop-down box.
Opera
Click on the Settings cog button in the sidebar on the left of the screen.
Under Basic settings scroll down until you see Search engine and a drop-down box. Select DuckDuckGo from the list.
When you get the “HTTP Error 304 Not modified” error in Google Chrome, Mozilla Firefox, or Microsoft Edge, there can be lots of reasons why you’re getting this error. The HTTP Error code 304 means redirection, technically. It could be that the DNS has some issues or the cache is already reusing the existing information to look for a website or it could also be that your browser might be infected.
In this post, we will show you what you can do to fix the “HTTP Error 304 Not modified” error when you are not able to open a website on your browser. Here are the exact details of the error message:
“This status code is returned if the client has already downloaded resources since the last visit and is displayed to notify the client browser that the requested resources is already stored in the browser cache which hasn’t been modified.”
Follow each one of the given fixes below to resolve the issue.
Option 1 – Clear the browsing data on your browsers
The first thing you can try is clearing the browsing data on your browsers.
Microsoft Edge:
Open Microsoft Edge.
Then click on the three horizontal dots to open the menu.
From there, click on Settings. And under Settings, click the “Choose what to clear” button under the Clear browsing data section.
Next, check all the checkboxes and then click the Clear button to clear the browsing data in the Edge browser.
Restart Edge.
Google Chrome:
Open Chrome and then click on the three vertical dots located at the top of the window.
Then click on Settings.
After that, click on Advanced. And from the Privacy and Security section, click on the “Clear browsing data” option.
Now click on the CLEAR DATA button.
Restart Chrome.
Mozilla Firefox:
Open Firefox and then click on the three horizontal lines to open the menu.
From there, click on Options.
Next, select Privacy & Security.
After that, click on the Clear Now button under the Cached Web Content section and then click the Clear All Data button under the Site Data section.
Restart Firefox.
Option 2 – Flush DNS and reset the TCP/IP
There are some websites that don’t resolve since the DNS in your computer still remembers that old IP address. And so you need to flush the DNS as well as reset the TCP/IP on your computer.
Click the Start button and type in “command prompt” in the field.
From the search results that appear, right-click on Command Prompt and select the “Run as administrator” option.
After opening Command Prompt, you have to type each one of the commands listed below. Just make sure that after you type each command, you hit Enter
ipconfig /release
ipconfig /all
ipconfig /flushdns
ipconfig /renew
netsh int ip set dns
After you key in the commands listed above, the DNS cache will be flushed and the TCP/IP will reset.
Option 3 – Try using the Google Public DNS
Changing your DNS to Google Public DNS might also help you in fixing the “HTTP Error 304 Not modified” error. To do so, follow the steps below.
The first thing you have to do is right-click on the network icon in the Taskbar and select Network and Sharing Center.
Next, click on the “Change Adapter Settings” option.
After that, search for the network connection that you are using to connect to the internet. Note that the option might be “Wireless Connection” or “Local Area Connection”.
Right-click on your network connection and click on Properties.
Then select the new window to choose the “Internet Protocol 4 (TCP/IPv4)” option.
After that, click on the Properties button and click the checkbox in the new window for the option “Use the following DNS server addresses”.
Type in “8.8.8.8” and “8.8.4.4” and click OK and exit.
Option 4 – Run Cleanup Tool and disable Extensions
You might also want to run the Cleanup Tool in Chrome if you are using this browser as well as disable all the extensions as some of them, if not all, might be the reason why you’re getting the “HTTP Error 304 Not modified” error.
Speech Recognition is a technology used to control computers using voice commands. Through this feature, you can say commands that your computer will respond to, and aside from that, you can also dictate text to your computer which eliminates the need to type words in any word processing program or text editor. All in all, the Speech Recognition feature allows you to communicate with your computer and improves your computer’s ability to understand your own voice better as well as improve its diction accuracy. However, before you can improve its accuracy, you need to “train the feature” first. And if so far you are not satisfied with its performance, you actually have the option to disable it. So in this post, you will be guided on how you can disable the Speech Recognition feature in Windows 10 v1809.
To disable Speech Recognition on your computer, follow the steps below.
Step 1: Go to Settings > Ease of Access.
Step 2: From there, go to Speech.
Step 3: Now switch off the toggle button for Speech Recognition to disable this feature.
On the other hand, you can also disable the Online Speech Recognition feature if you really don’t want to have anything to do with it. You have two options to do that – you can either do it using Settings or using the Registry Editor.
Disable Online Speech Recognition feature via Settings:
Click on the Start button and select Settings.
Next, go to the Privacy section and click on the Speech option located at the right pane.
Then switch the toggle button off to turn off the Online Speech Recognition feature.
Note: Speech services exist on your computer and even in the cloud since Microsoft collects essential information from these services in order to enhance user experience and if you want to stop this, you have to turn off the “Getting to know you” option under the “Inking and typing Personalization” section.
Disable Online Speech Recognition feature via Registry Editor:
Before you proceed, you need to create a System Restore Point first.
Tap the Win + R keys to open the Run dialog box.
Then type “Regedit” in the field and hit Enter to open the Registry Editor.
After that, check the default value of the “HasAccepted” key located in the right pane. As you can see its value is set to “1” which means that the Speech Recognition feature is enabled. And so to change it, you have to set “0” as its new value to permanently disable the feature.
Just double click on the key and change the value from “1” to “0”. Keep in mind that even if you are using a 64-bit Windows 10 computer, you still have to create a 32-bit DWORD value.
After that, restart your computer to apply the changes made.
What is DISM Error 1726? Every time you encounter some issues in your Windows 10 computer, especially when it comes to corrupted system files, you can always use the SFC scan and if the SFC can isn’t able to resolve the issue, there is also the DISM tool you can use which usually resolve the vast majority of system file corruption sufficiently. However, there are times when even the DISM commands experience issues as well. Such is the case with the 1726 error: “The remote procedure call failed”.
Some users reported that this DISM problem happens right before the process is supposed to end. According to experts, this error in DISM occurs due to any of the following reasons:
A third-party program might have interrupted the DISM operation and is the one that triggered the 1726 error: “The remote procedure call failed”.
The error could also pop up when there is a pending corruption repair. This usually happens when you tried to run a DISM command previously that was terminated manually or was halted because of some malfunction.
Lastly, the error could also occur because the process that’s responsible for the procedure is disabled or was prevented from running.
Whichever the case is, here are some suggestions that might help you in resolving the 1726 error: “The remote procedure call failed”.
Option 1 – Try updating your PC to the latest Windows build available
Since the problem is specific to certain builds in Windows 10, you need to make sure that your computer is updated before you try other troubleshooting steps. Thus, follow the steps below to update your Windows 10 PC.
Tap the Win + R keys to open the Run dialog box.
Then type “ms-settings:windowsupdate” in the field and hit Enter to open the Windows Update screen.
After that, click on Check for Updates and then follow the next on-screen instructions to apply the latest Windows update.
Once the update has been installed, restart your PC and run the DISM command again and see if the problem is fixed.
Option 2 – Try to change the Startup Type of the Remote Procedure Call service
As stated early on, the error might also be caused by a disabled Remote Procedure Call service or RPC or that it might be prevented from running for some reason.
In case you don’t know, RPC is the service control manager for both COM and DCOM servers and it’s responsible for performing object variation requests, exporting resolution as well as distributing collection for the servers. And so if the server is disabled, all programs that are using COM and DCOM including the DISM commands, will not function correctly. Thus, you need to make sure that the RPC service is scheduled to enable itself on every system boot. To do so, here’s what you have to do:
Tap the Win + R keys to open the Run dialog box.
Type “services.msc” in the field and hit Enter to open Services.
From there, scroll down until you see the Remote Procedure Call (RPC) service and then right-click on it and select Properties.
Then go to the General tab and change the drop-down menu next to Startup type to Automatic.
After that, click the Apply button and then OK to apply the changes made.
Restart your PC and run the DISM command once again at the next startup.
Option 3 – Try to modify the RpcSs registry key value
If the option didn’t work, you can also try enabling the RPC service using the Registry Editor. Before you proceed, make sure to create a System Restore point first and then follow the steps below afterward.
Tap the Win + R keys to open the Run dialog box.
Type “Regedit” in the field and hit Enter or click OK to open the Registry Editor. And if a User Account Control prompt appears, just click on Yes.
After that, navigate to this registry key: HKEY_LOCAL_MACHINE SYSTEM CurrentControlSet Services RpcSs
After selecting the aforementioned registry key, go to the right pane and double-click on the Start value.
Next, change the Value data of start to 2 and click OK to save the changes made.
Exit the Registry Editor and restart your PC and check if the 1726 error in DISM has already been resolved or not.
Option 4 – Try to disable the Windows Search service temporarily
Some users also recommended disabling the Windows Search service for the meantime as it could be the one that’s interrupting the DISM process.
Tap the Win + R keys to open the Run dialog box.
In the field, type “services.msc” to open the Services window again and hit Enter to open it.
Next, scroll down over the services list and double-click on the Windows Update service.
Afterward, go to Windows Search properties and click the General tab and then click the Stop button to stop the service from running temporarily.
Now try running the DISM commands again and see if the problem’s fixed or not.
Restart the Windows Search service and then restart your PC as well.
So, you have finished with work, game, movie, music, email, or whatever on your PC, you look at the clock, it is late, you decide to go to sleep or outside, you click on the power button and choose shutdown. Now when a PC is shut down you feel good and go with your business but the next time you power it up you get the same error like the computer never really shut down in the first place. You wonder why and reboot it, just in case and all of the sudden error is gone.
If something similar has happened to you or you had the feeling that after shutting down your computer has not really felt like shutting it down, do not seek professional help, everything is OK with you because when you click on shut down, your computer does not really shut down!
Truth is that Microsoft has changed how to shut down works and how rebooting works in Windows with an update but has not publicly said anything about it so some users may experience this feeling of not shutdown phenomenon and might even think there is something wrong with their PC.
Why this change?
A few years ago shutdown button and option in Windows were really shutting down OS, but things changed when Microsoft wanted to increase boot-up speed. Now when that decision was made shutdown option was changed. So, what was changed? Well in order to increase Windows booting time, the shutdown will now turn off power to PC components and it will look like everything is indeed shutdown but the Windows kernel will actually be saved to a hard drive with all settings and just awaken once the PC is turned back ON. This will result in all errors and other stuff being just still present same as they were once the system was instructed to be turned off.
Rebooting your PC will now clear kernel and file from the hard drive and you will get a clean system startup without any issues tied with the kernel itself.
Workaround
Now that we know why and what change has been made to Windows logical question is can we shut down our PC at all properly? Luckily for us, the answer is yes and we will not need any external application to do it, we can still do it inside Windows itself and it is quite quick and easy.
Bringing back the old shutdown
In order to bring the old shutdown functionality of your PC please follow the instructions but be aware that by doing this your PC will boot a little bit slower since it will have to load the kernel from scratch each time computer is turned ON.
First thing is to go to settings and go to System
Then once you are inside the system, navigate to the power and sleep and click on it to select it. Once you have it selected to all the way to the right and click on additional power settings.
When you click on advanced power settings you should be led to the control panel's power options. Inside this panel click on top left link where it says Choose what the power button does.
Inside options, you will need to untick the box next to Turn on fast startup (recommended), this option has been ticked ON by the Windows update and probably without notifying you. Option means exactly what was described, it will save kernel state on the hard drive for faster boot time but sadly it can cause some issues since it will never be reloaded from 0.
If you are unable to uncheck the box click on the text beside the shield icon that says: Change settings that are currently unavailable (you will have to be logged in as administrator).
Conclusion
Altho turning off fast startup and shutting down the PC completely will for sure extend your bootup time I still believe that it is the right choice since sometimes a lot of clutter and bad things accumulate over time inside the OS and can cause a vast variety of problems in a long run. So stay safe and shut down that PC as it used to be in the past.
If you encounter an error message that states, “Your computer has lost the lease to its IP Address <IP ADDRESS> on the Network Card with network address <NETWORK ADDRESS>”, then this post might be of help to you. This kind of error due to the timeout caused by the DHCPv6 address which is used to connect the client to the user network as an independent client or a part of a domain.
There are a lot of potential fixes you can try to fix this error and we will be discussing each one of them below. You can try to reboot your router, flush the DNS cache, reset the Network adapter, toggle the DHCPv6 Lease time or disable IPv6 in the Network Center. For more details, refer to the following options.
Option 1 – Try rebooting your router
The first thing you can try to do to fix the error is to simply restart your router. All you need to do is reboot the router from its Admin panel or you can also turn it off manually and turn it back on after a couple of seconds so that it can completely reboot. Once you’re done, try accessing your server again and see if the error is now fixed.
Option 2 – Try to flush the DNS configuration
You could also try to flush the DNS configuration in your computer to fix the error. How? Refer to these steps:
Tap the Win + X key combination and click on the Command Prompt (Admin) option or you could also search “cmd” in the Cortana search box and right-click on Command Prompt from the search results and select the “Run as administrator” option.
After opening Command Prompt with admin privileges, enter each one of the commands given below sequentially in order to flush the DNS cache.
ipconfig/release
ipconfig/renew
ipconfig/flushdns
Now type the exit command to close Command Prompt and then restart your computer and see if the problem is fixed.
One the other hand, you could also try to reset Winsock as well as the TCP/IP.
Once done, just exit the Command Prompt and check if that fixes your issue.
You may want to reset Winsock & reset TCP/IP as well.
Option 3 – Try to toggle the DHCPv6 Lease time
First, you need to log in to the Admin panel of your router.
Next, navigate to the DHCPv6 settings inside it and look for a field for Lease Time.
After you’ve found it, increase the Lease Time value to something greater than what is already entered depending on your preference.
Now apply the configuration and reboot your router to apply the modified settings. Just remember that if things didn’t work out, you can just change back the Lease Time value to what it was before.
Option 4 – Try disabling the IPv6 in the Network Center
Tap the Win + X key combination and click on Network Connections.
This will open the Settings app on a specific page. Now on the right-side panel, click on the Network and Sharing Center link.
After that, it will open the Control Panel and from there, click on the network that your computer is connected to and then click on Properties.
Next, uncheck the entry that says, “Internet Protocol Version 6 (TCP/IPv6)” in the list that populates.
Now click on OK and close all other windows and see if the error is fixed.
Option 5 – Run the Network Adapter troubleshooter
To run the Network Troubleshooter, refer to these steps:
Open the Search bar on your computer and type in “troubleshoot” to open the Troubleshoot settings.
Next, scroll down and select the “Network Adapter” option from the right pane.
Then click on the Run Troubleshooter” button.
After that, your computer will check for any possible errors and will pinpoint the root cause of the problem if possible.
Restart your computer.
Option 6 – Try to perform Network Reset
You can also try to perform a Network Reset to resolve the problem. This will reset the entire network configuration including your IP address. To perform Network Reset, follow these steps:
Tap the Win + I keys to open Settings.
From there, go to the Network and Internet section.
Next, scroll down and look for “Network Reset” under the status pane.
After that, click on Network Reset and then on Reset now to start resetting the network configuration. Once done, check if it is able to fix the error or not.
If your Windows 10 laptop suddenly turns off when you unplug its power cord, then you’ve come to the right place as this post will guide you on how you can fix this issue.
One of the most common causes for this kind of issue is that there is some problem with your laptop’s battery. It is possible that it might have gone bad or has been damaged. However, this couldn’t be the case especially if the laptop is new. The problem could have something to do with the system settings, connections, laptop hardware, and so on. To fix it, there are various suggestions you can check out such as follows:
Option 1 – Perform a hard reset on your laptop
This option works in most cases when the laptop with a removable battery is charging slowly as it is plugged in constantly. Refer to the steps below to do a hard reset on your laptop.
Switch off the power of your laptop.
Disconnect your laptop’s charger and then remove the battery.
Tap and hold the power button for at least 30 seconds – doing so will discharge the capacitors of the motherboard and reset the memory chips that were active constantly.
Plug the battery back and then charge the laptop again.
Check if the problem is fixed, if not, proceed to the next option below.
Option 2 – Try to change the Power Options
Tap the Win + R keys to open the Run utility.
Then type “powercfg.cpl” and tap Enter to open the Power Options window.
Next, go to your selected power plan and click the “Change plan settings” option to open a new page.
From there, click on the “Change advanced power settings” option. This will open a new window where you can see various power consumption options.
Now on the next window that appears, click on “Change advanced power settings”. This will open another window where you have to expand the Processor power management > Maximum processor state.
Then change the value for On battery mode to 25% and enable Adaptive brightness.
Now shut down your computer and try to boot it with the power cord unplugged.
Option 3 – Try to run the Power troubleshooter
The next thing you can do is to run the Power troubleshooter. To do so, follow these steps:
Go to Settings and navigate to Update & Security > Troubleshoot.
After that, look for the “Power” option from the given list of built-in troubleshooters and click on it.
Next, click on the “Run the troubleshooter” button to run the Power troubleshooter.
Once the troubleshooter is done identifying the problems, follow the next on-screen instructions to resolve the problem.
Option 4 – Try to run the Power Efficiency Diagnostics Report
You could also try to run the Power Efficiency Diagnostics Report to fix the problem. This tool is helpful and will help you analyze the status of the battery but note that this can be quite overwhelming especially if you’re not well-versed in this matter.
Option 5 – Try to uninstall or reinstall the Battery driver
You might also want to uninstall or reinstall the battery driver as it can also resolve the problem. But before you start, you have to shut down your computer and remove the power chord as well as the battery. Once you’re done, follow these steps:
Plug the power cord and restart your computer.
Once your computer has restarted, tap the Win + R keys to open the Run utility and type “devmgmt.msc” in the field and tap Enter to open the Device Manager.
After that, look for the “Batteries” driver from the list of drivers and expand it.
Then right-click on the “Microsoft ACPI-Compliant System” driver and click on the “Uninstall device” option.
Once it’s done, restart shut down your computer and remove the power cord and then attach the battery.
Now attach the power chord again and restart your computer to automatically install the driver.
Option 6 – Try to update the BIOS
Updating the BIOS can help you fix the problem but as you know, BIOS is a sensitive part of a computer. Even though it is a software component, the functioning of the hardware depends on it largely. Thus, you must be careful when modifying something in the BIOS. So if you don’t know much about it, it’s best if you skip on this option and try the other ones instead. However, if you are well-versed in navigating the BIOS, then follow the steps below.
Tap the Win + R keys to open the Run dialog box.
Next, type “msinfo32” in the field and press Enter to open System Information.
From there, you should find a search field on the bottom where you have to search for the BIOS version and then press Enter.
After that, you should see the developer and version of the BIOS installed on your PC.
Go to your manufacturer’s website and then download the latest version of BIOS on your computer.
If you are using a laptop, make sure that you keep it plugged in until you have updated the BIOS.
Now double click on the downloaded file and install the new BIOS version on your computer.
Now restart your computer to apply the changes made.
Note: If updating the BIOS didn’t help, you might want to consider resetting it instead.
Caching is used to enhance the performance of applications in Windows and other operating systems. It helps applications to load faster but there are times when the cache can get damaged or corrupted and as a result, you might encounter some issues. One of them is in the Firefox browser where the “Your Firefox profile cannot be loaded, It may be missing or inaccessible” error message may appear.
You could also encounter this kind of error when Firefox is unable to access or find the profile folder. In case you don’t know what the profile folder is, it is where Firefox stores your user data and settings by default. Firefox pulls information from this folder each time you choose to open it. You can find this default Firefox profile folder under the %APPDATA%MozillaFirefoxProfiles folder.
If you experience issues when trying to access the Profile Manager, you have the option to create a new default Firefox profile folder. This will fix the “Your Firefox profile cannot be loaded, It may be missing or inaccessible” error. How? Simply follow the given steps below.
Step 1: Tap the Win key or click the Windows Start button to open the Start menu.
Step 2: Next, type “%appdata%” in the field and hit Enter to open the hidden AppDataRoaming folder.
Step 3: Now double click the Mozilla folder as well as the Firefox folder.
Step 4: From there, look for the “profiles.ini” file and delete it. Make sure that you don’t delete the Profiles folder which should have the icon of a file folder.
Note: Keep in mind that the .ini file extension is identified as the file that features a gear icon beside the “Configuration settings” or “Application settings”.
Step 5: Once you open Firefox, a new profile will be created.
On the other hand, if you know where your profile exists, you can try the following steps below to help Firefox locate it.
First, you need to move the profile folder back to its original location.
Next, restore the profile folder’s original name if you have modified it.
Then create a new profile using the Profile Manager and give it an appropriate name.
Now click on the Choose Folder button and select the profile folder you have moved or renamed before you exit the Create a new profile wizard.
If you are trying to install a Feature Update in Windows 10 but you got the error code 0x80190001, then it means that there is something wrong with the installation files. The installation files are either corrupted or some of them failed to be downloaded. On the other hand, the issue might also have something to do with a driver issue.
When you encounter error 0x80190001, you will see the either of following error message on your screen:
“Something went wrongCouldn’t download Windows 10, please check your network settings and try again. You can contact Microsoft support for help with this error. Here’s the error code 0x80190001”.
Or:
“An unexpected error was encountered while attempting to download files required for the upgrade”.
Here are some fixes that could help you resolve the error 0x80190001. Follow them carefully.
Option 1 – Run the Network Troubleshooter
As mentioned in the error message the issue might have something to do with the network settings of your computer so you can try to run the Network Troubleshooter and then try updating or installing Windows 10 again.
Option 2 – Update Network drivers
Tap the Win + R keys to launch Run.
Type in msc into the box and tap Enter or click OK to open the Device Manager.
After that, look for Network Adapters from the list of device drivers displayed. Once you find it, expand it to see the Network drivers.
Right-click on it and select the option “Uninstall device” – do the same thing for the other Network drivers.
Restart your PC so Windows can detect and reinstall the drivers you just uninstalled.
Option 3 – Use Storage Sense to clean up temporary and junk files
Open Setting > System > Storage from the WinX Menu.
From there, you will see a list of all the local and connected storage devices along with the details on the free space.
Now make sure that the Storage Sense feature is turned On then go find a link that says “Free Up Space” and click it to open.
After that, a screen which is the built-in program in Windows 10 will appear and will scan your computer for the following junk files so you can free up disk space:
Windows Upgrade Log Files
The system created Windows Error Reporting Files
Thumbnails
Temporary Internet Files
Previous Windows Installation Files
Delivery Optimisation Files
DirectX Shader Cache
Note: Once you’re done freeing up space on your drive, try to run the setup file again.
Option 4 – Delete the contents in the SoftwareDistribution folder
The Software Distribution folder in the Windows operating system is a folder that can be found in the Windows directory and is used to store files temporarily which might be required to install the Windows Update on your PC. Thus, it is required by the Windows Update and maintained by WUAgent. A lot of users tried deleting the files in this folder to fix the problem and so far it has worked. Like them, you can try clearing the Windows Update cache by simply deleting the contents of the folder named “SoftwareDistribution” since Windows apparently can’t clear and re-download the update contents once they are corrupted. Thus, deleting the contents of this folder will make Windows download the contents again which will fix the problem. To do that, follow the steps below.
Open the WinX Menu.
From there, open Command Prompt as admin.
Then type in the following command – don’t forget to hit Enter right after typing each one of them.
net stop wuauservnet stop bits
After entering these commands, it will stop the Windows Update Service and the Background Intelligent Transfer Service.
Next, go to the C:/Windows/SoftwareDistribution folder and get rid of all the folders and files thereby tapping the Ctrl + A keys to select them all and then click on Delete. Note that if the files are in use, you won’t be able to delete them.
Once all the contents in the Software Distribution folder are deleted, restart your PC and then go back to Command Prompt and input the following commands again.
net start wuauservnet start bits
Since the folder has already been flushed, it will be populated afresh the instant your restart your computer and open Windows Update.
Option 5 – Run the Windows Update Troubleshooter
You might also want to run the Windows Update Troubleshooter as it is also known to help users resolve Windows Update errors like error 0x80190001.
Option 6 – Try to disable your antivirus program
Disabling the antivirus program or any security software installed in your computer is always a good idea you can try when the Windows Update process does not go smoothly. So before you try updating your computer again, make sure to disable the antivirus or security program and once the Windows Update is done, don’t forget to enable the antivirus program back again.
Option 7 – Try to use the Media Creation tool
The Media Creation tool in Windows allows you to use the ISO installation file to make a bootable device that you can use to install Windows on your PC. Note that this is kind of different from the usual installation process as it could erase your computer’s current settings and data on the primary drive. Thus, before you proceed, you need to backup all your data into some removable drive and then use the Media Creation Tool to make a bootable drive.
After making the bootable drive, you need to plug it into your computer and then reboot.
Next, tap the F10 or Esc key to open the boot options.
Now set the boot priority of the removable drive the highest. Once the setup comes forth, follow the next onscreen instructions and install Windows without any problems.
Runtime Error r6034 is one of the most commonly occurring errors. This error usually arises in Windows Vista and Windows 7.
The message that appears to the user states ‘An application has made an attempt to load C runtime library incorrectly, please contact the support team for more information’.
As the message suggests, this problematic error occurs simply because an application attempts to load the C runtime library without a manifest.
Solution
Error Causes
Runtime Error r6034 occurs when the system compiler fails to compile the working application. While this is the primary reason, there are some other conditions that trigger Runtime Error r6034 which are outlined below.
Existence of viruses and malware in the system.
Corrupt or missing system files.
Power outages.
Hardware problems.
Hardware driver problems.
There are several other reasons that may trigger Runtime Error r6034 that are beyond the scope of this article. Regardless of what triggers this error, it is crucial to ensure that it is fixed as soon as possible.
Further Information and Manual Repair
There are several ways to deal with Runtime Error r6034. However, one of the most effective ways is listed below as follows.
When this error occurs, restart your computer. Make sure you press F8 before the windows logo is displayed.
Choose safe mode and press enter.
Go to the ‘Start’ button and type ‘msconfig’ in the search box. Press enter.
The MSConfig program will now open.
Choose ‘Start up’ in the general tab and then click on the ‘Load Start Up’ item.
Click on the ‘Services’ tab. Now click ‘Hide all Microsoft Services’ and then choose ‘Disable All’.
Close the system configuration window.
Restart the computer.
After restarting your computer, you will notice that the Runtime Error r6034 has been removed. If this approach fails to deliver the desired results, it is advised to follow the steps listed below.
Go to the start button. In the search box, type ‘System Restore’.
The system restore window will open. Make sure any process or application that’s open is now closed.
In the System Restore window, if a calendar list appears, it means the restore point is open. Now choose the point from where the error appeared and click Next.
This process may take some time. Your system will restart automatically and the Runtime Error r6034 will disappear.
Hello and welcome everyone, just a few years ago we had FLASH video content on the internet, we had FLASH games, full FLASH website experiences, and more, but then flash was shut down mostly due to security reasons meaning that in just a few months we have lost most of FLASH web content.
However, there is still FLASH content on the internet even today, there are still FLASH videos and flash games, but we can not play any of that content since browsers do not support FLASH and you can not get the FLASH plugin for browsers. So what might be the solution for this situation?
Ruffle and FLASH emulation
Emulation of course. We will not be able to get the flash player working, well at least not the original and official one, but we can make flash content playable again inside our browsers.
The first thing is first, we need to get an emulator package from the internet in order for this trick to work, one we will be using is RUFFLE. It is lightweight, it is free, it is open source and it is reliable, everything we need.
Download RUFFLE from its official website here.
For Chrome and Edge download the ZIP package, for Firefox, go to the Firefox section of the tutorial.
There is also a desktop version of RUFFLE there so if you are keen on playing your flash content on your desktop computer you might well grab that as well, but for the sake of this tutorial where we are enabling flash in our browsers, we will not focus on that part since it is pretty straightforward.
Now once you have downloaded the RUFFLE emulator, please extract it to the desired folder somewhere on your computer.
Once it is extracted, start your browser of choice and follow instructions.
FOR CHROME:
Navigate to: chrome://extensions/
Turn ON developer mode in the top right corner
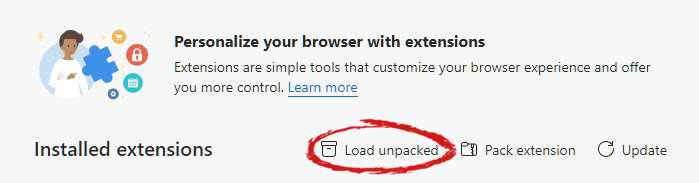
Click on Load unpacked
Navigate to the folder where you have extracted RUFFLE
FOR EDGE:
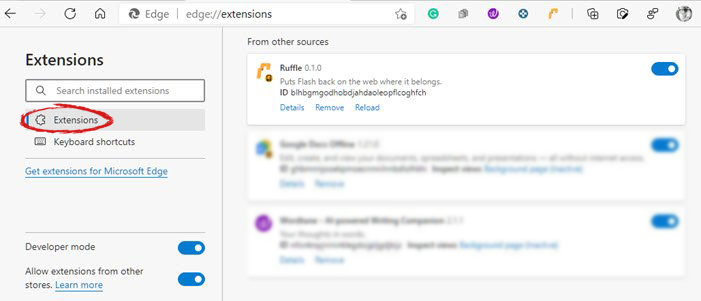
Navigate to: edge://extensions/
Turn ON developer mode on the bottom left corner
Navigate to the folder where you have extracted RUFFLE
Turn RUFFLE ON
FOR FIREFOX:
Go to the RUFFLEdownload page, we can not use the zip package we were using for Chrome and Edge
Right-click on the Firefox download link
Save link by clicking on Save link as...
Navigate to about: debugging
Click on this Firefox
Click Load Temporary Add-on
Select the .xpi that you have downloaded
BONUS:
If you want to enable FLASH content live on your website use: <script src="path_to_ruffle/ruffle.js"></script>