Error Code 0x80070017- What is it?
Error Code 0x80070017 is an error code that is most often associated with Windows 10 installations, although it has also been encountered by users on previous versions of the Windows operating systems. It is usually encountered as users attempt to install a new version of the software on their machine.
Common symptoms include:
- A vague error message regarding the inability of the system to copy over the necessary files pops up as users attempt to install a new version of the Windows operating system on their computer
While it can be hard to tell what the exact cause of Error Code 0x80070017 is on your specific device, the good news is that there are two primary methods that can be used to fix the problem and to allow you to proceed with your installation. These two methods do require some degree of technical knowledge and/or skill, so if you don’t feel like you have the ability to undertake them on your own, be sure to get in touch with a trusted computer repair professional to assist you.
Solution
 Error Causes
The most basic cause of Error Code 0x80070017 is that some of the files that are needed by the system to complete the installation are either not being found by the computer or are believed to be corrupted by the system. When this happens, security features within the software prevent it from completing the installation process, so as to avoid damage to the computer.
Error Code 0x80070017 can be disruptive to your installation process, but there are two basic methods that can be employed to resolve it.
Further Information and Manual Repair
While it can be frustrating to encounter Error Code 0x80070017 on your Windows machine, there are two methods that can be used to try to resolve the problem. One of these methods is extremely simple, even for the most basic users, while the second method takes a little bit more skill and technical knowledge. If you aren’t able to complete these methods on your own, be sure to get in touch with a qualified computer repair technician that can assist you.
Here are the best ways to attempt to resolve Error Code 0x80070017 on your device:
Method One: Clean Your Physical Disk
If you purchased a physical disk version of the installation files for your Windows operating system, remove the disk from your drive and clean it using a microfiber or other lint-free cleaning cloth. As you wipe down the disk, do not use any chemicals, and be sure to wipe gently from the center towards the outside edge rather than the other direction, as failure to do so can damage the disk irreparably.
In some cases, you may need to contact Windows support if you believe that there is an error on the disk itself, such as a scratch, that would prevent the disk from being used as needed in the installation process. They may be able to offer you a replacement disk or you may be able to download a digital copy of the version that you are attempting to install on your machine.
Method Two: Use the Chkdsk Utility
To determine if there may be an error within the disk drive itself, place the installation disk into the drive and restart the system. Go through the prompts until you see the option to “repair your computer.” Choose the operating system that you are using, go into the menu for System Recovery, and type in the words “Chkdsk/r” to begin to use the tool.
Whenever you run a tool like Chkdsk on your computer, it is important to restart your machine afterward to ensure that any changes that have been made are able to be fully applied and accepted by the operating system that you are running.
Method Three: Use An Automated Tool
If you wish to always have at your disposal a utility tool to fix these Windows 10 and other related issues when they do arise,
download and install a powerful automated tool.

 If you consider yourself a power user or you value your privacy then firefox is the browser for you. It is open source and is packed with great features like reporting when your email has been used for a known data breach, it stops annoying pop-up notifications, stops browser fingerprinting, and many more. Firefox is also a cross-platform browser making it a great choice if you want to transfer and use your data across multiple devices with one account. The downside of firefox however is its speed, this browser is the slowest on this list, I guess features and advantages took their tool in the speed department, but if that is not a concern for you and you feel like the positives outweigh some slower speed, grab it
  Chrome browser has been a game-changer when it was released and even today some of its features are still great and needed. It is packed with some great features like tab freezing, for example, it is cross-platform meaning that also as firefox you can change data between browsers on different devices. it is a very expandable browser with tons of extensions and its speed performance is very very good. The downside of Chrome are two things sadly, one of them is its hunger for RAM, the browser takes a big chunk of RAM once it is active and on some older computer with limited RAM it performs slowly, another is telemetry which its sending, in other words, other browsers don’t come with the lingering fear that Google’s just a little bit too involved in all of our lives. But if downsides do not trouble you and you have a decent amount of RAM in your system chrome might be the best solution for you, grab it
  Or should I say Microsoft edge 2.0 since this new Edge is completely recoded and rethought, a completely new browser based on chromium. The first version of the edge was an inhouse attempt from Microsoft and it was a disaster, I guess the lesson was learned, and this new edge we have today is a great Browser, it is lightning fast and packed with some great features with one among them standing out I just love, that is the ability to save web pages as applications and truth to be told you have to try this in order to see al great advantages it offers. A very interesting feature is that edge itself wins the speed race from all of the 5 contestants here which is a great surprise. Of course, the downside of annoying Microsoft pushing it to be your default is, well it's Microsoft, as chrome is tied to Google so is edge tied to Microsoft, and the same dreaded feeling that big MS is watching you. If however, you do not concern yourself with these kinds of things, since it is already part of Windows 10, give it a spin and try it, I am sure you will at least love its blazing speed.
 A new kid on the block, relatively unknown Browser Vivaldi offers some great customizable features no other one on this list offers, a very unique and down to each detail customization option, you can literally tweak each and every aspect of this browser making it best customizable and personal browser ever. How it is also based o chromium, every chrome extension works in it naturally. It is very good in speed and constantly updated and developed. The downside, well if you are anything like me, you could spend ages trying to customize it, ages, it has tons of features, and making it really feel and tick as you want can consume a really lot of time. If this thing does not bother you at all, grab Vivaldi
  Last but not least, we have another relic of the old browser age, the Opera browser. Packed with great security and great in-house features like a built-in VPN, built-in ad blocker, built-in crypto wallet, etc this browser seems like a swiss army knife. Opera is full of features and it shows once you start using it. The downside of opera is that its look and feel are specifically tailored to a certain type of user and not everyone will find that appealing or attractive, add some great but hidden and hard to come by features and it may go unnoticed. However, I think you should really give it a go since it definitely deserves more attention than it gets. Grab it
 I do not know about you, but I prefer to set my Windows to be more to my liking and not how Microsoft thinks it should be. Let’s face it, not all users feel comfortable whit Microsoft settings and idea how things should be.
One of the things I particularly did not like even in Windows 10 is icons that come by default on my taskbar, now so far, well until the latest Windows 11 update you could remove default taskbar icons the same way as in Windows 10, just right-click on them and unpin, sadly with latest update build on Windows 11 this option has been removed.
In order to remove default icons from the taskbar, one must go now to Windows 11 settings and choose from there which one you would like to be placed on it. Of course, this is nothing game-breaking but it still feels strange why the standard option has been removed, it just makes no sense but lately not many things that come from Microsoft do.
I do not know about you, but I prefer to set my Windows to be more to my liking and not how Microsoft thinks it should be. Let’s face it, not all users feel comfortable whit Microsoft settings and idea how things should be.
One of the things I particularly did not like even in Windows 10 is icons that come by default on my taskbar, now so far, well until the latest Windows 11 update you could remove default taskbar icons the same way as in Windows 10, just right-click on them and unpin, sadly with latest update build on Windows 11 this option has been removed.
In order to remove default icons from the taskbar, one must go now to Windows 11 settings and choose from there which one you would like to be placed on it. Of course, this is nothing game-breaking but it still feels strange why the standard option has been removed, it just makes no sense but lately not many things that come from Microsoft do.  Well if anyone told me just a few years ago that I will see the day when Microsoft releases a new OS based on Linux I would be very amused, but that day has come. Mariner is the newest OS out of nowhere.
Microsoft’s new Linux Distro, dubbed Common Base Linux (CBL)-Mariner, isn’t the type of distro you’d want to install directly on any old machine. It’s primarily meant for cloud infrastructure and edge products. Specifically Microsoft’s Cloud and Edge products.
But if you are curious, it’s possible to run. Juan Manuel Rey, a Microsoft Senior Program Manager for Azure VMware, recently published a guide to ISO CBL-Mariner image. With that, you can easily get it up and running. And you can build CBL-Mariner on an Ubuntu 18.04 desktop. So you can try it out since it is free.
You can get it from here:
Well if anyone told me just a few years ago that I will see the day when Microsoft releases a new OS based on Linux I would be very amused, but that day has come. Mariner is the newest OS out of nowhere.
Microsoft’s new Linux Distro, dubbed Common Base Linux (CBL)-Mariner, isn’t the type of distro you’d want to install directly on any old machine. It’s primarily meant for cloud infrastructure and edge products. Specifically Microsoft’s Cloud and Edge products.
But if you are curious, it’s possible to run. Juan Manuel Rey, a Microsoft Senior Program Manager for Azure VMware, recently published a guide to ISO CBL-Mariner image. With that, you can easily get it up and running. And you can build CBL-Mariner on an Ubuntu 18.04 desktop. So you can try it out since it is free.
You can get it from here: 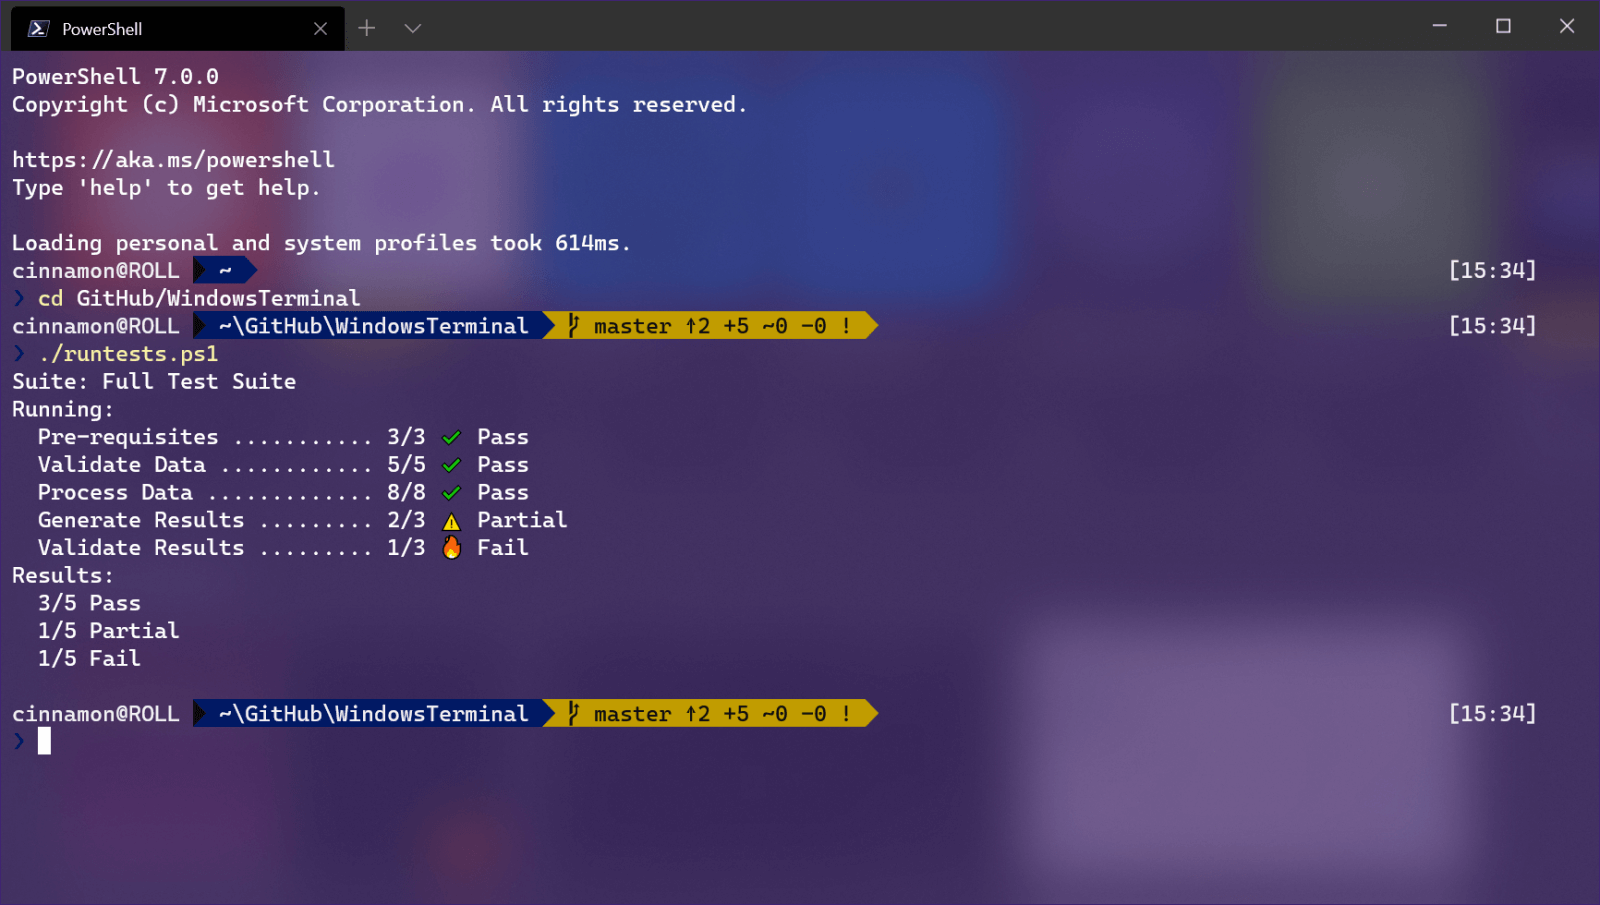 Windows Terminal is a new free Microsoft terminal sort of application. When you open either Power Shell or Command Prompt in Windows they will be opened in different windows, and if you want several of each you will have several windows of each on your screen.
Windows Terminal fixes this by opening each of the Instances of Command Prompt and Power Shell as separate tabs inside itself making it much easier to manage multiple instances of named applications.
You can also run both Power Shell and Command prompt tabs in the same Windows Terminal. Luckily running command prompt and power shell in different tabs is not the only thing you can do. Windows Terminal lets you choose your own theme, it has emoji support, GPU rendering, split panes, and many more customizable options.
Windows 11 will have Terminal as the default command-line environment for opening Power Shell or Command prompt, even Windows Subsystem for Linux (WSL)
Windows Terminal is a new free Microsoft terminal sort of application. When you open either Power Shell or Command Prompt in Windows they will be opened in different windows, and if you want several of each you will have several windows of each on your screen.
Windows Terminal fixes this by opening each of the Instances of Command Prompt and Power Shell as separate tabs inside itself making it much easier to manage multiple instances of named applications.
You can also run both Power Shell and Command prompt tabs in the same Windows Terminal. Luckily running command prompt and power shell in different tabs is not the only thing you can do. Windows Terminal lets you choose your own theme, it has emoji support, GPU rendering, split panes, and many more customizable options.
Windows 11 will have Terminal as the default command-line environment for opening Power Shell or Command prompt, even Windows Subsystem for Linux (WSL)
 I going to admit right here that I am a big fan of Cooler Master PC cases, I like them and they are always one of the things that I consider when building a new PC, overall I like their ideas and quality so personal for me it was quite a surprise to see that they are one that is making a new generation gaming chair.
Now truth to be told Orb X is not your typical gaming chair as you can clearly see from the pictures. The chair itself will come in two colors: white or black and RGB lighting looks to be prominently featured throughout.
I going to admit right here that I am a big fan of Cooler Master PC cases, I like them and they are always one of the things that I consider when building a new PC, overall I like their ideas and quality so personal for me it was quite a surprise to see that they are one that is making a new generation gaming chair.
Now truth to be told Orb X is not your typical gaming chair as you can clearly see from the pictures. The chair itself will come in two colors: white or black and RGB lighting looks to be prominently featured throughout.
 The chair itself is advertised as both meant and aimed for professional and gaming crowds but I believe the gaming crowd is in general more interested in this hardware piece.
Hardware is enclosed in a fully motorized shuttle dome which aims to maximize your privacy, it supports a single 49inch display or three 27inch monitors along with surround speakers if you do not wish to use headphones.
The chair itself is advertised as both meant and aimed for professional and gaming crowds but I believe the gaming crowd is in general more interested in this hardware piece.
Hardware is enclosed in a fully motorized shuttle dome which aims to maximize your privacy, it supports a single 49inch display or three 27inch monitors along with surround speakers if you do not wish to use headphones.
 It offers an adjustable headrest, lumbar support, and footrest so you can spend some time in it and be comfortable. Controls on the chair itself allow you to raise or lower the dome for easier getting in and out of it.
Orb X also has a compartment in its backside, it folds out and has a sliding tray designed to hold your PC or console. Everything is enclosed so wiring is not the issue.
Overall Orb X seems really like the computer chair of the future, Cooler Master expects to release the Orb X by December 2021, priced around $12,000-$14,000.
It offers an adjustable headrest, lumbar support, and footrest so you can spend some time in it and be comfortable. Controls on the chair itself allow you to raise or lower the dome for easier getting in and out of it.
Orb X also has a compartment in its backside, it folds out and has a sliding tray designed to hold your PC or console. Everything is enclosed so wiring is not the issue.
Overall Orb X seems really like the computer chair of the future, Cooler Master expects to release the Orb X by December 2021, priced around $12,000-$14,000.