Default Taskbar inside Windows 11 is pretty good if we are talking about its height. Sitting at 48 pixels it is a pretty decent size considering functionality and size ratio but if you want to make it a little larger or smaller know that you can do that as well in order to customize it for your personal needs.
Sadly in order to actually change height size, you will have to do it inside the registry editor, but worry not, we are here with you to guide you all the way, one step at a time.
Also, note that you can only change Taskbar from normal size of 48px to either small of 32px or large gapping at 72px. Icons will also be scaled proportionally with the taskbar.
 Guide
GuideAnd there you go, you have successfully changed Taskbar size inside Windows 11. If you want to revert back to standard size just repeat steps and place 1 as a value in point 6.

netsh int ip reset
chkdsk /f /r
“An internal error has occurred: The specified resource name cannot be found in the image file. (0x90070716).”You can also encounter this error when you run the System Image Backup function. As mentioned, you can resolve this error using two potential fixes namely checking the status of the Windows Backup Service and checking the settings in the Windows Registry. For more details, refer to the instructions provided below but before you proceed, it would be better if you create a System Restore point first.
Error code 0x80070652 occurs when Windows users attempt to upgrade their operating system while another program is in the process of being downloaded. It may also occur due to problems related to previously failed update attempts within Window Update. When this Windows 10 upgrade occurs, Windows users fail to access the version of Windows they are attempting to download. Instead, a message box occurs stating that error code 0x80070652 has occurred on the device. If this error message is not rectified, it could give birth to other Windows 10 errors such as error code 0x80072EE2.
 Error Causes
Error code 0x80070652 may result from Windows 10 users attempting to download another program while upgrading their operating system. It may also be caused by an issue related to previous installations of updates. For instance, in some cases, your previous installation of the Windows process may have been interrupted or it was simply not completed properly. This causes any other upgrade process that follows to result in error code 0x80070652.
But what can be done in such a situation to resolve the error code? Windows users have several options available. For instance, they can wait on any additional program that may be in the process of downloading to complete the process before attempting to upgrade Windows. They may also troubleshoot problems related to any failed updates or select a system restore point in which the error code was not present.
The manual repair methods Windows 10 users choose may involve any of the solutions mentioned previously. The choice is largely dependent on the user and his determination to fix the error code. However, note that automated tools or Windows repair technicians may also provide solutions to PC issues like error code 0x80070652.
Since previously failed updates within Windows Update can lead to the occurrence of error code 0x80070652, Windows 10 users will need to verify which of these failed updates occurred by checking the history section of the Windows Update tool. Once you’ve been able to verify that failed updates have occurred in the recent past, you’ll need to troubleshoot these problems to rectify the error code. Follow the instructions below to check for updates that have failed to install properly via Windows Update.
Once you’ve completed the troubleshooting of any updates which failed, proceed by rebooting your device. You may then reattempt to upgrade to the latest version of Windows 10 once no other program is in the process of being downloaded.
If the problem causing error code 0x80070652 was related to failed updates of the past, these issues will likely be resolved once you successfully troubleshoot them. However, if the error code reoccurs, apply the next manual repair solution mentioned in this article.
Another option available to users is simply downloading updates manually by visiting the official Microsoft website, specifically the Windows section which provides downloads. To successfully complete this process, ensure you look for stand-alone packages of these downloads available on the website. You will need to know the Microsoft Knowledge Base (KB) article number related to the specific update(s) which failed.
Once a Windows user has verified the KB article number of the specific update, download it from the Microsoft website, then select Run to install the update. Reboot your PC, then check Windows Update to see if you are able to successfully complete the Windows 10 upgrade.
If the upgrade fails, you may need to implement the next manual repair method as is mentioned below.
One of the best options for Windows 10 users facing certain PC problems is to apply System Restore. This allows them to reset their machine for a period of time in which the problem was not present. This is known as the restore point. To apply this manual repair method, follow the steps below.
If you wish to always have at your disposal a utility tool to fix these Windows 10 and other related issues when they do arise, download and install a powerful automated tool.
This is a common Device Manager Error Code that users encounter. It is commonly found on all Windows 2000 and later versions of Windows operating systems. Error Code 36 is usually prompted by the following message:
"This device is requesting a PCI interrupt but is configured for an ISA interrupt (or vice versa). Please use the computer's system setup program to reconfigure the interrupt for this device. (Code 36)"
 Error Causes
Error Code 36 occurs when there is a failure in IRQ translation due to your Windows operating system getting corrupted. This is caused due to a number of triggers, such as:
When programs are removed excessively, some programs are not removed completely and create problems in your computer’s registry.
Also, due to the presence of malware and spyware and other causes mentioned above, your computer registry builds up errors with the time that leads to slowing your PC, time lags, and even result in crashes and freezes.
Error Code 36 can cause internal and external components to malfunction or experience time lags such as DVD drive or printer and hence can severely affect your entire PC.
Error Code 36 is a severe PC error and any attempt at fixing the error must be approached with extreme caution for your PC to start functioning properly again. Here are two methods to fixing your PC.
Changing the IRQ reservation settings is the best way you can rely on to fix the error code. You can do this by changing the BIOS settings of your PC.
The BIOS stands for ‘Basic Input/Output System’ and is the program of your PC’s microprocessor that allows your PC to boot after you switch it on.
Caution needs to be exercised before changing the BIOS settings of your PC. This is because every PC’s BIOS version differs from another and any wrong attempt to change the settings may make matters worse.
It is therefore recommended to refer to hardware documentation that you received with your PC or motherboard and check for the model number and details of your PC’s motherboard.
Only after you have checked and confirmed all the details, should you use the specific BIOS settings required to configure your IRQ reservations?
Error Code 36 isn’t an easy error to remove.
While changing the BIOS settings can work to restore your PC, it may create a whole lot of inconvenience for finding the time and effort to check the hardware documentation details and attempting to change the specific settings and especially, if your PC does not support the options to change IRQ reservations.
Given the high risks of fixing such an error, you can also install software that enables you to fix your slow PC at the click of a few buttons.
Programs such as DriverFIX can enable you to download and replace your outdated drivers with new updated ones without you having to look for them. It will detect which drivers to download based on your PC’s motherboard version from the program’s database and can get rid of error code 36.
Click here to download DriverFIX and remove error code 36 and any other type of Device Manager error from your PC.

 In the Device Manager expand Network adapters, choose adapter, right-click on it and choose Uninstall.
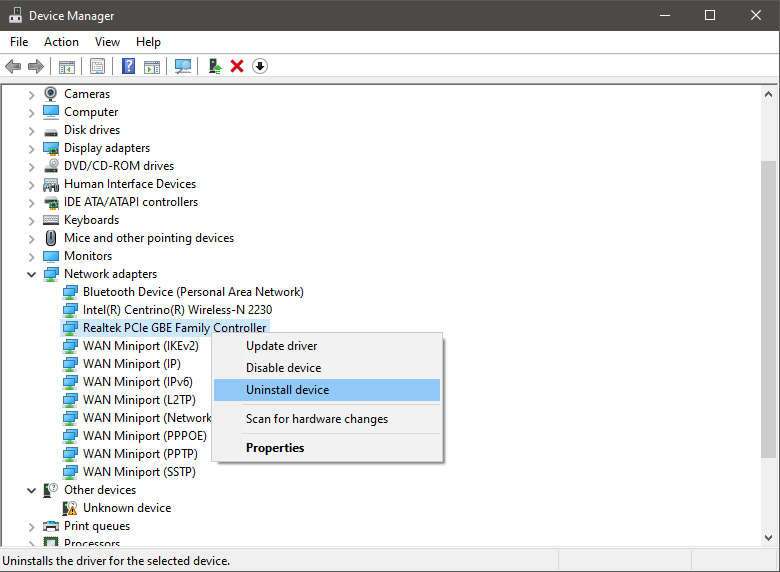 Install latest driver or reboot so Windows will install the driver automatically
In the Device Manager expand Network adapters, choose adapter, right-click on it and choose Update Driver.
Install latest driver or reboot so Windows will install the driver automatically
In the Device Manager expand Network adapters, choose adapter, right-click on it and choose Update Driver.

 In command prompt type next line and press ENTERDEL /F /S /Q /A “C:\Windows\System32\drivers\mfewfpk.sys
Reboot the system
In command prompt type next line and press ENTERDEL /F /S /Q /A “C:\Windows\System32\drivers\mfewfpk.sys
Reboot the system