 It would be very difficult to even start a free eMail list without mentioning Google's Gmail. Introduced all the way back in 2004 as an invite-only service it became over time the most popular email platform largely due to the fact Google is offering free eMail accounts.
 Free Windows eMail client simply called Mail is what was once outlook express. Mail itself has the ability to work with other popular accounts like Google Gmail account, Yahoo, iCloud etc. How it comes with Windows OS and it integrates very well with Microsoft Calendar, this eMail client is for many the first choice.
 Great eMail client matching in functions against paid and premium solutions of big tech companies. Fueled with plenty of customization options and reskinning ones this eMail client offers a lot for its free price tag.
 Outlook comes as a part of the Microsoft Office suite and as one of the oldest eMail clients, it is still widely popular and adopted through many users and businesses. It has tight integration with all Microsoft services and full integration with Calendar making it one of the if not the best eMail client out there.
 eM Client offers a wide array of features, including a calendar, contacts, and chat. Support is provided for all the major email services including Gmail, Yahoo, iCloud, and Outlook.com. The latest version also offers PGP encryption, live backup, basic image editing capabilities, and auto-replies for Gmail.
 This eMail client's main focus is the simplicity of use with visual appeal while tackling multiple eMail accounts. It has many built-in apps along with a customizable interface. Unlike some more Microsoft-centric email clients, Mailbird Business supports a diverse range of integrated apps, including WhatsApp, Google Docs, Google Calendar, Facebook, Twitter, Dropbox, and Slack, all making for a better-streamlined workflow.
 Inky is eMail client if you are looking for security. It uses AI along with machine learning in order to block all types of phishing attacks that can get through to other clients. The proprietary machine learning technology can literally read an email to determine if it has phishing content, and then is able to quarantine the email or deliver it with the malicious links disabled. It also takes things a step further and offers an analytics dashboard, which allows an administrator to see patterns of attacks based on dates, or targeted users.
Code 43 - What is it?
Code 43, Device Manager Error, is reported when Windows doesn’t recognize a hardware device such as the video card, USB, printer, or any other piece of external hardware attached to your PC.
The Device Manager stops the hardware if it reports some kind of unspecified problem. It is mostly displayed in the following format:
“Windows has stopped this device because it has reported problems. Code 43”
Solution
 Error Causes
Code 43 can be triggered due to several reasons. However, 95% of the times it is related to the device driver problems such as:
- Missing Drivers
- Corrupted Drivers
- Outdated Drivers
Driver problems pop up when either new driver versions are available or drivers become damaged due to some underlying reasons like viral infections.
Other than driver problems, code 43 can also pop up when you install and remove the software. This can cause hardware conflict in the registry, altering driver communication.
Code 43 can hamper your ability to use your desired device smoothly. Although Code 43 is not a fatal error code like Runtime and BSoD errors, it is still advisable to resolve it immediately to avoid inconvenience.
You can sometimes bypass error code 43 temporarily by a simple PC reboot but this will not fix the problem permanently. For a permanent fix, try the methods given below.
Further Information and Manual Repair
To help you repair code 43 permanently from your PC, below are some of the best, easy perform, and effective solutions. Simply follow the steps to get rid of code 43 from your PC.
Method 1 - Launch and Run the Troubleshoot Wizard
This is one way to find the exact nature of the problem that spurred error code 43 to pop up. To launch and run the Troubleshoot Wizard, here’s what you need to do:
- Go to the start menu
- Type Device Manager in the search bar and then press enter
- Click on Device Manager to run it on your system
- Now click on the ‘General Tab’
- After that press Trouble Shoot to launch the Troubleshooting Wizard
The Wizard will diagnose the problem and provide you a solution to resolve it, all you have to do from there is to follow the Wizard’s instructions
Method 2 - Check the Hardware Documentation
If for some reason Method 1 doesn’t work, another solution would be to check the hardware documentation for more information about diagnosing the problem.
Method 3 - Uninstall Faulty Drivers
If the underlying reason for code 43 is related to driver problems, then the best way to resolve it is to uninstall faulty drivers and then reinstall new drivers. One of the many ways to uninstall drivers is:
- Click on the start button
- Type ‘sysdm.cpl’ in the search box and then press enter to continue
- In the System Properties dialog box open the Hardware tab
- Click Device Manager and then double click Device Type
- Now click on the problematic hardware device reporting code 43
- After that go to the Driver tab and click Uninstall to uninstall that driver completely
- Visit the manufacturer’s website and download the new driver version
- Install it on your system by extracting the .ZIP file
Method 4 - Update Drivers Automatically
Identifying and updating new driver versions manually can be both frustrating and time-consuming especially if you are in a rush and no computer whiz.
Also, after you update the drivers, you need to keep checking them time and again to ensure they don’t become outdated. You need to update them every time new versions are available which can be stressful.
To avoid this hassle by repairing code 43 permanently, download DriverFIX. This is an innovative and user-friendly device driver software program exclusively designed to resolve all kinds of driver problems.
Whether code 43 occurs on your PC due to missing or outdated drivers, DriverFIX can resolve the problem easily.
The intelligent programming system embedded in this software enables it to detect problematic and outdated drivers in seconds.
It matches new and compatible versions and updates the drivers immediately, automatically, and on a regular basis in just a few clicks. This resolves code 43 and also ensures that all your drivers remain up to date.
DriverFIX is compatible with all Windows versions.
Click here to download DriverFIX to repair and resolve code 43 right away.

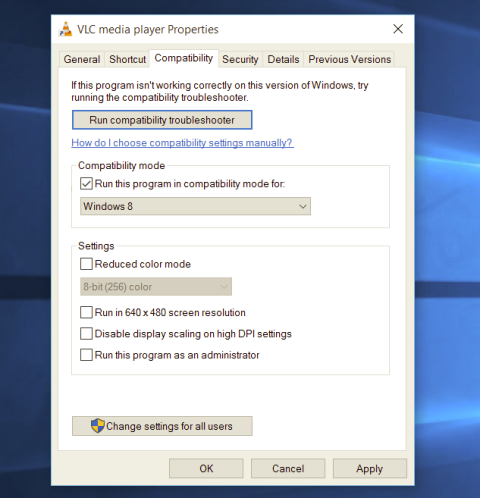 Most of the time running applications with typical settings is fine but from time to time we might have some applications that will require running with administrator privilege in order to work properly. In this case, it is very easy to do it, you just right-click and choose run as administrator.
Although a very easy solution, it can be quite annoying if running the app is on a daily basis or even more times per day. If this is the case then right-clicking and choosing to run as administrator can be a daunting task, sometimes you can even forget to run it like this in heat of work and some unforeseen consequences might occur.
Luckily there is an easy hack so you can open the chosen application each time as an administrator with a simple double click each time.
Most of the time running applications with typical settings is fine but from time to time we might have some applications that will require running with administrator privilege in order to work properly. In this case, it is very easy to do it, you just right-click and choose run as administrator.
Although a very easy solution, it can be quite annoying if running the app is on a daily basis or even more times per day. If this is the case then right-clicking and choosing to run as administrator can be a daunting task, sometimes you can even forget to run it like this in heat of work and some unforeseen consequences might occur.
Luckily there is an easy hack so you can open the chosen application each time as an administrator with a simple double click each time.
 From the Device Manager choose the troublesome device and right-click on it, choose properties.
 Device properties floating Window will appear.
 Click on the top tab which says, Driver. From the Driver tab, click on Roll Back Driver.
 Note that if the device is working properly, the Roll Back Driver button will be greyed out and you will not be able to click on it meaning that chosen device is not the issue. If the device is not working properly and you can click on Roll Back driver, do it, choose the previous version, and reboot your computer.
You can use this method to get back to the previous driver version for any device that is causing issues in your computer.
Note that if the device is working properly, the Roll Back Driver button will be greyed out and you will not be able to click on it meaning that chosen device is not the issue. If the device is not working properly and you can click on Roll Back driver, do it, choose the previous version, and reboot your computer.
You can use this method to get back to the previous driver version for any device that is causing issues in your computer.