Error Code 0x80240020 – What is it?
Error code 0x80240020 is a Windows 10 upgrade error code that affects users who attempt to upgrade their Windows operating system. This may occur due to a particular program that blocks the upgrade from completing. It can also result when other PC issues interfere with the upgrade process by disrupting the ability of Windows Update to download updates on one’s machine. Common symptoms of error code 0x80240020 include the following:
- Message box detailing the presence of error code 0x80240020
- Inability to complete Windows 10 upgrade process
Solution
 Error Causes
Upgrade error codes occur when Windows users experience upgrade failure while using Windows Update, the Microsoft Windows Update website, the Microsoft Update website, or the Windows Server Update Services (WSUS) server. Disruption may cause this process to fail, for instance, due to system file corruptions or problems related to the Windows Update services.
Further Information and Manual Repair
To correct issues related to error codes, it is often best to apply manual repair methods. These help Windows users determine the root causes of the error code and provide solutions that permanently fix these issues. For instance, if error code 0x80240020 on your machine is due to an issue within the Windows Update tool, you will need to first verify that this is the problem by using a troubleshooter option found within your machine’s settings. The troubleshooter will detect and fix the issue.
Most of these manual repair methods can be implemented by any Windows user, regardless of their background, technical abilities, or lack thereof. However, in certain cases, technical skills are required. If you have trouble implementing the procedures highlighted below or in any other error code article found on this site, consider getting help from a Windows repair technician or use a powerful automated tool.
Below are details regarding the manual repair methods for fixing error code 0x80240020. Ensure you follow the instructions correctly. After all, any error you make will likely cause further problems on your machine and prevent you from resolving error code 0x80240020 in Windows 10.
Method One: Run Windows Update Troubleshooter
One way to fix error code 0x80240020 is to troubleshoot Windows Update. To do this you will need to access Settings within your machine then simply select the relevant troubleshooting options available. Follow the instructions below:
- Step one: Type Settings within search box near Start button then press Enter
- Step two: In the search box within Settings, type Troubleshooting
- Step three: Select the troubleshooting option
- Step four: Under System and Security, select Fix problems with Windows Update
- Step five: Under Windows Update, select Resolve problems that prevent you from updating Windows.
- Step six: Click Next and wait for the troubleshooter to detect and fix problems
If there are problems with Windows Update, the troubleshooter will be able to fix them. Once this process is complete, restart your PC and then reopen Windows Update. Attempt to upgrade your Windows operating system. If Windows Update completes the process and your machine downloads and runs the upgrade, you have successfully resolved error code 0x80240020.
If, however, there is another upgrade failure and the message box detailing the presence of error code 0x80240020 in Windows 10 appears, you will need to apply another manual repair procedure. Please see below for further details regarding manual repair method two.
Method Two: Use SFC to Scan and Fix Corrupted System Files
Corrupted or missing system files may interfere with your machine’s ability to successfully download an upgrade. For this reason, scan and fix any problems related to system files on your machine using Command Prompt. This manual repair method is often called a System File Check/ Checker (SFC).
- Step one: Right-click Start Menu
- Step two: Select Command Prompt (Admin)
- Step three: Type sfc /scannow
To ensure you follow this procedure correctly, enter the command as it is written above, with a space between “sfc” and “/scannow”. Once missing, corrupted or damaged files are present on your machine, the SFC command will enable Command Prompt to scan and fix these issues. Wait until the process is complete then reboot your PC.
With your system successfully rebooted, reattempt the Windows 10 upgrade process in Windows Update or on the Windows Update website. If the issue causing error code 0x80240020 was related to problems with system files, you should be able to complete the upgrade after using the SFC tool.
Method Three: Download an Automated Tool
If you wish to always have at your disposal a utility tool to fix these Windows 10 and other related issues when they do arise, download and install a powerful automated tool.

 The true cause is that there is no working Border Gateway Protocol (BGP) routes into Facebook's sites. BGP is the standardized exterior gateway protocol used to exchange routing and reachability information between the internet top-level autonomous systems (AS). Most people, indeed most network administrators, never need to deal with BGP.
Cloudflare VP Dane Knecht was the first to report the underlying BGP problem. This meant, as Kevin Beaumont, former Microsoft's Head of Security Operations Centre, tweeted,
"By not having BGP announcements for your DNS name servers, DNS falls apart = nobody can find you on the internet. Same with WhatsApp btw. Facebook has basically de-platformed themselves from their own platform."
Many people are very annoyed by this and with the fact that they cannot use their social media platforms but it seems that Facebook employees are in even bigger annoyance as it was reported that Facebook employees can't enter their buildings because their "smart" badges and doors were also disabled by this network failure. If true, Facebook's people literally can't enter the building to fix things.
Reddit user u/ramenporn, who claimed to be a Facebook employee working on bringing the social network back from the dead, reported, before he deleted his account and his messages:
"DNS for FB services has been affected and this is likely a symptom of the actual issue, and that's that BGP peering with Facebook peering routers has gone down, very likely due to a configuration change that went into effect shortly before the outages happened (started roughly 1540 UTC). There are people now trying to gain access to the peering routers to implement fixes, but the people with physical access is separate from the people with knowledge of how to actually authenticate to the systems and people who know what to actually do, so there is now a logistical challenge with getting all that knowledge unified. Part of this is also due to lower staffing in data centers due to pandemic measures."
Ramenporn also stated that it wasn't an attack, but a mistaken configuration change made via a web interface.
Both BGP and DNS are down, the "connection to the outside world is down, remote access to those tools don't exist anymore, so the emergency procedure is to gain physical access to the peering routers and do all the configuration locally."
Technicians on site don't know how to do that and senior network administrators aren't on site.
It seems that it will all be down for a couple of more hours before the issue is resolved.
The true cause is that there is no working Border Gateway Protocol (BGP) routes into Facebook's sites. BGP is the standardized exterior gateway protocol used to exchange routing and reachability information between the internet top-level autonomous systems (AS). Most people, indeed most network administrators, never need to deal with BGP.
Cloudflare VP Dane Knecht was the first to report the underlying BGP problem. This meant, as Kevin Beaumont, former Microsoft's Head of Security Operations Centre, tweeted,
"By not having BGP announcements for your DNS name servers, DNS falls apart = nobody can find you on the internet. Same with WhatsApp btw. Facebook has basically de-platformed themselves from their own platform."
Many people are very annoyed by this and with the fact that they cannot use their social media platforms but it seems that Facebook employees are in even bigger annoyance as it was reported that Facebook employees can't enter their buildings because their "smart" badges and doors were also disabled by this network failure. If true, Facebook's people literally can't enter the building to fix things.
Reddit user u/ramenporn, who claimed to be a Facebook employee working on bringing the social network back from the dead, reported, before he deleted his account and his messages:
"DNS for FB services has been affected and this is likely a symptom of the actual issue, and that's that BGP peering with Facebook peering routers has gone down, very likely due to a configuration change that went into effect shortly before the outages happened (started roughly 1540 UTC). There are people now trying to gain access to the peering routers to implement fixes, but the people with physical access is separate from the people with knowledge of how to actually authenticate to the systems and people who know what to actually do, so there is now a logistical challenge with getting all that knowledge unified. Part of this is also due to lower staffing in data centers due to pandemic measures."
Ramenporn also stated that it wasn't an attack, but a mistaken configuration change made via a web interface.
Both BGP and DNS are down, the "connection to the outside world is down, remote access to those tools don't exist anymore, so the emergency procedure is to gain physical access to the peering routers and do all the configuration locally."
Technicians on site don't know how to do that and senior network administrators aren't on site.
It seems that it will all be down for a couple of more hours before the issue is resolved.  If you are about to install Windows 10, then during the installation process, your computer boots into the Install and Configure Windows 10 screen with Cortana that assist you during the setup. Once you reach the last page which is “Choose privacy settings for your device”, you will see the Advertising ID of your computer. Under the Advertising ID, you have to disable or toggle off the “Apps can use advertising ID to provide more personalized advertising in accordance with the privacy policy of the app provider” option. After you disable it, click on the Accept button to proceed with the installation. After that, the copy of your Windows 10 you are using will have the Advertising ID disabled by default.
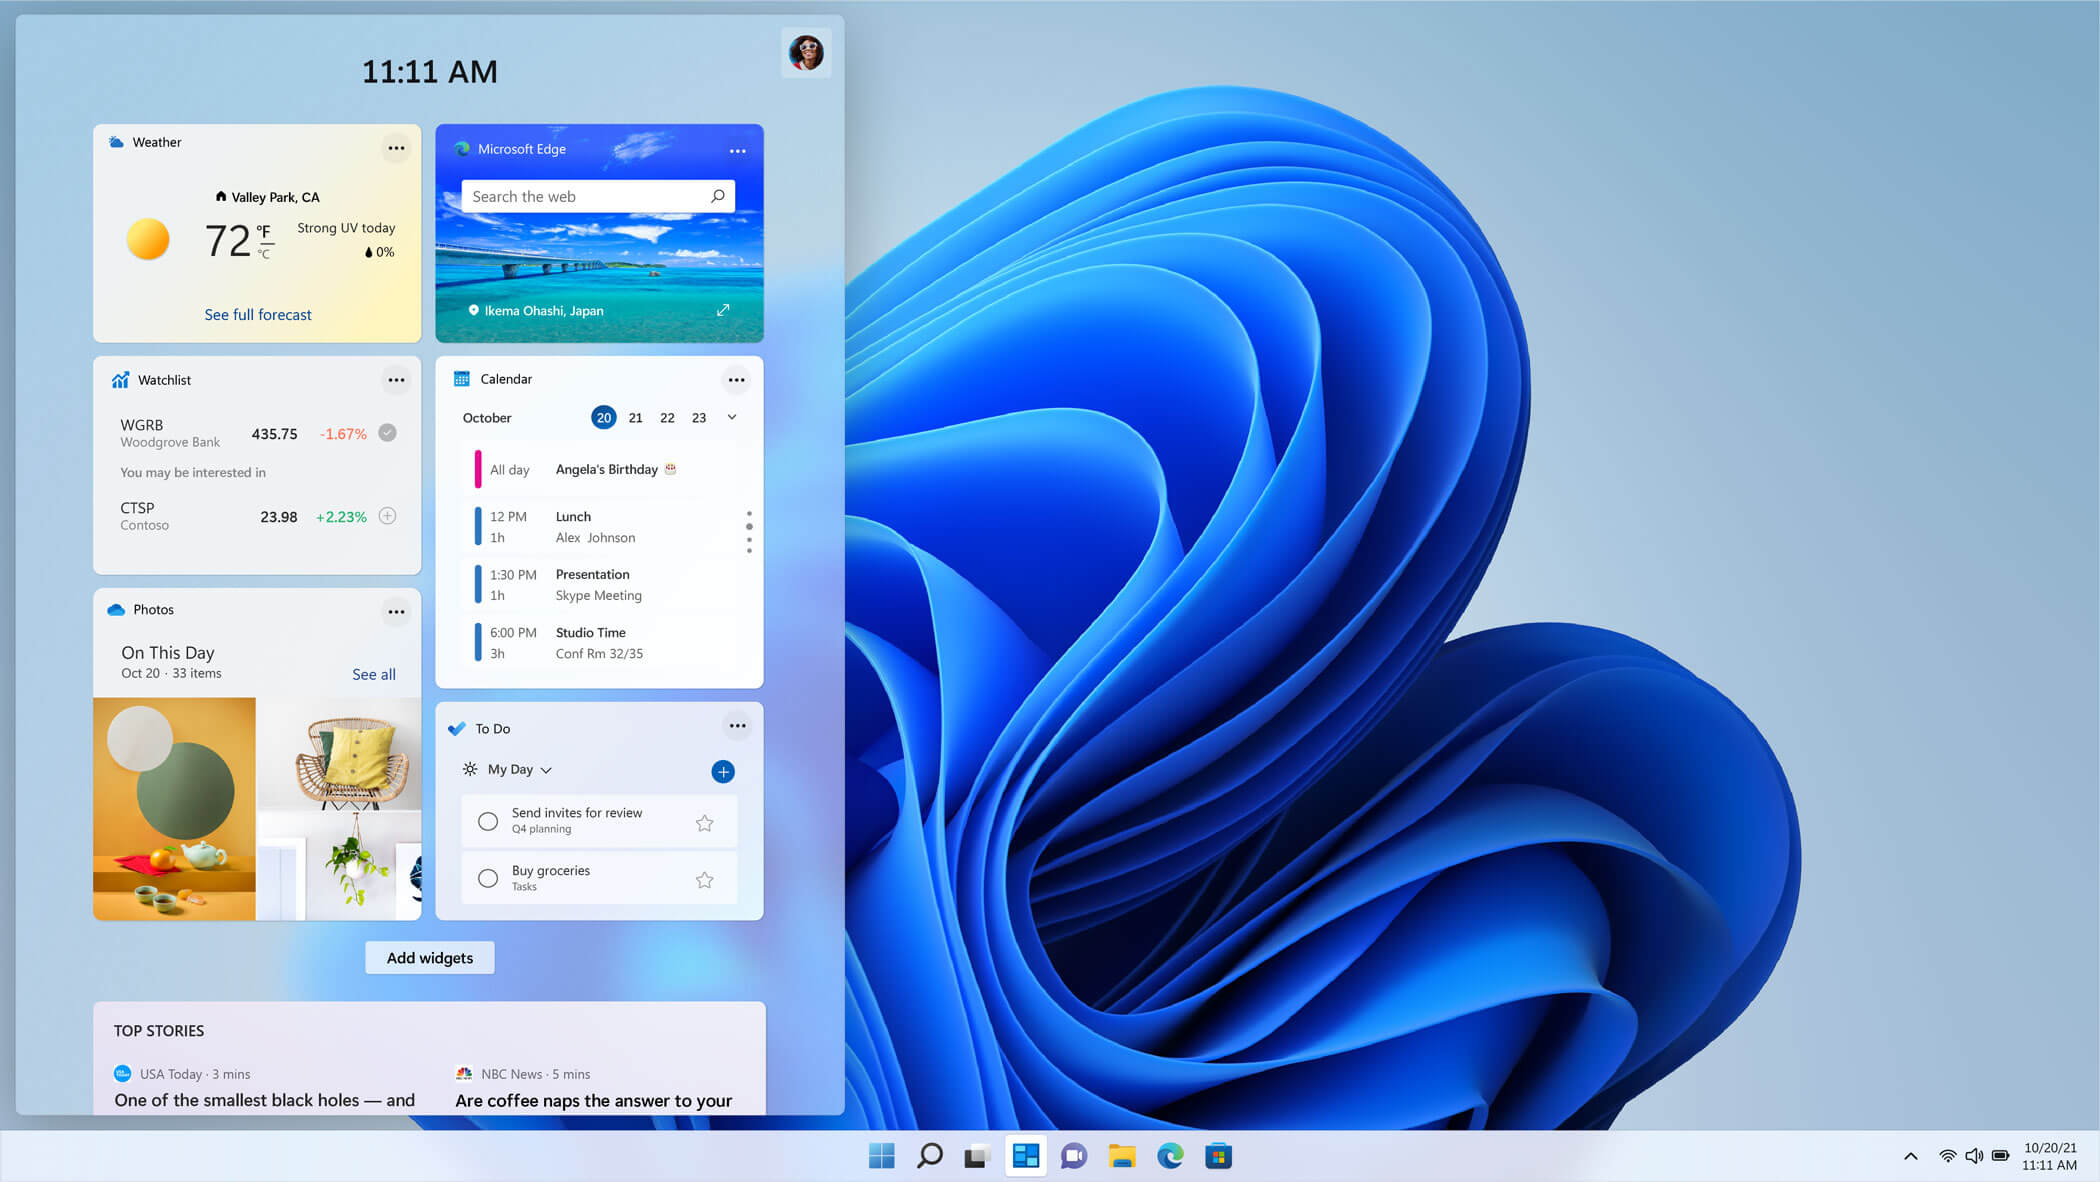 The new widget's menu inside Windows 11 is generally met with a positive attitude but there are still users which prefer not to have it. Luckily for them, Microsoft included a very easy way to turn the widgets menu on or off. Follow this easy guide to see how.
Right-click on the widget button in the taskbar and click on Hide from Taskbar and that’s it
Alternatively, you can also turn it off via the setting app.
Go to the settings app and navigate to Personalization > Taskbar > Taskbar Items and flipping the switch beside Widgets to Off.
Please note that both methods will only hide the button to toggle widgets menu, at the current state there is no really a way to actually turn it off, only hide it and make it not available to bring it up.
The new widget's menu inside Windows 11 is generally met with a positive attitude but there are still users which prefer not to have it. Luckily for them, Microsoft included a very easy way to turn the widgets menu on or off. Follow this easy guide to see how.
Right-click on the widget button in the taskbar and click on Hide from Taskbar and that’s it
Alternatively, you can also turn it off via the setting app.
Go to the settings app and navigate to Personalization > Taskbar > Taskbar Items and flipping the switch beside Widgets to Off.
Please note that both methods will only hide the button to toggle widgets menu, at the current state there is no really a way to actually turn it off, only hide it and make it not available to bring it up. 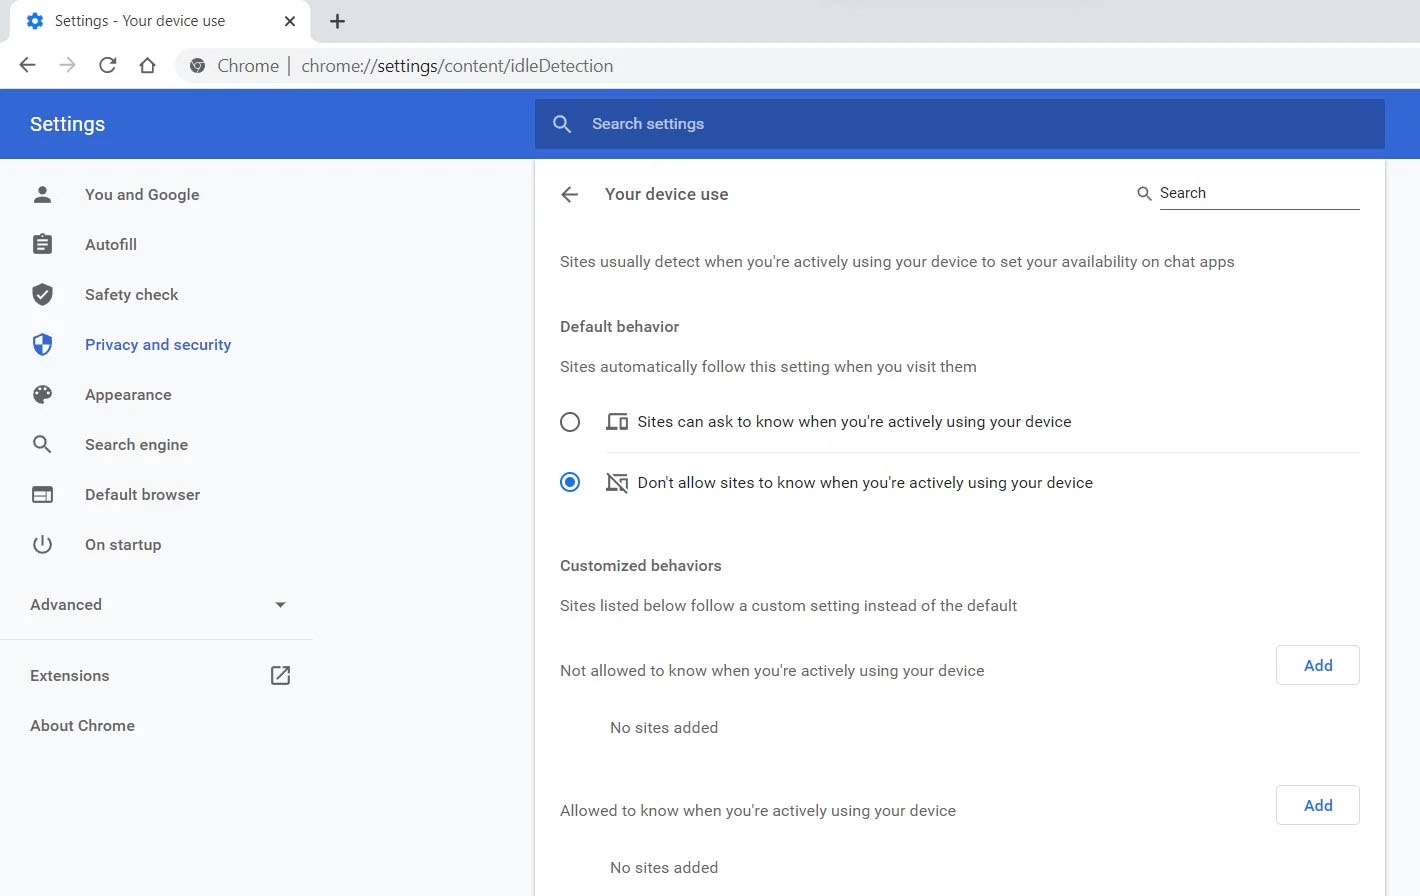 Good thing is that website or web application will prompt you to allow it to use this feature like when a site/application wants to use your microphone or web camera. Developers are on board with this feature since it can provide them with more telemetric data on how users are interacting with their website/application but there are some that are strongly voicing against this.
Tantek Çelik, Mozilla Standards Lead, commented on GitHub, saying:
Good thing is that website or web application will prompt you to allow it to use this feature like when a site/application wants to use your microphone or web camera. Developers are on board with this feature since it can provide them with more telemetric data on how users are interacting with their website/application but there are some that are strongly voicing against this.
Tantek Çelik, Mozilla Standards Lead, commented on GitHub, saying:


