0x800ccc79 error is an error message that you may come across when sending emails through Outlook Express from Microsoft. This error message is accompanied by a notification that is displayed as ‘email was not delivered’ or ‘the server doesn’t support SSL connection’.
Solution
Download Available to Recover all Lost Outlook data
Error Causes
This error code 0x900ccc79 is triggered due to the following causes:
Problems related to email servers
Changes in the configuration settings
Corrupted Windows Registry
Further Information and Manual Repair
When you receive the error 0x800ccc79 it may hamper your ability to send emails. Therefore it is advisable to fix it to ensure your emails are sent and received without any difficulty.
This Outlook error 0x800ccc79 is quite easy to repair. By following the quick fix 0x800ccc79 error code solutions given below you can resolve this error in just a couple of minutes.
Here’s what you need to do to fix this error right away:
Cause: Configuration issues
Solution: If the error occurs due to Outlook Express being configured to use the SSL protocol while sending and receiving emails via the web, then to resolve it, you need to allow Outlook Express to bypass the Secure Socket Layer settings.
To do so, click on ‘tools’ and then on ‘Accounts’. Now select the email account that you want to modify.
Now select the ‘Properties’ tab and then click on ‘Advanced Settings’.
Here search for the following text message ‘This server requires a secure connection’. Once you locate it, uncheck all the checkboxes given next to this option. After that save the changes and restart Outlook Express to see bring the changes into effect.
Cause: Missing or Corrupt Registry Entries
Solution: If the error 0x800ccc79 occurs due to missing or corrupt registry entries, then the best way to fix this error is to download and install a good registry cleaner on your PC.
The registry cleaner will help you clean your corrupt and damaged Windows registry entries and get rid of this error right away. It is suggested you download the registry cleaner tool from a reliable website to avoid any malware or virus downloads simultaneously.
Once you download the registry cleaner on your system, click on scan. The cleaner will scan your computer completely for registry errors and show you the results in a list form.
After the scanning is complete, click on repair to fix the errors.
So, next time, if you or anyone at your office comes across the Outlook Express error 0x800ccc79, you can try these solutions and fix the error immediately without waiting for the network personnel to come and resolve it.
This is a type of DLL error code. DLL is the abbreviation of Dynamic Link Library. DLL files contain small programs which are similar to executable files. One DLL file may be used to load and run several programs.
Fmod.dll is created by Electronic Arts Inc. and associated with Crysis. This file is developed for the Windows OS. This error code occurs when you are unable to access, run and load programs supported by Crysis on your PC.
Fmod.dll error code message is displayed in different formats such as:
"Fmod_event.dll not found."
"The file fmod_event.dll is missing."
"This application failed to start because fmod_event.dll was not found. Re-installing the application may fix this problem."
"Cannot start Crysis. A required component is missing: fmod_event.dll. Please install Crysis again."
"Fmod_event.dll Access Violation."
"Cannot register fmod_event.dll."
"Cannot find C:\Windows\System32\fmod_event.dll."
Error Fmod.dll may pop up when you start-up or shut down the PC or even during the installation of a program.
Solution
Error Causes
Narrowing down to one cause for Fmod.dll error code is impossible virtually because this error may result due to different reasons on your system. Some of the common causes associated with this error code are:
Viral Infection
Hardware failure
Missing, Corrupt, or Deleted Fmod.dll file
Improper program installation
Registry issues
No matter what the underlying cause of the reason may be, it is recommended to resolve the issue immediately to avoid serious PC threats.
Further Information and Manual Repair
To resolve this error on your system, try the methods discussed below:
Method 1 - Check the Recycle Bin
As mentioned above, Fmod.dll is a DLL file that is used to run and load a variety of programs on your system. There is a possibility that you uninstalled a program that was supported by the Fmod.dll file and accidentally deleted it.
In such a scenario, the easiest way to resolve the Fmod.dll error code is to re-install the deleted file from the recycle bin. For this, go to the recycle bin and search for the file. If you find it reinstall if you can’t then simply download the Fmod.dll file from a reliable website.
Method 2 - Scan for Malware
Malware usually enters through phishing emails and downloads. These malicious programs then hide in your system disguising as either DLL or EXE files.
The occurrence of fmod.dll file error may be due to malicious programs hiding in your system. Therefore scan your entire PC with a powerful anti-virus. An antivirus detects and removes all malicious software programs such as viruses, malware, Trojans, spyware, and adware.
Try this, to resolve error code Fmod.dll and see the results.
Method 3 - Fix Hardware Problems
Fmod.dll file error may also pop on your screen due to hardware failure. If this is the reason, then we advise you to use the Device Manager an in-built tool in Windows 7 and 8 to fix hardware failures.
For this go to the start menu then control panel. Now click on the ‘hardware and sound link’ and then click on the Device Manager. If you find any devices in red exclamation point, then this means this device is problematic.
Uninstall the driver for that hardware device and then update the driver. Install the latest version to resolve. Remember, hardware problems are mostly related to outdated drivers.
Method 4 - Restore Points
Use System Restore, an in-built utility also known as the recovery tool, to restore points and ensure your PC is back to its previous working condition before the error code occurred.
Simply put, it helps undo recent changes. You can find the System Restore tool in the System Tools folder.
Method 5 - Clean and Repair the Registry
The registry is that part of your PC that stores all the information, activities performed, and files including the junk files, invalid keys, bad entries, and cookies.
When these files accumulate on your PC, they take up all the registry space and corrupt the important system and DLL files also stored in the registry, thereby generating such errors. Now you can clean the registry manually.
But this process can be time-consuming and slightly technical, hence we advise you to download Restoro. This is a PC Fixer integrated with a registry cleaner.
It is easy to use deployed with an intuitive interface. The registry cleaner scans the entire PC and removes all registry errors. It wipes out all the obsolete files and repairs the damaged DLL and system files.
Click here to download Restoro.
Today most users have an SSD drive, times have changed and SSD has become your typical computer equipment.
A lot of time has passed from the first SSD hard drives up to today and technology has evolved and improved but still, there are some cool tricks and tips to speed up and extend the lifespan of your SSD hard drive.
That being said let us dive right into what I would like to call the essentials of having an SSD hard drive.
Keep your SSD firmware up to date.
This one really is a no-brainer, keeping your firmware updated at all times will ensure longer life and SSD stability. The trick here is that each SSD manufacturer has its own ways of updating firmware so this is not something universal, you will have to go to the official website of your SSD manufacturer and get firmware updates and instructions from them directly.
Enable ACHI.
Advanced controller host interface or short ACHI is a feature that will ensure that your Windows will support all of the features that come with running SSD on your computer. It controls the TRIM feature which is crucial in helping Windows itself in its garbage collection on your hard drive. In order to enable ACHI, you will have to do it from your BIOS and it would be very good if the feature is enabled before Windows itself is installed so it can take full advantage of it.
Enable TRIM.
TRIM feature is vital in extending your SSD lifespan and it should be enabled by default in Windows but you can never be too cautious and double-check and enable if needed. To make sure it is enabled, open your command prompt and type in: fsutil behavior set disabledeletenotify 0
Make sure your system restore is enabled.
In the first SSD days, system restore was really a feature that you wanted to be disabled in order to prevent and extend the life span of your SSD drive, but we came a long way from there and today there is no reason to keep this feature turned off since it can be helping many ways with both your system and SSD.
Disable Indexing in Windows.
A large portion of the speed of your SSD drive is used for indexing files in Windows. Of course, the indexing feature is great if you store everything on your SSD drive but if by any chance you have another drive for your backup, pictures, music, etc. it would be highly beneficial for you to turn it off on your SSD. To turn indexing off click on your start menu, click on the computer. Right-click on your SSD and then click on properties. De-select boxthat says: Allow files to have contents indexed in addition to file properties and click OK. Once you do this the operating system will apply this to all the files and folders on the drive. If you see a dialog telling you that it couldn’t remove a file from the index, click Ignore All.
Keep Windows defrag ON.
This also was the option in early SSD days which was better to be OFF, but as said before since technology has been making progress and Windows has been improved and made aware of SSD drives, defrag has evolved as well, and now it is more of optimization tool then defragmenter which was once.
Disable Prefetch and Superfetch.
Windows is placing information in both physical and virtual memory for applications that you are not currently using but they are used often in order to speed their response time. If you are running low on space or having struggles with virtual memory it would be best to turn them both off. Go to registry manager and find: HKEY_LOCAL_MACHINE\SYSTEM\CurrentControlSet\Control\Session Manager\Memory Management\PrefetchParameters, there you have 2 values: EnablePrefetcher and EnableSuperfetch, set both values to 0.
Disable Search and Superfetch services.
Disabling Superfetch in the registry is not all work, Press WINDOWS + R to bring run dialog, type in it services.msc, Find both Search and Superfetch and disable them.
Configure Write Caching.
Write caching can be enabled and disabled in the device manager by expanding disk drives, right-clicking on SSD, then click properties, select the policies tab. In the tab, there is the option to Enable write caching on the device. Now trick in this is that you will need to try and benchmark your SSD with both options turned ON and OFF since different manufacturers have different performances with this option being ON or OFF.
Disable CleanPageFileAtShutdown and LargeSystemCache.
Page file and a large cache of page files are not something that we longer need, since SSD writes with great speed in its flash memory both of these options can be disabled and you will both speed up shut down the process of your system and save some SSD life since page files will not be written. Find both options in the registry under the key: Computer\HKEY_LOCAL_MACHINE\SYSTEM\CurrentControlSet\Control\Session Manager\Memory Management set both to 0
Set high performance in Power options.
This option in power management will prevent your SSD from constantly shutting down and bringing it up increasing speed without sacrificing its life span.
These are tips and tricks for having great and longer life as well as speed for your SSD drive. We hope that you have found them useful and that you will come again to check new articles published daily for easier IT life.
Windows 11 has brought some new features and changed some of the existing ones. One of these changes includes quick switching of audio devices which will play audio.
Audio switching can still be done under the taskbar, it is just a little different and one could say even hidden. Follow this quick guide and you will be switching from your headphones to speakers as an example in a matter of seconds.
Click on the speaker icon located in the far-right part of the taskbar.
After the quick settings menu appears click on the right arrow located right of the volume slider. If the arrow is not present, instead of click on the pencil icon, then on add, and finally select Volume from the list.
After clicking on the arrow icon, a list of all enabled audio devices on the system will replace the volume slider. Click on the desired audio device in order to make it active.
Click anywhere outside the quick setting menu to save changes and close it.
Note: in the Quick settings menu if you choose More Volume Settings it will bring you to System > Sound where you can access more sound input and output options.
In previous versions of Windows changing the system, the font was a pretty straightforward process, but it seems Microsoft did not want this feature to keep for whatever reason and there is no option as of the time of the writing of this article to do it in standard options in Windows 10.
But do not worry, you are still able to customize your Windows and choose which font would you like to see inside it in all of its dialogs. You can choose whichever font you desire, the only prerequisite is it to be installed on your system.
This guide will require you to change values in the registry of Windows itself so please follow step-by-step instructions and always make a backup of the registry before changing it in order to prevent some permanent Windows issues.
All of that being said, let's start.
Setting new font
First thing is to open notepad, in the notepad paste the next block of code:
Windows Registry Editor Version 5.00[HKEY_LOCAL_MACHINE\SOFTWARE\Microsoft\Windows NT\CurrentVersion\Fonts]"Segoe UI (TrueType)"="""Segoe UI Bold (TrueType)"="""Segoe UI Bold Italic (TrueType)"="""Segoe UI Italic (TrueType)"="""Segoe UI Light (TrueType)"="""Segoe UI Semibold (TrueType)"="""Segoe UI Symbol (TrueType)"=""[HKEY_LOCAL_MACHINE\SOFTWARE\Microsoft\Windows NT\CurrentVersion\FontSubstitutes]"Segoe UI"="NEW_FONT"
Where in "Segoe UI"="NEW_FONT" instead of NEW_FONT you need to write the exact name of the font that you wish to use as a system font.
Once you have replaced the default system font with your desired one, go to File and save as, from file type drop-down menu, choose all files and save this file as .REG type giving it whatever name you wish.
When the file is saved, close notepad, right-click on the saved file and choose the merge option. Confirm with YES and click on OK. Reboot your system and your Windows will now use the font of your choice as its default system font.
Restoring default font
If you wish to return the old default system font as it was, follow the same steps but in your notepad paste this code:
Microsoft has started building a unified store with Windows 8 and later with Windows 10 in order to make it easier for users to get safer and more modern applications for their Windows 10 devices. This unified store is called the Microsoft Store which is tied up with the Windows Update. The delivery for them both are quite similar which is why they also have some common errors as well as fixes for them. So in this post, you will be guided on how you can fix error 0x80246019 for both Microsoft Store and Windows Update in your Windows 10 computer.
The error 0x80246019 might be caused by corrupted system files or missing ones or be due to some glitch in the component services and other possible causes but whatever the cause is, you can fix it with the help of the following fixes, make sure to follow each one of them carefully.
Option 1 – Reset Windows Update components
Open Command Prompt with admin privileges.
After that, type each one of the following commands and hit Enter after you key in one after the other.
net stop wuauserv
net stop cryptsvc
net stop bits
net stop msiserver
Note: The commands you entered will stop the Windows Update components such as Windows Update service, Cryptographic services, BITS, and MSI Installer.
After disabling WU components, you need to rename both the SoftwareDistribution and Catroot2 folders. To do that, type each one of the following commands below, and don’t forget to hit Enter after you type one command after the other.
Next, restart the services you’ve stopped by entering another series of commands. Don’t forget to hit Enter after you key in one command after the other.
net start wuauserv
net start cryptsvc
net start bits
net start msiserver
Close Command Prompt and reboot your PC.
Option 2 – Toggle the Windows Insider Program settings
This option is only applicable to you if you are a part of the Windows Insider Program. If you are, then follow the steps below.
First, you have to open Settings and go to the Update & Security section.
From there select the Windows Insider Program.
After that, select the “Stop Insider Preview builds” option and then restart your computer.
Now open the Windows Insider Program again and check if it fixes error 0x80246019 or not.
Option 3 – Run the System File Checker Scan
System File Checker or SFC is a built-in command utility that helps in restoring corrupted files as well as missing files. It replaces bad and corrupted system files with good system files that might be the cause why you’re getting error 0x80246019. To run the SFC command, follow the steps given below.
Tap Win + R to launch Run.
Type in cmd in the field and tap Enter.
After opening Command Prompt, type in sfc /scannow
The command will start a system scan which will take a few whiles before it finishes. Once it’s done, you could get the following results:
Windows Resource Protection did not find any integrity violations.
Windows Resource Protection found corrupt files and successfully repaired them.
Windows Resource Protection found corrupt files but was unable to fix some of them.
Reboot your computer.
Option 4 – Run the DISM tool
You can also run the DISM Tool as it helps in repairing the Windows System Image as well as the Windows Component Store in Windows 10. Using this built-in tool, you have various options such as the “/ScanHealth”, “/CheckHealth”, and “/RestoreHealth” which could help in fixing error 0x80246019.
Open the Command Prompt with admin privileges.
Then type in the following commands and make sure to hit Enter right after you type each one of them:
Dism /Online /Cleanup-Image /CheckHealth
Dism /Online /Cleanup-Image /ScanHealth
exe /Online /Cleanup-image /Restorehealth
Do not close the window if the process takes a while as it will probably take a few minutes to finish.
Option 5 – Try to reset the Microsoft Store cache
Just like browsers, Microsoft Store also caches as you view apps and games so it is most likely that the cache is no longer valid and must be removed. To do so, follow the steps below.
Right-click on the start button and click on Command Prompt (administrator).
Next, type in the command, “wsreset.exe” and tap Enter. Once you do, the command will clear the cache for the Windows Store app.
Now restart your PC and afterward, try opening Microsoft Store again and then try to install your app or update your computer again.
Option 6 – Run the Windows Update Troubleshooter
You might also want to run the Windows Update Troubleshooter as it could also help in fixing error 0x80246019. To run it, go to Settings and then select Troubleshoot from the options. From there, click on Windows Update and then click the “Run the troubleshooter” button. After that, follow the next on-screen instructions and you should be good to go.
In your Graphics Settings, select r5apex.exe and change the Graphics performance preference to Classic App, set it to High Performance, and then launch the game as an administrator when you want to play.
Inside the Nvidia Control Panel, click “Manage 3D Settings”, and select Apex Legends and change it to “Prefer Maximum Power”
You can also change “pre-rendered frames” to 1, but it will make you lag just a tiny, tiny bit.
Turning the shader cache on can help improve FPS, but on some systems, it may cause additional negative performance changes.
If you have the ability to use G-Sync, use that as well (Only available on some monitors and graphics cards)
From the task manager, change the priority of r5apex.exe to “High” and close out of other applications.
Update your graphics drivers.
Ensure your PC complies with the games minimum system requirements:
This is a typical system error that occurs during Windows setup. To be precise, this error may pop on your computer screen during the text mode portion of Windows setup.
The setup hangs and stops responding and the error message is displayed in either one of the following formats:
‘The file I386Ntkrnlmp.exe could not be loaded. The error code is 7.’or ‘The file I386L_intl.nlf could not be loaded. The error code is 7.’
Solution
Error Causes
Error 7 may be triggered due to several reasons but the 2 most common causes for this error code are:
Incorrect settings of the BIOS
Faulty RAM modules
Registry corruption
Further Information and Manual Repair
To resolve this error on your system, here are some easy and effective DIY methods that you can try.
Method 1 - Change Back the BIOS to its Default Settings
If the underlying cause of error code 7 is related to incorrect BIOS settings, then it is recommended to restore default settings to resolve.
You can reset your computer’s BIOS (basic input and output system) settings to factory defaults by selecting the restore defaults option within BIOS or by removing CMOS ( Complementary Metal Oxide Semi-Conductor) battery from your unplugged computer for about five minutes.
The battery removal method requires opening the computer case, so only attempt it if you are unable to access BIOS.
To reset BIOS follow these steps, reboot your PC and then press the key assigned to loading BIOS during your computer boot splash screen.
The key assigned to load and access BIOS varies from manufacturer to manufacturer but usually, it's F1, F2, or F12. Once you enter the BIOS, select the ‘Restore Defaults’ option listed in the menu. I
t may be a keyboard shortcut or be under the Advanced settings menu. Confirm settings and then exit BIOS. Hopefully, this will resolve Error 7.
Method 2 - Remove the Faulty RAM
When error code 7 is triggered by faulty RAM modules, then to resolve it simply remove the memory modules that are installed in the computer.
If the error code is displayed again after you remove the memory module, remove a different memory module. This procedure requires you to reboot your PC several times to identify the specific memory module that is not working properly.
Method 3 - Repair the Corrupted Registry
Error code 7 is sometimes also linked with registry issues. If the reason for the error occurrence is a damaged or corrupted registry, then simply download Restoro.
This is a powerful PC Fixer embedded with a registry cleaner. It is easy to operate and user-friendly. The registry cleaner detects and removes all errors in seconds. It cleans the registry and repairs the damages in no time.
Click here to download Restoro.
As we near the end of 2022 we look at the current best antivirus software for popular platforms, why they are the best, and why you should get them.
Avira, a great free Antivirus
Avira has been around a long time with its free antivirus version of the larger protection suite. It had its ups and downs but the latest versions are really great. With high-speed scans and low system impact, Avira antivirus is really one of the best free antivirus software currently on the market.
The software itself has also received UI & UX updates making it straightforward and easy to use. The virus scanning engine is the same as in paid version that ranks among the top engines in the world for this type of work. The package also gives you some great browser protection and a good firewall as well, there is really no excuse to skip on this if you want a free solution.
The only thing that we would say is not so great in Avira is reporting some false positives, sometimes even for MS updates, it is rare but it can happen.
Malwarebytes, a powerful Windows antivirus
Malwarebytes Premium is easy to use, simple antivirus solution that shies away from complicated UI, and simply put, it just works. Its scanning engine is well-known and places among the top and best in the world often finding some malware that other can miss.
Another great thing is its integration with Windows itself, it is one of the rare applications that can and will work incredibly well beside your typical Windows protection tools so you can have both of them running at the same time.
Installation and running are really simple and every typical PC user will find it as easy as walking in the park. On the other hand, sadly system impact is a little high and it will have issues running on lower-end systems due to its memory requirements.
Intego MAC Internet Security X9, the best Mac antivirus
Gone are the days when MAC had no virus issues, since MAC rose in popularity among the users, also rose the number of viruses and malware. The system itself has some great protection built it inside but for more security and better control of it, you will need a third-party dedicated solution.
Intego was made by Mac antivirus experts who have been building this kind of software last 25 years. The interface is easy to use and premade presets are really helpful, but the security suite can also be customized to fit your needs and desires.
Since this is only available as a security suite, you are getting a firewall and some other security tools along with your antivirus that will run as a part of it.
The bad side is that scans can sometimes run slow, most of the time they are OK in terms of speed but occasionally they can switch to slower speeds and impact scanning time to some annoying times. Also, there is no webcam protection nor VPN service included where others on this list have them.
Bitdefender mobile security: best Android protection
While protection is not only needed for your gaming or workstation, software suites that are dealing with mobile and tablet security exist. The best of them is the Bitdefender antivirus mobile suite. Low on system resources and low on performance impact with the really great virus detection rate Bitdefender is at the top of suites for your phone.
Consistent high virus detection packed with low battery impact is great but the suite comes with tons of other tools as well like browser security tools, email protection, and real-time link and notification protection.
The application will always scan each file and newly installed application in the background and alert and cut off any found threat. App itself is easy to install and use and most of the time it will do everything in the background for you but offer you customization if you need it.
The package also includes VPN and application lock that will let you protect the critical applications from being accessed as well as an online account scanner. Anti-theft and anti-loss tools, which allow you to find, remotely lock or wipe a stolen or lost device, add yet another layer of protection.
One thing that is missing from this great package is fraudulent call protection. Newer Android phones have this feature inside but it would be nice if Bitdefender had it as well.
Bitdefender, the best antivirus software
Now that we have covered specific cases of each platform, there is one player that has all of them covered and with a quality product, that player is BitDefender and it is great. Personally, this is my protection suite of choice and as I type this it is running in the background.
Bitdefender has it all, low system impact, as a matter of fact, it is one, if not, the lowest performance impact engine on the market currently and that is packed with a great and highly consistent virus & malware detection suite. Along with real-time malware protection, browser security, and anti-spam tools, you also get anti-phishing defenses, ransomware protection, and a strong firewall.
Bitdefender scores are very high in both the zero-day threat and real-world protection tests at AV-Test, an established organization that tests antivirus software. Despite being tested against tens of thousands of well-known and widespread malware threats, the software consistently achieves a 100% blocking rate.
The suite also comes with a restricted free VPN and with parental controls as well. Webcam and microphone protection are also included in the suite and on top of all, it has great pricing plans and constant discounts.
BitDefender is really a great package and it might sound too good, but after years and years of personally using it I have not had single malware or virus issue, the only thing that I would put as a negative is that system is severely slowed down when system scans are performed so be sure to run or schedule them when you are not using your computer. This, of course, can put some people off and I will admit it is a serious drawback but for me, the security of my workstation is more important than leaving the computer for 20 or so minutes in order to perform a full scan of the system.
Microsoft Designer, a new application developed by Microsoft will bring design backed with DALL-E 2, an AI image creation open-source software. The new app is shown as a dedicated graphic design tool that will help you in the creation of stunning social media posts, invitations, digital postcards, graphics, and more, all in a flash.
Use of the application will be by typing headings and then typing text into the prompt to generate a background image. Since Microsoft uses DALL-E 2 for image creation output should be fairly good but if you wish you will be able to use your own images instead of using AI to generate one.
The designer will be a free application once it is ready and it already has a web preview version, also free but with a waitlist. There will be premium features inside the app once it is released that will be available to Microsoft 365 Personal and Family subscribers. Microsoft also wants to add a version of a designer directly to the Edge browser as well.
Nvidia GeForce RTX is a high-end professional visual computing platform created by Nvidia, primarily used for designing complex large-scale models in architecture and product design, scientific visualization, energy exploration, and film and video production. Nvidia RTX enables real-time ray tracing.
Historically, ray tracing had been reserved for non-real-time applications (like CGI in visual effects for movies and in photorealistic renderings), with video games having to rely on direct lighting and precalculated indirect contribution for their rendering.
RTX facilitates a new development in computer graphics of generating interactive images that react to lighting, shadows, and reflections. RTX runs on Nvidia Volta-, Turing- and Ampere-based GPUs, specifically utilizing the Tensor cores (and new RT cores on Turing and successors) on the architectures for ray-tracing acceleration.
Advantage in games
With incredible lighting and shadows, reflection, better smoke, and water effects, and more, RTX has managed to place awesome real-time effects on your desktop all that’s to Nvidia technology behind it.
Of course, in order to harvest this kind of technology and features game itself needs to support and have RTX in it, you can not turn RTX in just any game, the game itself must have technology build in it.
Therefore we are bringing you the list of all RTX games you can find currently on the market so you can enjoy at the moment best graphics a PC can offer

 Error Causes
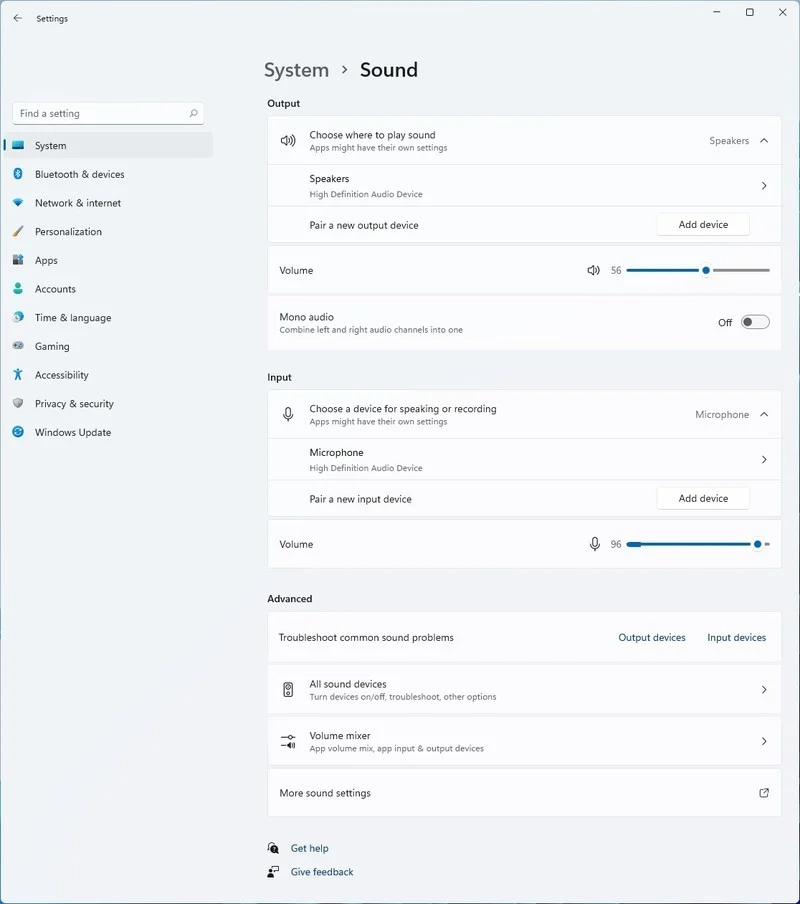 Windows 11 has brought some new features and changed some of the existing ones. One of these changes includes quick switching of audio devices which will play audio.
Audio switching can still be done under the taskbar, it is just a little different and one could say even hidden. Follow this quick guide and you will be switching from your headphones to speakers as an example in a matter of seconds.
Windows 11 has brought some new features and changed some of the existing ones. One of these changes includes quick switching of audio devices which will play audio.
Audio switching can still be done under the taskbar, it is just a little different and one could say even hidden. Follow this quick guide and you will be switching from your headphones to speakers as an example in a matter of seconds.


 What is RTX