Ever gotten an e-mail offer that seemed just a little bit too good to be true? Might’ve been a phishing attempt! These are everywhere and can come in many different forms.
So what’s phishing exactly, how can you detect it and how can you keep safe?
Phishing (pronounced like fishing) is a type of cyberattack that tricks the user into trusting the source and revealing sensitive information. Fishing being the perfect analogy, the bait is a legitimate-looking site, e-mail or file and when you take a bite, your identity, banking information and much more can be revealed and stolen.

Some phishing attempts are incredibly obvious, others are super elaborate. Like with most types of malware, cybercriminals have become extremely well-versed in phishing and anyone can fall for it. To help you recognize and avoid it, we’ll take you through a couple of phishing types and give you tips on what to do if faced with them.
This is actually the most common type of phishing. A cybercriminal creates an e-mail containing stuff like attractive offers, legitimate-looking attachments or links and makes it appear as though it’s coming from a trusted source.

For example, it looks like it’s coming from your bank or your favorite retailer. The logo looks legit and the structure of the e-mail seems familiar, so you might get tricked into clicking on whatever clickable content is in it.
Unfortunately this exposes your device to malware that hands your data off to the hacker, who can decide what to do with it further.
Like the above example, you could be approached with lucrative offers or links via text messages or social media messages. Typically, the messages seem relevant to the user as they will be made to look like they’re related to apps or services you’re using.
Voice phishing attacks are schemes that appear as though they’re coming from a credible number. Normally, you’ll get a call about something related to credit cards or taxes to get you into a state of worry, leading you to disclose personal information on the phone.
Spear phishing normally targets specific individuals within a company who are likely to have access to sensitive data. Spear phishers spend time collecting information they can use to reach out to the individual looking as trustworthy as possible. They’ll typically lead with something relevant, for example mentioning an upcoming company event, and make a seemingly legitimate request.
Whaling is a more elaborate form of spear phishing, which targets people in even stronger positions such as executives or high-value individuals. The ultimate goal is to get them to transfer financial or other sensitive information that can be used to compromise the entire business.

BEC, or Business e-mail compromise, is a specific spear phishing technique carried out via e-mail. While there are many ways this is done, most commonly you’ll see instances where the phisher poses as a CEO or similar executive, or as a lower-level employee in specific positions (e.g. sales managers or financial controllers).
In the first situation, the impersonator reaches out to employees requesting them to transfer certain files or pay invoices. In the second situation, the phisher takes control of the employee’s e-mail account and sends false instructions to other employees in order to obtain data and information from them.
There are many ways you can be aware and spot a phishing attempt. Here are some tips:
Those are some of the ways to identify and prevent phishing attacks. However, sometimes phishers disguise themselves a little too well or a misclick happens and there you go - you’ve been exposed to malware.

This won’t happen if you invest in powerful protection software from the get-go, though. A good antivirus program like Bitdefender will keep you safe from becoming a victim of phishing scams. In fact, it will protect you from malicious attacks overall.
Be it your household or your business you’re concerned about, there are a bunch of different packages and options available, providing different kinds of cybersecurity services. That’s the only way you can ever really be sure you aren’t at risk of a digital attack.
Have you ever been targeted by phishers and didn’t know that’s what it was until you read this article? Many can relate. Protect yourself before it’s too late!

“The remote computer that you are trying to connect to requires network level authentication (NLA), but your windows domain controller cannot be contacted to perform NLA. If you are an administrator on the remote computer, you can disable NLA by using the options on the Remote tab of the System Properties dialog box.”Or you could also see this error message instead:
“The remote computer requires Network Level Authentication, which your computer does not support. For assistance, contact your system administrator or technical support.”Before you proceed in troubleshooting the problem using the options provided below, you need to create a backup for your data or system restore point as well as make a copy of any registry entries you are going to modify.
“The program can not start because corefoundation.dll is missing from your computer. Try reinstalling the program to fix this problem”. "This application has failed to start because CoreFoundation.dll was not found. Re-installing the application may fix this problem." “The procedure entry point_CFBundleCopyFileTypeForFileData could not be located in the dynamic link library corefoundation.dll.” "MobileMe Control Panel cannot continue as Apple Application Support is missing or outdated. Please uninstall and reinstall the latest version of iTunes and MobileMe Control Panel to fix this issue.”Though this error code is not fatal but if it is not fixed immediately it will hamper your ability to load and run Apple programs on your system.
 Error Causes
 Valve has officially announced that Steam Deck will be compatible with Windows 11 despite TPM 2.0 Microsoft requirements.
From the beginning, Deck was announced like a mini handheld PC device. Powered with new Steam OS 3.0 based on Linux. However, besides out-of-the-box OS it was also stated that Deck will be a personal device meaning that other PC-based operating systems could be installed on it and even run your typical applications in it.
Since Microsoft announced Windows 11 hardware requirements, specifically the TPM 2.0 requirement many users voiced concern that Steam Deck will not be able to connect to Windows 11
TPM 2.0 is something that Microsoft requires for every internal and hardware component that is to connect on a Windows 11 device. This is to ensure that only trusted devices would be included in the array of a PC setup and avoid any problems like malicious hardware injecting software into a system.
This would also minimize the compromise Windows would have, as unverified or untrusted devices connect to a Windows PC.
However, Valve and AMD are ensuring us that Deck will not have any issue connecting to a PC running Windows 11 or even if you wish to transform Deck itself into a Device running Windows 11.
Valve has officially announced that Steam Deck will be compatible with Windows 11 despite TPM 2.0 Microsoft requirements.
From the beginning, Deck was announced like a mini handheld PC device. Powered with new Steam OS 3.0 based on Linux. However, besides out-of-the-box OS it was also stated that Deck will be a personal device meaning that other PC-based operating systems could be installed on it and even run your typical applications in it.
Since Microsoft announced Windows 11 hardware requirements, specifically the TPM 2.0 requirement many users voiced concern that Steam Deck will not be able to connect to Windows 11
TPM 2.0 is something that Microsoft requires for every internal and hardware component that is to connect on a Windows 11 device. This is to ensure that only trusted devices would be included in the array of a PC setup and avoid any problems like malicious hardware injecting software into a system.
This would also minimize the compromise Windows would have, as unverified or untrusted devices connect to a Windows PC.
However, Valve and AMD are ensuring us that Deck will not have any issue connecting to a PC running Windows 11 or even if you wish to transform Deck itself into a Device running Windows 11. Windows 10 and Windows 11 have automatic dynamic screen brightness depending on the surrounding light inside the room. Please take note that this option is available only on devices with build-in screens like laptops, tablets, and all in one desktop PC. If you are connected with your PC via an external monitor you will not have these settings available and probably feature is not even working.

Some computers will also allow automatic brightness changes also on what is displayed on the screen. This option is meant to save battery life on devices. Microsoft calls this automatic brightness feature Content adaptive brightness control. In order to change this setting, we will go to settings inside Windows.
Open Settings inside Windows, in Windows 11 press WINDOWS + I to open settings, then click on the system in the sidebar and then go to Display. Click on the small arrow beside the Brightness slider in order to expand a small menu and then uncheck Help improve battery by optimizing the content show and brightness. If you see Change brightness automatically when lighting changes, uncheck that as well. Close the settings and you are good to go, now brightness will always be as set in settings.
Inside Windows 10, go to Settings and then go to System and then in Display under the Brightness and Color section look below and locate the box that says Automatically adjust contrast based on the displayed content to help improve battery and uncheck it, if the box below with text Change brightness automatically when lighting changes exists, uncheck it as well. Close settings and you are done.
In 2014 Proton mail started as an end-to-end encrypted email service offering secure and private email services. Proton mail is still live and going with the same dedication to privacy and security but the company has expanded its offering into cloud storage drive services.
Starting as a public beta at the end of 2020, Proton Drive is keeping its privacy and security policy philosophy with the new service. Proton Drive is the newest service besides Proton Calendar, Proton VPN, and Proton Mail.
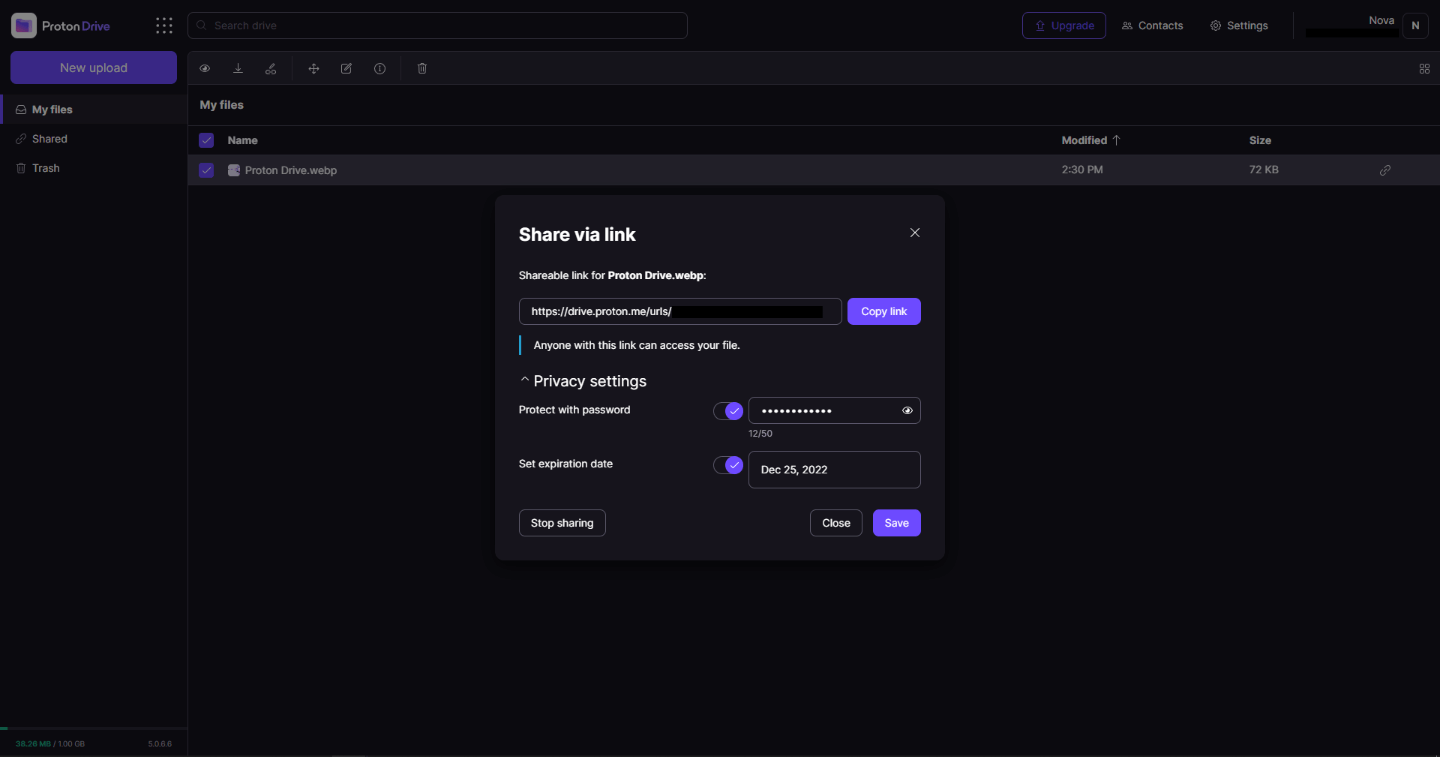
Drive has end-to-end encryption for everything on it including files themselves, filenames, folder structure, folder names, extensions, and file sizes. This means that you and only you can access your files. Servers are located in Geneva, Switzerland and they are under Swiss privacy laws making sure that your files are protected. Proton services in general are all open source so anyone can take a look at them to be sure that nothing is lurking under the hood. For now, sync is done either via the android app or web interface but the desktop client will come soon since currently, it is under development.
Sadly free plan of Proton Drive will give you only 1GB of storage which is much less than other services and sadly payments plans are also not so jaw-dropping going for $4 USD per month for a 200GB plan or with Proton ultimate subscription that will set you $10 behind but you will get 500GB of drive storage. Of course, if you value privacy for your files these options are good but if you do not mind that part other services have much better options.
All in all Proton Drive is a great cloud storage solution if you need privacy and well worth the investment. With the ultimate subscription, you will get enough space for most people and company needs with other services and guaranteed privacy and security, on the other hand, if you just need a large amount of cloud storage not caring too much about privacy other options are better.