The WidgiToolbar is an unscrupulous application designed to advertise other applications as a part of a bundle, steal financial information and penetrate the security of a computer system, making it open to other threats. In most cases, WidgiToolbar claims to center its installs on toolbars but that’s not always the case.
Technical details about WidgiToolbar Malware include:
Digital Publisher: GreenTree Applications srl
Product Version: YTD Video Downloader 4.8.9.7
Original File Name: YTDStub.exe
Entry Point: 0x0000323C
Assessment of WidgiToolbar
Created by GreenTree Applications/ Spigot Inc., the WidgiToolbar is a list of nested toolbars. This application was in fact a bundle, installing several other applications upon installation. For this installation, WidgiToolbar installed only the YouTube Downloader toolbar and several other applications. Thereafter, the application appeared pretty harmless but is intended on distributing advertisements over the user’s computer, often without the user’s discretion. It’s all in the ads.
Additionally, based on evaluations made by Security Analysts, the WidgiToolbar application is used for extracting personal and financial information from a user’s computer system. Financial information encapsulates banking and credit card details. Your passwords and other highly confidential information might be detected by the WidgiToolbar application if care is not taken.
Overall, the WidgiToolbar installs and collects information from your computer system without your knowledge and permission. Furthermore, WidgiToolbar leaves a computer system vulnerable and susceptible to other threats and malware. The application is known for opening a portal or door into your computer system. This implies that other software can be installed on your computer via this avenue, once again without your knowledge.
Responsible for wreaking havoc on your computer, it’s then pertinent that you remove it altogether. Manually removing the WidgiToolbar is not an option. Why? A manual removal procedure will not be able to remove the software in its entirety. An automated tool is the best option.
Like all other programs offered as a bundle, several other programs were installed. These include:
MS Build
Reference Assemblies
PRO PC Cleaner
Soon after the installation of WidgiToolbar was completed, there were a total of four (4) new applications installed on the computer. These were all found in the computer's Local Drive.
After WidgiToolbar was installed, the application attempted to change the default search provider to search.yahoo.com. This was a clear indication that this was a promotion to get more Internet users to use the Yahoo search engine.
Why Use Spyhunter to Remove WidgiToolbar?
As a result of its nature, the WidgiToolbar is difficult to remove. You might be able to remove other programs that were manually installed within the bundle, but to remove WidgiToolbar completely; an automated tool is a necessity. This is to ensure that specific registry keys installed by WidgiToolbar are found and removed.
To completely remove WidgiToolbar from your computer, click here to download and install Spyhunter.
After a scan was done with Spyhunter, there were 330 threats detected. Spyhunter was able to remove all 330 threats with ease and success.
Hello and welcome to errortools another tutorial which aims to make your computer life easier and more relaxed. This time we will be talking about how to switch sound output devices in Windows 10 in a matter of seconds between Headphones and external speakers, Between 2 different speakers, or any other audio output device in general.
Windows 10 with its updates has really gone from OK to one of the greats, little hacks and shortcuts which every update has introduced have really made life easier.
Now, your typical switching from one audio output device to another can be accomplished with your standard go to settings, go to devices, choose audio, pick one which you prefer and click on OK. This way altho nothing wrong with it is a little slow and if you need to switch your output devices several times in a single day often it can be time-consuming as well. Lucky for you we have a quick solution for you.
Switching guide
All right, now in order to be able to actually switch between your audio output devices make sure that all of them are working and that they are plugged in. For example, make sure that both of your headphones and speakers are turned ON and plugged in. Once you have confirmed that everything is in working order:
Click with a left mouse button on a speaker icon located on the right part of your taskbar next to the clock
Click on the small up arrow on the right next to your current audio output device.
The list will open, choose, and left click with the mouse button on your choice.
And that's it, you have changed your default audio output device in a matter of seconds.
The good thing about this method is that Windows will remember output audio levels for each device.
Potential issue
If by any chance when switching your audio devices this way freezes volume control just go to the task manager and restart Windows Explorer.
To restart Windows explorer:
There are cases when you encounter some issues while updating your Windows 10 computer. One of these issues is the error 0x80240034. This particular error is a Windows Update Error that appears on the Windows Update pane every time an update fails to install. When this happens, your Windows Update will only get stuck at 1% and nothing happens afterward and eventually fails.
If you click on the View Installed Update History, you will see the error code 0x80240034 for the failed updates. You will see this error each time you try to update your Windows PC. Take note that this issue doesn’t only happen to a specific version of the Windows Update but on various different Windows builds based on many users. What’s more, is that some users are also seeing a different error code when their Windows Update fails but they still end up seeing the error code 0x80240034 when they check the Windows Update history.
At the time of writing, it isn’t determined yet what really causes this error but it’s most likely due to some corrupted files in the computer which is why the most common solution you can try is resetting the Windows Update cache. On the other hand, other users also resolved the issue by using the ISO and selecting the “Do not keep previous settings” option during the Windows Update so it might be something to do with transferring the previous settings through the update client. For clear instructions in fixing this issue, refer to the two options provided below.
Option 1 – Try to clear the Windows Update Cache/Distribution Folder
As mentioned earlier, a lot of users tried clearing the Windows Update cache to fix the problem and so far it has worked. Like them, you can try clearing the Windows Update cache by simply deleting the contents of the folder named “SoftwareDistribution” since Windows apparently can’t clear and re-download the update contents once they are corrupted. Thus, deleting the contents of this folder will make Windows download the contents again which will fix the problem. To do that, follow the steps below.
Step 1: Tap the Windows key once.
Step 2: Next, type in “command prompt” in the Windows Start Search, and from the search results that appear, right-click on Command Prompt and select the “Run as administrator” option from the context menu.
Step 3: After opening Command Prompt, type in “net start wuauserv” and hit Enter.
Step 4: Then type in “rmdir %windir%SoftwareDistribution /S /Q” and hit Enter.
Step 5: Now type in “net start wuauserv” and hit Enter. Once it’s done, try updating your Windows PC again, it should now work just fine.
Option 2 – Update Windows via ISO file
If option 1 didn’t work for you, you can try this second option of updating your Windows 10 computer using an ISO file which means that you will have to create a Windows 10 bootable media and use it to install the latest Windows 10 version. The most user reported that this option works and the reason why it does have something to do with the Windows Update client since the Windows Updates downloaded from the regular Windows Update client seems to create issues such as the error 0x80240034. However, issues like this one don’t occur when the very same Windows Updates are downloaded and installed via an ISO file.
Take note that when using a Windows ISO file, you will be asked to choose what you want to do with the previous settings and apps. A lot of users opted for the “Not to keep the old Windows settings” option which has resolved the issue. So if you want to keep the previous settings then you must try to update Windows first while keeping the old settings. However, if it doesn’t work, you have to try installing the latest version of Windows without keeping the previous settings.
Step 1: Click this link and then click the Download Tool Now button.
Step 2: Next, click the “Use the tool to create installation media (USB flash drive, DVD, or ISO file)…” option and follow the next given instructions on the screen.
Step 3: Now select the ISO file option in step 5.
Step 4: After that, you should now have an ISO file.
Step 5: Next, go to the location where you’ve downloaded the ISO file.
Step 6: Then right-click on the Windows 10 ISO file and select the Open with an option and then select File Explorer.
Step 7: Now click on “setup.exe” and follow the next instructions that appear on the screen. When asked, you have to select either: Nothing (clean install) or Keep personal files only option. Take note that you must not select the “Keep personal files, apps, and Windows settings since it doesn’t really work.
Oobesttings error is the blue screen of death error caused by some faulty settings inside the Windows registry. The good news is that this is not a hard error to fix and if by any chance you are one of the unfortunate people getting this dreaded annoying error, please do keep reading because we have several things that you can do in order to eliminate this issue from your computer.
Reboot your system
This is the easiest and straightforward solution and can work sometimes since if the system has not been properly rebooted in a while memory could be filled with various processes and it can trigger oobesettings error. A simple restart of the system can solve the issue by decluttering files and emptying memory.
Scan and repair with SFC
If rebooting the system was not helpful and sadly you still receive an error then let's scan and repair system files by using Windows built-in tool SFC. In order to use this, we will have to run the command prompt in elevated administrator mode. Follow instructions closely.
First click on the search icon on the taskbar and type in CMD
The command prompt will show as a search result, on the right side click on Run as administrator.
Once it opens type in following command: sfc /scannow and press ENTER
Wait for the process to finish completely and restart your device after.
Repair the system registry
If the SFC scan has not repaired the issue then we will move to the next solution that involves repairing the system registry itself. Please note that you need to follow step-by-step for provided instructions since playing with the system registry can cause some serious issues if not done properly and can even render the system unstable. That being said, let's begin:
Press ⊞ WINDOWS + R to open Windows run dialog
Type inside regedit and press ENTER
Inside registry editor locate the following key: HKEY_LOCAL_MACHINE/SYSTEM/CurrentControlSet/Control/Session Manager/ Memory Management. and click on it to see properties
Inside the properties right-click on CommitLimit value and choose delete. Confirm with yes.
Close registry editor and reboot your computer.
Reset Windows 11
If even clearing key inside the registry editor has not helped next step would be to reset the system itself.
Press ⊞ WINDOWS + I to open Windows settings and click on System on the left.
Inside on the right part click on Recovery
In recovery click on the button next to Reset this PC that says Reset PC
Choose between keep my files and remove everything (a better option is remove everything, but be sure that you have all your files on a separate drive backed up)
Choose between Cloud Download or Local reinstall.
Click on next to confirm choices and after that on Reset to start the reset process.
Follow onscreen instructions until it is fully done.
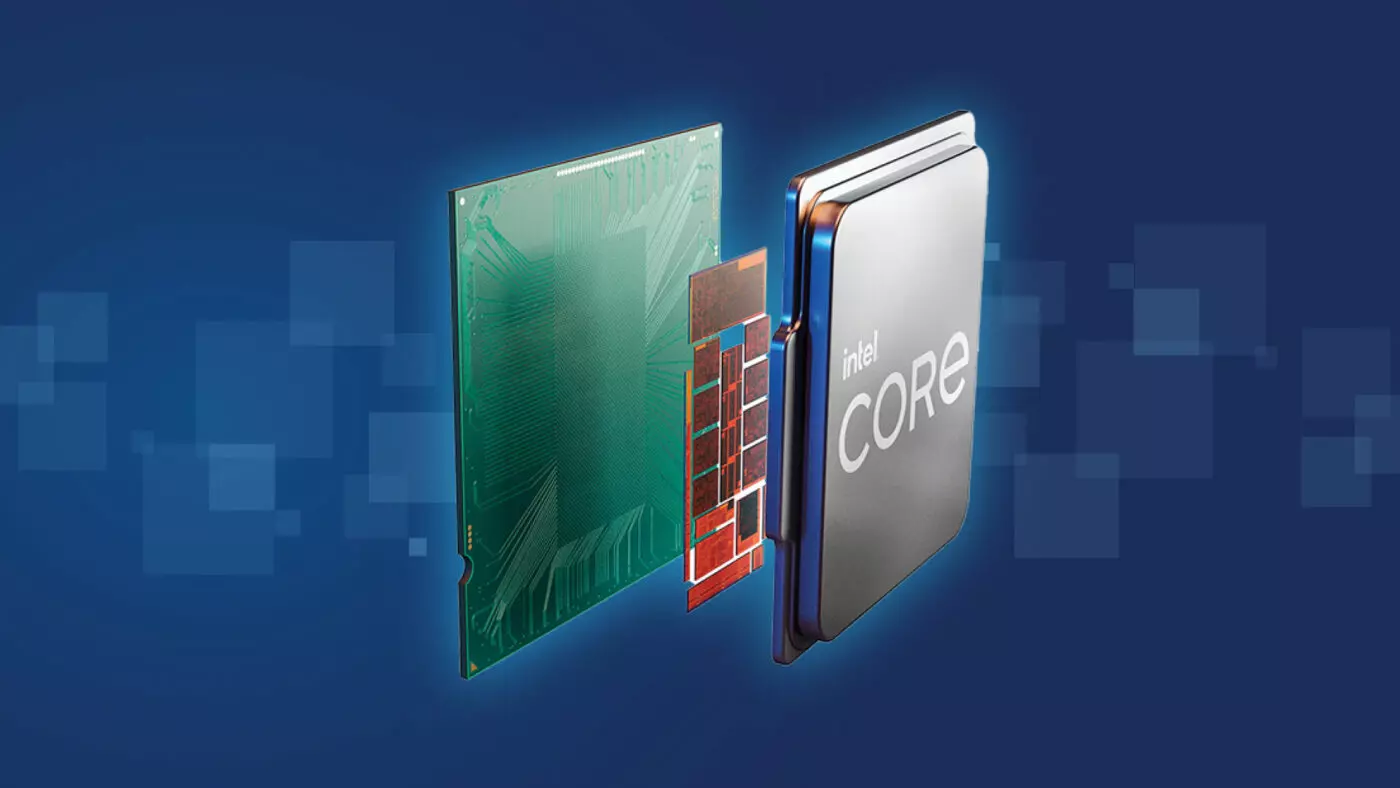
Raptor Lake, a new and upcoming Intel 13th generation CPU will break the 6GHz barrier for the first time ever in normal working mode, overclocked mode in Intel words will go as high as 8GHz. CPU will be 15% faster than Alder lake in single-threaded tasks and a stunning 41% faster in multi-threaded workloads.
The current world record for overclocking is 8.72GHz done with AMD FX-8370 and Intel is aiming at breaking that record with Raptor Lake, of course, this kind of extreme overclocking will require some top-of-the-line nitrogen cooling systems.
Raptor Lake will run on the current LGA 1700 socket, so you will not need to buy another motherboard for CPU and they will also be manufactured on a 10nm process which means that you will need to take care of cooling and power supply if they really go over 6GHz.
Mid-range Intel Core i5-13600K processor will come with 14 cores inside and 20 threads running at a maximum P-core frequency of 5.1GHz, while Core i7-13700K will have 16 cores and 24 threads and run on 5.3GHz max P-core frequency. Best i9-13900K will come packed with 24 cores, 8 of them will be P-cores, and the rest 16 are E-cores, and 32 threads. It will reach 5.4GHz frequency but it was stated it can go to 5.8GHz with Thermal Velocity Boost.
After this statement, we can clearly see that the 6GHz breaker CPU will probably be an i9 special KS variant. In other words, specially tested and picked existing i9 running at higher speeds as was with Alder Lake as well where normal i9-12900K ran at 5.2GHz while i9-12900KS was running at 5.5GHz.
As you know, Bluetooth headphones allow users to connect to their mobile devices wirelessly. This allows you to talk on your mobile device or listen to music without having to connect any cords or wires. Additionally, it even allows you to adjust the volume of a left or right speaker. However, Bluetooth headphones in Windows 10 are another story as their scope is limited. For instance, the left and right pieces can’t have different volume levels. But if you still want to change the dual control of the volume of headphones separately in Windows 10. And in this post, you will be guided on how exactly you can do that.
In addition, in this post, you will also be guided on what you can do if the Windows Update messed with the Bluetooth volume control and what you can do to disable the absolute volume in Windows 10. In case you don’t know, the Absolute Volume feature is actually incompatible with a number of Bluetooth devices which can result in the inability of the Bluetooth device to adjust its volume.
Thus, if you experience this kind of issue, you’ll notice that the volume slider in the taskbar and the device volume control neither have any effect in adjusting the volume. And each time you try to adjust the volume level for one speaker, the volume of another speaker also automatically changes. In such a case, it would be difficult for you to separately change the dual volume control headphones. Worry not for there is an easy registry tweak you can try to make this possible to do. But before you proceed with the instructions provided below, make sure that you create a System Restore first. Once you have that covered, follow the steps below carefully.
Step_1: Tap the Win + R keys to open the Run dialog box and type “Regedit” in the field and hit Enter to open the Registry Editor.
Step_2: Next, navigate to this registry path: HKEY_LOCAL_MACHINESYSTEMControlSet001ControlBluetoothAudioAVRCPCT
Step_3: After that, look for the entry named “DisableAbsoluteVolume” which should be located in the right pane. But if you’re unable to find this entry, you can just create it by right-clicking on the CT key and selecting New > DWORD (32-bit) value, and then assign “DisableAbsoluteVolume” as its name.
Step_4: Once done, double click on the “DisableAbsoluteVolume” DWORD and set its value from 0 to 1.
Step_5: Now exit the Registry Editor and restart your computer.
On the other hand, you can also disable or enable the Absolute Volume feature by executing a command in the Command Prompt.
If you want to disable the Absolute Volume feature, just execute this command: reg add HKLMSYSTEMControlSet001ControlBluetoothAudioAVRCPCT /v DisableAbsoluteVolume /t REG_DWORD /d 1 /f
If you want to enable the Absolute Volume feature, just execute this command: reg add HKLMSYSTEMControlSet001ControlBluetoothAudioAVRCPCT /v DisableAbsoluteVolume /t REG_DWORD /d 0 /f
After you execute the command, just restart your computer.
After your computer restarts.
Once you’re done executing the given instructions above, you have to right-click on the speaker icon located in the system tray and select Open Sound Settings and click on Manage device settings – the same controls will be visible to you like earlier. Now when you change the volume level for one speaker, the other speaker should now remain as it is and won’t change alongside the speaker.
Dell laptop is a great choice for laptop users who like to have the best configuration, fast working platform, and long warranty period. But this does not mean that your errors can’t pop up on Dell laptops.
Users can experience a variety of hardware and software-related issues on Dell laptops. And one such error is the error code 0146.
This is a typical Dell laptop hard drive-related error code. It can cause your Dell laptop to freeze and system applications to stop responding for a long period of time. Therefore, it is recommended to fix the error immediately.
Solution
Error Causes
Error 0146 may be triggered due to several reasons on your system. These include:
Program corruption
Viral infection
Hard drive issues
Further Information and Manual Repair
The good news is that error 0146 is easy to fix. Here are some of the easy do it yourself methods that you can try to resolve error 0146 on your system:
Method 1 - Run a Virus Scan
Malware and viruses can corrupt and damage the hard drive and trigger error 0146. In such an event, it is recommended that you open your antivirus, update it and run a full virus scan on your PC.
Once the scan is complete, remove all the viruses. This will hopefully resolve the error 0146.
Method 2 - Run Your Laptop in Safe Mode and Clean Boot
Another alternative is to run your Dell laptop in safe mode and clean boot. To do this, simply disconnect all the attached devices like wireless printers, routers, and USB keys and turn off your laptop.
Turn it on again and then press and hold the F8 key. Make sure you do it quickly before the Windows logo comes up. Now select ‘Safe mode with networking’ and press enter.
After that, open System Configuration Utility by going to the start menu and typing ‘msconfig’ in RUN, and then click OK. In the System Configuration Utility click General then selective startup. Now uncheck the load startup items box ad select services and then check the hide all Microsoft services box and disable all.
To apply these changes, click ‘Apply’ and then OK. Now restart your laptop.
Method 3 - Change to SATA Drive
Sometimes error 0146 may pop up due to hard drive configuration changes.
If this is the reason for error occurrence, then simply go to Dell Laptop BIOS. Check whether the hard drive configuration has been changed to AHCI SATA from SATA Drive.
If it has changed, then it is advisable to change it back to SATA Drive. When you are done back up all your data, and then format your hard drive. It is important to create a backup because formatting will make you lose all your data.
Once you format the hard drive, reinstall Windows from scratch.
Method 4 - Run a Registry Scan
If the error 0146 results due to program corruption then there is a possibility that the underlying reason might be registry damage. Therefore it is advisable to run a registry scan and repair it.
To do so, download Restoro. This is a cutting-edge and user-friendly PC Fixer integrated with a registry cleaner.
Run it to scan for registry issues. It removes all obsolete files corrupting and damaging the registry, repairs important and damaged system files and cleans the registry in the shortest time.
Click here to download Restoro and resolve error 0146.
Error 10013 is a type of Socket Windows PC error. Socket error 10013 occurs when the attempt to access the server is denied. This indicates that the needed socket connection is denied which further implies that a port is blocked or unreachable.
Solution
Error Causes
The socket error 10013 can occur due to multiple reasons:
Antivirus or firewall software
Incompatible drivers
Registry corruption
Misconfigured files
Further Information and Manual Repair
To resolve the socket error 10013 on your PC, here are some methods that you can try:
1. Disable Firewall
To resolve this issue on your PC, you may have to temporarily disable Firewall. Sometimes Firewall can stop you from connecting to the server. Try doing this; it is most likely to resolve the error. If the Firewall is the reason for the denied access, turning it off will surely help.
2. Disable your Antivirus Software
If disabling the Firewall doesn’t resolve the issue, try disabling your antivirus software temporarily. If the error still persists, then try other solutions listed below.
3. Upgrade Drivers
Incompatible drivers could be a reason too for denied server access.
Your server may no longer be using the drivers that you have on your PC which is why you may not be getting permission to access it. If this is the cause, then the best way to resolve it is to upgrade drivers. To find out about new drivers, visit the software manufacturer’s website for new drivers and then download them to your PC.
4. Registry Issues
Sometimes the underlying cause of the error could be registry issues and misconfigured files.
If you don’t wipe out unnecessary and obsolete files from your systems like junk files, cookies, internet history, temporary files, and other files from your PC, it can damage and corrupt the registry and misconfigured files thereby causing socket error 10013 on your system.
To resolve registry issues and repair your PC, download Restoro. It is an advanced, easy to use, and highly functional PC fixer embedded with multiple utilities including a powerful registry cleaner. It is deployed with an intuitive algorithm that scans and detects all registry issues in seconds.
It removes all the unnecessary and obsolete files stored in your PC overloading your registry. This registry cleaner repairs the damaged and misconfigured files and restores the registry, thereby resolving socket error 10013 on your system right away.
It has simple navigations and a user-friendly interface which makes it very easy for all levels of users to work around and use it to its maximum advantage. Furthermore, it can be installed on all Windows PC.
Restoro is compatible with all Windows versions.
In addition to this, it also includes several other value-added features such as an antivirus, a system optimizer, and an Active X controls and class scanner. These utilities can be used to resolve numerous other PC-related errors.
Click here to download Restoro today and resolve socket error 10013 on your PC right away.
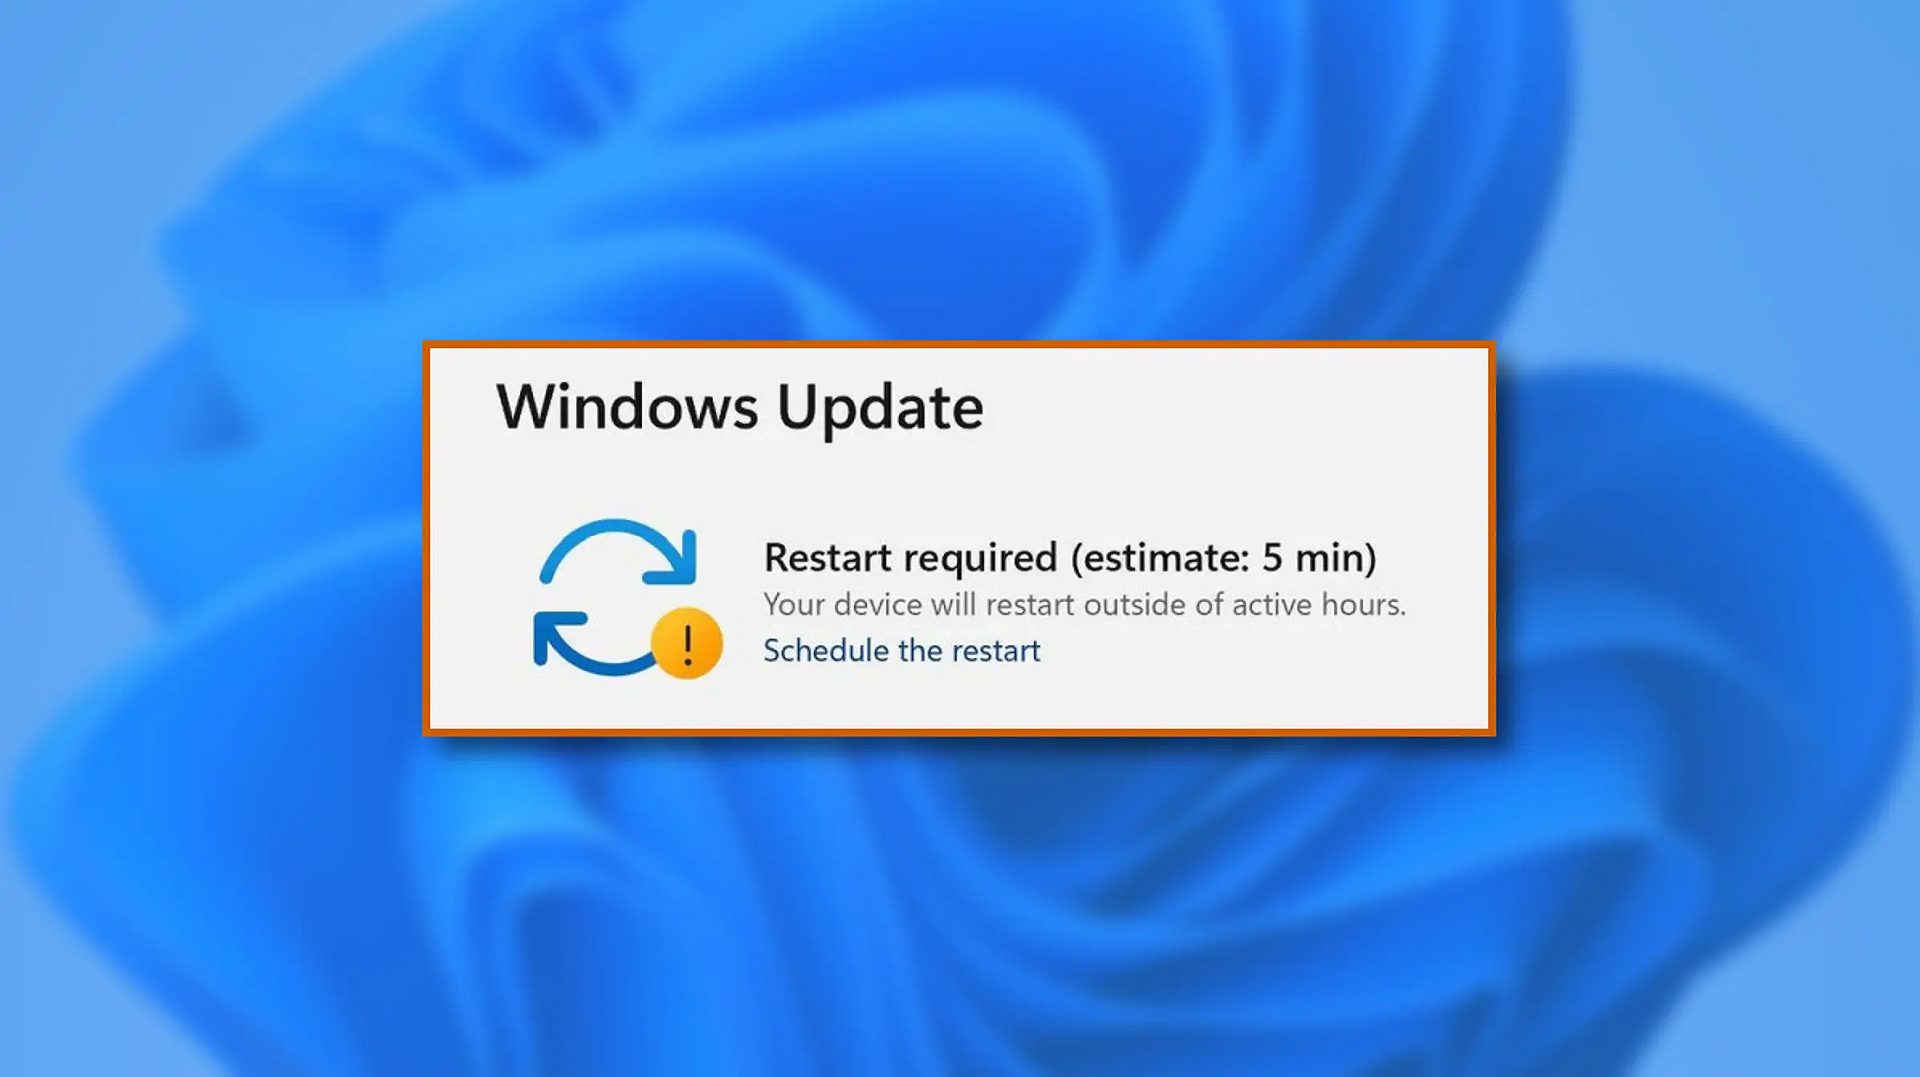
When Windows 11 update is available but you do not wish to restart right away because you are in the middle of using a computer, you can schedule a restart for up to 7 days. It is very easy and we will show you how to do it.
Press ⊞ WINDOWS + I to open settings
Click on Windows Update
At the top, under the Restart required to click on Schedule the Restart
Click the switch under Schedule a Time to turn it ON
Use the Pick a Time and Pick a Day menu to set time and day when you want to update
Go back to one screen and visually confirm that the date is set
Close the settings
The scheduled restart will be confirmed in a message on the Windows Update page.
The Windows 10 Orange Screen of Death, unlike Blue Screen of Errors, is quite an uncommon error where the hardware is the culprit which is mostly caused by some issues with the GPU. If you are currently facing this problem, then you’ve come to the right place as this post will guide you on what you can do to fix it.
There have been reports from users that the Orange Screen of Death is caused by various reasons. Some users reported that they encountered Orange Screen of Death when they were watching a YouTube video, while some were not able to boot into their Windows 10 PCs and encountered an error instead of that either says, FAULTY_HARDWARE_CORRUPTED_PAGE or WHEA_UNCORRECTABLE_ERROR error. In addition, this error can also occur when your computer wakes up from Sleep or while using BitLocker, or while you use a second monitor. Whatever the case is, you can try updating your drivers or lower the clock speed of the GPU. You could also try to fix the DRIVER_IRQL issue in case it’s the one that triggers the error or performs Automatic Repair or uninstalls any recently installed software.
Option 1 – Update your Graphics card drivers
One of the possible reasons why you’re getting the Orange Screen of Death error is most likely related to the Graphics card drivers in your computer. Thus, the first thing you can do to resolve it is to update these drivers by following these steps:
First, boot your computer into Safe Mode.
After that, tap the Win + R keys to launch Run.
Type in msc into the box and tap Enter or click OK to open the Device Manager.
After that, a list of device drivers will be displayed. From there, look for the Display Adapters and click on them.
After that, right-click on each entry under the Display Adapters and select the “Uninstall Device” option from the menu.
Now restart your computer.
After restarting your computer, go to the Settings app and Check for Updates in the Windows Update section.
Note: You also have the option to go directly to the website of your graphics card manufacturers like NVIDIA, Intel, or AMD and go to the section called Drivers then check if there’s a new available update – if there is, download and install it.
Option 2 – Try to uninstall software you’ve installed recently
If you have installed a software or two recently and then suddenly encounter this Orange Screen of Death, then they are most likely the culprits. The best thing you can do is to first check the System Log in the Event Viewer for any additional information in case it’s not the GPU but some other driver or device that’s causing the error. Once you have identified the culprits, uninstall them and see if the error is fixed.
Option 3 – Try disabling Overclocking
If overclocking is enabled, you might have to disable it as some users reported that the WHEA_UNCORRECTABLE_ERROR 0x00000124 error started to appear right after overclocking. To disable it, follow the steps below.
Go to the Start Menu and open Settings.
Next, select Update and Security and go to the Recover tab.
From there, click on Restart now in Advanced startup. This will restart your computer.
Once you’re in the Advanced startup, go to Troubleshoot and then select Advanced Options.
From there, select the UEFU Firmware Settings.
Now click on Restart. Once your computer has restarted, it will automatically open BIOS.
From the BIOS, go to the Advanced tab and navigate to Performance and then look for Overclocking.
Once you’ve found Overclocking, make sure that it is disabled. If it’s not, then disable it and then save the changes made by tapping the F10 key.
Start your computer normally and check if the WHEA_UNCORRECTABLE_ERROR 0x00000124 error is now fixed.
Option 4 – Use the Driver Verifier Manager
The Driver Verifier Manager is another tool in Windows that could help you fix driver-related issues. And so if you want to fix the Wdf01000.sys Blue Screen error, you need to use the Driver Verifier Manager:
Type in the keyword “Verifier” in the Cortana search box to search for Verifier in Windows 10.
After that, select the option “Create custom settings”.
Make sure that you have checked everything except the options “DDI compliance checking” and “Randomized low resources simulation”.
Next, select the option “Select driver names from a list” option.
Afterward, you have to select all the drivers from any unofficial or third-party provider. To simply put it, you have to select all the drivers that are not supplied by Microsoft.
Then click on the Finish button.
Open Command Prompt as administrator and execute this command – verifier /querysettings
The command you just executed will display the Driver Verifier settings so if you see any of the flags enabled boot your Windows 10 PC into Safe Mode.
Open the Command Prompt as admin again and run this command – verifier /reset
The command will reset the Driver Verifier. Once the process is done, restart your PC and check.
Option 5 – Try to run the Automatic Repair Utility
You might also want to use Automatic Repair in fixing the error. To do so, follow the steps below.
You can start by creating and booting from a bootable Windows 10 USB Stick.
After that, click on Repair your computer located on the bottom left corner when you are on the initial Windows Startup screen.
Next, click on Troubleshoot, and then on the other screen, click the Startup Repair option.
Now select the operating system you want to repair. Once you do that, it will start to repair your operating system. Wait until the process is completed and then check if the problem’s now fixed.
Afraid of the growing threats online? As you should be. But we’re here to show you what kinds of malware are out there and what you can do to keep them at bay.
Malware definition
Malware comes from the term malicious software. It’s software designed to attack and exploit devices and networks to the advantage of the hacker who made it.
Malware can be transmitted in different ways. Most commonly this happens via infected USB drives, downloadable files or malicious websites. Depending on the type and ultimate goal, the consequences of a malware attack can range from negligible to catastrophic.
Credit: Ed Hardie on Unsplash
What kinds of malware are there?
1. Virus
A virus is typically spread via infected files, websites or links. It’s one of the oldest malware types and one of the most difficult to get rid of. That’s because, once activated, it replicates itself - hence the name.
It can perform different kinds of attacks, depending on what the creator wants to achieve. The main characteristic of a virus is that it really doesn’t show itself until you activate the host. So that’s a scary thought for sure.
2. Adware
Sometimes an ad blocker isn’t enough to fight off unwanted ads. And some of them can, unfortunately, be malicious. They may redirect you to infected sites or prompt downloads of risky files. Even just opening a malicious site can lead to data theft.
So, definitely be careful when clicking around. Even if an ad seems completely legitimate, you can never be too sure.
3. Ransomware
Through ransomware, cybercriminals gain access to a user’s data and use it to extort them for money. Basically, the user is threatened with data deletion or even exposure if a ransom isn’t paid by a specific deadline.
This is a particularly nerve-wracking type of malware. If it targets an individual, it preys upon their sense of anxiety, fear, guilt and even shame. If it targets a business (which is a lot more common), it preys upon not only that business’s profit but also every single one of their customers and their data.
4. Trojans
This type of malware disguises itself very well as a legitimate-looking program. Once you download it, hackers can get full access and control of your device, data and network. They can even be hidden in games, apps and attachments. They cannot self-replicate, though, so we guess that’s… good news?
5. Worms
Worms can replicate, just like viruses, but you don’t need to actually activate the infected program for them to get going. They can be used for various purposes, ranging from data deletion to file encryption to support a ransomware attack.
Credit: Growtika on Unsplash
6. Spyware
Spyware refers to malicious software that stays hidden on your computer and monitors your activity. The best-known type is keyloggers. This can be used to steal sensitive data like passwords and banking information.
7. Rootkits
Rootkits are among the most dangerous types of malware. They allow administrative access and full control of a device, which lets hackers continue hijacking all your data and monitoring your activity without your knowledge.
8. Botnets
Botnets are networks made up of bots - computers that cybercriminals have infected with malicious software. Bots and botnets give hackers remote access to users’ devices and allow them to spy on your camera, take screenshots, memorize passwords and launch Distributed Denial of Service attacks. This one truly makes your hair stand on end.
What can you do about it?
You know the old adage - better safe than sorry. And trust us, malware attacks are such a pain in the you-know-what that you really don’t want to be sorry.
Luckily, there are simple solutions that can shield you from most digital threats these days. What you want to be looking at is a solid antivirus program. Well, technically, you need an antimalware program, but since the latter evolved from the former, we still mostly refer to them as antivirus software. The majority of antimalware programs these days don’t just shield you from potential risks online, but include additional features as well. For example, some Bitdefender antivirus packages also include parental control and a VPN. And Bitdefender is not just for PCs either - it offers protection for your beloved iPhone or Android as well. You can throw in a password manager in there too, for an additional layer of security.
Credit: Dan Nelson on Unsplash
If you aren’t too concerned about all these various threats or feel like you don’t need extra security, you can at least take a step to protect your information from being exposed to lurking cybercriminals as you’re browsing. This can be done through a good VPN like Surfshark, which hides your identity in the digital space and prevents your data from being tracked.
Choosing the right protective software is especially important if you have children with access to the Internet, since they’re unfortunately even more vulnerable to malicious attacks. If you aren’t sure what the right kind of antimalware program is right for you, you can reach out to us and we’ll be happy to help keep your entire household or office digitally secure.
The bottom line
The truth is that there’s no way to be 100% protected in the online world. Hackers are constantly coming up with new ways to infiltrate our devices. But malware-battling software evolves along with them and there’s still plenty you can do to keep risks away. Stay safe!

 Oobesttings error is the blue screen of death error caused by some faulty settings inside the Windows registry. The good news is that this is not a hard error to fix and if by any chance you are one of the unfortunate people getting this dreaded annoying error, please do keep reading because we have several things that you can do in order to eliminate this issue from your computer.

 When Windows 11 update is available but you do not wish to restart right away because you are in the middle of using a computer, you can schedule a restart for up to 7 days. It is very easy and we will show you how to do it.


