Logo

An Easy Guide to Fixing Error Code 800b0100

Error Code 800b0100 - What is it?

800b0100 is a typical Windows Update error. This error message occurs when you try to install the latest updates from Microsoft Updates and Windows Updates. The error message is displayed in the following format:

“Code 800B0100 Windows Update encountered an unknown error.”

Solution

Restoro box imageError Causes

Error code 800b0100 may pop up on your computer screen due to different reasons. However, some of the common causes include:

  • The file needed by Windows Update is corrupt or missing
  • Security software conflict such as Firewall
  • Incorrect Registry keys
  • Windows security .dll files are registered incorrectly

Further Information and Manual Repair

To resolve error code 800b0100 on your system, you don’t have to hire a professional. This error is quite easy to repair and requires no technical expertise. In other words, you don’t need to be a computer programmer or technically sound to repair this issue.

Here are some of the easy and effective DIY methods that you can try to resolve error code 800b0100 on your system:

Method 1

Download System Update Readiness Tool from Microsoft’s website on your PC. This tool can help you fix this problem that might prevent Windows Updates from installing.

Typically it will take 15 minutes or less to scan your entire PC.  The System Update Readiness Tool will scan your computer for inconsistencies that may cause errors to occur.

Method 2

Disable Security Software on your PC for example if you use Windows Vista then you will have Firewall already built in.

Disable it to resolve error 800b0100. To do this, simply go to the start menu and open the control panel and then select security. Now locate the option Windows Firewall and upon finding, simply choose the option Turn Windows Firewall on or off. Select off (not recommended) option, then click Apply and OK to reset and confirm changes.

After that, go back to the Windows Update screen and then click the try again button. The download and installation would start.

After the installation is complete, restart your PC to activate changes. Once the updates are successfully installed, not re-enable the Firewall, to ensure your PC is not exposed to potential security threats or viruses.

Method 3

Remove Invalid Keys from the Registry by downloading Restoro.

This is a PC Fixer deployed with a registry cleaner. It scans your entire PC and removes all the obsolete and unnecessary files like cookies, bad and invalid registry keys. It cleans and repairs the registry in a few clicks.

Click here to download Restoro.

Do You Need Help with Your Device?

Our Team of Experts May Help
Troubleshoot.Tech Experts are There for You!
Replace damaged files
Restore performance
Free disk space
Remove Malware
Protects WEB browser
Remove Viruses
Stop PC freezing
GET HELP
Troubleshoot.Tech experts work with all versions of Microsoft Windows including Windows 11, with Android, Mac, and more.

Share this article:

You might also like

Upcoming comic book movies with release dates
upcoming comic moviesThe World of Superhero movies has gone through some interesting variations, from good ones to bad ones, from big-budget ones to small ventures, even from large well-known characters to niche ones. No matter what you think of some of them no one would disagree that since the release of Iron Man and starting Marvel cinematic universe superheroes movies exploded in popularity. Following the Superhero craze, let’s see what is coming up in comic books transferred to big screens with their release dates.

List of upcoming movies

Shang-Chi and the Legend of the Ten Rings, Sept. 3, 2021 Trailer Venom: Let There Be Carnage, Oct. 15, 2021 Trailer Eternals, Nov. 5, 2021 Trailer Spider-Man: No Way Home, Dec. 17, 2021 Trailer Morbius, Jan. 28, 2022 Trailer The Batman, March 4, 2022 Trailer Doctor Strange in the Multiverse of Madness, March 25, 2022 Thor: Love and Thunder, May 6, 2022 DC League of Super-Pets, May 22, 2022 Black Panther: Wakanda Forever, July 8, 2022 Black Adam, July 29, 2022 Trailer Spider-Man: Into the Spider-Verse 2, Oct. 7, 2022 The Flash, Nov. 4, 2022 The Marvels, Nov. 11, 2022 Aquaman and the Lost Kingdom, Dec. 16, 2022
Read More
Fix Windows Update Error 0x80070BC9
As you know, every Windows Update is essential for every Windows operating system. They have to be regularly installed, especially since they include various security updates that are important to the system. However, there are times when Windows Update fails to execute properly and you get errors like the error code 0x80070BC9. When you encounter this particular Windows Update error, you will get the following error message on your screen:
“0x80070BC9 – ERROR_FAIL_REBOOT_REQUIRED. The requested operation failed. A system reboot is required to roll back changes made.”
This kind of Windows Update error is most likely caused by a newly installed problematic software, corrupted Windows Update files, or policies that restrict the behavior of the Windows Module Installer. The Windows Module Installer, also known as “WMIW” or “TiWorker.exe”, is the one that checks for new updates from the Windows server and installs them on your computer. This is why you need to make sure that you do not have any policies that control the start behavior of the Windows Module Installer since this service must not be hardened to any start value and should be managed by the operating system. To resolve the Windows Update error code 0x80070BC9, you can check out the options provided below.

Option 1 – Try checking the status of the Windows Modules Installer Worker Service

Since the Windows Update error code 0x80070BC9 has something to do with the Windows Module Installer Worker service, you need to check its status in the Service Manager. Refer to the following steps to do so.
  • In the Cortana search box, type “services” and click on the Services icon to open the Services Manager. Alternatively, you can also tap the Win + R keys to launch the Run prompt and then type “MSC” in the field and hit Enter to open the Services Manager.
  • After opening the Services Manager, look for the Windows Modules Installer Worker Service.
  • Once you found it, check its status and make sure that its Startup type is set to Manual.
  • Now click on the Start button and see if it fixes the Windows Update error.

Option 2 – Run the Windows Update Troubleshooter

You might want to run a built-in Windows Update troubleshooter to resolve the Windows Update error. It is one of the things you can check out as it is known to automatically resolve any Windows Update errors like error code 0x80072EE2. To run this troubleshooter, go to Settings and then select Troubleshoot from the options. From there, click on Windows Update and then click the “Run the troubleshooter” button. After that, follow the next on-screen instructions and you should be good to go.

Option 3 – Try contacting the IT administrator to modify the group policies

You could also try to contact the IT administrator to have the group policies modified. This option is applicable for company-managed systems. As mentioned, one of the possible causes of the Windows Update error 0x80072EE2 is the policies that control the start behavior of the Windows Module Installer. Thus, you need to have them removed so that the Windows Module Installer Worker service is managed by the operating system itself. And since there could be many policies, it is highly advised that you contact your company’s IT administrator to get the job done for you.

Option 4 – Try to install the Windows Updates in a Clean Boot State

There are some instances that some conflicting programs installed in your computer might be the one that’s causing Windows Update error code 0x80070BC9. To identify which program is causing the problem, you need to put your computer in a Clean Boot State. To do so, follow the steps below.
  • Log onto your PC as an administrator.
  • Type in MSConfig in the Start Search to open the System Configuration utility.
  • From there, go to the General tab and click “Selective startup”.
  • Clear the “Load Startup items” check box and make sure that the “Load System Services” and “Use Original boot configuration” options are checked.
  • Next, click the Services tab and select the “Hide All Microsoft Services” check box.
  • Click Disable all.
  • Click on Apply/OK and restart your PC. (This will put your PC into a Clean Boot State. And configure Windows to use the usual startup, just simply undo the changes.)
  • From there, start to isolate the problem by checking which one of the programs you installed recently is the root cause of the problem.
Read More
Fix Windows Update Error 0x8024A10A
The Windows Update service, just like other services in Windows 10 may sometimes experience some issues and stop behaving properly. One of the issues you might encounter as you use the Windows Update service is the Windows Update error 0x8024A10A. This kind of error code signifies that the Windows Update service is shutting down. So if you encounter this error, read on as this post will guide you on how you can fix it. When you receive the Windows Update error 0x8024A10A, you may see this error message on your screen: “USO_E_SERVICE_SHUTTING_DOWN indicates that the WU Service is shutting down. This may happen due to a very long period of time of inactivity, a system hang leading to the service being idle and leading to the shutdown of the service. Ensure that the system remains active and the connections remain established to complete the upgrade.” You could try to restart your computer to resolve the problem since there are instances when a simple restart can fix errors. However, if it does not work, you might find the options provided below useful.

Option 1 – Try to restart the Windows Update Service

The first thing you can do to fix Windows Update error 0x8024A10A is to restart the Windows Update Service from the Services Manager. To do so, follow these steps:
  • In the Cortana search box, type “services” and click on the Services icon to open the Services Manager. Alternatively, you can also tap the Win + R keys to launch the Run prompt and then type “services.msc” in the field and hit Enter to open the Services Manager.
  • After opening the Services Manager, look for the Windows Update Service.
  • Once you found it, right-click on it and check if the Service is stopped. If it is, then select the Start option. On the other hand, if the Windows Update Service is already started, just select the Restart option.
  • After that, try to run the Windows Update again and see if the error 0x8024A10A is now fixed.

Option 2 – Run the Windows Update Troubleshooter

Since the Windows Update troubleshooter reviews the status of the services that support the process, it would prompt and fix it if there is anything that’s not right. Thus, you might want to run a built-in Windows Update troubleshooter to resolve the Windows Update error. It is one of the things you can check out as it is known to automatically resolve any Windows Update errors like error 0x8024A10A. To run this troubleshooter, go to Settings and then select Troubleshoot from the options. From there, click on Windows Update and then click the “Run the troubleshooter” button. After that, follow the next on-screen instructions and you should be good to go.

Option 3 – Run Microsoft’s online troubleshooter

Aside from the Windows Update troubleshooter, running Microsoft’s online troubleshooter might also help you fix the Windows Update Error 0x8024A10A. This online troubleshooter is known to help in fixing Windows Update errors, it scans your computer for issues that might be causing the problem and then fixes them automatically.

Option 4 – Try to run the Windows Update Service in a Clean Boot State

There are some instances that some conflicting programs installed in your computer might be the one that’s causing Windows Update error code 0x8024A10A. To identify which program is causing the problem, you need to put your computer in a Clean Boot State. To do so, follow the steps below.
  • Log onto your PC as an administrator.
  • Type in MSConfig in the Start Search to open the System Configuration utility.
  • From there, go to the General tab and click “Selective startup”.
  • Clear the “Load Startup items” check box and make sure that the “Load System Services” and “Use Original boot configuration” options are checked.
  • Next, click the Services tab and select the “Hide All Microsoft Services” check box.
  • Click Disable all.
  • Click on Apply/OK and restart your PC. (This will put your PC into a Clean Boot State. And configure Windows to use the usual startup, just simply undo the changes.)
  • Now try to run the Windows Update Service again and see if Windows Update error 0x8024A10A is now gone.
Read More
Windows 10 won't upgrade to a newer version
If when hovering over the upgrade icon on the taskbar you get:
Your version of Windows 10 would reach the end of service soon, Click to download a newer version of Windows 10 to stay supported. or An unsupported version of Windows will no longer receive software updates from Windows Update. These updates include security updates that can help protect your PC from harmful viruses, spyware, and other malicious software which can steal your personal information. Windows Update also installs the latest software updates to improve the reliability of Windows—such as new drivers for your hardware.
and you are unable to perform updates then this guide is for you. There are several things you can do to fix this issue presented here, it is advisable to follow them in a way how they are presented for best performance and system safety.
  1. Run setupdiag

    Download and run Setupdiag from the official MICROSOFT website. SetupDiag is a standalone diagnostic tool that can be used to obtain details about why a Windows 10 upgrade was unsuccessful. It works by examining Windows Setup log files to determine the root cause of a failure to update or upgrade the computer. Once the scan is completed, check the generated log files. The SetupDiagResults.log will be generated and saved in the same folder where you downloaded Setupdiag. Open SetupDiagResults.log using Notepad. You may need to take a look at these folders:
    • \Windows\Panther
    • \$Windows.~bt\sources\panther
    • \$Windows.~bt\Sources\Rollback
    • \Windows\Panther\NewOS
    If there are any issues or conditions that are blocking the upgrade, they will be listed here.
  2. Edit TargetReleaseVersionInfo Registry key

    Press ⊞ WINDOWS + R to open the run dialog In run dialog type Regedit and press ENTER Locate: HKLM\SOFTWARE\Policies\Microsoft\Windows\WindowsUpdate Locate two DWORD files, if they do not exist, create them as: TargetReleaseVersion TargetReleaseVersionInfo Set the value of TargetReleaseVersion to 1 If you are stuck on Windows 10 1909 and want to upgrade to Windows 10 20H2 now, you need to set the value for TargetReleaseVersionInfo to 20H2 Reboot the computer
  3. Use Windows 10 update assistant

    Visit Microsoft.com and hit the ‘Update now’ button visible on the page Download tool and run it Click on Update now to start the upgrade process
Read More
Reddit released the application in MS store
Reddit app
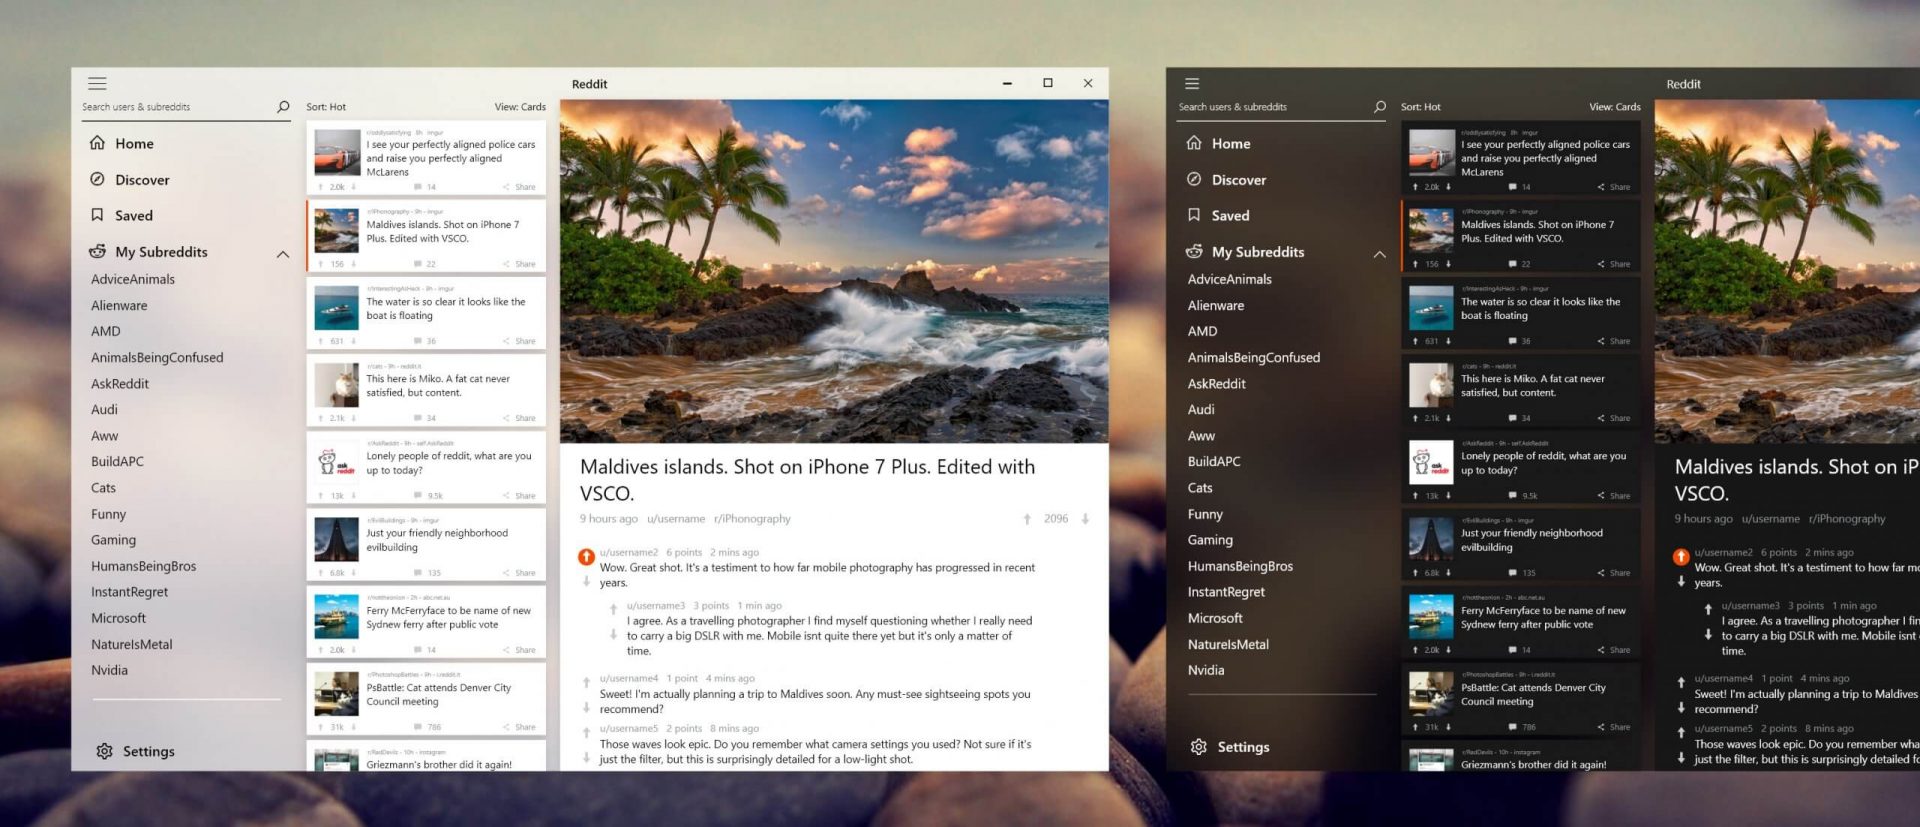
Reddit is one of the most popular websites in the world and how Microsoft is opening doors to everyone in its new store Reddit took a logical step and made a Progressive web application and placed it in it. Being a Progressive web app makes it more familiar and feels like a home experience using it for a lot of Reddit users. Reddit itself has a large community and active topics discussions all the time about anything. Bringing it to Windows as an application is, in my opinion, a great move since as an application it is independent, more light-weighted, and offering some other advantages specifically tied to being a standalone windows application. Everyone familiar with and using the Reddit website will feel right at home in this app and you can start using it right away.
Read More
A Quick Guide to Fixing Error 2

Error 2 - What is it?

Error 2 is a typical Battle.net error code. Battle.net is a desktop app that allows you to access all Blizzard games. It enables Blizzard gamers around the world to play multiplayer matches together, online. Error 2 occurs when you are unable to connect to the login server. This error code is displayed in the following format:
Battle.net Error #2: Unable to connect. Please try again later. If the problem persists, please contact technical support.

Solution

Restoro box imageError Causes

Error 2 may be triggered due to several reasons. These include:
  • Program conflict
  • Security software conflict
  • Bad DNS cache entry
  • Issues with network devices
  • Viruses and malware
  • Registry corruption
Error 2 is not a fatal error like the blue screen of death error codes. However, this error may hamper your ability to play Blizzard multi-player games. To overcome this problem it is advisable to fix error 2 immediately.

Further Information and Manual Repair

To resolve this error you don’t need to spend hundreds of dollars to hire a professional and get it fixed. Here are some of the easy do-it-yourself methods to resolve this error on your PC. These methods require no technical expertise or knowledge. Let’s get started:

Method 1

Error 2 may sometimes pop up on the screen due to program conflict. This happens when you have Blizzard games and other programs running on your PC at the same time. In such a situation, it is advisable to close background applications to resolve conflicts between Blizzard games and other programs running in the background.

Method 2

Sometimes antivirus programs and firewalls can also hinder and interfere with the game’s connection to our servers. In this event, the best way to fix the error is to temporarily uninstall your security software.

Method 3

If error 2 is triggered by the issues with network devices then simply power cycle network devices to re-stabilize the connection. Power cycling router and modem allow you to reset and reestablish a connection to your ISP. To do this, shut down the computer then power down/unplug the router and the modem. Allow the modem to sit for 60 seconds, unplugged. Then turn it on and allow it to boot up till the front panel connection lights show a steady connection. Now turn on the router and do the same as you did with the modem. After that start the computer and allow it to completely boot up. Now try logging on to the Blizzard gaming server. This will hopefully resolve the issue.

Method 4

Viruses and malware infections can also trigger error 2. In such a situation install an antivirus and remove all malicious programs infecting your PC.

Method 5

If the cause of the error is related to registry corruption, then it is advisable to download Restoro. This is a user-friendly PC Fixer with a registry cleaner. The registry cleaner removes all unnecessary and obsolete files corrupting the registry, cleans and repairs the corrupted registry in a few minutes. Click here to download Restoro on your PC to resolve error 2. For further information you may be interested in these similar issues:
Read More
Restoring accidentally deleted system files
There are times when we delete a system files without meaning to on your Windows 10 computer. This happens a lot for users sometimes mistake a system file for a malware-laden file or junk file when it’s actually a system file from the System32 or SysWOW64 folder. In such cases, it could affect your computer. For instance, you might not be able to reboot your PC or open Settings. If you have removed system files from any of these folders by accident and you desperately want to restore them, read on, as this post will guide you in resolving the problem. Restoring them isn’t actually hard, just make sure that you have system admin access. The good thing is that there exists Windows Resource Protection which protects registry keys and folders and even critical system files. So if there are any detected changes to a protected system file, the modified file is restored from a cached copy located in the Windows folder. However, if the Windows Resource Protection program fails to restore these files, you need to check out the given fixes below.

Option 1 – Run System File Checker scan

To restore the system files you deleted, you can try running System File Checker or SFC scan. System File Checker is a command utility built into your computer that helps restore corrupted files and missing files. Refer to the following steps to run it:
  • Boot your PC into Safe Mode.
  • Hit the Win + R keys to launch Run.
  • Type in cmd in the field and tap Enter.
  • After opening Command Prompt, type in sfc /scannow
The command will start a system scan which will take a few while before it finishes. Once it’s done, you could get the following results:
  1. Windows Resource Protection did not find any integrity violations.
  2. Windows Resource Protection found corrupt files and successfully repaired them.
  3. Windows Resource Protection found corrupt files but was unable to fix some of them.
  • Reboot your computer.

Option 2 – Try to run the DISM tool

Aside from System File Checker, you can also run the DISM or Deployment Imaging and Servicing Management Tool as it could help in restoring the system files on your Windows 10 computer. Using this built-in tool, you have various options such as the “/ScanHealth”, “/CheckHealth”, and “/RestoreHealth” which could help you resolve the problem.
  • Open the Command Prompt with admin privileges.
  • Then type in the following commands and make sure to hit Enter right after you type each one of them:
    • Dism /Online /Cleanup-Image /CheckHealth
    • Dism /Online /Cleanup-Image /ScanHealth
    • exe /Online /Cleanup-image /Restorehealth
  • Do not close the window if the process takes a while as it will probably take a few minutes to finish.

Option 3 – Try performing a System Restore

Running System Restore can also help you bring back the system files. You can do this option either by booting into Safe Mode or in System Restore. If you are already in the Advanced Startup Options, just directly select System Restore and proceed with the next steps. And if you have just booted your PC into Safe Mode, refer to the steps below.
  • Tap the Win + R keys to open the Run dialog box.
  • After that, type in “sysdm.cpl” in the field and tap Enter.
  • Next, go to the System Protection tab then click the System Restore button. This will open a new window where you have to select your preferred System Restore point.
  • After that, follow the on-screen instructions to finish the process and then restart your computer and check if the problem is fixed or not.

Option 4 – Try to run Automatic or Startup Repair

Startup Repair, previously known as Automatic Repair, is an advanced tool in Windows that can help you diagnose various system issues, including this one. This tool will scan system files, configuration settings, registry settings, and so on in order to fix the problem on its own. To run Startup Repair, all you have to do is boot into the Advanced Startup Options and then go to Troubleshoot > Advanced option > Startup Repair and then run it. This will resolve the problem if you have deleted any system file that’s essential to your Windows 10 PC.

Option 5 – Reset your computer

  • Tap the Win key or click on the Start button located in the Taskbar.
  • Then click on the Power button at the bottom right portion of the screen.
  • Next, press and hold the Shift key on your keyboard and then click on Restart. This will restart your Pc into the Advanced Startup options.
Note: Once you have access to the Advanced Startup options, you have to go to the setting which allows you to Reset your Windows 10 PC. All you have to do is select Troubleshoot > Reset this PC to reach the following screen Afterward, select either the “Keep my files” option and then proceed to the next on-screen instructions that follow to reset your Windows 10 computer without losing your files.
Read More
Preventing installation of Removable Devices
In case you don’t know, Windows 10 supports installation and use of a number of removable devices which includes plug and plays mouse, keyboard, and other USB-based devices. But this could actually pose a threat to the integrity of a computer system and thus, some organizations pose a restriction in using these kinds of devices. the restriction on these devices is also useful especially if you keep on leaving your computer idle and someone tries to mess it up by plugging in a removable device. In such situations, the restriction will defend the user against data theft. Thus, in this post, you will be guided on how you can prevent the installation of removable devices on your Windows 10 computer. There are two options that can help you in preventing the installation of any removable devices on your computer – you can either try to use the Registry Editor or use the Group Policy Editor instead. Follow whichever option you want to use the instructions given below but before you start, don’t forget to create a System Restore Point first.

Option 1 – Prevent installation of Removable Devices via Registry Editor

  • Tap the Win + R keys to open the Run dialog box and type “Regedit” in the field and hit Enter to open the Registry Editor.
  • Next, navigate to this registry path: HKEY_LOCAL_MACHINESOFTWAREPoliciesMicrosoftWindowsDeviceInstallRestrictions
  • From there, look for a DWORD named “DenyRemovableDevices” and set its value to “0”. On the other hand, if you can’t find this DWORD, just simply create it and set its value to 0.
  • Once done, exit the Registry Editor and reboot your PC to apply the changes made.

Option 2 – Prevent installation of Removable Devices via Group Policy Editor

Keep in mind that the Group Policy Editor is not available in the Home Edition of the Windows operating systems. Thus, if you are using one, just stick to the first option, otherwise, proceed to the following steps.
  • Tap the Win + R keys to open the Run utility and type “gpedit.msc” and click OK or tap Enter to open the Group Policy Editor.
  • After that, go to this policy setting: Computer ConfigurationAdministrative TemplatesSystemDevice InstallationDevice Installation Restrictions
  • Next, look for the “Prevent installation of removable devices” entry and once you find it, set it as “Enabled”. From this window, you should see the following description of this policy setting:
“This policy setting allows you to prevent Windows from installing removable devices. A device is considered removable when the driver for the device to which it is connected indicates that the device is removable. For example, a Universal Serial Bus (USB) device is reported to be removable by the drivers for the USB hub to which the device is connected. This policy setting takes precedence over any other policy setting that allows Windows to install a device. If you enable this policy setting, Windows is prevented from installing removable devices and existing removable devices cannot have their drivers updated. If you enable this policy setting on a remote desktop server, the policy setting affects redirection of removable devices from a remote desktop client to the remote desktop server. If you disable or do not configure this policy setting, Windows can install and update device drivers for removable devices as allowed or prevented by other policy settings.”
  • Then click the Apply and OK buttons to save the changes made.
  • Now restart your computer to save the changes made. This should prevent the installation of any removable devices in your Windows 10 computer.
Read More
Steam Deck will be able to dual boot
Steam Deck release is almost upon us and more news comes to light. The Latest officially confirmed technical detail is that the user will have access to device's BIOS and that dual booting will be officially supported. steam deck
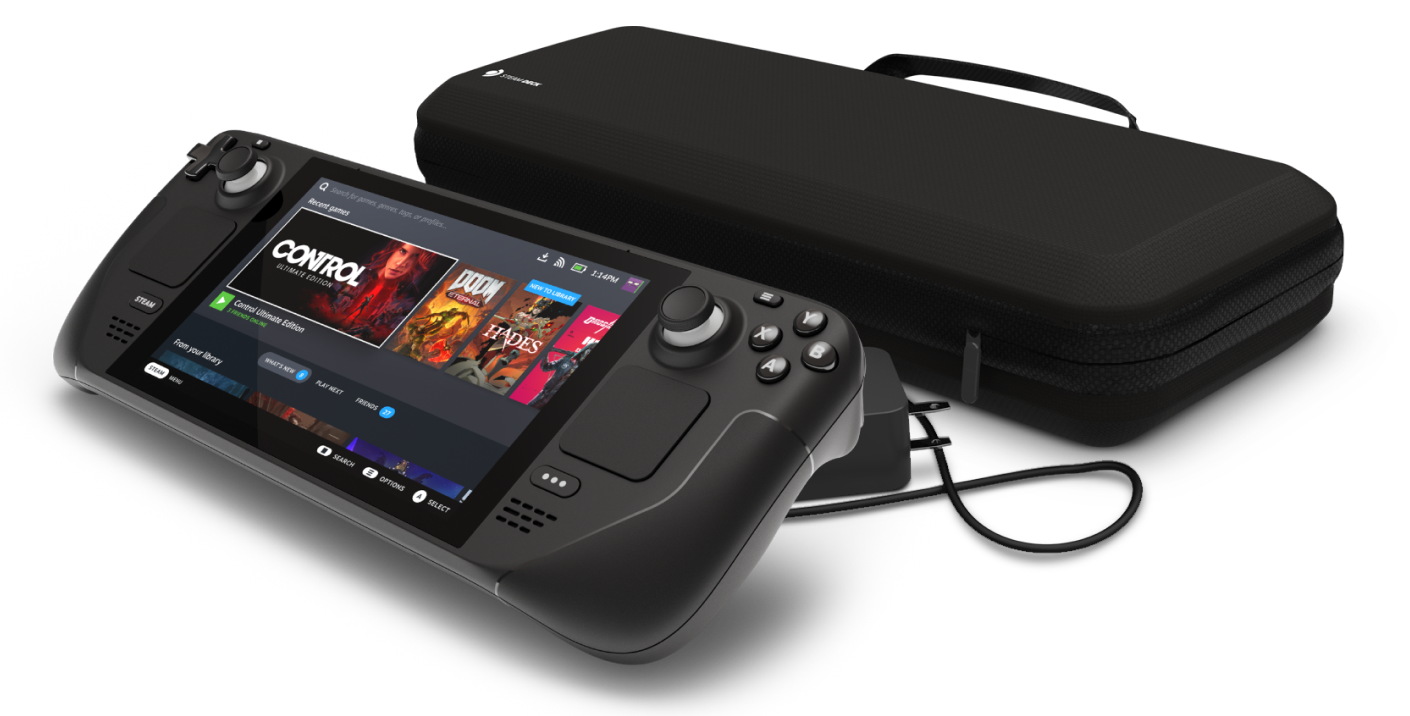
This, of course, means that you will be able to have both Proton and Windows on your device letting you play anything that you wish if the hardware is strong enough. Valve also said that you can launch OS from an SD card! This of course will save space available for games themselves, especially for entry models with less than one available. All of this information really pushes Deck into the territory of a handheld PC and not just another console and I must admit that this announcement left a smile on my face.
Read More
Software review series: KRITA
Krita Desktop is a free and open-source painting application. Krita is a full-featured free digital painting studio for artists who want to create professional work from start to end. Krita is used by comic book artists, illustrators, concept artists, matte and texture painters, and in the digital VFX industry. Krita has been in development for over 10 years and has had an explosion in growth recently. It offers many common and innovative features to help the amateur and professional alike. Krita has a user-friendly interface. The dockers and panels can be moved and customized for your specific workflow. Once you have your setup, you can save it as your own workspace. You can also create your own shortcuts for commonly used tools. In addition to painting, Krita comes with vector, filter, group, and file layers. Combine, order, and flatten layers to help your artwork stay organized. There are also three different views on how to see the layers. Krita supports full color management through LCMS for ICC and OpenColor IO for EXR, allowing you to incorporate Krita into your existing color management pipeline. Open PSD files that even Photoshop cannot open. Load and save to PSD when you need to take your artwork across different programs. Krita is the only dedicated painting application that lets you open, save, edit and author HDR and scene-referred images. Furthermore, with OCIO and OpenEXR support, you can manipulate the view to examine HDR images, and use it in the most cutting-edge workflows from the film and visual effects industries.
Read More
1 2 3 171
Logo
Copyright © 2023, ErrorTools. All Rights Reserved
Trademark: Microsoft Windows logos are registered trademarks of Microsoft. Disclaimer: ErrorTools.com is not affiliated with Microsoft, nor claims direct affiliation.
The information on this page is provided for information purposes only.
DMCA.com Protection Status